CAREER CONVERSATION
This is a “lighter” version of Performance Management that focuses on a conversation between the employee and his manager.
- User Manual
- Introduction to Career Conversation
- Employee's Perspective
- Manager's Perspective
- Action Plan
- Connect Questionnaire - Employee's Perspective
- Connect Questionnaire - Manager's Perspective
- Administrator's View
- Quick Reference Guides and Practical Exercises
User Manual
Introduction to Career Conversation
The Career Conversation Module is a new addition to the HR System. This is a “lighter” version of Performance Management that focuses on a conversation between the employee and his manager. The employee’s role profile is discussed and the main focus is on the key performance areas, key performance indicators and competencies. These KPA’s, KPI’s and Competencies are marked as Start, Stop and Continue and all items selected with an output of Start and Stop will form part of the employee’s Action Plan.
Below is a comparison between the Performance Management and Career Conversation Module.
| Career Conversation Module | Performance Management Module |
|---|---|
|
|
|
|
|
|
|
|
|
|
Employee's Perspective
Employee's Perspective
The employee will see the time line on the dashboard, to ensure that he knows when each conversation needs to be completed. It is expected of the employee to create his own Career Conversation. The employee will have instructions that will guide him through the process. The employee will have the opportunity to change any of the KPI’s output to a Start, Stop, Not Applicable or Continue. The employee will be able to add any additional KPA’s, KPI’s and Competencies to the conversation, but are restricted from deleting the original KPA’s, KPI’s and Competencies originating from the job profile. When the employee is ready to have his discussion with the manager, he will select the Let’s Meet button and then the system will inform the manager by means of a system notification. The manager then arranges a meeting with the employee independent of the system.
1. Employee Dashboard
- The Career Conversation Module is located under the My Quick Start items.

- When selecting this, the employee will be able to see his dashboard.
- The dashboard consists of the time line, the quick links and the section where he can create his conversations.

2. Create New Career Conversation
- The employee creates his own career conversation.

- When selecting this, a confirmation screen with the following information will display:
- Position
- Manager

- Upon selecting No, another message will display instructing the employee to contact his Human Resources Business Partner.

- Upon selecting Yes, the career conversation will be created and the employee will be taken to the created career conversation page.
- This page consists of the following sections:
- Instructions to the employee
- Quick link to the role profile and action plan
- Progress bar
- Yellow: In progress
- Green: Completed
- Key Performance Areas section
- Competencies section

3. Key Performance Area Section
- The employee can only view the KPA’s and KPI’s that was imported from the job profile.

- Each KPA and KPI is defaulted to Continue.
- The employee has the ability to change these outputs to Start, Stop or Not Applicable. When changing the output, it is necessary to specify a reason for this change.


- The employee has the ability to add new key performance areas.
- By selecting the Add New Key Performance Area button, a screen will open allowing to specify the KPA and KPI.


- These added KPA’s can be deleted or edited.

4. Competencies Section
- The employee can only view the competencies that was imported from the job profile.

- Each competency is defaulted to Continue.
- The employee has the ability to change these outputs to Start. When changing the output, it is necessary to specify a reason for this change.


- The employee has the ability to add competencies.
- By selecting the Add New Competency button, a screen will open allowing the employee to specify the competency title and description.

- These added competencies can be deleted or edited.

5. Let's Meet
- Once the employee is satisfied with the Key Performance Area and Competencies sections, he clicks on the Let’s Meet button.

- When clicking on this button, a confirmation message will display.

- By selecting Let’s Meet, a system notification will be sent to the employee’s manager.
- The manager must arrange the meeting with the employee independent of the system.
- An example of the email looks as follow:

6. Employee Dashboard
- The employee’s dashboard will be updated with the career conversation added.
- The employee will have the ability to view the conversation, but cannot change the contents of the conversation.


Manager's Perspective
Introduction
The manager will see the time line on the dashboard, to ensure that he knows when each conversation needs to be completed. The manager will be able to see the statistics of the employees that is reporting to him. The employees in each status can be accessed under the applicable tabs. The manager has access to quick links which allows him to easily navigate between his own career conversation and his employees’ career conversations. The manager has instructions on the employee’s career conversation to guide him through the process. The system enables the manager to create an employee’s career conversation on behalf of them because not all employees have access to their own pc’s. The action plan is created and managed upon finalisation of the career conversation.
1. Manager Dashboard
- When the manager logs in and accesses the Career Conversation, under My Quick Start, the Manager Dashboard are displayed.
- The three main sections are:
- The instructions
- The quick links
- Employees section

2. View My Employees
- There are two tables displayed. The first table is an overall summary and the second table is where the employees are managed.
2.1. Not Started Tab
- Includes all employees who have not started with their career conversations yet.
- The managers can create a career conversation on behalf of an employee under this tab.
2.2. Started Tab
- All employees who have started with their career conversations, but did not request a meeting yet can be found here.
2.3. Meeting Request Tab
- All employees who requested a meeting with their manager will be displayed under this tab.
- The manager has the ability to view an employee’s career conversation before they have a meeting - in order to prepare.
- This tab is the default tab that is displayed to the manager as these requests takes priority and generally this would be the starting point for the manager.
2.4. Meeting in Progress Tab
- If the employee and manager was in their meeting, but got interrupted for example, they will have to continue at a later stage and this career conversation will be displayed under this tab.
2.5. Finalised Tab
- All employee’s career conversations which has been finalised will be displayed under this tab.
- The employee’s action plans can also be accessed from this tab.
3. Meeting Request Process
- The manager receives a system notification from the employee requesting a meeting.
- The manager schedules a meeting with the employee independent of the system.
- On the day of the meeting, the manager logs into the system and navigates to the Meeting Request tab.
- On the employee, he selects Actions and then Manage Conversation.

- The manager now sees all of the employee’s conversations (previous and current).

- The manager has the ability to continue the conversation or view the conversation.
- There are two tabs namely 2017 Career Conversation where all the current period’s conversations will be displayed and Historic where all the previous period’s conversations will be displayed.
- When the manager selects Continue Conversation, a confirmation message will display to confirm that the employee is sitting with him in the meeting.

4. Employee's Career Conversation
- Once the manager confirms that the employee is present for the career conversation, the career conversation page will open.
- This page consists of the following sections:
- Manager Instructions
- Quick Links
- Progress bar of the career conversation
- The Key Performance Areas section
- The Competencies section


5. Key Performance Areas Section
- The manager has the ability to see the employee’s outputs for each KPA and KPI.
- These KPA’s and KPI’s are marked as Continue by default.
- While in discussion, the manager changes these KPA’s and KPI’s to either another output or the same output as the employee. (Refer to Section 3 in this document)
- Only the manager’s output will be carried over to the Action Plan later on.
- When the manager changes an output, the reason for the change is mandatory. (Refer to Section 3 in this document)
- The manager also has the ability to add a new KPA and KPI. (Refer to Section 3 in this document)
- KPA’s that are imported from the job profile cannot be deleted. (Refer to Section 3 in this document)
- KPA’s that were newly added can be deleted. (Refer to Section 3 in this document)

6. Competencies Section
- The manager has the ability to see the employee’s outputs for each competency.
- These competencies are marked as Continue by default.
- While in discussion, the manager changes these competencies to either another output or the same output as the employee.
- Only the manager’s output will be carried over to the Action Plan later on.
- When the manager changes an output, the reason for the change is mandatory.
- The manager also has the ability to add a new competency.
- Competencies that are imported from the job profile cannot be deleted.
- Competencies that were newly added can be deleted.

7. Finalise Conversation
- When the discussion is over regarding the KPA’s, KPI’s and Competencies, the manager needs to finalise the career conversation by clicking on the Finalise Conversation button.

- A confirmation message will open, which the manager needs to confirm or cancel.

- Upon finalisation, the Action Plan will be created.
- The manager is taken to the employee’s Action Plan.
Action Plan
Introduction
An employee’s Action Plan is created from the KPA’s, KPI’s and Competencies which was marked as Start or Stop. The Action Plan also has a section for actions that needs to be listed from the outcome of the Connect Questionnaire. Items from here are not carried over automatically.
From this Action Plan, the employee can have a clear view of what is expected from him in order to enhance his performance. It is the employee’s responsibility to complete this action plan by the due date. The Action Plan is open-ended and available at any time.
Employee and Manager Perspective
1. Action Plan View
- After the employee’s career conversation is finalised, the action plan is formulated.

2. Key Performance Area Section on the Action Plan
- All items that was marked as a Start or Stop on the Key Performance Areas section on the career conversation, are carried over to the Key Performance Areas section on the Action Plan.
- On the Actions button, this item can be edited or deleted.
- The details can also be viewed.

- When an item needs to be edited, the following page will open.

3. Competencies Section on the Action Plan
- All items that was marked as a Start on the Competencies section on the career conversation, are carried over to the Competencies section on the Action Plan.
- On the Actions button, this item can be edited or deleted.
- The details can also be viewed.

- When an item needs to be edited, the following page will open.

4. Connect Questionnaire Section on the Action Plan
- No items from the Connect Questionnaire are automatically carried over to the Action Plan, because there are no Start or Stop items
- Use the Create New Connect Questionnaire Action
- Once an item is created, this item can be edited or deleted using the Actions button
- The details can also be viewed.

5. Create New KPA, Competency and Connect Questionnaire Action
- Additional KPA’s, Competency and Connect Questionnaire Actions can be added to the Action Plan.
- The same page as for the edit opens and needs to be completed.

- Once the Action Plan has been completed, there is a message that will take you back to the dashboard.

6. Historic Tab - Completed Actions
- Once an item has been completed, this item will be moved from the Outstanding tab to the Historic tab.
- A search filter is available to filter through records more easily.
- On the Actions button, the action’s details can be viewed.

7. Finalising the Period
- Once all preferred Career Conversations has been completed and finalised, the period, which will then be 2017 (2017-01-01 until 2017-12-31), can now be finalised.

- It is important to note that once this period has been finalised, no additional career conversations can be added.
- A confirmation message will display and warn the manager of what is about to happen if he continues.

Connect Questionnaire - Employee's Perspective
Introduction to Connect Questionnaire
The Connect Questionnaire is a set of questions that needs to be completed by each employee for the third conversation. There are various questions in the Connect Questionnaire Roadmap regarding themes namely Purpose, Career Momentum, Career Fitness, My Strengths, Skills Transfer, Relationships and Networks, Confidential and My Performance. From this Connect Questionnaire, a meeting takes place between the employee and manager and the Action Plan should also be updated / created.
Employee's Perspective
1. How to locate the Connect Questionnaire
- On the employee’s dashboard, a button for the Connect Questionnaire are located.
- The employee can also use the Quick Links on the right-hand side.

2. Connect Questionnaire Roadmap
- The front page of the Connect Questionnaire allows you to go to any of the theme’s questions
- From here the navigation tabs is located on the bottom that allows you to:
- Go to the Next Page
- View Summary
- Go Back to Career Conversation
- The themes wheels allow you to click on a theme and you will be navigated to the question sections
- The menu on the right-hand side also allows you to navigate to the question sections

3. Questions
- The employee does not need to complete / answer all the questions at once
- The questions do not need to be completed in sequence
- The Connect Questionnaire is available throughout the year and can be answered at any stage
- On each page, the employee is allowed to:
- Go to the Previous Page
- Go to the Next Page
- To Continue Later
- The employee comment on each question is mandatory and the employee will not be allowed to request a meeting with the manager should all the questions not be answered.

4. Let's Meet
- When the employee is on My Performance and all questions have not been answered, a View List option is available to go to the questions not answered yet

- To view the list, click on the View List button. Select the outstanding question and complete it

- Once all of the questions have been answered, the employee can select the Let’s Meet button
- The Manager will be notified of the meeting request
5. Print the Connect Questionnaire
- Both the Manager and Employee has the option to print the Connect Questionnaire
- By selecting the View Summary option – on the Home Page as well as the My Performance page – a detailed summary is displayed.
- The Print Connect Questionnaire option is found on the bottom of the page

- From here, the employee also needs to view / update his Action Plan
Connect Questionnaire - Manager's Perspective
1. Manager's Dashboard
- On the Manager’s Dashboard, an additional tab can be found for the Connect Questionnaire

- The following statuses is available:
- Not Started
- Started
- Meeting Requests
- Meeting in Progress
- Finalised
2. View Employee's Connect Questionnaire
- On the Meeting Requests tab, the manager clicks on Action | View Connect Questionnaire

- The manager can prepare the Connect Questionnaire by Printing it
- The Connect Questionnaire conversation should take place while the employee is with his manager

3. Finalise an Employee's Connect Questionnaire
- Once the manager went through the Connect Questionnaire with the employee, he can Finalise

- Once the Manager selects Finalise, the following confirmation message displays

4. View Summary
- The manager will be taken to the Summary page
- The Connect Questionnaire can be printed so that the Action plan can be updated more easily
- After printing the Connect Questionnaire, go to the Action Plan

Administrator's View
The Administrator are able to view the employee’s career conversation in order to address any queries that the employee or manager might have. This is accessed through Manage Employees under Employee Development.
1. Manage Employees
- The administrator goes to Manage Employees and selects an employee whose career conversation he would like to view.
- Then under Employee Development he selects Career Conversation.

- The view that the Administrator now finds is the same as the employee (either a manager or employee).
- Different rights can be given on subgroup level which will allow an administrator to either only view or edit the employee’s career conversation.

2. Career Conversation Master Data
2.1. Periods
- New periods can be created. These periods can be specified per date. To create a new period, go to:
System Administration | Modules | Career Conversation | Master Data | Periods

- Click on Create New Period

- The period details needs to be specified:
- Period Name
- Start Date
- End Date
- Enabled Status

- The newly created period will be displayed in the list.

2.2. Questions used for the Connect Questionnaire
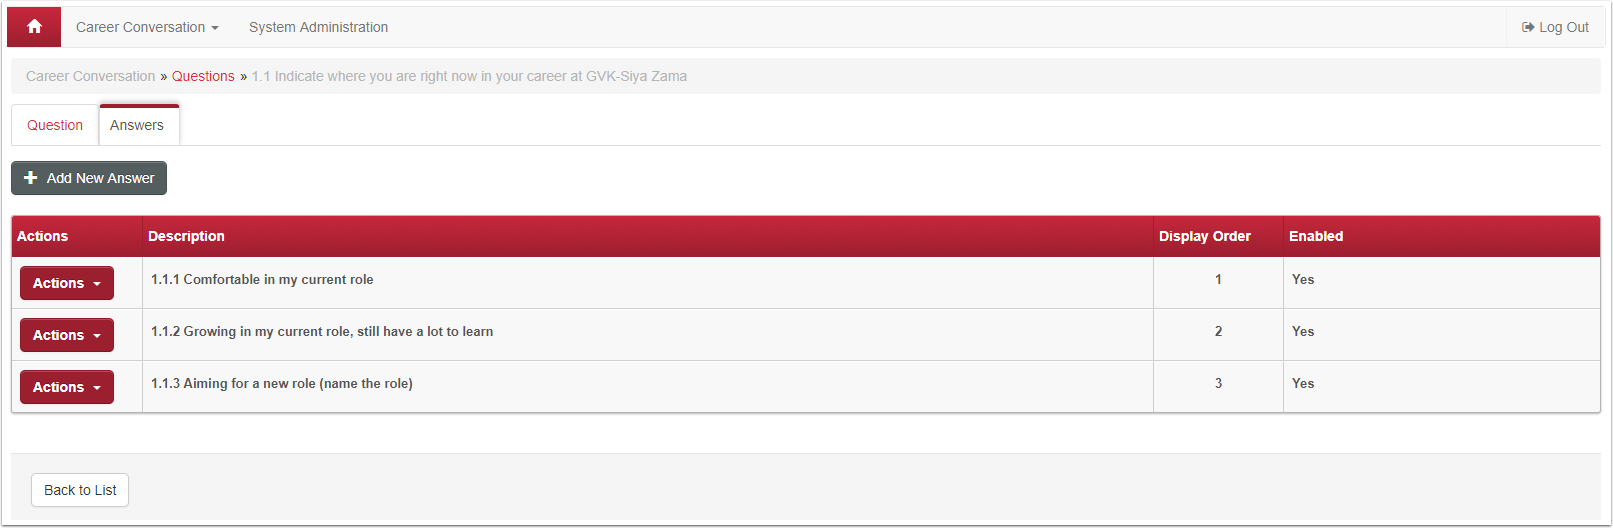
- New questions can be created. To create new questions, go to:
System Administration | Modules | Career Conversation | Master Data | Questions

- A list of all the questions already set-up will be displayed. The questions are linked to a Section / Theme and can be enabled.

- To create a new question, click on the Create New Question button

- To add a new question, the following field needs to be completed:
- Description
- Section
- Enabled Status
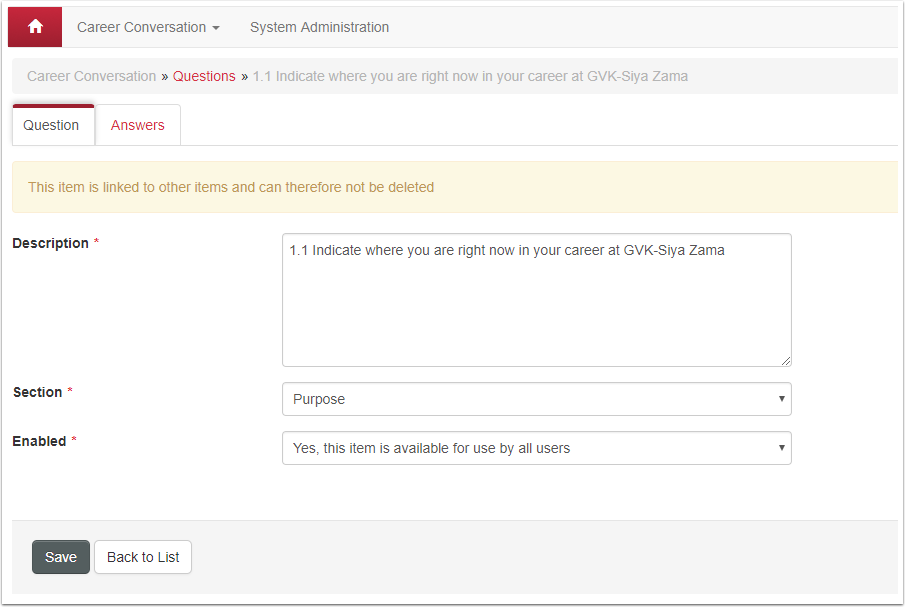
- Once the question is created and saved, answers can be specified if needed.
2.3. Linking the Questions with Answers to a specific Period
- Once the period and questions are added, the questions needs to be linked to the Period.

3. Reset of Statuses
- The administration can reset the following statuses for an employee:
- Career Conversation
- Connect Questionnaire
- The path to follow:
Manage Employees | Search for the Employee | Employee Development | Career Conversation
System Administration | Modules | Manage Employees | Search for the Employee | Employee Development | Career Conversation

3.1. Reset Last Conversation
- Resetting the Career Conversation, will reset it to the status. The Conversation Manager can be set to the current manager.

- The reset status consist of the following:
- Not Started
- Started
- Meeting Request
- Meeting in Progress
- Finalised (Disabled)
- Each status will have a description of changes that will be made:
- Not Started:
- No Career Conversation will be displayed on the Employee's Dashboard
- Started:
- The conversation will remain active for any changes by the employee.
- The conversation will be locked for the manager.
- Manager outputs will be cleared for all Competencies and KPA's.
- Manager comments will be cleared for all Competencies and KPA's.
- Meeting Request:
- The conversation will be locked for any changes by the employee.
- The conversation will remain active for the manager.
- A Let's Meet email will be sent to the new manager, if changed.
- Manager outputs will be set to default for all Competencies and KPA's.
- Manager comments will be cleared for all Competencies and KPA's.
- Meeting in Progress:
- The conversation will be locked for any changes by the employee.
- The conversation will remain active for the manager.
- Not Started:
- The Administrator will have an indicator to show in which status the Career Conversation is:

3.2. Reset Connect Questionnaire
- The Administrator resets the Connect Questionnaire to:
- Not Started
- Started
- Meeting Request
- Meeting in Progress
- Finalised (Disabled)
- Each status will have a description of changes that will be made:
- Not Started:
- All the content will be removed.
- The employee will have to answer all questions again.
- Started:
- The Connect Questionnaire will remain active for any changes by the employee.
- The Connect Questionnaire will be locked for the manager.
- Manager comments will be cleared for all questions.
- Meeting Request:
- The Connect Questionnaire will be locked for any changes by the employee.
- Manager comments will be cleared for all questions.
- A Let's Meet email will be sent to the manager.
- Meeting in Progress:
- The Connect Questionnaire will be locked for any changes by the employee.
- The Connect Questionnaire will remain active for the manager.
- Not Started:

4. Career Conversation and Connect Questionnaire Exclusions
Excluding an employee means that this particular employee will not be doing the Career Conversation and/or Connect Questionnaire for a specific period. The employee can be included at any given time to do a Career Conversation or the Connect Questionnaire.
To add an employee to the list of exclusions – in order for them not to do a Career Conversation and/or Connect Questionnaire – navigate to System Administration | Modules | Career Conversation | Exclusions

Employees listed on this page, are not doing the Career Conversations and/or Connect Questionnaire.

To add an employee to the exclusion list – in order for them NOT to do the Career Conversation and/or Connect Questionnaire – select the "Link Exclusions" button. To select employees, that must NOT do the Career Conversation and/or Connect Questionnaire, click on the "Link" button.
To remove employees, in order for them to be included in the Career Conversation and/or Connect Questionnaire, click on the "De-link" button (remove them from the exclusion list).
Both Career Conversation and Connect Questionnaire are selected by default when an employee is added on the list of exclusions. To select either Career Conversation or Connect Questionnaire, click on the "Actions" button and select "Edit Exclusions" option. Select the option that needs to be included by unticking that box. The employee will thus be participating in the particular option selected.
To remove an employee from the exclusion list – in order for them to do the Career Conversation and/or the Connect Questionnaire – click on the "Actions" button and select the "De-link" option. The employee will be removed from the list of exclusions and enable them to do the Career Conversation and/or Connect Questionnaire.
4.1. A practical example
Currently, Monica Alberts (7001) can do both the Career Conversation and the Connect Questionnaire as she is not part of the exclusion list. Monica’s manager requests that she should not do the Career Conversation, but she must complete the Connect Questionnaire.
- Go to the Exclusion page
- Select the "Link Exclusions" button
- Select the "Link" button to add her to the list of exclusions

- You will see the "Link" button now changed to a "De-link" button. This is to remove her from the list when requested to do so.

- She is now added to the list of exclusions. Thus, she cannot do the Career Conversation nor the Connect Questionnaire.

- To enable her to do the Connect Questionnaire, click the "Actions" button and select the "Edit Exclusions" option.

- Deselect the Connect Questionnaire tickbox and select the "Continue" button.

- The employee is excluded from the Career Conversation but can still complete the Connect Questionnaire.

- After a couple of months, she needs to do a Career Conversation and must therefore be removed from the list of exclusions.
- Select the "Actions" button and click on the option. She is removed from this list and will be able to do both Career Conversation and Connect Questionnaire.

Quick Reference Guides and Practical Exercises
COMING SOON....