User Manual
- Creating the Catalogue
- Catalogue Basics
- Administrator Perspective
- Administrator Navigation Controls
- User Perspective
- Using a catalogue in a pathway
- Administrative functions
Creating the Catalogue
Product catalogues are used to convey information regarding products and/or services offered by organisations. These catalogues are made available on each employee’s home page or in pathways where their progress can be tracked.
By working through this document, administrators will learn how to use the product catalogue module to create catalogues. Once they have been added to pathways, learners or employees can receive training and certification based on the content in these catalogues.
The main steps which will be followed in this manual to familiarise you with the Product Catalogue module are:
- Create a new catalogue
- Assign an expert to a catalogue
- View/edit a catalogue
- Basic navigation controls
- The Page Editor
- Using a catalogue in a pathway
- Administrative Functions
Creating the Catalogue
In this section we discuss how to create a new catalogue, allocate an expert, how to add content to the catalogue and general administration of all catalogues in the system. Only a user which has been allocated the catalogue administration role will be able to create product catalogues. Experts can update the content within catalogues.
Product Catalogue Administration Menu

Create a new Catalogue

Click on “Create New Catalogue” to add a new catalogue to the system, then enter the basic details for the catalogue.
Complete the details after the “Add New Catalogue” window has loaded.
- Catalogue Name: The name for the catalogue which clearly identifies the content within the catalogue.
- Image URL: The full URL to the primary image to be used on the first page of the product catalogue, as obtained from the Image Uploader in the system - see the administrative processes later in this document for instructions on using the Image Uploader.
- Thumbnail URL: The full URL to the thumbnail image to be used for the product catalogue, as obtained from the Image Uploader in the system - see the administrative processes later in this document for instructions on using the Image Uploader.
- Status: Whether the catalogue is published for view and editing by users (and experts) in the catalogue menu item of the system.
- Primary Color: The hexadecimal value used to represent the primary background colour in the catalogue.
Note: Do not publish a catalogue before all of its content has been confirmed and it is ready for use.
Capture catalogue details
Enter the required details and save. More details regarding each field:
- Catalogue Name: The name for the catalogue which clearly identifies the content within the catalogue.
- Image URL: The full URL to the primary image to be used on the first page of the product catalogue, as obtained from the Image Uploader in the system - see the administrative processes later in this document for instructions on using the Image Uploader.
- Thumbnail URL: The full URL to the thumbnail image to be used for the product catalogue, as obtained from the Image Uploader in the system - see the administrative processes later in this document for instructions on using the Image Uploader.
- Status: Whether the catalogue is published for view and editing by users (and experts) in the catalogue menu item of the system.
- Primary Color: The hexadecimal value used to represent the primary background colour in the catalogue.
Note: Do not publish a catalogue before all of its content has been created by an expert and it is ready for use by all employees from the Catalogue menu item in the system.

Assign an Expert to a Catalogue
Once a catalogue has been created an expert must be assigned to work on the specific catalogue - the expert is then responsible to populate the catalogue with graphics and content.
To assign an expert, click the “Experts” quick link menu item on the right-hand side of the screen.

Then click on “Add an Expert” to open a new page where the expert and catalogue needs to be selected.
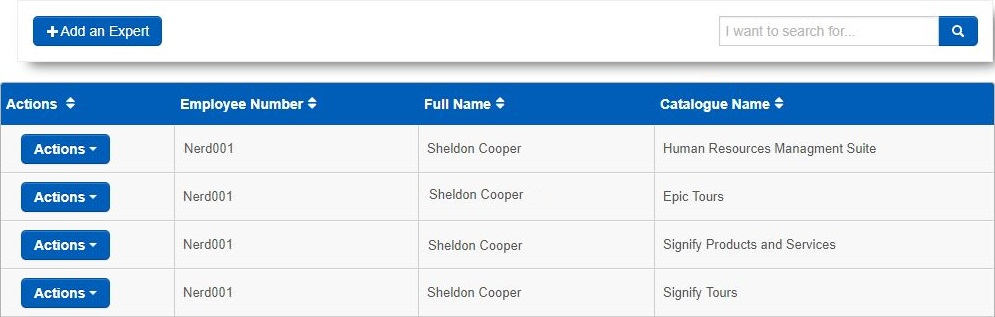
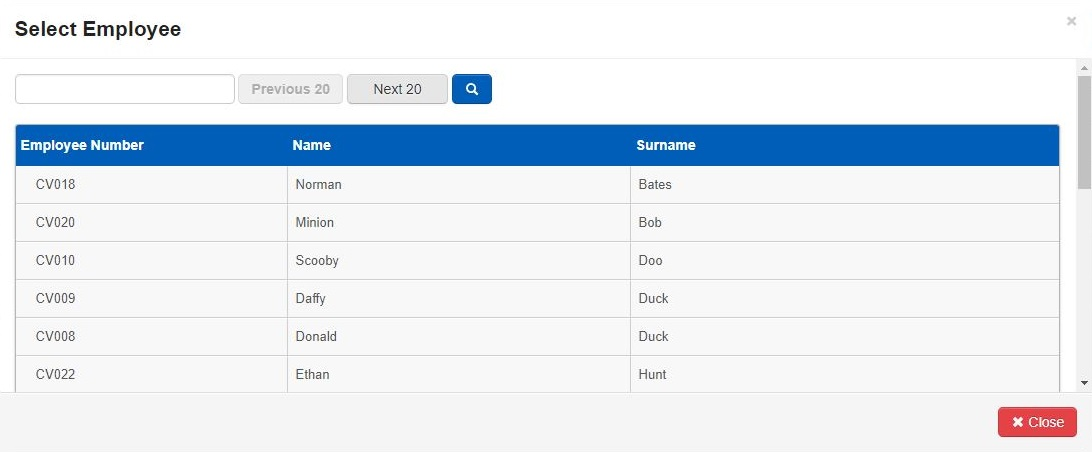
Click on “+ Choose Expert” to load the “Select Employee” window. Search for and select an employee from the list of employees.
The page refreshes automatically and the selected employee’s full name will show in the text box.
The last step is to assign the expert to a catalogue. Click on the dropdown below “Catalogue” to load and select all of the catalogues available.
Click “Save” and the selected expert will now be able to add and edit content on that specific catalogue.
Note that the employee’s name is grayed out and that it cannot be changed from this page.

Catalogue Basics
This section describes how to view the catalogue, as well as how the basic navigation of a catalogue works.
Opening a Catalogue
There are 3 ways of viewing or editing a catalogue.
- Catalogues can be accessed from the System Administration menu.
- Catalogues can be made available from the main menu. If a catalogue has been published it can be accessed from the catalogue menu item
- Catalogues can be published as part of pathway steps. All users with access to the pathway will have access to the catalogue.
Accessing Catalogues from the System Administration Menu
Click “Catalogues” in the quick links menu on the right - the screen will display a list of all catalogues in the system and their current status.

Clicking on the link in the URL column on this page will open the catalogue in a new window or tab for viewing/editing by the administrator

Quick Access to a Catalogue
Should there be a specific catalogue that a system user wants edited, the system user should send the catalogue URL to the expert.
The catalogue expert should then log into the system, then open a second tab and then paste the URL link received from the system user into the tab.
This will open the catalogue for the catalogue expert to edit.
Administrator Perspective
Opening a catalogue from the catalogue menu item
If the catalogue menu item has been enabled on the home screen, all users will have access to the published catalogues.
System users will have permission to page through the catalogue, where catalogue administrators and catalogue experts will have permission to edit the catalogue.

Catalogue View and basic Navigation Controls
When clicking on a catalogue link, the catalogue will automatically load in a separate tab. The catalogue tour will load with the start-up page. These catalogue tours are a standard item for all catalogues and all first-time users (including catalogue administrators and experts) will be taken on the tour when they log into the catalogue.
A tour is a series of steps which highlights the main navigational controls available on the screen.
- Click on “Next” to view the next hint of the tour.
- Should a user work through less than 10% of the catalogue, the tour will be repeated the next time they log in.

- Once all steps in the catalogue tour have been completed, the tour can be ended by clicking on “End Tour”
- This button can also be clicked at any point during the tour.

Continuing to the next page of the Catalogue
Arrows on the right-hand side of the page allow users to navigate to the next or previous page of the catalogue. These controls are available to all users.

Administrator Navigation Controls
The primary navigation menu

The navigation menu
- Search: The search function in the catalogue can be used to find specific text and to navigate to a specific position in the catalogue where the text is located.
- Add category: This function is available to administrators and experts and is used to add categories and subcategories. These are used to group related sections together.
- Add window: Click on the "+" icon on the right of the Navigation Menu to add a new window.
- Edit: Click on the edit icon to edit or delete pages, categories or subcategories

User progress calculation
The user’s progress will be indicated in a block on the bottom right of the catalogue screen, as they page through the catalogue. Each page viewed within the catalogue is logged and taken into consideration when calculating the total user progress. It is developed in such a manner that the user will not receive 100% by simply searching for and going to the last page in the catalogue.
Once a user has viewed all pages within a catalogue, the system will save his progress as 100%, allowing the adding of a learner record for the logged in employee if the catalogue has been configured as a prerequisite step within a pathway for a certification point. The correct setup of a pathway to achieve this is covered later in this document.
Adding Categories and Subcategories
Adding categories or subcategories has been made very easy with easy to follow steps for each function. In the “Navigation Menu”, click on either “Add Category” or “Add Subcategory” as shown below.

Category Details
When adding or editing a category or subcategory, the fields in the screen shot below will be made available.
- Choose an appropriate name for the category or subcategory.
- Ensure it will display in the correct position in the catalogue by specifying the correct display order.
- Choose a primary background colour for the category or subcategory, if different from the primary background colour of the catalogue or category containing the subcategory.
- Drag and drop an image file onto the editing page section for image to display the image as background for the section title page.

Adding and editing pages within categories and subcategories
Creating pages in categories or subcategories is done through the interface. To add a new page to the currently selected category or subcategory, click the "+" icon on the left, then choose the desired layout for the page and click “Save Page”. This will open the Page Editor with controls to update the page content with the correct layout as chosen.

The page editor
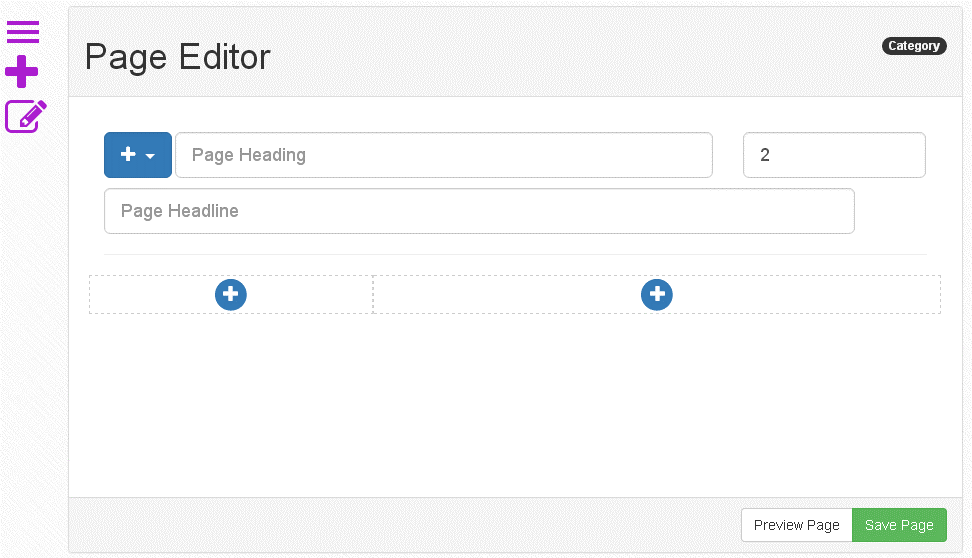
The page editor will load directly after a new page has been added and the layout chosen, can also be opened for an existing page by navigating to the page and clicking the “Edit” icon on the left of the screen. The administrator or expert can now add the required content to the page layout as shown on the screen shot below. The exact location of items on the screen will be different depending on the page layout selected. To add content to the page layout, click the "+" at the correct position in the layout to add new content to the page.
The following functions are available in the Page Editor:
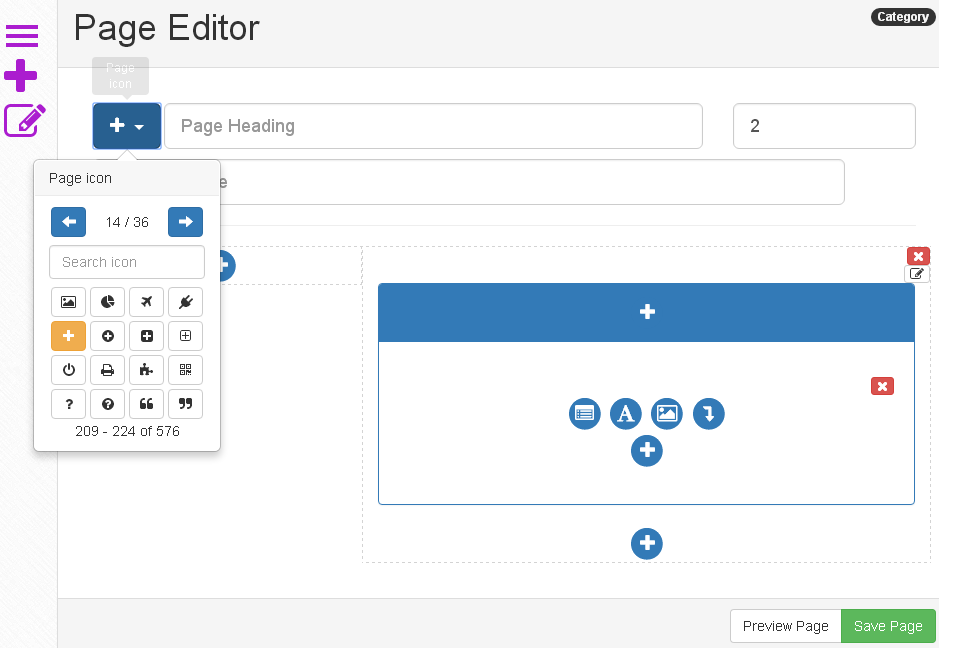
- Page Icon: The page icon can be changed by clicking on the it and selecting the desired icon.
- Page Heading: Use the provided text box for the page heading. The heading will show in the Navigation Menu
- Page Headline: The page headline will be displayed on top of the page when it is opened.
Add Content
Click on the "+" button to add content below the Page Headline.
- Add Space: A space will be inserted between two sections of a page.
- Add Image: Upload an image to the page
- Add Text Editor: Add text to the catalogue page
- Add Content Panel: This will load a new section in the colours of the category. Within the content panel, each of the options presented above will be made available again.
Click “Save Page” once all content has been added to the page.
Note the following when using the Page Editor:
- When adding text to the catalogue, it is not possible to edit or delete that specific text content entry (e.g. a word or sentence). If any change has to be made to the text after the page has been saved, all of the text will need to be removed and then added again
- There is a full screen option when adding text which makes the editing and formatting of text much easier, e.g. when text needs resizing or changing fonts
- Pictures can be dragged and dropped from its file icon in the file explorer/browser on your PC
- The icon and text colour of the heading will be the same as that chosen for the category or subcategory. This will change whenever the colour of the parent category or subcategory is changed.
User Perspective
The user perspective is similar to the editor perspective. When opening a catalogue, the user will also be required to complete a guided tour.
The primary difference between the user perspective and the editor perspective is that the user does not have the “Add new page” or the “Edit” buttons. The user will only be presented with a Navigation Button. This button will allow the user to navigate, without providing them with the ability to edit a catalogue.

Using a catalogue in a pathway
The most secure and simple way to make a catalogue available, is to add it as a step to a pathway and making that pathway available only to the employees/users which need to access the catalogue via the pathway. A pathway toolbox item has been added to allow the adding of a catalogue step in a pathway. The controls available on the catalogue will be dependant on the user’s permissions.
To add and edit pathways, navigate to the following menu option:
Note: The user creating or editing the pathways should have the role of learning administrator.
A full discussion of how to add a catalogue to a pathway step will be discussed in the pathway manual. Please take note of the below:
- Only published catalogues will show in the list of available catalogues.
- To create a learner record after the catalogue has been completed, add a Certification Point step to the pathway and set the catalogue step as a prerequisite for the Certification Point.
- A pathway can be configured that the expert is the only person on the target audience of the pathway until the catalogue is ready to be used.
Administrative functions
In this section some administrative functions relating to the product Catalogue module is discussed.
Enabling Catalogues
To make use of the Catalogue Module, it must be enabled in the Signify system.
This can be done by following the below path:
From the Home Screen | System Administration | Tools | Configuration | Framework | Portal Web Part Admin
Ensure that “Catalogue” is “enabled” and “visible”.
- The main Catalogue menu item, when enabled, should ideally have a target audience configured for the administrative users which will be able to access this menu option.
- Please contact support to assist in both these aspects, should the module not be available or the Catalogue menu item is not available to the correct group of users as target audience.
Catalogue Administrator
The catalogue administrator role should be assigned to the primary catalogue administrator user:
Setup Requirements
To add the role for a user, navigate to:
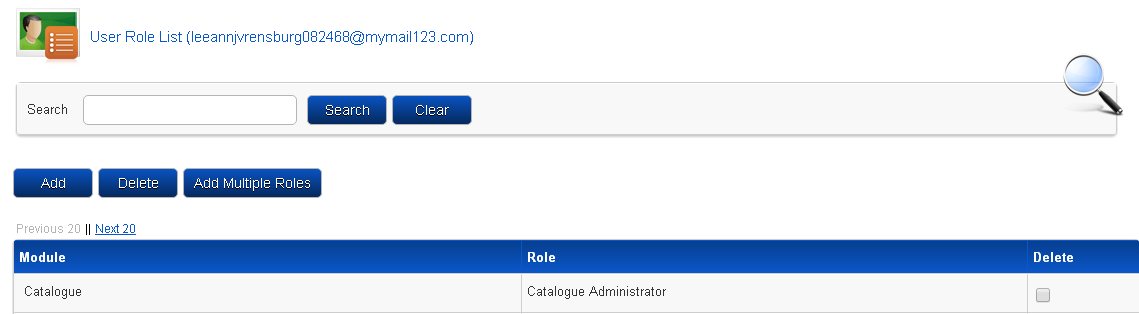
System Administration | Users | Manage Users | Select user | Role Assignment
- To ensure that the administrator has access to the catalogues menu, click on “Add Multiple Roles”. This will load the pop-up window
- Search for “Catalogue”
- Change the dropdown to “Catalogue Administrator”
- Click on “Save” and the catalogue administrator will now have access to edit the catalogue.
Uploading images using the Signify Image Uploader
The Signify Image Uploader is an administrative screen which can be used to upload image files to the system which can later be used in other parts of the system - e.g. pathways and catalogues. For every image uploaded 2 images are stored: a small thumbnail image as well as a full-size image of the image. The following steps shows how an image can be uploaded to the system and how the image and thumbnail URL can be obtained to include in other parts of the system. Only a system administrator will be able to upload images to the system.
To access the Image Uploader, do the following:
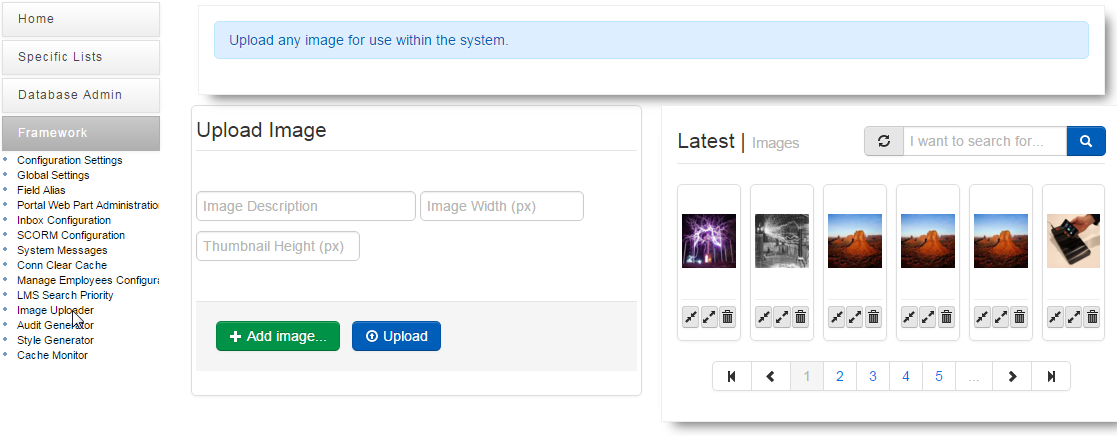
- Click “Add image” and select an image file from your local PC to upload to the system
- Specify a name/title for the image in the Image Description text box
- Optionally specify a specific width for the image, if it should be re-sized from the original image size - the aspect ratio of the image will be kept
- Optionally specify a specific width for the thumbnail image to be created from the image (a smaller image to be used as icon in the system), if you do not wish to use the standard size for the thumbnail image
- Click “Upload” to upload the image to the system.

The image will be displayed with the latest images. If the image is not available, use the search function to find the image.
These URL addresses can now be used in other parts of the system to display images, e.g. in a Pathway, the Assessment Builder module and the Catalogue module (to specify a primary catalogue image to be used on the first page of the catalogue when creating the catalogue).
