User Manual - Salary Review
- 1.1 Introduction to Salary Review
- 2.1 Step 1: Define an Active Period
- 2.2 Step 2: Download and Upload of REM Channel Codes Template
- 2.3 Step 3: Download and Upload of Reporting Lines Template
- 2.4 Step 4: Ratings
- 2.5 Step 5: Undo Submissions
- 2.6 Step 6: Move Managers and Employees
- 2.7 Step 7: Override Employee Salary Ratings
1.1 Introduction to Salary Review
This module enables the manager to view his or her budget with regards to salaries. The employees’ performance ratings can be added and the salary can be reviewed accordingly. This module stands loose from the other modules and therefor no data pulls through to Salary Review.
1.2 Requirements and Set-Up
Salary Review should be switched on, on the Signify system:
Path -> System Administration | System Administration | Tools | Configuration | Framework | Configuration Settings | Human Resources | Salary Review

1.3 Required User Roles
- The only role that is required to be given is Salary Review Administrator.
- The Salary Review Administrator will be responsible for downloading the REM Channel Codes and Reporting Lines, completing them and uploading both (this will be explained in detail), setup the Period, undo Submissions and move Managers and Employees.
- The Salary Review Administrator Role can be found at System Administration | Users | Manage Users | Employee search | Role Assignment

2.1 Step 1: Define an Active Period
WHY: This section assists the administrator in adding an Active Period
WHERE: From the system portal, click System Administration | Modules | Salary Review | Period

- If there is no active Period, click on Add to create a new active period

- The newly created Period can be Viewed and Edited

- Complete all applicable fields
- Mandatory fields include:
- Period
- Start Date
- End Date
- Global Increase Percentage
- Code of Conduct - Title, Description and Acceptance Text

2.2 Step 2: Download and Upload of REM Channel Codes Template
WHY: This section assists the administrator in downloading the REM Channel Codes, completing them and uploading them
WHERE: From the system portal, click System Administration | Modules | Salary Review | Period | Download REM Channel Codes
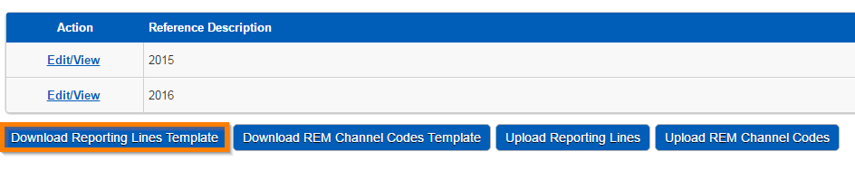
2.2.1 Download REM Channel Codes Template
- These codes must be downloaded first
- Click on “Download REM Channel Codes Template”

- Complete the Template
- These are the remuneration brackets and once uploaded it will be plotted on the graph

2.2.2 Upload REM Channel Codes Template
- Click on “Upload REM Channel Codes Template”

- A page will open where you are prompted to choose the file
- Choose the template that you completed and saved
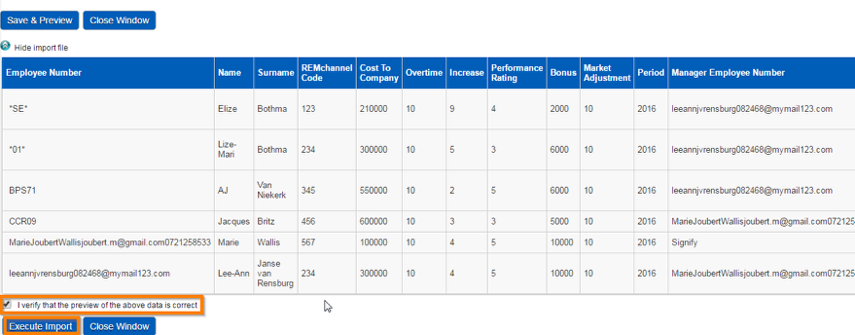
- Click then Save and Preview

- If the data is correct, tick the verify box and select Execute Import

2.3 Step 3: Download and Upload of Reporting Lines Template
WHY: This section assists the administrator in downloading the Reporting Lines Template, completing them and uploading them
WHERE: From the system portal, click System Administration | Modules | Salary Review | Period | Download Reporting Lines Template
2.3.1 Download Reporting Lines Template
- The most recent template will download with information regarding the last uploaded template
- Click on “Download Reporting Lines Template”
- Complete the Template with the following information:
- Employee number
- Name
- Surname
- REM Channel Code
- Cost to Company
- Overtime
- Increase
- Performance Rating
- Bonus
- Market Adjustment
- Period
- Manager employee number
- Manager Name
- Manager Surname

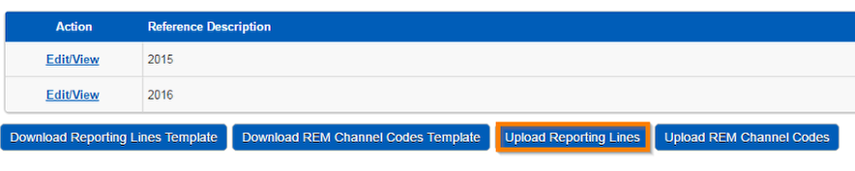
2.3.2 Upload Reporting Lines Template
- After completing the template, save a copy.
- Click on “Upload Reporting Lines Template”
- A page will open where you are prompted to choose the file
- Choose the template that you completed and saved
- There are two options choose from:
- Upload entire list and remove existing data
- Upload only this information and keep existing data as is
- Click then Save and Preview


- If the data is correct, tick the verify box and select Execute Import
2.4 Step 4: Ratings
WHY: This section assists the manager to see the summary information of the employees reporting to him as well as the subordinate managers and employees.
WHERE: From the system portal, click System Administration | Modules | Salary Review | Ratings
2.4.1 Code of Conduct
- Accept the Code of Conduct

- You will be prompt to confirm your password

- On the screen that is shown, all the imported data from the template will display
2.4.2 Summary Information Tab
- On this page all the employees that report to you as a manager are displayed on this page
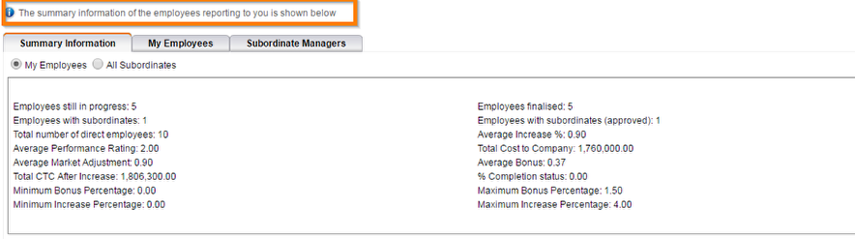
- A graph of the Cost To Company (CTC) of the employees and on which Quartile the employee fall into are shown

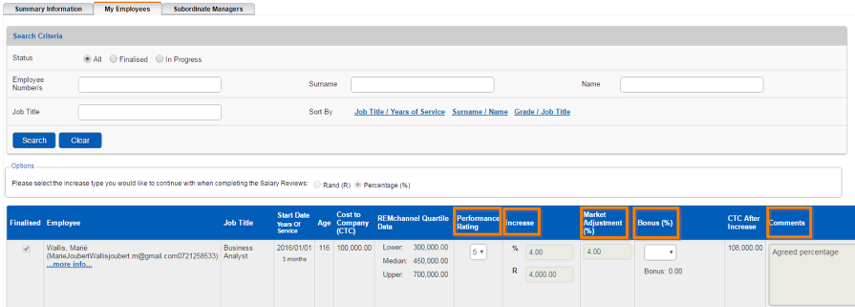
2.4.3 My Employees Tab
- The Manager’s employees are displayed on this page
- The increase type can be selected in Rand (R) or Percentage (%)
- The “Performance Rating”, “Increase”, “Market Adjustment” and “Bonus” does not pull through from the “Reporting Lines Template”
- These fields needs to be completed and the “Comment” field is mandatory.
- If all the fields are completed, click “Save”
- These saved data will be shown on the “Summary Information” page
2.4.4 Subordinate Managers Tab
- A list of the subordinate managers with their employees are displayed on this page
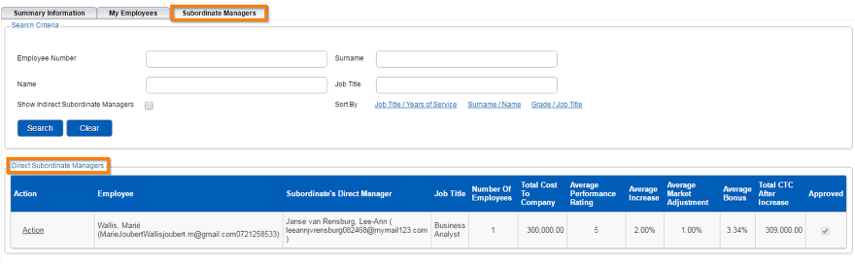
- Click on “Action” and select View Subordinate

- The Subordinate’s Manager can see who the Manager is with all their employee’s ratings for example:
- Direct Manager = Manager A
- Employee = Manager B
- Manager B = Employee A

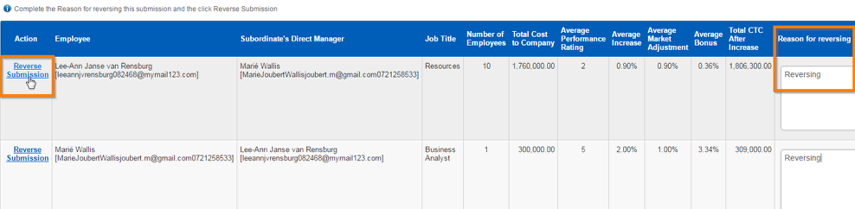
2.5 Step 5: Undo Submissions
WHY: This section assists the administrator to undo submissions that was wrongfully submitted.
WHERE: From the system portal, click System Administration | Modules | Salary Review | Undo Submissions
- Once a submission is made, it can be reversed
- A reason for reversing the submission is mandatory
- Cases where a reversing occurs will be when an employee needs to be moved from one manager to another
2.6 Step 6: Move Managers and Employees
WHY: This section assists the administrator to move managers and employees.
WHERE: From the system portal, click System Administration | Modules | Salary Review | Move Managers and Employees
- Here you can select an Employee and move them from one Manager to another
- This can only be done when NO SUBMISSION has been made
- Select an employee you wish to move
- Select the new manager by clicking on the hand icon

2.7 Step 7: Override Employee Salary Ratings
WHY: This section assists the manager to override his subordinate employees' ratings as well as his own employees without reversing a submission.
WHERE: From the system portal, click System Administration | Modules | Salary Review | Override Employee Salary Ratings
- A Manager can override his subordinate’s employees’ ratings as well as his own employees without reversing a submission
- “The reason for overriding” field is Mandatory
- On an employee, you can change the ratings percentages and submit
