eLearning - OTHER
LMS Portal ; Moderation ; Mentors and Coaches; Learnerships;
- User Manual - LMS Portal My Achievements
- User Manual - Moderation
- How to Start with the Moderation Process
- How to Moderate a Learner’s Personal Documents
- How to Moderate a Learner’s Learner Records
- How to Moderate a Learner’s Online Assessments
- How to Add and View Moderation Feedback
- Example of Feedback Email sent from Moderator to Assessor
- User Manual - Mentors & Coaches
- 1. Introduction to Mentors and Coaches
- 2. Mentors & Coaches - Administrator
- 3.1 LMS Portal
- 4.1 Training Interventions for Coaching Assessments
- 5.1 Coaching Assessments
- User Manual - Learnerships
- What is a Learnership?
- Working with the Learnership Module
- How to Create a Learnership using Master Data
- What are the Steps in the Learnership Process
- Working with a Learner Group
- Working with a Learnership Pipeline
- Learnership Reports
- User Manual - Salary Review
- 1.1 Introduction to Salary Review
- 2.1 Step 1: Define an Active Period
- 2.2 Step 2: Download and Upload of REM Channel Codes Template
- 2.3 Step 3: Download and Upload of Reporting Lines Template
- 2.4 Step 4: Ratings
- 2.5 Step 5: Undo Submissions
- 2.6 Step 6: Move Managers and Employees
- 2.7 Step 7: Override Employee Salary Ratings
User Manual - LMS Portal My Achievements
Badges and Leaderboard for the End User
The purpose of the Leaderboard functionality is to introduce learning gamification, by enabling employees/learners to compare points and badges they have earned through learning, to other employees/learners in their team or company. Companies can combine badges with internal reward programmes to encourage employees/learners to complete their required training on time. Using badges as part of a training strategy, can enhance business performance.
The "achievements section" also provides the employees/learners with a summary of qualifications, courses and other learning initiatives completed.
How do I get there?
Buttons
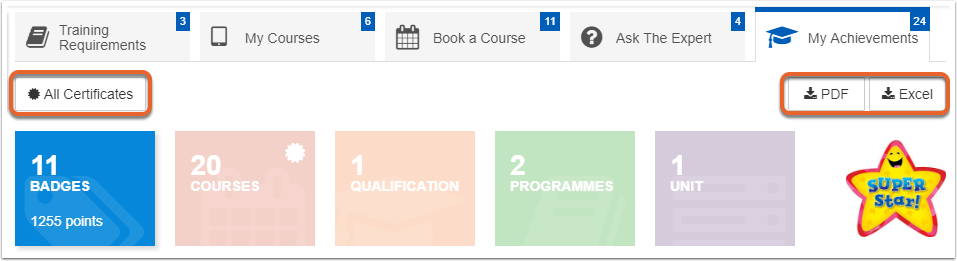
All Certificates:
- When the All Certificates button is selected, a list of all Achievement Certificates are displayed.
- To download a copy of the certificate, click on the rosette icon next to the course.

PDF:
Excel:
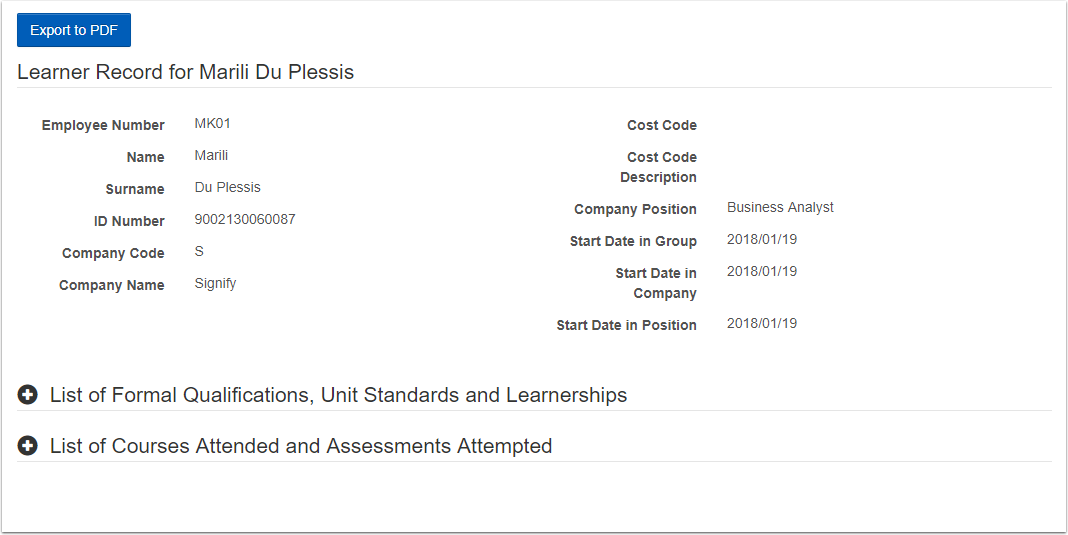
- Click on the Excel button, to download the Learner Record page in Excel format.
- Click on the Excel file in the bottom left hand corner of your browser to open the document.

- The export contains the information listed below and more:
- Appointment Details
- Training Start, End and Expiry Dates
- Training Completed and Competent Status
- Training Score
- Training Provider, NQF Level
- Course Information Types and Comments related to your Learner Records.
Badges
The Badges section on the My Training History/My Achievements tab, displays a list of all courses which have Badges and Points linked to them. It is important to note, that not all training courses have linked Badges or Points.
Badges, consist of a Leaderboard and My Badges section.
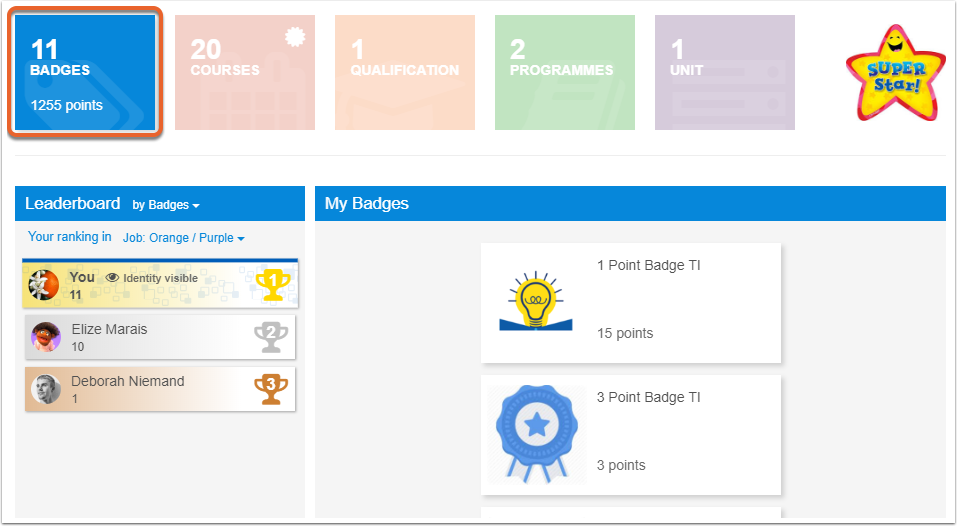
Leaderboard:

On the Leaderboard employees/learners can view their training based on:
- Badges
- Points

Or employees/learners can view their training compared to others based on their raking in:
- Training Level
- Company
- Job

Your ranking in :
- Training Level
- Training Levels are defined based on the number of points obtained by a learner.
- When a learner has obtained the number of points that fall within the range for that training level, they are classified in that Training Level.
- For example, in order to reach the Stroller Training Level, a learner need to have between 50-99 Points awarded to them.
- Company:
- The employee/learner is ranked against other employees on the same organisational node, the node directly above and the top most organisational node.
- For example, employees/learners can view their ranking compared to everyone appointed Sales, if they are appointed in the Sales department (same node). Employees/learners can compare themselves everyone appointed in Gauteng (node directly above). Employees/learnerscan also compare themselves to the Senior Management node (top most organisational node).
- Job
- This compares learners who are appointed in the same Job and who fall within the same Job Family to each other.
- For example, employees/learners who are appointed in the Business Analyst position, will be able to compare themselves to all other Business Analysts appointed in the same Job Family.
My Badges
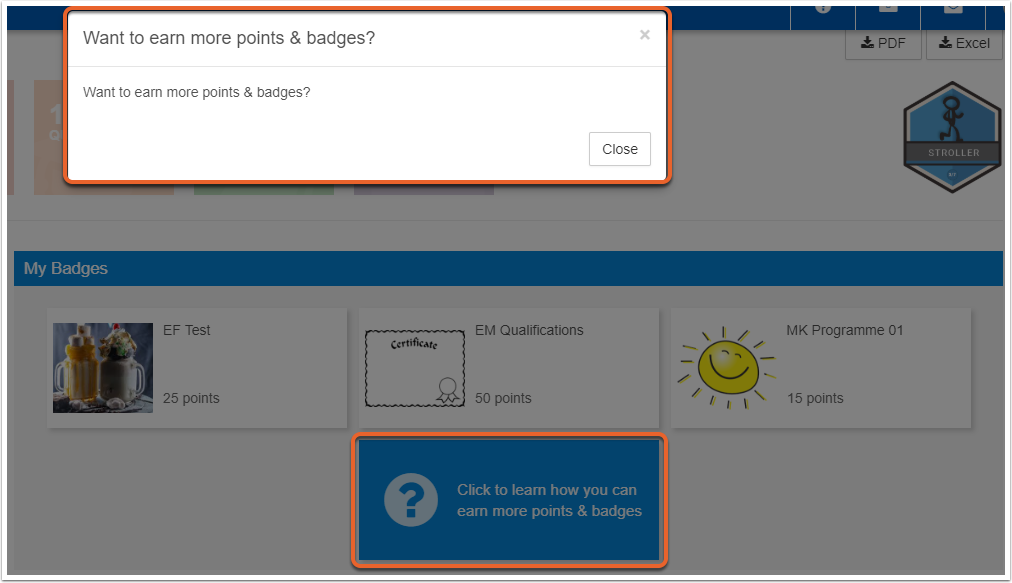
All Badges employees/learners have obtained, are displayed in the My Badges section. For each badge obtained, the Badge image, Training Title and number of points earned per Badge is displayed.

The Click to Learn how you can earn more Points & Badges button displays more information regarding how to earn more Points and Badges.
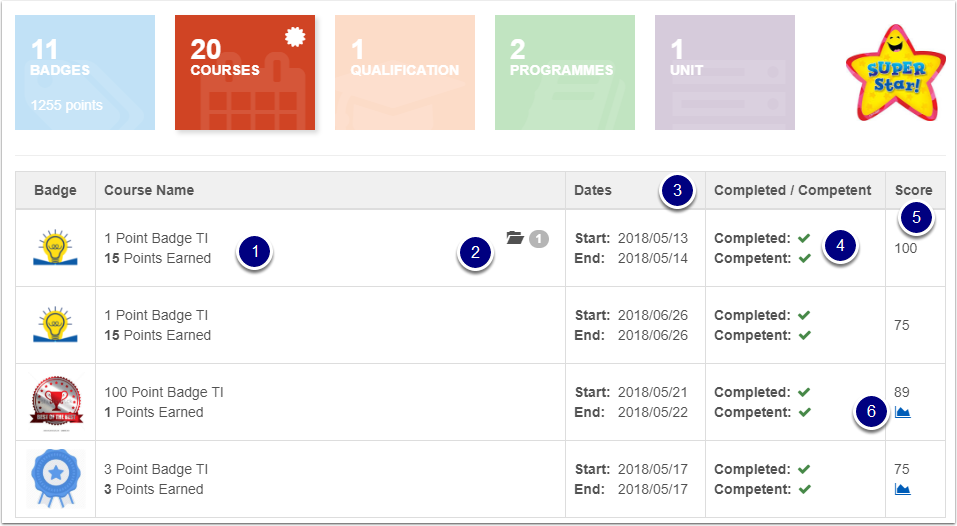
Courses
The courses tab displays a list of courses a learner has completed.
- The Badge Image, Course Name as well as the number of Points earned for the Badge are displayed.
- Learner Record documents and Certificates can be downloaded from the list.
- The course Start and End Dates are displayed.
- The Completed / Competent Status for the Course is indicated.
- The Score obtained for the Course is displayed.
- Rankings can be viewed for specific courses.
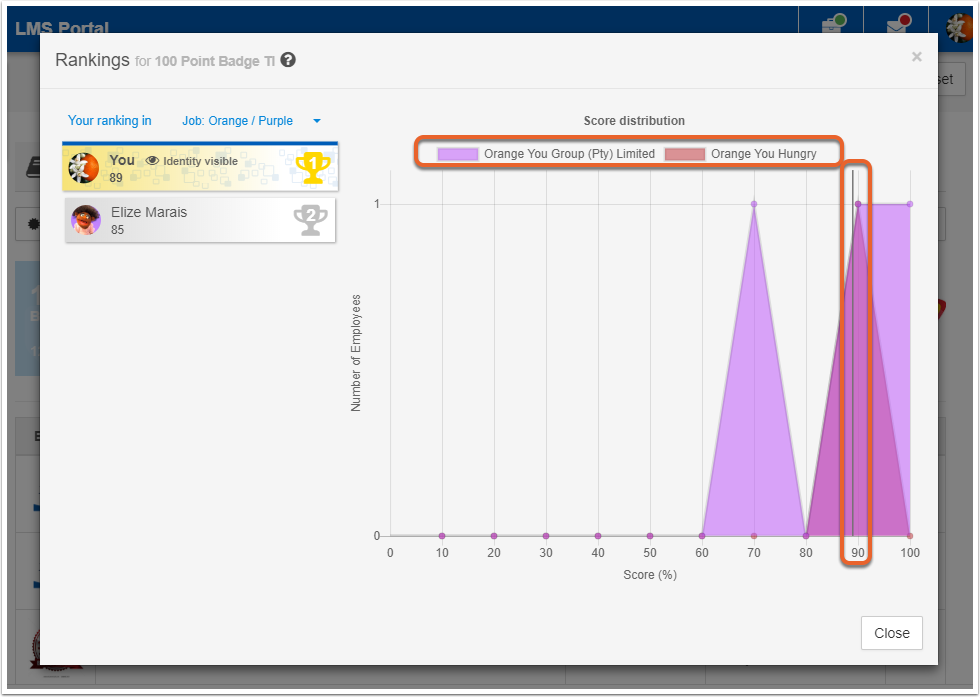
When the Rankings image is selected, the Ranking page is displayed for that specific course. Rankings are only calculated and displayed for individuals on the employee/learner's organisational level, one level above and on the highest level of the company.
The employees/learners can view their Ranking in the same way as it is displayed on the Leaderboard.
The employees/learners have the option to exclude certain organisational units from the graph, by selecting the organisational unit from the legend above the graph.
There is a vertical line displayed on the graph, which indicates the position of the employees/learners compared to others.
Qualifications
The Qualifications section displays a list of Qualifications the employees/learners have completed which have Badges/Points allocated to them.
Similar to the Badges section the following information is displayed:
- The Badge Image, Qualification Title as well as the number of Points earned for the Badge are displayed.
- Learner Record documents and Certificates can be downloaded from the list.
- The Qualification Start and End Dates are displayed.
- Additional Information relating to the NQF Level, Credits and Hours spent are displayed.
- The Completed / Competent Status of the Qualification is indicated.
- Rankings can also be viewed for the Qualification.

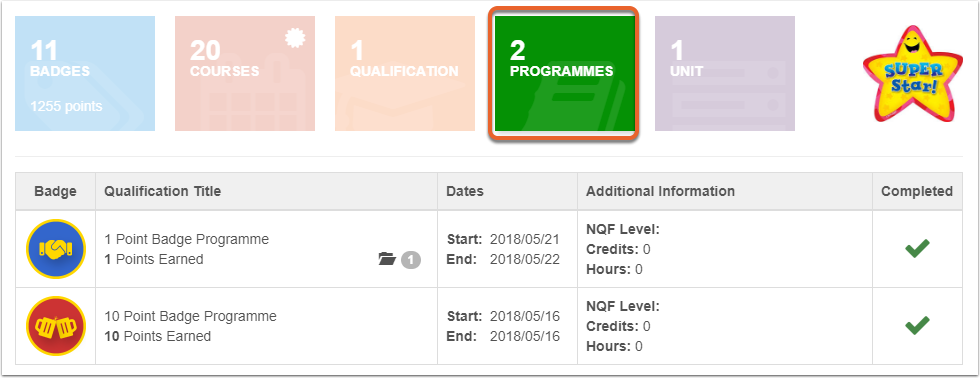
Programmes
The Programmes section, displays a list of Programmes employees/learners have completed which have Badges/Points allocated to them.
The same information is displayed as in the Qualification section.
- The Badge Image, Programme Title as well as the number of Points earned for the Badge are displayed.
- Learner Record documents and Certificates can be downloaded from the list.
- The Programme Start and End Dates are displayed.
- Additional Information relating to the NQF Level, Credits and Hours spent are displayed.
- The Completed / Competent Status of the Programme is indicated.
- Rankings can also be viewed for the Programme.
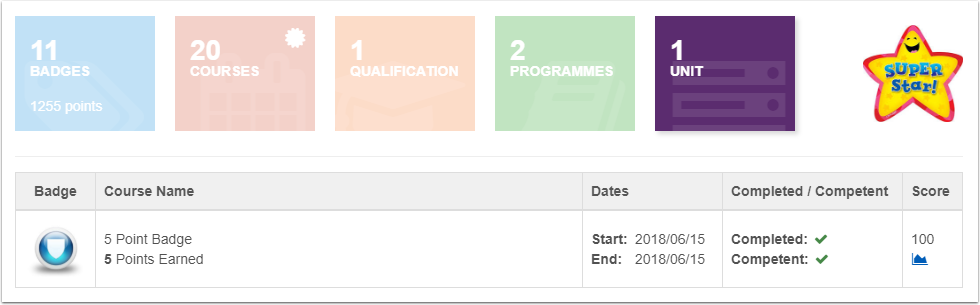
Unit
The Unit section, displays a list of Unit Standards/Standards employees/learners have completed which have Badges/Points allocated to them.
The same information is displayed as in the Qualification section.
- The Badge Image, Standard Title as well as the number of Points earned for the Badge are displayed.
- Learner Record documents and Certificates can be downloaded from the list.
- The Standard Start and End Dates are displayed.
- The Completed / Competent Status of the Programme is indicated.
- The Score obtained for the Standard is displayed.
- Rankings can also be viewed for the Programme.
Training Level Summary
The Training Level summary allows employees/learners to view the number of points linked to each individual Training Level. The employees/learners can click on the image related to each Training Level in order to learn more about the Training Level and what is required in order to progress to the next level.
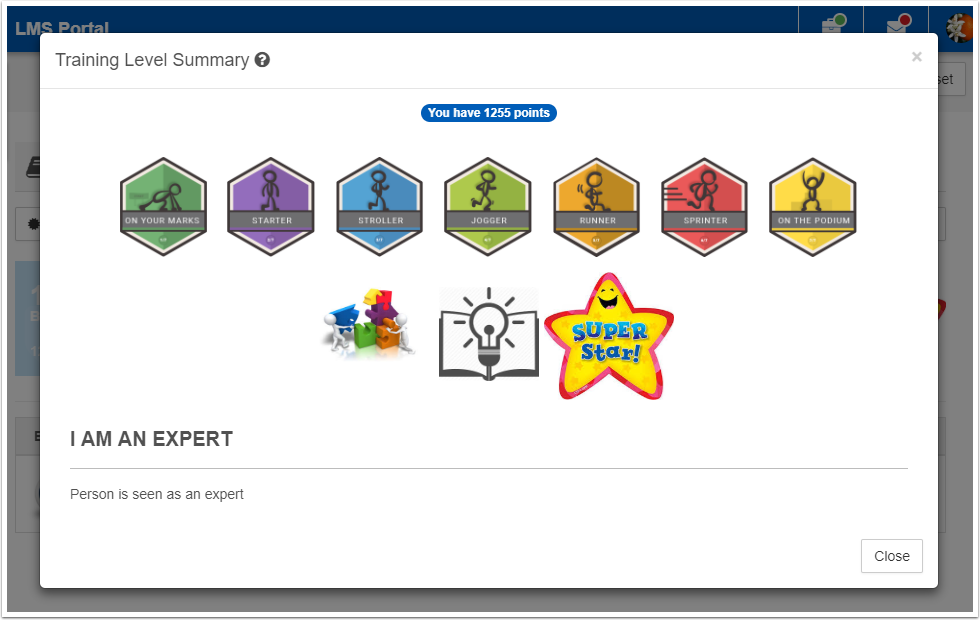
Badges and Training Levels are customizable per installation, so the examples used in this article may not be relevant to how the Badges and Training Levels are configured for your organisation.
User Manual - Moderation
How to Start with the Moderation Process
The moderation functionality allows internal and external moderators to easily access, open and moderate personal document and various training history records e.g. online assessments, practical assessments and POE documentation.
- The number of learners accessible by a moderator will be determined by his active subgroup e.g. a specific group/pipeline or other defined search criteria.
- Moderation results can be captured and stored by the moderator. The following accompanying information is also captured: moderation date, moderation outcome and comments.
- The Internal Moderator will be able to send email notifications to the assessor containing the outcome of the moderation process.
- The External Moderator will be able to send email notifications to the Internal Moderator containing the outcome of the moderation process.
- The moderator has access to the following information:
- Personal learner documentation e.g. copies of ID books.
- All documents uploaded by the different role players on a learner’s training history record e.g. POE documents.
- Online assessment attempts and transcripts.
- Practical Assessment results e.g. assessment date, score, number of attempts and comments.
- Training history records displaying the following information: Complete and competent status, Assessed status, Moderated status (Final or Mid-Year).
- All the comments made on a learner’s training history record by the assessor and moderator.
WHO: Internal or External Moderators.
WHY: To open the Moderation Dashboard in order to moderate items on a learner’s profile.
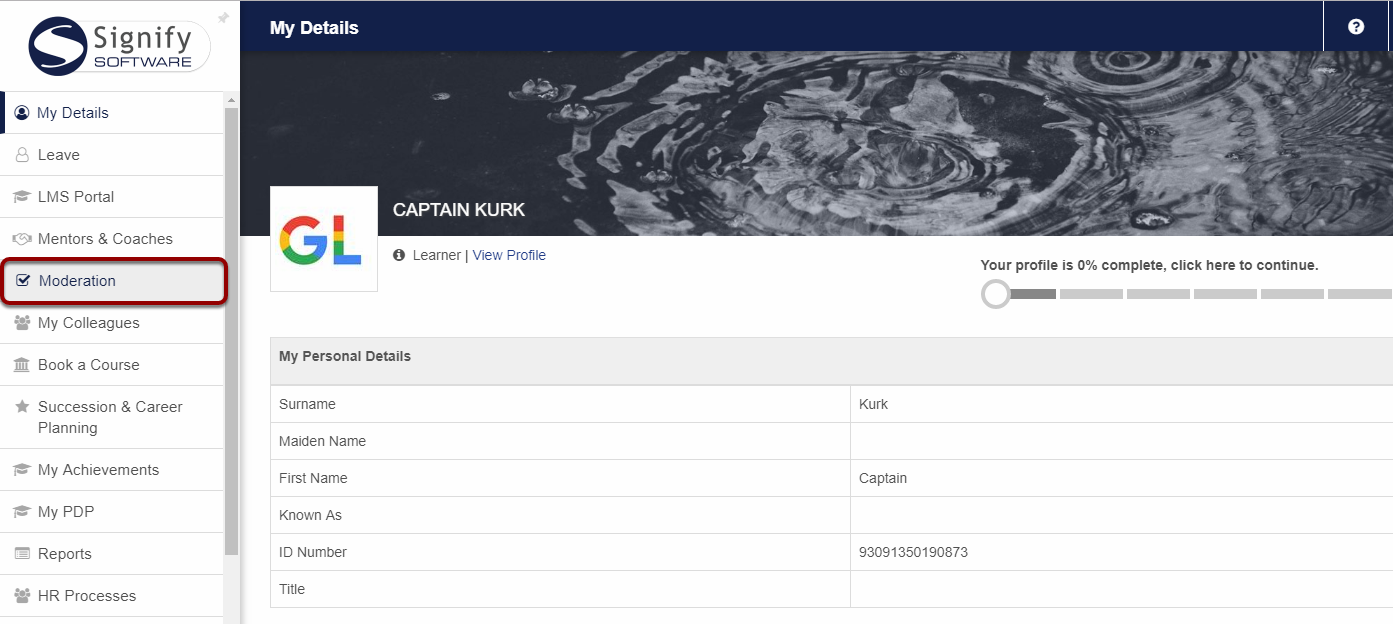
WHERE: Main Portal Menu| Moderation
- Click on the Moderation menu item on the Main Portal.
- A list of all learners in your subgroup will be displayed.
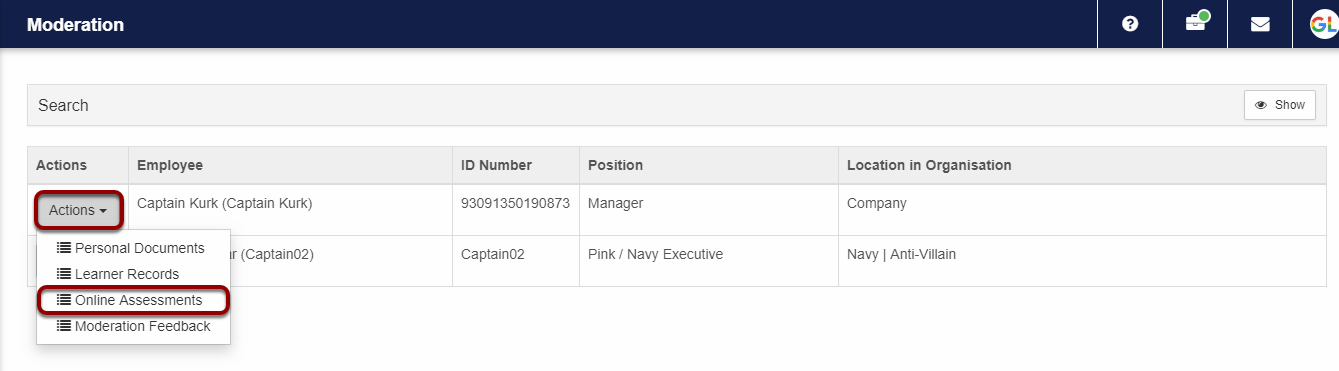
How to Access The Information on a Learner's Profile
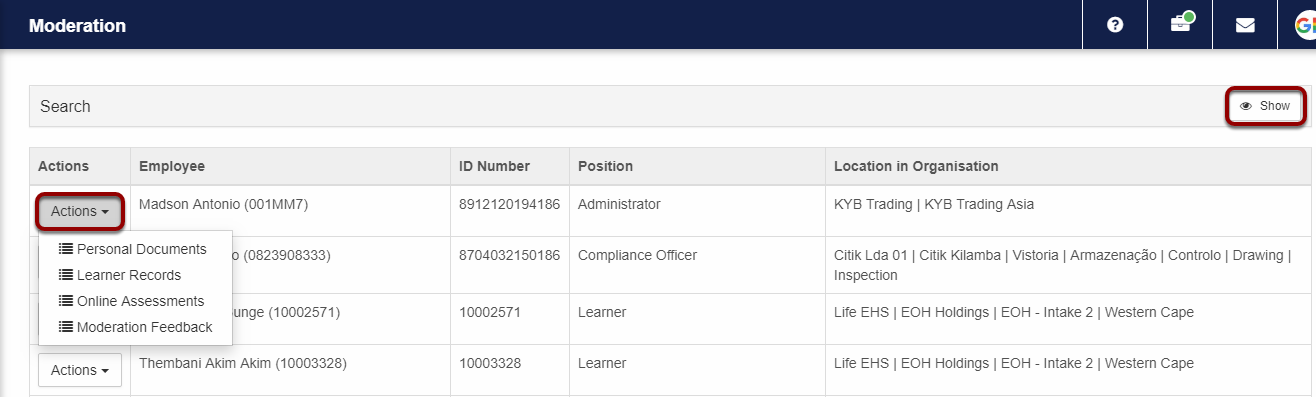
- Use the Search functionality to find a specific employee by entering search criteria and click Search.
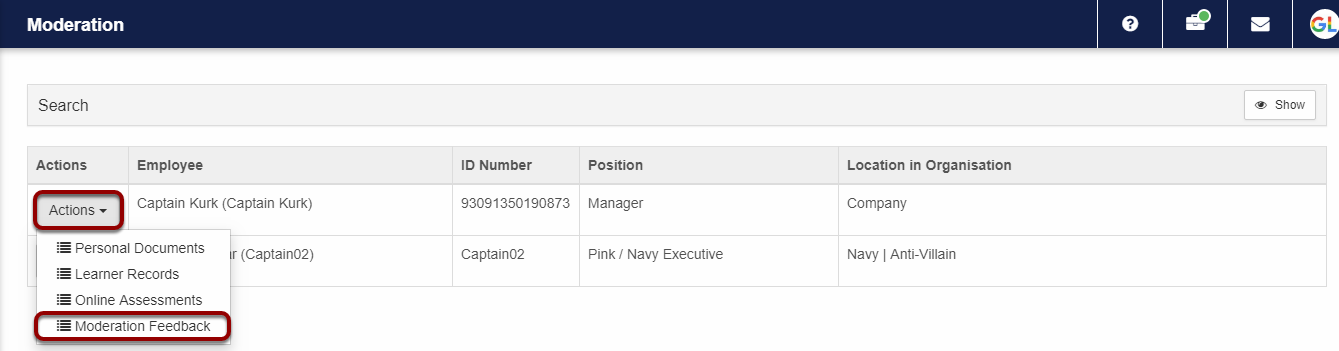
- Click on the Actions drop-down to view the three information categories available for moderation i.e. Personal Documents, Learner Records and Online Assessments.
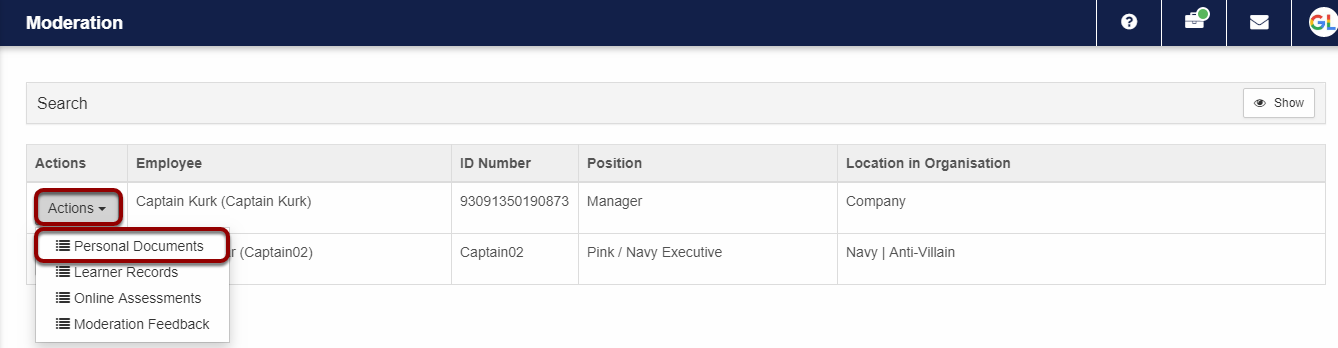
How to Moderate a Learner’s Personal Documents
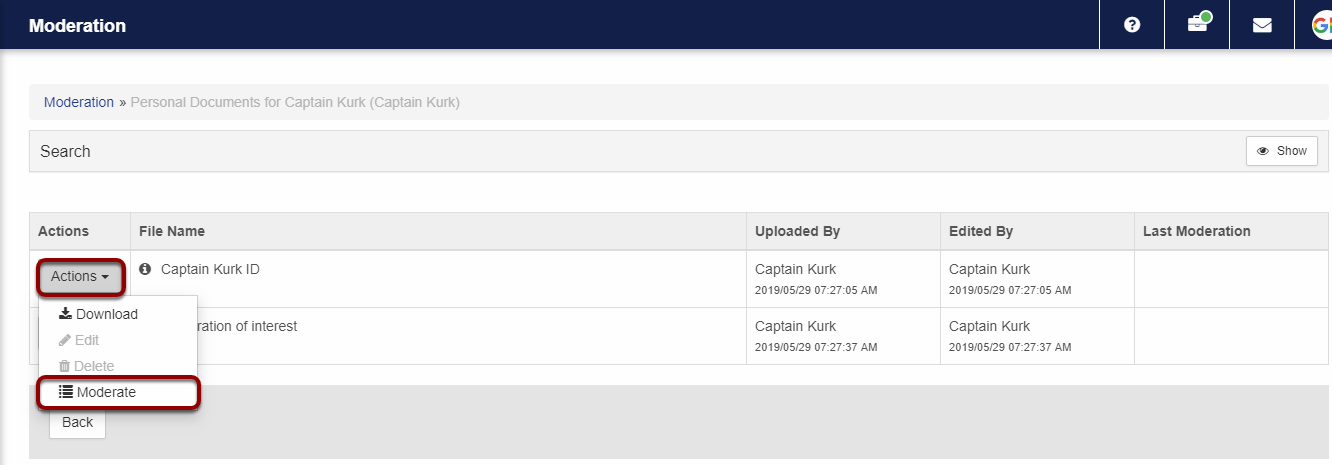
- On the previous screen, click on Personal Documents in the Actions drop down.
- A list of documents will be displayed.
- Click on the Actions drop-down next to the document to view the options available.
- To download a document, click Download. The document will be downloaded in the Downloads folder of your computer.
- To moderate the document, click Moderate.
Note: A moderator will not be able to upload, edit or delete any documents.
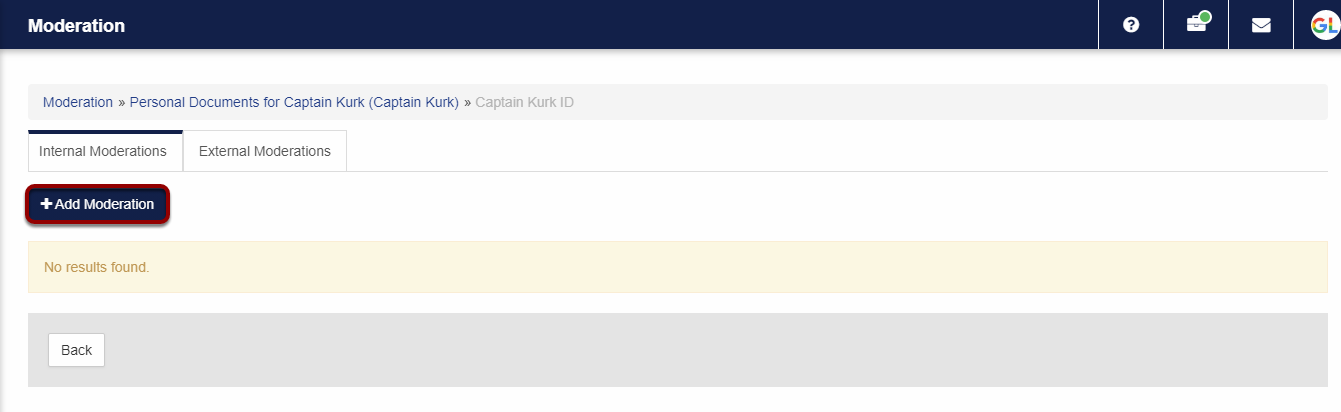
- To create a new moderation record click on the +Add Moderation button.
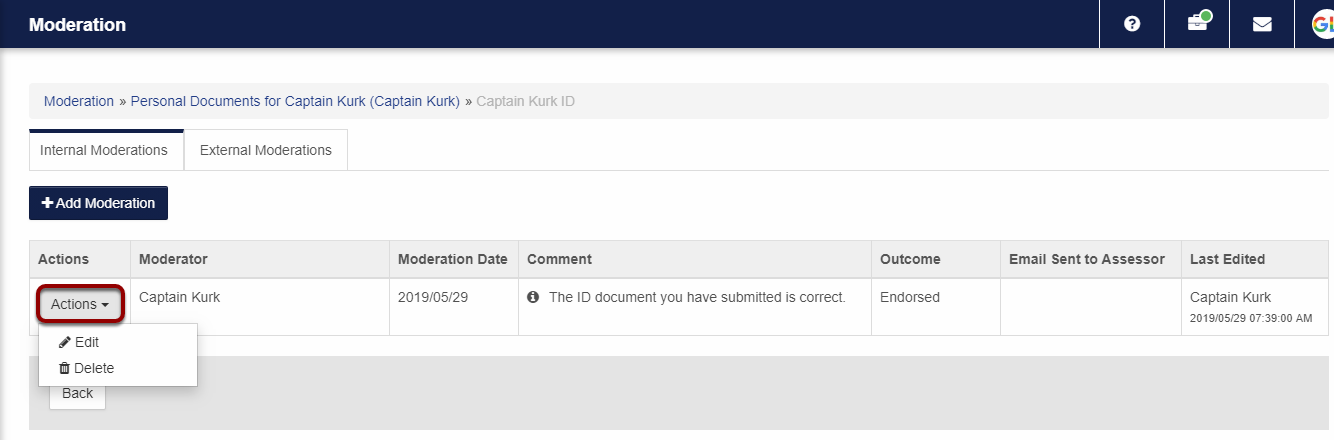
- Complete the following values on the Moderator Feedback screen:
- Moderator
- Moderation Date
- Outcome
- Comment (This field is compulsory when the Send Email tick box is selected.
- Select the Send Email tick box if you want to send an Email to an assessor containing the outcome of the moderation.
- Assessor
- If the selected Assessor’s email address does not exist, the following message will be displayed:

- Click Save to close the Moderator Feedback screen.

- To Edit/Delete the moderation records click on the Actions drop-down next to the moderation record to view the options available.
- Click Edit to amend the moderation record.
- Click Delete to remove the moderation record.
- Click Back to return to the Personal Documents screen.
Note: The Edit and Delete options will only be available on moderation records added by you. All other moderation records can only be viewed.
How to Moderate a Learner’s Learner Records
- Open the Moderation Dashboard and click on Learner Records in the Actions drop down.
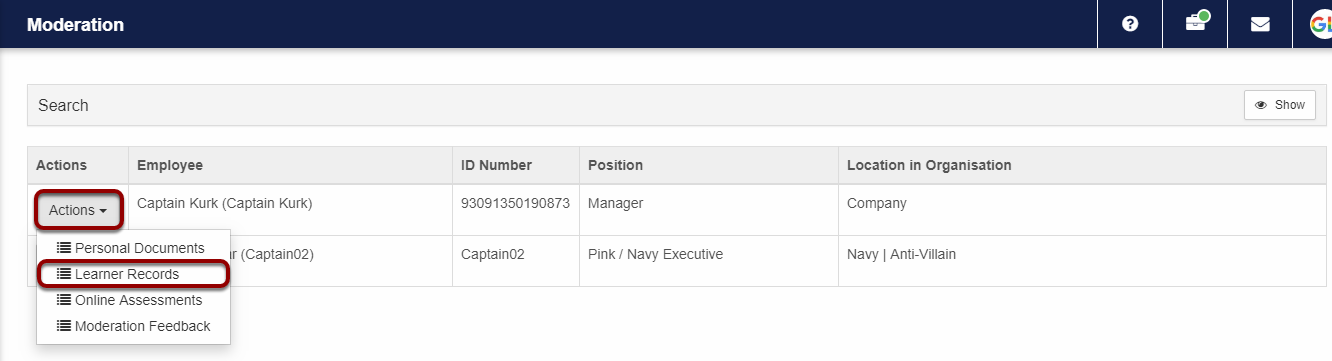
- A list of learner records will be displayed.
- Click on the Actions drop-down on the learner record to view the options available.
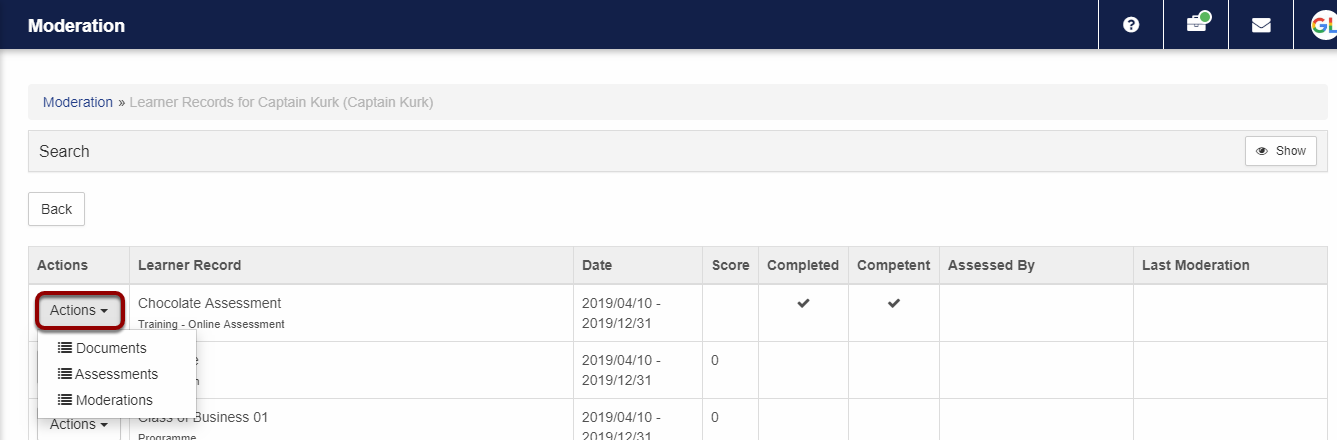
- When the Documents, Assessments or Moderations options are clicked, a screen will be displayed showing four tabs with the following functionality:
- Documents: Download documents
- Assessments: View assessments done by Assessors
- Internal Moderations: Create, Edit or Delete Internal moderations
- External Moderations: Create, Edit or Delete External moderations
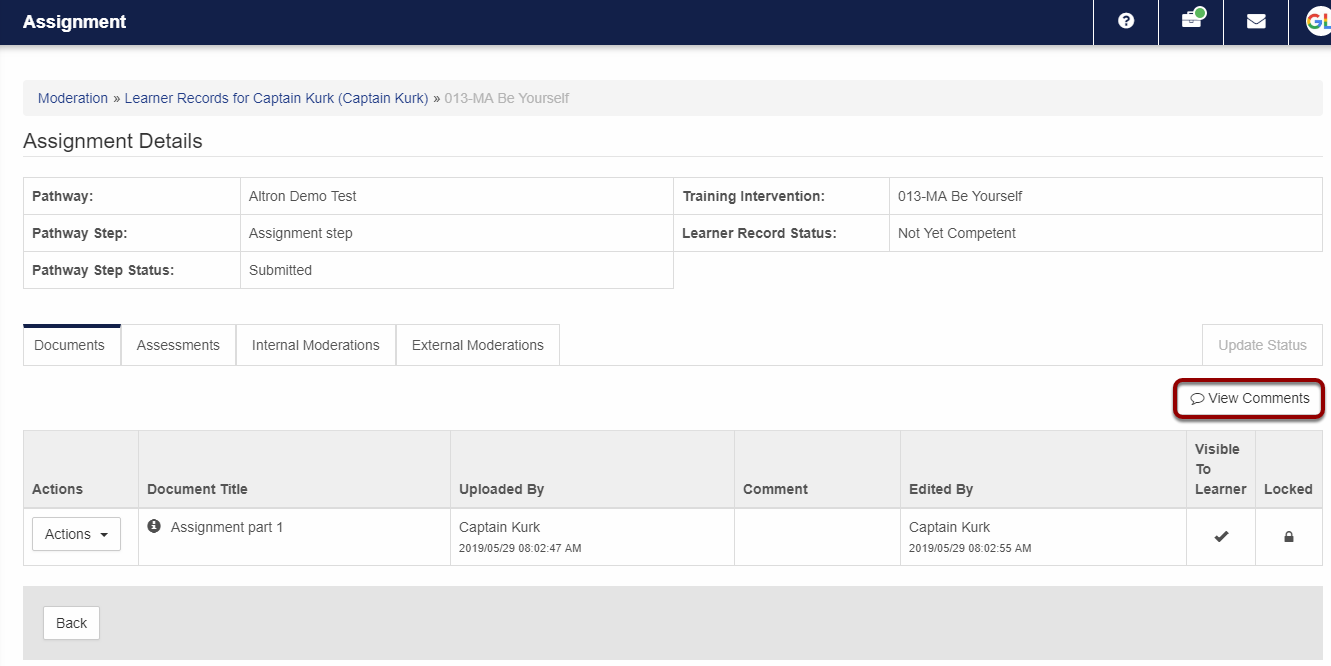
- On an Assignment type learner record, a moderator can View all comments made on the assignment learner record by clicking on the View Comments button.
How to Moderate a Learner’s Online Assessments
- Open the Moderation Dashboard and click on Online Assessments in the Actions drop down.
- A list of online assessments will be displayed.
- Click on the Actions drop-down on the Assessment record to view the options available.
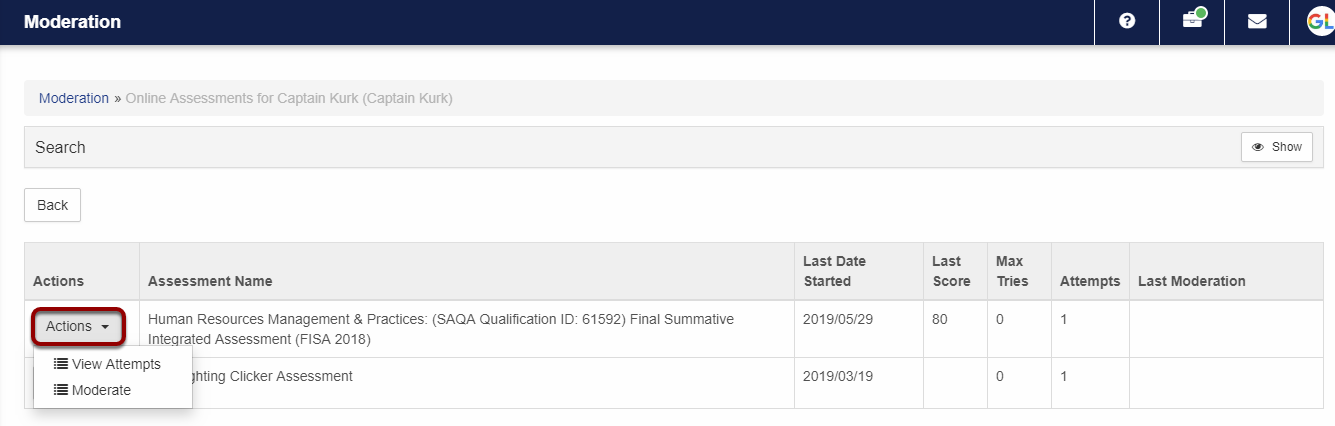
- When any of the Actions options are clicked, a screen will be displayed showing three tabs with the following functionality:
- Assessments Attempts: View all assessment attempts and a transcript report.
- Internal Moderations: Create, Edit or Delete Internal moderations
- External Moderations: Create, Edit or Delete External moderations
How to Add and View Moderation Feedback
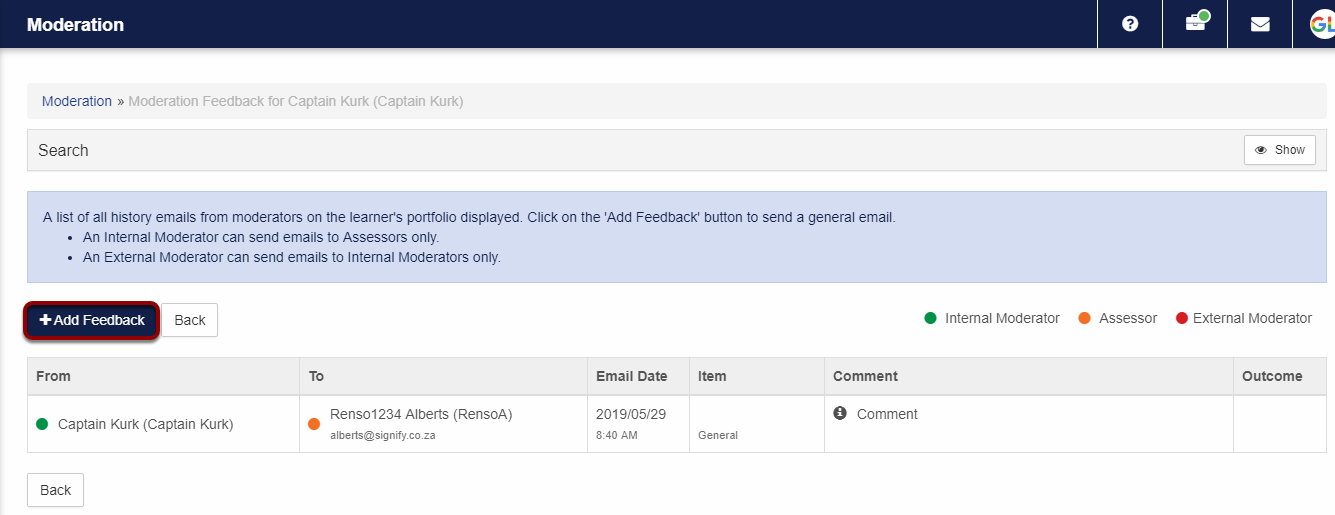
- The purpose of the Moderation Feedback functionality is to show a list of all history emails from moderators and assessors on a learner’s profile.
- Open the Moderation Dashboard and click on Moderation Feedback in the Actions drop down.
- Click on the +Add Feedback button to send a general email.
- An Internal Moderator can send emails to Assessors only.
- An External Moderator can send emails to Internal Moderators only.
- Complete the following values on the Moderator Feedback screen:
- Moderator
- Moderation Date
- Outcome
- Comment (This field is compulsory when the Send Email tick box is selected.
- Select the Send Email tick box if you want to send an Email to an assessor containing the outcome of the moderation.
- Assessor
- If the selected Assessor’s email address does not exist, the following message will be displayed:

- Click Save to close the Moderator Feedback screen.

Example of Feedback Email sent from Moderator to Assessor
- This is an example of an email that the assessor will receive.

User Manual - Mentors & Coaches
1. Introduction to Mentors and Coaches
The Mentors and Coaches module enables the employee to have a Mentor and/or Coach assigned to them to help with learning or employee development. It also enables the Mentor and/or Coach to keep track of employee growth.
1.1 Mentoring definition
Mentorship is a longer-term relationship in which a more experienced or more knowledgeable person helps to guide a less experienced or less knowledgeable person. The mentor may be older or younger than the person being mentored, but he or she must have a certain area of expertise.
Some of the qualities of a good mentor includes the willingness to share skills, knowledge, and expertise. A good mentor is willing to teach what he/she knows and accept the mentee where they currently are in their professional development.
1.3 Coaching definition
Coaching can be seen as a short term, task-based method of directing, instructing and training a person or group of people, with the aim to achieve some goal or develop specific skills.
Some of the qualities of a good coach includes being organised, process oriented, objective, knowledgeable, patient and realistic.
1.3 Why use mentors and coaches?
The purpose of mentoring is to develop the employee not only for the current job, but also for the future. This distinction differentiates the role of the immediate manager and that of the mentor.
The purpose of coaching is to improve the employee’s performance on the job. This involves either enhancing current skills or acquiring new skills. Once the coachee successfully acquires the skills, the coach is no longer needed.
2. Mentors & Coaches - Administrator
WHY: This section assists the administrator to add mentors and coaches, set-up relationships between the mentor/coach and the employee being mentored/coached.
WHERE: From the system portal, click System Administration | Modules | Mentors and Coaches | Mentors and Coaches
2.2 Adding a Mentor or Coach
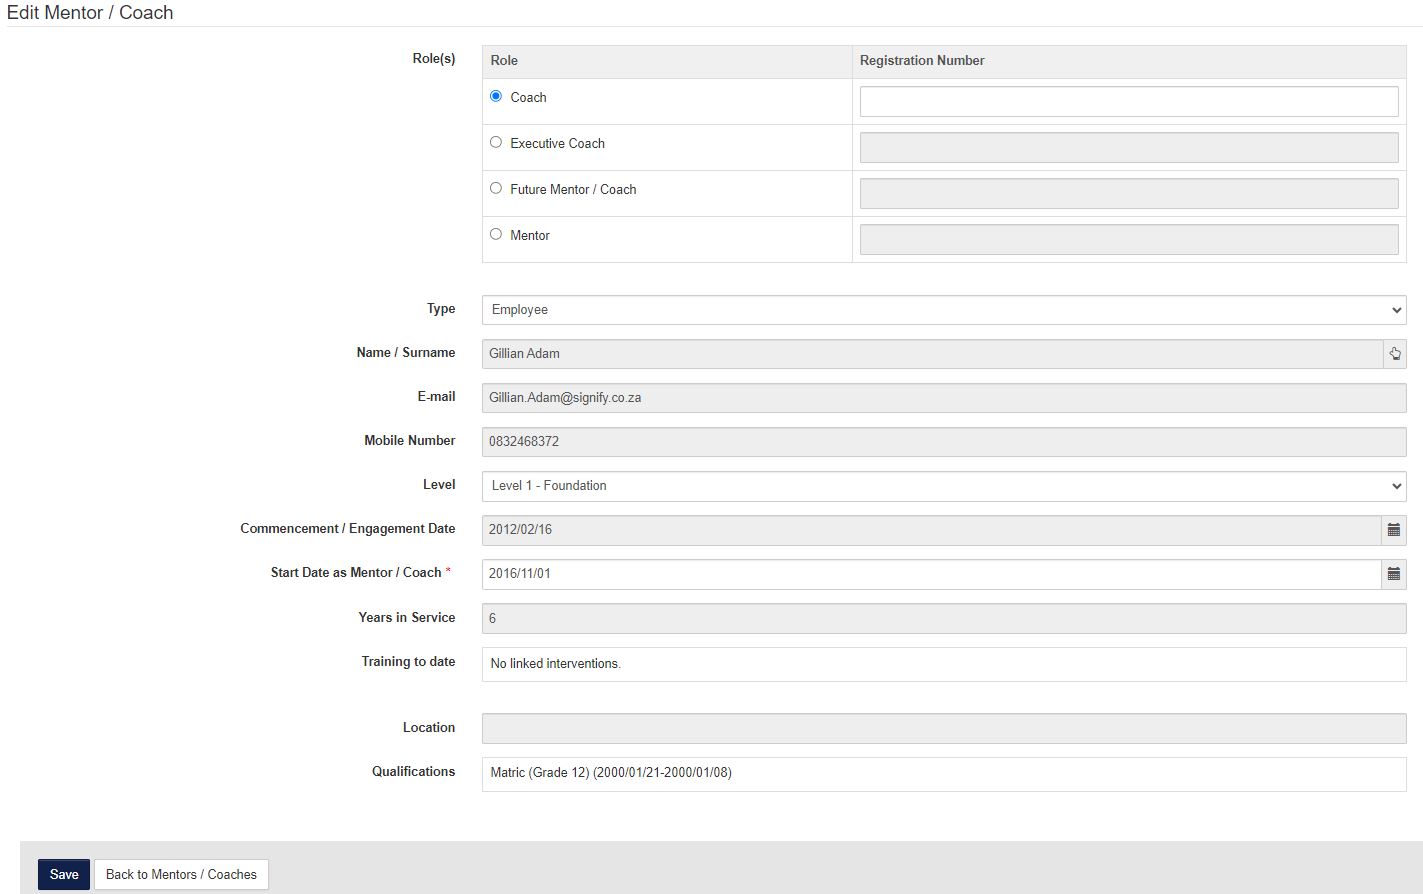
There are 4 different types of Mentors or Coaches that can be added namely:
- Coach
- Executive Coach
- Future Mentor/Coach
- Mentor
An external or internal mentor/coach can be added
The training to date is all Training Interventions that is linked to this person as a mentor or a coach
The Qualifications is all the Qualifications that is linked on the employee’s Learner Records
- Relationships refers to the Mentor/Coach, an employee and training that is linked together
- For the purposes of Smollan it refers to the Mentor/Coach and Employee relationship (when not referring to Learnerships)
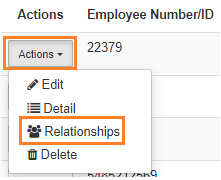
- On this screen, new relationships can be added

- The employee that is chosen from the list of employees
- The type which can be:
The employee (this is the one used by Smollan when not referring to Learnerships)
Learnership Pipelines
Event
Training Intervention
- This relationship can be made active
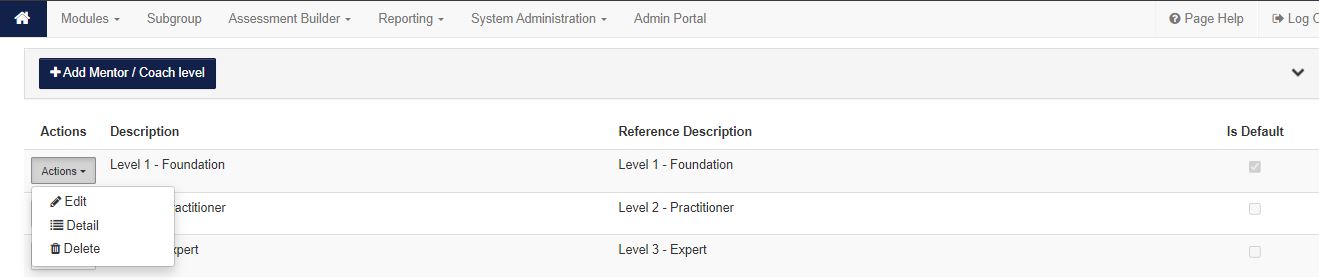
On this page the following can be done:
- Add a Mentor / Coach level.
- On the Mentor/Coach level that was added, you can view the detail, edit and delete.
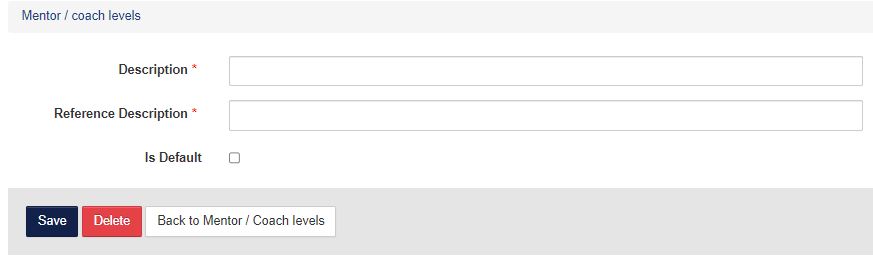
- On this screen, a new Mentor / Coach level can be added.
- When adding a new Mentor/Coach level, the following is required:
- Level Description
- Reference Description
- Whether the level is the default value.
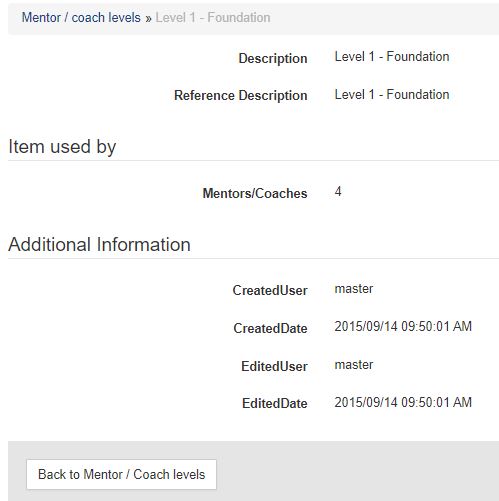
- When viewing the detail of the level, the following information is displayed
3.1 LMS Portal
WHY: This section assists the mentors and coaches to view the employees assigned to them, add new comments, setup the coaching plans and do a coaching assessment. The employees can view their comments and coaching plans.
WHERE: On the LMS Portal, click Mentors and Coaches
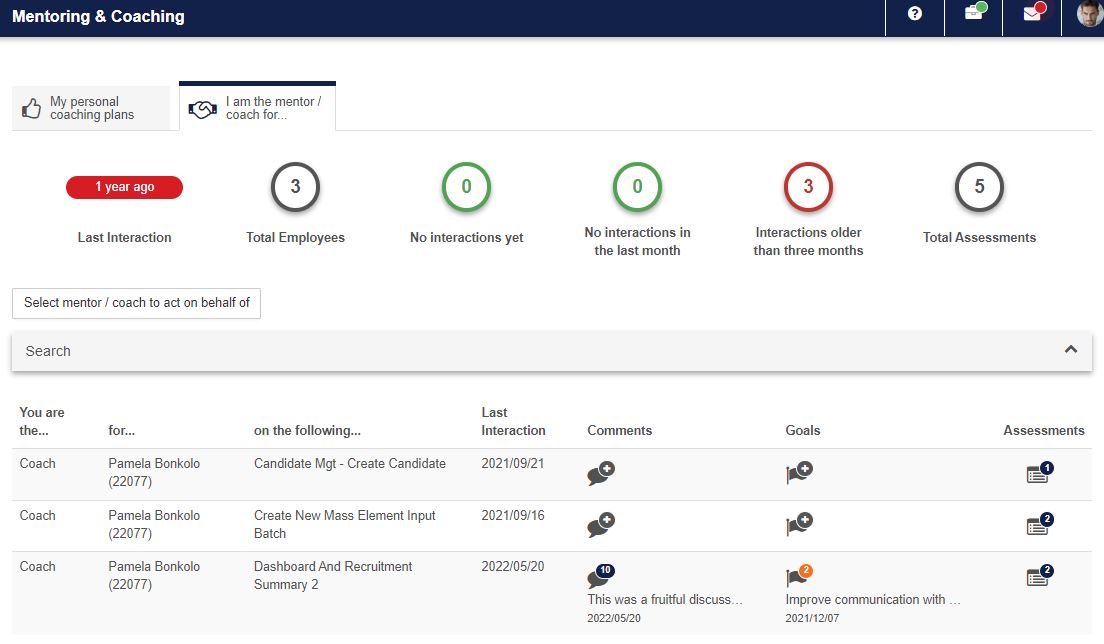
3.2 Mentor/Coach View
- On the LMS Portal, the Mentors & Coaches will be available only for the employee that is setup to be a Mentor or Coach.
- When clicking on the comments or goals links, either the comments or the goals pages will open - depending on the link you choose.
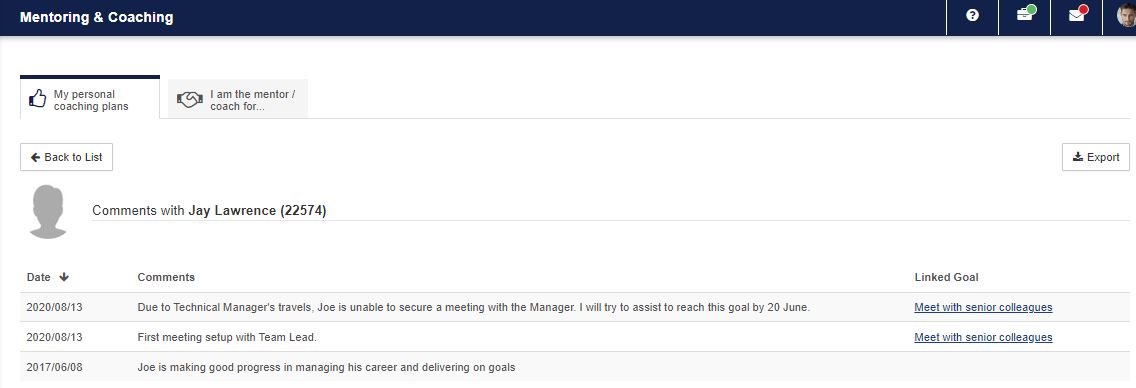
- A new comment can be added or an existing comment viewed when selecting the comments link.
- To add a new comment, click on the Comments icon.
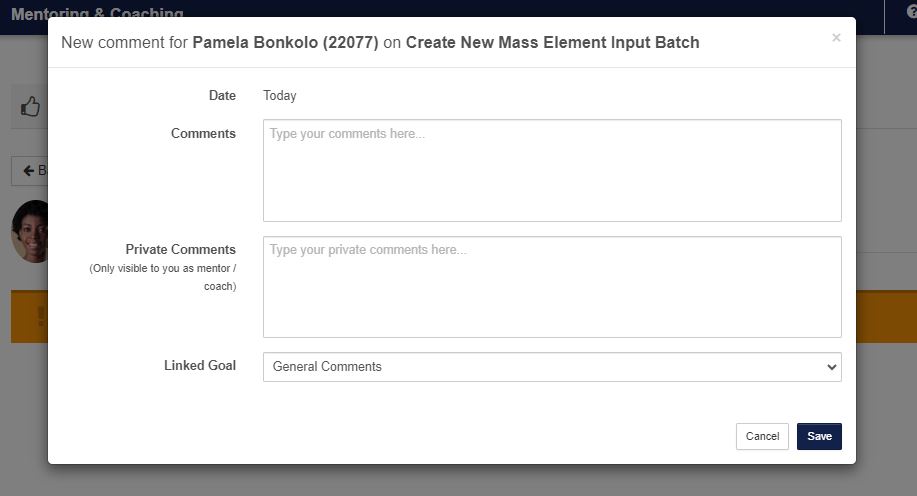
- When adding a comment, the following screen opens:
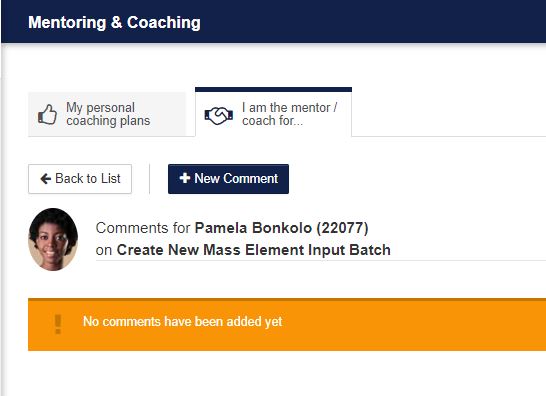
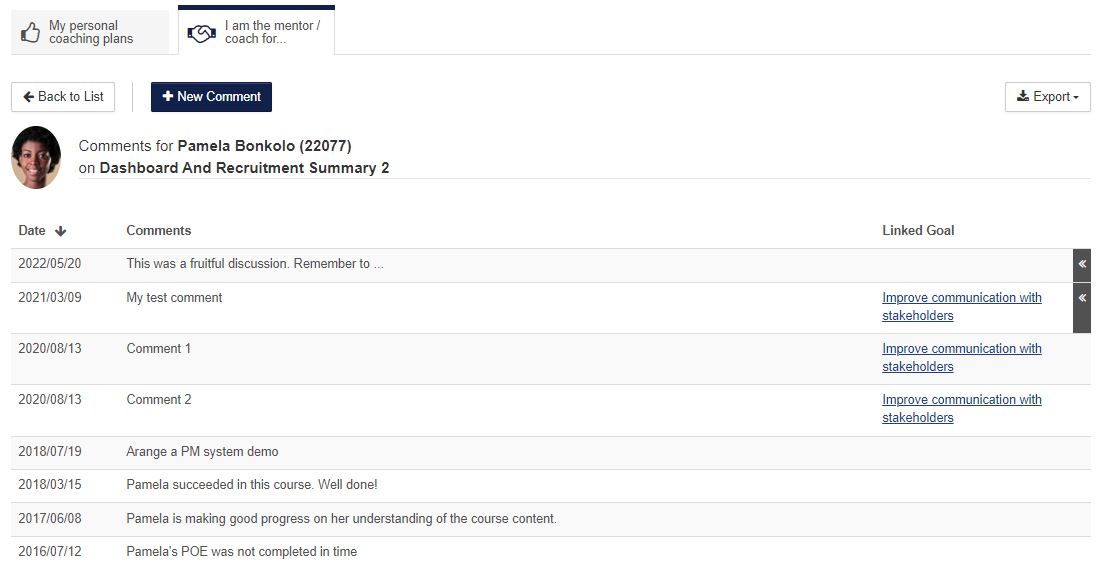
- All the general comments added will be available for viewing under the Comments link (from here you can also add new comments).

3.4 Coaching Plans
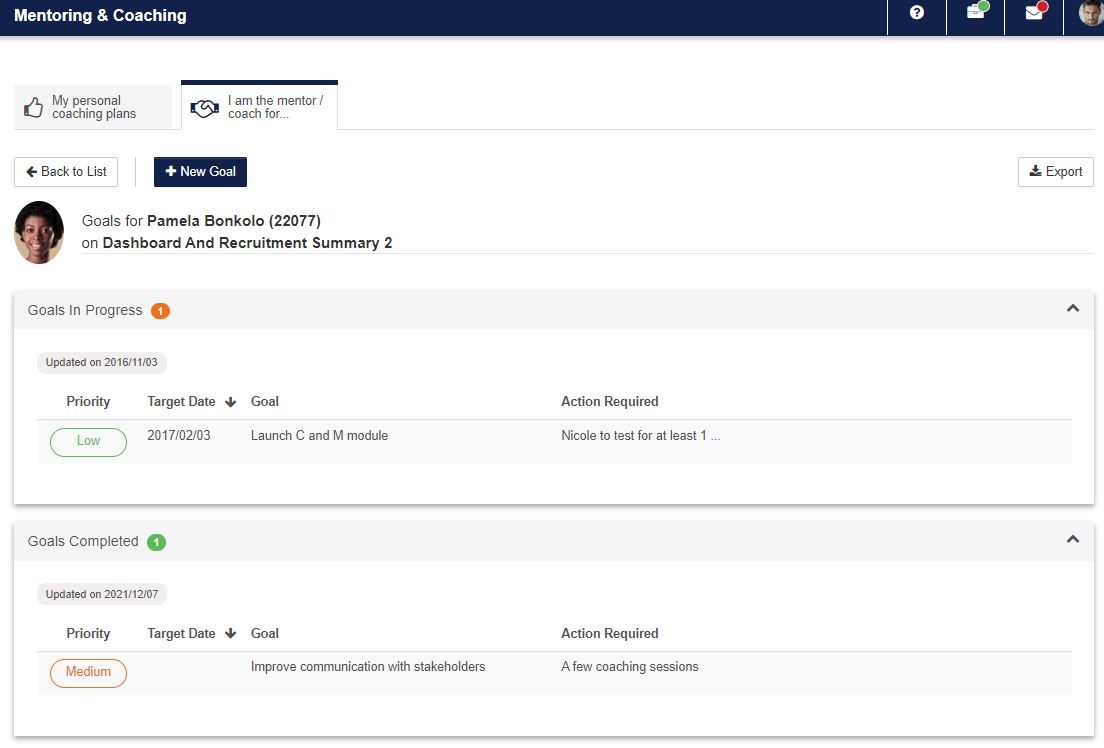
- When opening the coaching plans screen Goals - the mentor/coach will be able to view all plans the employee has completed, those that he/she is still busy with, as well as the general comments loaded.
- New development plans can also be loaded from this screen.
- The date the last change was made to any of the goals is also available on this screen.
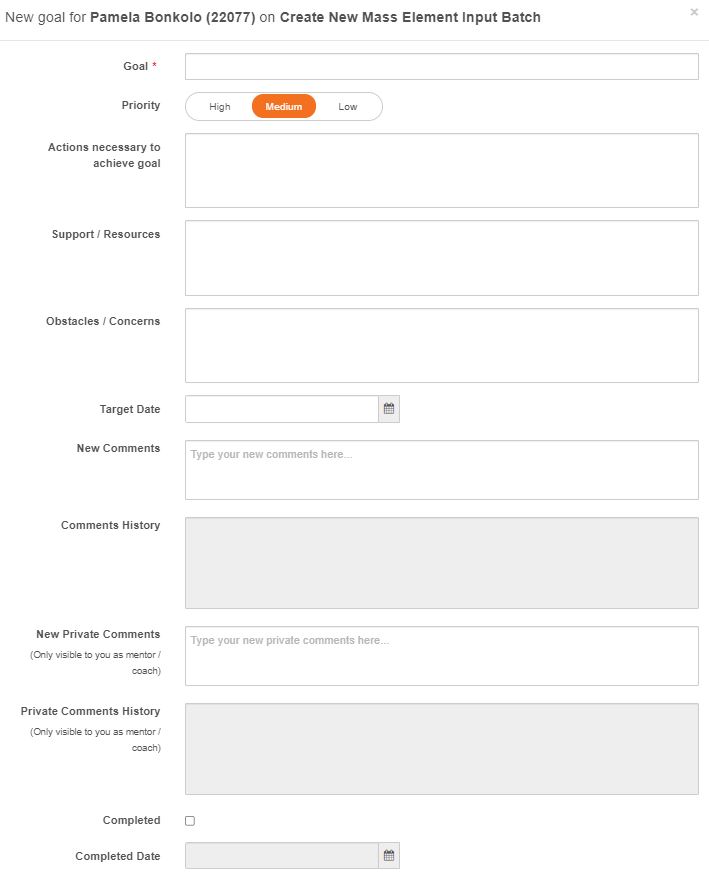
- To add a new goal the following fields are available for completion:
- Goal
- Priority
- Actions necessary to achieve goal
- Support / resources needed
- Obstacles / Concerns
- Target date
- New comments
- Comments History
- New Private Comments
- Private Comments History
- Completed
- Completed Date
- When viewing the goals more information can be viewed by clicking on the Info Tab .
- When viewing the ‘Goals in Progress’ the mentor/coach can edit the plan to either add comments or mark it as completed. (Where after it will move to the ‘Completed Plans’ section).

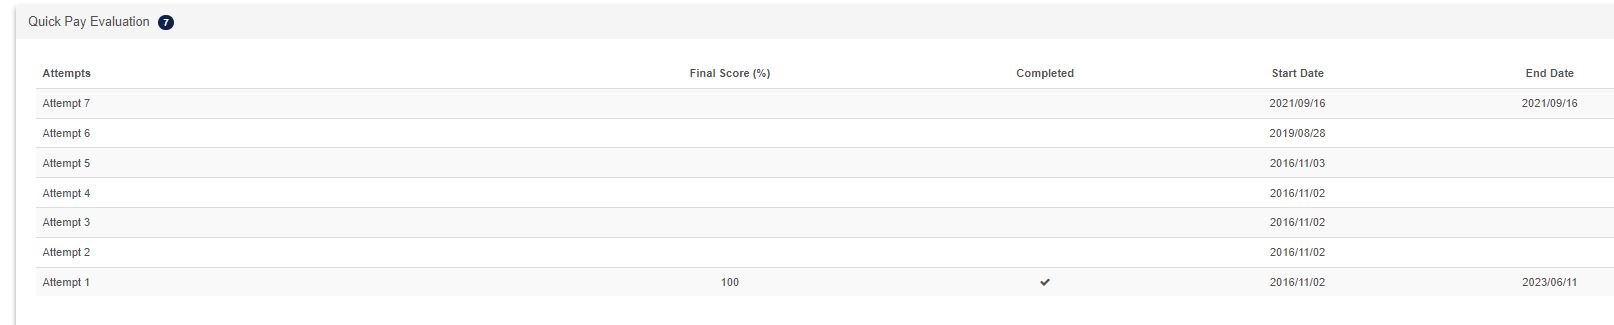
- When clicking on the assessments icon, a screen opens enabling the mentor/coach to start a new assessment or to continue with a previous assessment.
- When clicking on new assessment, choose the date of the assessment and then the assessment. (Only assessments that was created as Coaching Assessments will be listed on the screen.
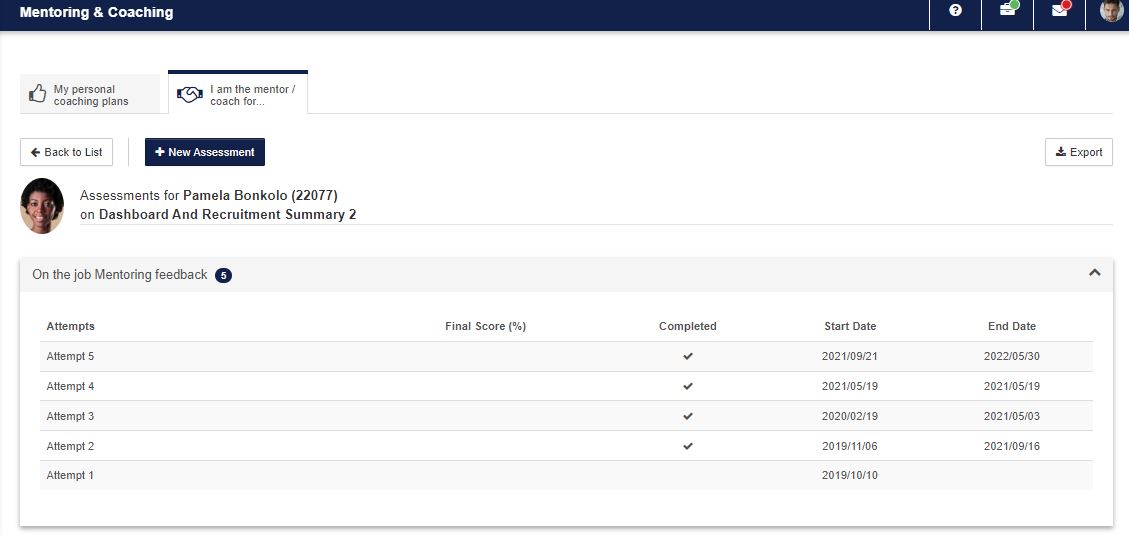
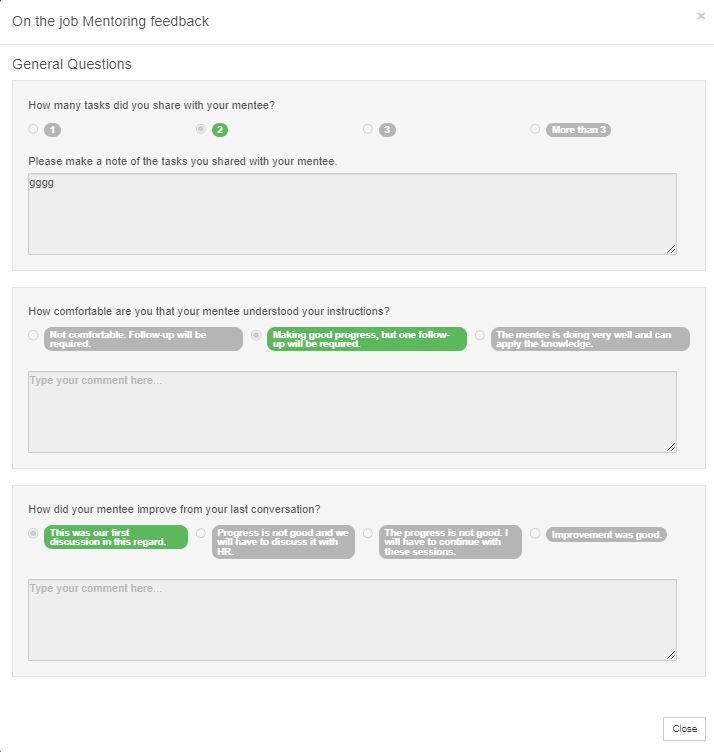
- The assessment is then completed and closed
- To view the score, select the previous coaching assessment
- On this screen the Assessment with the final score can be viewed

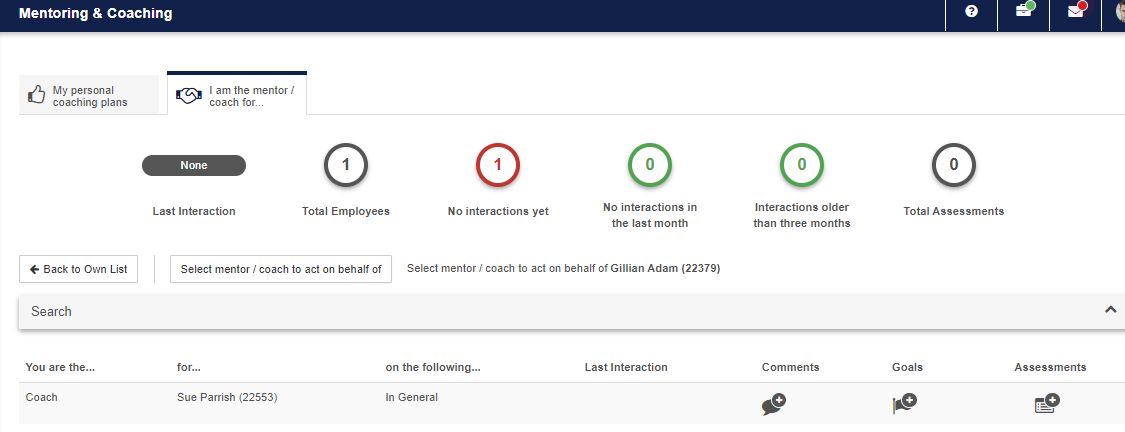
3.6 Act on behalf of a mentor/coach
- When going back to the LMS you also have the option to act on behalf of a mentor or coach
- A mentor/coach can be chosen from the list
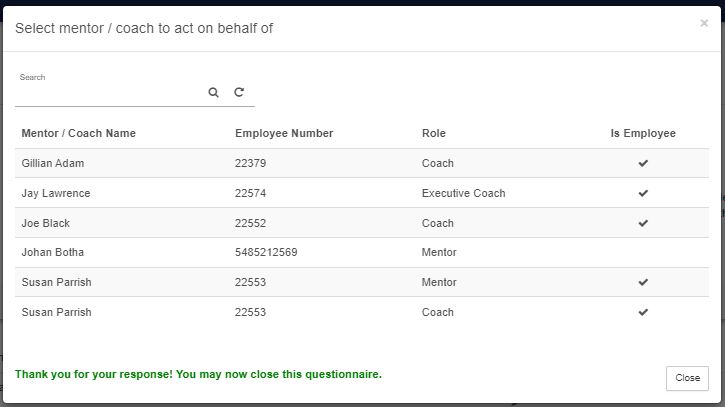
- All employees will be seen that is linked to the mentor/coach

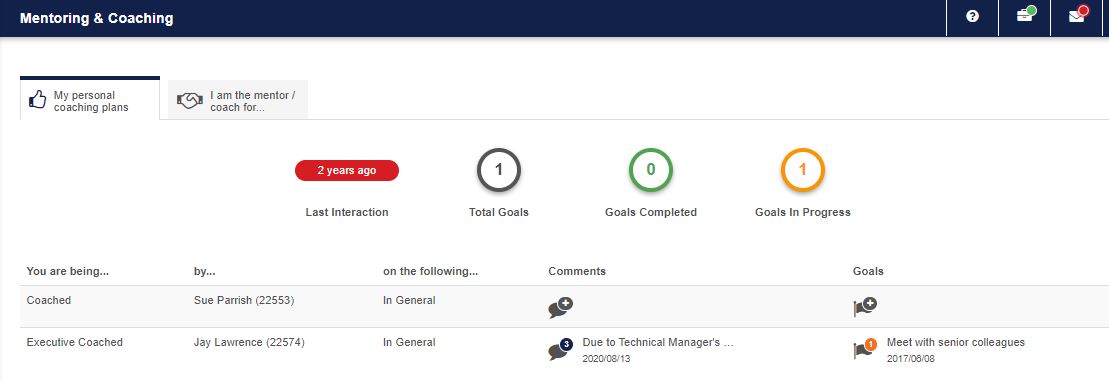
3.7 Employee View
- From the Mentor & Coach Plans screen the employee can view their mentoring and coaching plans.

- Nothing can be edited from this screen.
- Clicking on the goals link will open up the coaching plans screen.

4.1 Training Interventions for Coaching Assessments
WHY: A Training Intervention should always be created when the end result of a task is a Learner Record. The name of the Assessment and that of the Learner Record should be exactly the same.
WHERE: The path to Training Interventions List is System Administration | Database | Training Interventions.
- Here you can add and edit Training Interventions.
- Training Interventions can also be disabled, but never deleted.
- Please note that the Pathway Step Type should be Assessment otherwise this will not be available for selection in Assessment Builder.

5.1 Coaching Assessments
WHY: The Coaching Assessment is used in Mentors and Coaches. The following section will explain how the assessment is built. Here you are able to add and edit Assessment Categories, add and edit Assessments and delete categories and assessments.
WHERE: The path to Assessment Builder is System Administration | Modules | e-Learning | Assessment Builder.
5.2 Question List
Before an assessment can be compiled all the questions should be added to the system.
- Select Assessment Builder | Question List

- The Question Management screen opens.

- From here the user can add, edit and delete categories and questions
- Answers should also be added to questions; or answer groups linked to the question.
- Note: Indicate on the question whether a comment box should display as well as whether the comment should be mandatory.
5.3 Answer Groups
- To set up Answer Groups select Assessment Builder | Answer Groups

- The Answer Groups screen will display.
- From here you can create answer groups that can be added to questions.

5.4 Add Assessment Category
- Click on the Root node ‘eAssess Assessments’
- Then click on ‘Add Assessment Category’

5.5 Assessment Category Detail
- Provide an ‘Assessment Category Description’ and click on ‘Save’

5.6 Categories
- To add a new category, click on ‘Add’; multiple Categories can be loaded(this is not a compulsory step).

5.7 Assessments
- Add an assessment.
- Note that the type HAS to be coaching assessment in order to be viewed from mentoring and coaching.
- Also remember that the Training Intervention should already exist before creating the assessment, should it be required that a learner record is created from the assessment. (See Training Intervention creation in the next section.)

- After the assessment has been created, Questions should be linked to the assessment from the ‘Question Section’ on the screen.

User Manual - Learnerships
What is a Learnership?
A learnership is a structured learning process for gaining theoretical knowledge and practical skills in the workplace leading to a qualification registered on the National Qualifications Framework (NQF). Learners participating in a learnership have to attend classes at a college or training centre to complete classroom-based learning, and they also have to complete on-the-job training in a workplace under the guidance of a mentor. The workplace experience must be relevant to the qualification.
Learnerships are directly related to an occupation or field of work, for example, electrical engineering, hairdressing or project management.
During the learnership, learners will be required to complete assignments, tasks and practical tests and projects. They will be formally assessed in the classroom and a Portfolio of Evidence will be mentored in the workplace. A learner's progress will also be moderated internally and/or externally by a moderator.
If all these assignments are completed successfully, they will be awarded an NQF-registered qualification, that is recognised nationally. They will receive a certificate stating the qualification and the area of skill development.
Learnerships are managed by Sector Education and Training Authorities (SETAs). They were introduced by government to help skill learners and to prepare them for the workplace.
A learnership requires that a learner enter into a fixed term employment contract with the company whilst studying towards a qualification registered on the National Qualifications Framework (NQF), which is in line with the learnership (the cost of the qualification falls to the Company). Once the qualification is completed, the learnership will also end.
How do learnerships work?
A Learnership consists of Unit Standards, Training Interventions, Programmes and a Qualification.
- Unit Standards: A collection of knowledge, skills and attributes in which a candidate must prove competence (in a structured assessment) to acquire credits on the NQF.
- Training Interventions: Specific goals or activities to be performed by the learner during the training process e.g. Theoretical Classroom Training and provide a Portfolio of Evidence Document.
- Programmes: A grouping of unit standards will form a occupationally based learning programme.
- Qualification: A group of programmes and unit standards that have been clustered together to make up a registered qualification. There are 3 types of qualifications on the NQF: certificates (120cr), diplomas (240cr) and degree (360cr). The number of credits needed to graduate varies from learnership to learnership.
Working with the Learnership Module
Steps in the Learnership Process
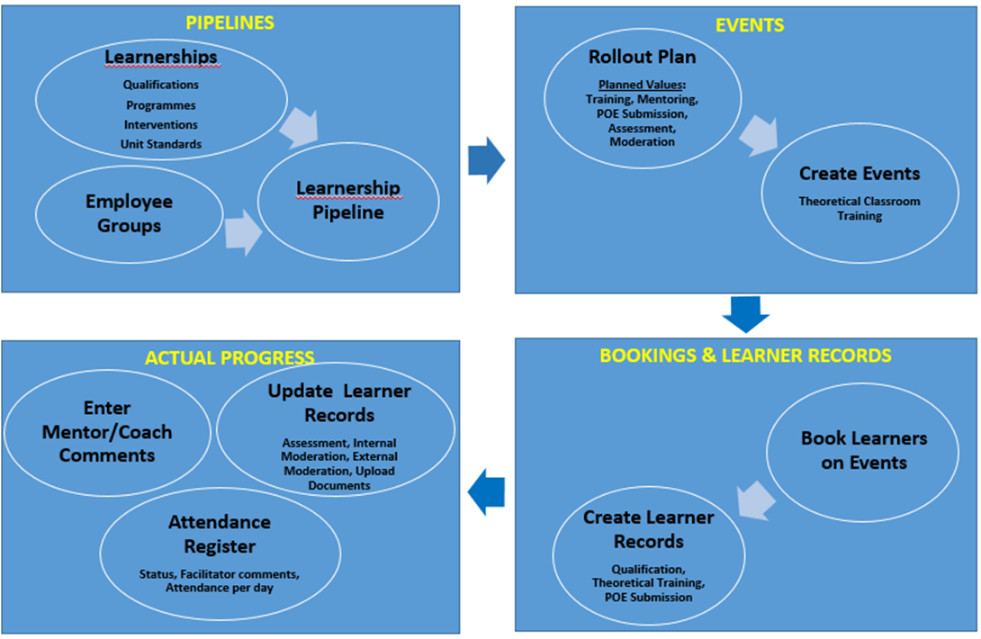
The following detail steps illustrate the typical Learnership process in the Signify System. A Learning Administrator will have access to perform the following actions:
- Master data is created for the Learnership linked to a qualification, programmes, interventions and unit standards.
- Facilitators, assessors, moderators, mentors and coaches are defined in the master data catalogue.
- A learner group is created.
- Create a pipeline by linking the learner group to a Learnership.
- A planned schedule with training dates for all programmes on the Learnership. (Rollout Plan) is created manually. All the learners registered for the Learnership can now receive a Learnership Rollout Plan.
- An automated procedure creates a relationship link between the Line Manager and Employee’s POE training interventions. The Learning Administrator can also manually link mentors/coaches to the employee’s training interventions.
- Training events for all the programmes are created for the Learnership using a bulk procedure.
- All the learners on the Learnership pipeline are booked on events, by using a bulk procedure.
- Learner records for all the employees on the pipeline are created, by using a bulk procedure.
- The learner do formal theoretical classroom training on programmes by completing the unit standards defined in the Learnership Programmes.
- An attendance register is maintained per day. A paper attendance register has to be sent to the Training Department before 10:00 on the day of the event to allow phoning absent attendees. The facilitator or Learning Administrator can enter progress and comments on the learner’s classroom training progress.
- After the learner has completed the formal theoretical training and is find to be competent, the learner will start with the following activities in the listed order: workplace mentoring, POE submission, assessing the POE, internal moderation and external moderation. (Only a sample of learners will be selected for external moderation).
- Update the actual progress on the learner records for the above mentioned activities.
- More than one actual can be captured per activity.
- Capturing of workplace mentoring comments can be done by Mentors, Coaches or Learning Administrator.
- Capturing of POE submission, assessing the POE, internal moderation and external moderation information.
- The Acadamy do the application for certificate or diploma from SETA. After the learner successfully completed all the programmes/unit standards on the Learnership. The pipeline status can be set to “Pending Certificate” by the Learning Administrator.
- After the certificate was received the pipeline status can be set to “Completed”.
- Learners receive the qualification.
- Close the Learnership group by changing the Active Indicator = “No”.
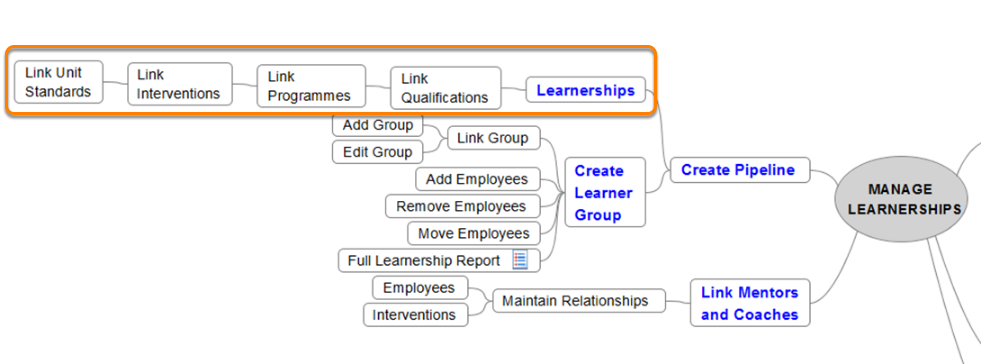
How to Create a Learnership using Master Data
In this section you will learn how to create a Learnership by using the following steps:
- Create Unit standards
- Create Training Interventions and link Unit Standards
- Create Programmes and link Training Interventions
- Create Qualification and link Programmes
- Create a Learnership and link Qualification
Learnership Master Data Mind Map
How to Work with Unit Standards

HOW DID I GET HERE?
System Administration | System Administration | Database | Standards
Unit Standard List Screen

The Unit Standard List Screen shows a list of Unit Standards.
- Add, Edit and Delete functionality exists in order to maintain Unit Standards.
- The System Administrator is responsible to maintain the Unit Standards catalogue.
Unit Standard Details Screen

Note on the following when adding or editing the Unit Standards:
- The accuracy of the credits field is important, because this field will be used to calculate the total credits (to be earned/completed) for programmes and learnerships.
- Training Intervention Sync Mode should be "Do not create/update learner record"
How to Work with Training Interventions

HOW DID I GET HERE?
System Administration | System Administration | Database | Training Interventions
Training Intervention List Screen
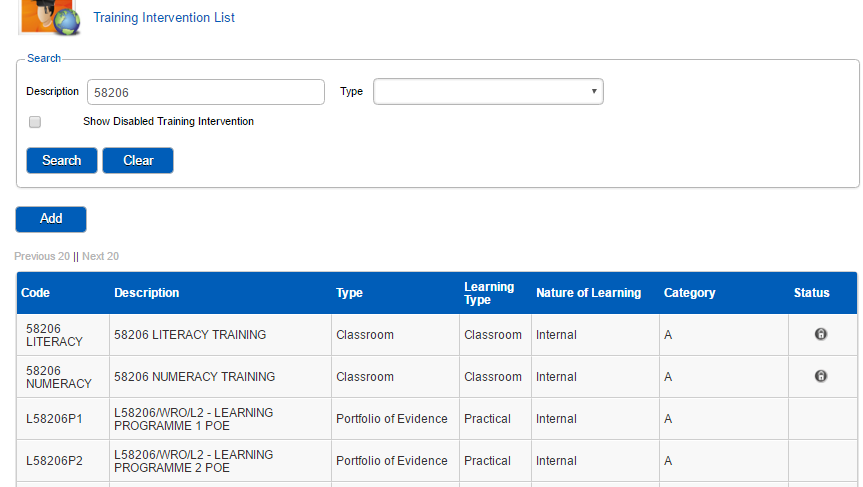
The Training Intervention List Screen shows a list of Training Interventions.
- Add and Edit functionality exists in order to maintain the Training Interventions.
- The System Administrator is responsible to manage and maintain the Training Intervention catalogue.
Training Intervention Detail Screen

Note on the following when adding or editing the Training Interventions:
- All the mandatory fields are marked with an asterisk(*).
- It is important to note that the Pathway Step Type field on the intervention have to be defined as “Classroom” for all the Theoretical Training Interventions. The classroom interventions will be used in the "Create Events" procedure, later in the learnership management process.
- The intervention credits field will only be used in reporting by the Learnership Module, only the unit standard credits will be used in credits calculations.
- Tick the Mentor Manual Update check box for training interventions that should not be included in the automated procedure to assign the Line Manager as a Mentor on the Training Interventions. (A classroom intervention will be marked, because it will not be mentored by the Line Manager)
- Check the "Add to Learner Record" check box.
Link Unit Standards to Training Interventions

Link the predefined unit standards to the training interventions using the “Link Unit Standards” tab.
How to Work with Programmes

HOW DID I GET HERE?
System Administration | System Administration | Database | Programmes
Programmes List Screen
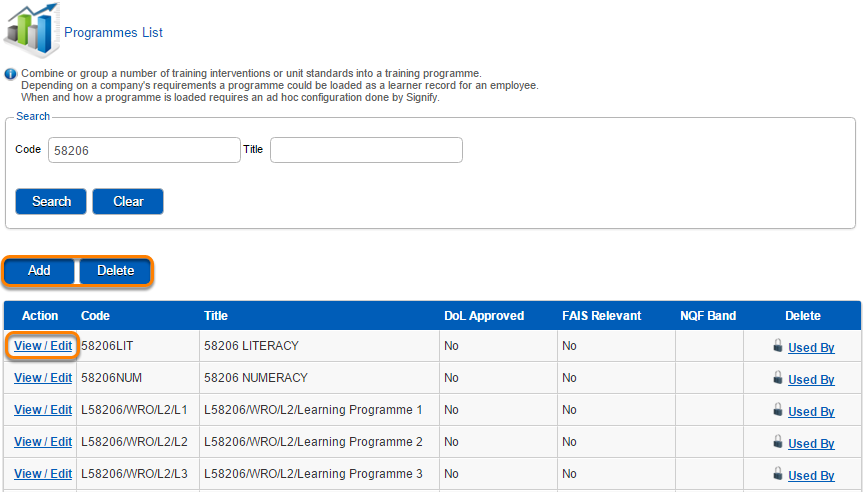
The Programmes List Screen shows a list of Programmes which consists of a number of Training Interventions.
- Add, Edit and Delete functionality exists in order to maintain the Programmes.
- The System Administrator is responsible to manage and maintain the Training Programmes catalogue.
Programme Detail Screen

Link Training Interventions to Programmes
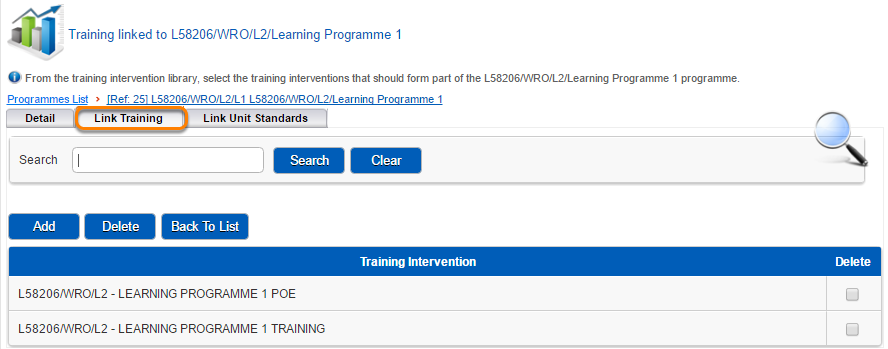
Link the predefined Training Interventions to the Programmes using the “Link Training” tab.
How to Work with Qualifications

HOW DID I GET HERE?
System Administration | System Administration | Database | Qualifications
Qualifications List Screen
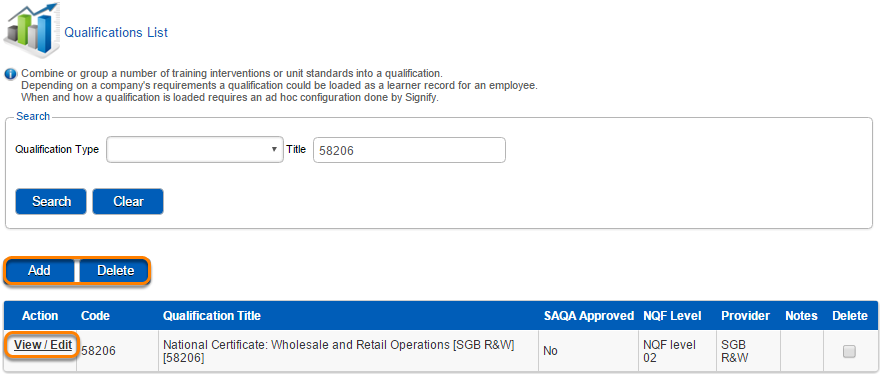
The Qualifications List Screen shows a list of Qualifications.
- Add, Edit and Delete functionality exists in order to maintain the Qualifications.
- The System Administrator is responsible to manage and maintain the Qualifications catalogue.
Qualifications Detail Screen

The important fields to be entered on the Qualification screen are shown above.
Note: Skills Programme Synchronisation Mode should be set to "Automatically update the status of an existing learner record if all conditions are met".
Link Programmes to Qualifications

Link the predefined Programmes to the Qualification by using the “Link Programmes” tab.
How to Link a Qualification to a Learnership

HOW DID I GET HERE?
System Administration | System Administration | Database | Learnerships
Learnerships List Screen

The Learnerships List Screen shows a list of Learnerships.
- Add, Edit and Delete functionality exists in order to maintain the Learnerships catalogue.
- The System Administrator is responsible to manage and maintain the Learnerships catalogue.
Learnerships Detail Screen

What are the Steps in the Learnership Process
Continue with the following steps after the creation of all the learnership master data and catalogues. The detail description and function of the learnership management steps are as follows:
Create a Learner Group:
A learner group is a group of learners that is going to be trained as a group.
Create a Learnership Pipeline:
A learnership pipeline is defined by a learner group linked to a learnership for a specific time period.
STEP 1 (Planned Values):
The manual capturing of planned values (rollout plan detail) for all the programmes on the learnership pipeline.This action can be done as soon as the planning information for the learnership and programmes are available.
STEP 2 (Create Events):
The bulk creation and scheduling of all the "Theoretical Training" events for all the Programmes on the learnership pipeline. Events will be created for classroom type interventions only. It is important that the planned values (STEP 1) are entered first before events can be created because the planned start dates and planned end dates will be used to schedule the events.
This action can ideally be done a month before the course start date.
STEP 3 (Book learner group on events):
After events have been created in Step 2, a group of learners can now be booked on the events. It is important that the events were created correctly before the bulk procedure is used to book all the learners on the learnership on events. An email can be send out to the learners reminding them that they have been booked on a course.
This action can ideally be done a week before the course start date.
Enter Mentor/Coach Relationships:
This action involves the creation of a list of employee’s interventions that have to be mentored or coached by a specific mentor or coach. A pre-defined mentor will be linked to a learners’ interventions. This action can be done any time after STEP 3.
STEP 4 (Create Learner Records):
After learners have been booked on the events, learner records will be created by means of a bulk procedure. Examples of learner records that will be created are:
- A qualification learner record.
- The learner’s training interventions linked to the programmes for the learnership e.g. Theoretical Training, POE Submission.
The creation of learner records can be done directly after STEP 3.
STEP 5 (Event Attendance Register):
Update learner’s attendance records on the day of the theoretical training session or soon thereafter. Attendance information that can be captured for the training intervention learner record are: competency and completion statuses, facilitator comments as well as attendance per day.
Enter Mentor and Coach Comments:
After the theoretical training session has been completed successfully by the learner, the mentor or coach can make multiple comments on a learner’s progress during the workplace mentoring phase. Comments by mentors and coaches can be captured on a learner’s training interventions.
This action can be done after the theoretical training activity has been completed successfully and the mentor and coach relationships have been created.
STEP 6 (Update Employee learner records):
In addition to the updating of attendance on learner records, additional comments can also be captured by assessors and moderators per learner record. Documents can also be uploaded on the learner records.
STEP 7 (Programmes Actuals):
The detail information on the actual progress for the Programmes per learner can be viewed at any time during the learner’s training process.
Working with a Learner Group
A Learner Group is a predefined group of learners to be scheduled and trained as a group on a Learnership. The criteria for grouping learners is the Learnership as well as the location where training will take place.
Learner Group Mind Map
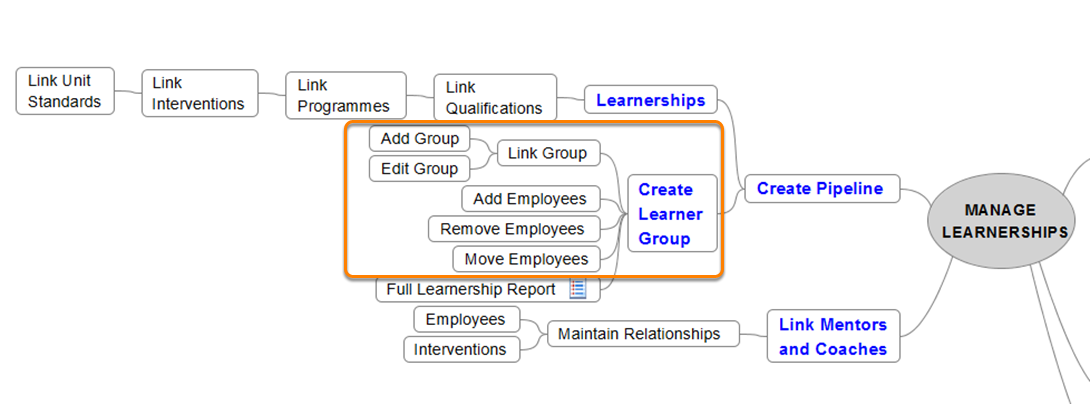
How to Work with a Learner Group

HOW DID I GET HERE?
System Administration | Modules | eLearning | Learning Management | Learnership | Learner Groups
Learner Group List Screen

- A learner group is defined by a descriptive name to be used when managing a group of learners that is going to be trained as a group.
- A list of existing learner groups will be displayed.
- Functionality to add a new group, edit an existing group and delete a group is available to maintain the Learner Groups.
- A group cannot be deleted when employees have been linked to the group. The linked employees should be deleted first, before a group can be deleted.
- Change the active indicator field = “No” to indicate that a learner group is no longer in use.
- The Link Employees functionality is used to add new employees to the group.
- The Learning Administrator is responsible for creating and maintaining the learner group catalogue.
How to Link Learners to a Learner Group

A list of learners is displayed when you click on the "Link Employees" link on the Action button on the Group List Screen.
- These learners will typically be from the same region and will do the same Learnership and will therefore be booked on events as a group.
- Add a new learner to the learner group: A selection screen will be displayed to filter and select employees to add to the group. Only employees linked to an organization structure can be added to the group. An employee can be linked to more than one group at a time.
- A learner can be removed from a group: All history data (event bookings, learner records etc.) will not be deleted. A manual action is necessary to delete the history where necessary.
- Move a learner to another group: New events, bookings and learner records will be created in the new group. Manually remove events, bookings and learner records from the old learner group if necessary. History of completed/attended events will not be deleted.
- A learner can be scheduled in more than one pipeline at the same time. There can be a potential double booking of learners on events that should be manually managed by the Learning Administrator.
- The Learning Administrator is responsible for creating and maintaining the learner group employee list.
Working with a Learnership Pipeline
A Learnership Pipeline is a predefined group of learners to be scheduled and trained as a group on a Learnership for a specific pipeline period.
Learnership Pipeline Mind Map
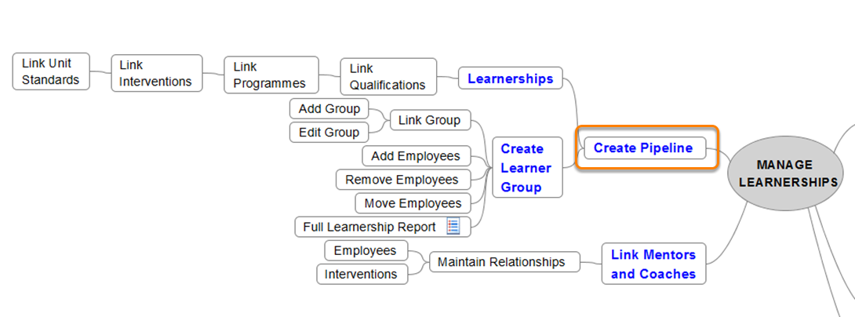
How to Work with a Learnership Pipeline

HOW DID I GET HERE?
System Administration | Modules | eLearning | Learning Management | Learnership | Learner Groups
Learnership Pipeline List Screen
- The “Learnership Pipeline Screen” is the starting point for the whole learnership management process.
- A list of all the learner groups linked to learnerships will be display on the Learnership Pipeline List Screen.
- The list can be filtered by: Group, Learnership, Qualification, Begin date, End Date, Status and Region.
- Functionality to Add and Edit of a Pipeline is available.
- Note that a pipeline cannot be deleted once it has been created. It can only be edited and the learners within the learner group, can still be changed. In the case of pipeline wrongfully created, change the status to ‘Cancelled’
- The System/Learnership Administrator is responsible for creating and maintaining the pipeline list.
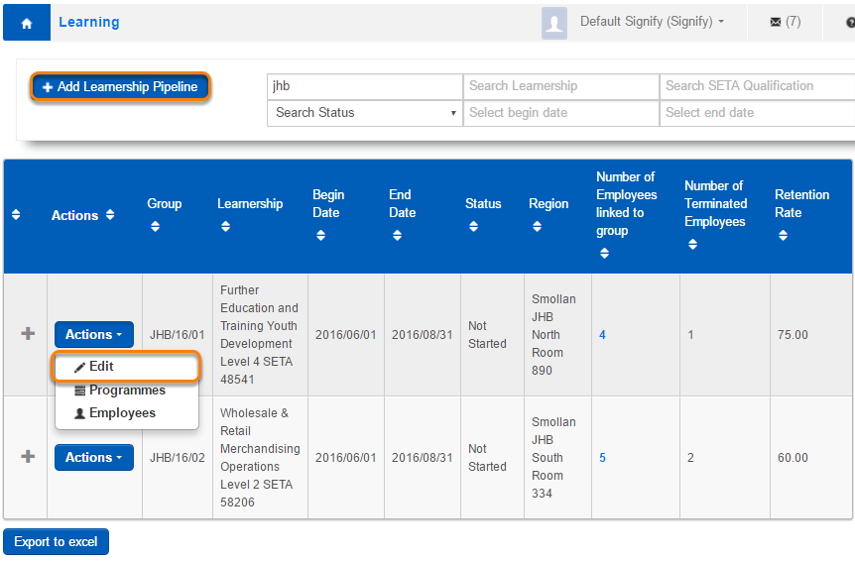
How to Add a Learnership Pipeline
To add a new learnership pipeline, click on the Add Learnership Pipeline button on the Pipeline List screen.
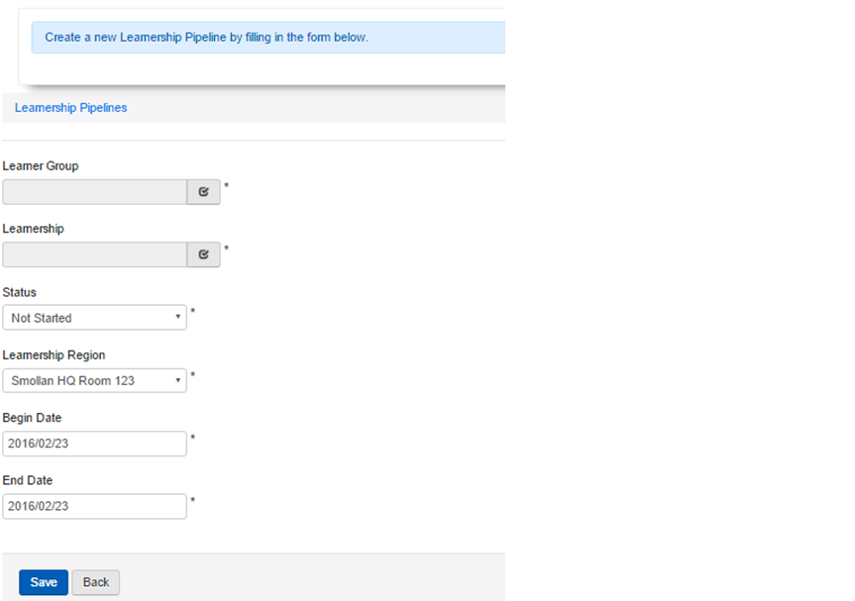
The following information is available to be entered on the Add a Pipeline screen:
- Learner group drop down: list of all the active learner groups.
- Learnership drop down: list of all the registered learnerships.
- Status dropdown: list with hardcoded values: Not Started, In Progress, Pending External Verification, Pending Certificate, Completed and Cancelled.
- Learnership Region: Populate drop down list from Event Management Region.
Note: On adding of a pipeline a warning message should be displayed: “Are you sure you want to create this pipeline, because once created, the pipeline cannot be changed.”
How to Manage the Learnership Pipeline

The steps in managing a learnership are dependent on each other. It is therefore important to complete the steps in a certain order as shown in the mind map above:
STEP 1: Enter planned values
STEP 2: Create Events
STEP 3: Book Learner Group on Events
STEP 4: Create Learner Records
STEP 5: Attendance Register
STEP 6: Update Learner Records
STEP 7: View and Update Actuals
How to work with Learnership Pipeline Programmes
HOW DID I GET HERE?
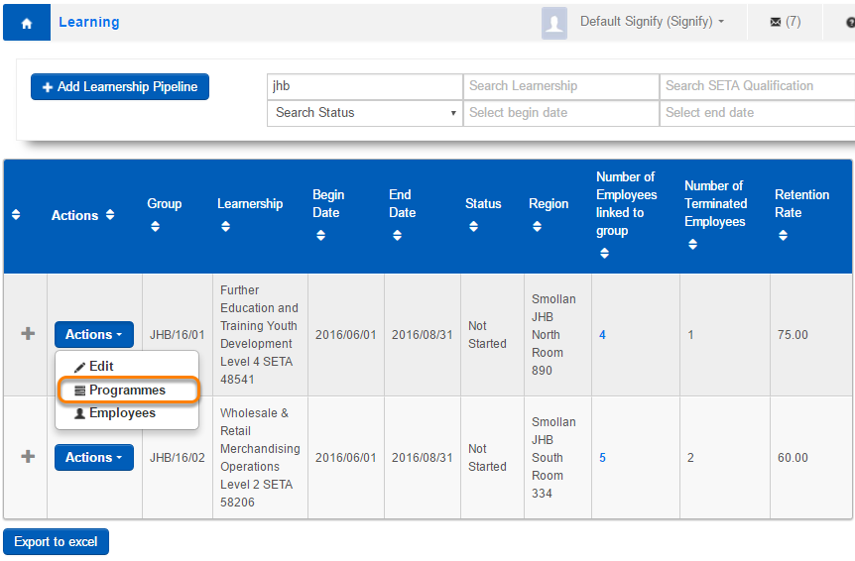
System Administration | Modules | eLearning | Learning Management | Learnership | Pipelines | Programmes
The first step in the learnership process is to create the Rollout plan with planned values. To enter planned values click on Programmes in the Actions drop down list on the Learnership Pipeline List screen.
Learnership Pipeline Programmes List Screen

- A list of all the programmes linked to the selected learnership will be displayed.
- The following functionalities are available per programme:
- Enter planned values that will be used for generating the rollout plan and events.
- Display learner records with the opportunity to enter assessment and moderation detail as well as upload documents.
- It is important that the planned values be entered first, before you can continue with Step 2, i.e. “Create Events”.
- Only the System/Learnership Administrator can execute the actions on this screen.
STEP 1 (Planned Values):
The first step in the learnership process is to capture planned values (rollout plan detail) for all the programmes in the list by selecting Planned Values in the Actions dropdown.
STEP 1: How to Work with Planned Values (Rollout Plan)

The System/Learnership Administrator is responsible for maintaining the Rollout Plan detail. There are mainly two types of interventions i.e. Classroom and POE Submission used when entering planned values.
The Classroom Intervention:
- On the Rollout Plan Detail screen, select the Theoretical Training Classroom intervention from the dropdown list on top of the screen.
- Only the Training Start Date and Training End Date are mandatory fields and will be used when events are created in Step 2. However all the values should be filled in for the Classroom intervention because these values will be printed on the Rollout Plan report.
The POE Submission Intervention:
- On the Rollout Plan Detail screen, select the POE Submission intervention from the dropdown list on top of the screen.
- Only the Training Start Date and Training End Date are mandatory fields and will represent the planned POE Submission date.
- The Training Start Date and Training End Date will be used to create the POE Submission learner records later in the Learnership process.
- For reporting purposes the POE submission date should also be entered for the POE Intervention.
After the values have been entered and saved you can use the Rollout Plan report to validate the inputs. This is an important step to ensure the Start and End Dates have been entered correctly because the dates will be used to create bulk events in the next step of the Learnership process.
How to Print the Rollout Plan Report

Click on the Print Rollout Plan button on the Learnership Pipeline Programmes screen to view the Rollout Plan Report.
Example of the Rollout Plan Report

STEP 2: How to Create Events

STEP 2 (Create Events):
This functionality will automatically create and schedule the "Theoretical Training" events for all the Classroom type interventions linked to the programmes in the list.
All the training start dates and training end dates for all the theoretical training interventions per programme should be entered, before events can be created.
To create events click on the “Create Events” button.
Before the actual events are created, a validation screen will be displayed, showing the outcome of the bulk event creation procedure. You can choose to continue or cancel the process.
- Events will be created automatically using the following values:
- Create an event only if the intervention pathway type = Classroom
- Ref no = The next available number
- Created Date = Today
- Created User = System/Signify
- Event Status = Planned
- Status = Not Yet Published
- Training Intervention = Intervention Name
- Start Date = Planned training start date Start Time = 09:00
- End Date = Planned training end date End Time = 16:00
- Include non-working days = Yes
- Provider = Smollan L&D (This value should be pre-defined in the “Event Management | Master Data | Training Providers” master table, otherwise the event will not be created.
- Venue = blank
- Coordinator = blank
- Send event notifications from coordinator address = No
- Facilitator = Rollout plan facilitator name or blank
- Attendees allowed: Min=0 Max=100
- Attendee bookings will be accepted up to 1 days before...
- Attendee cancellations will be accepted up to 1 days before...
- Classification = Smollan - Local
- Category = Foundational (This value should be pre-defined in the “Event Management | Master data| Training | Category” master table otherwise the event will not be created)
- Region = Learnership Pipeline | Region
- Course Type = Internal
- Intended Target Market = blank
- Terms and Conditions = blank
How to work with Learnership Pipeline Employees
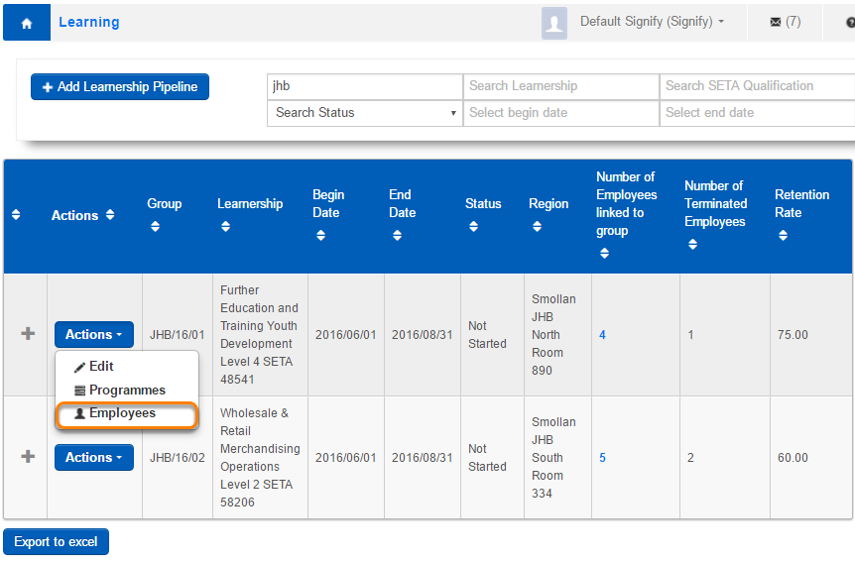
HOW DID I GET HERE?
System Administration | Modules | eLearning | Learning Management | Learnership | Pipelines | Employees
The next step in the learnership process is to book learners on events. Click on Employees in the Actions drop down list on the Learnership Pipeline List screen.
STEP 3: How to Book Employees on Events
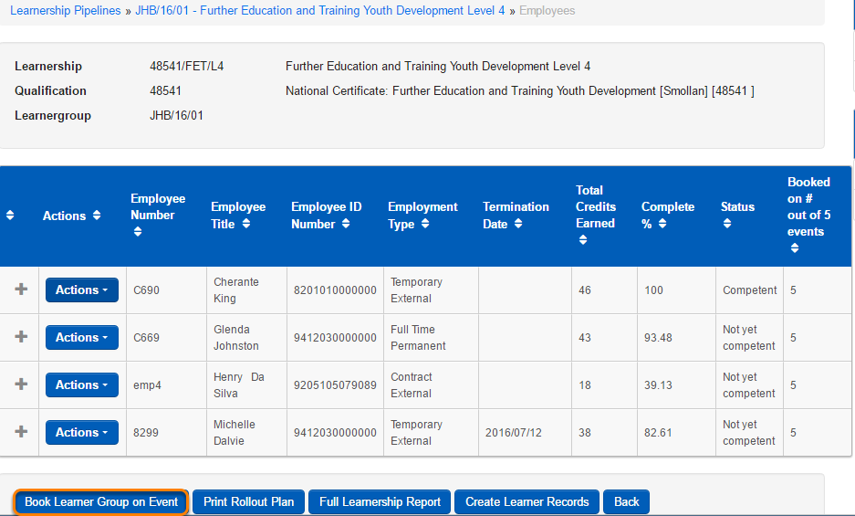
STEP 3 (Book learner group on event):
After events have been created in STEP 2, the group of learners can now be booked on the events. Click on Book Learner Group on Events button.
Before the learners are booked on the events, a validation screen will be displayed, showing the outcome of the bulk event booking procedure.
STEP 4: How to Create Learner Record
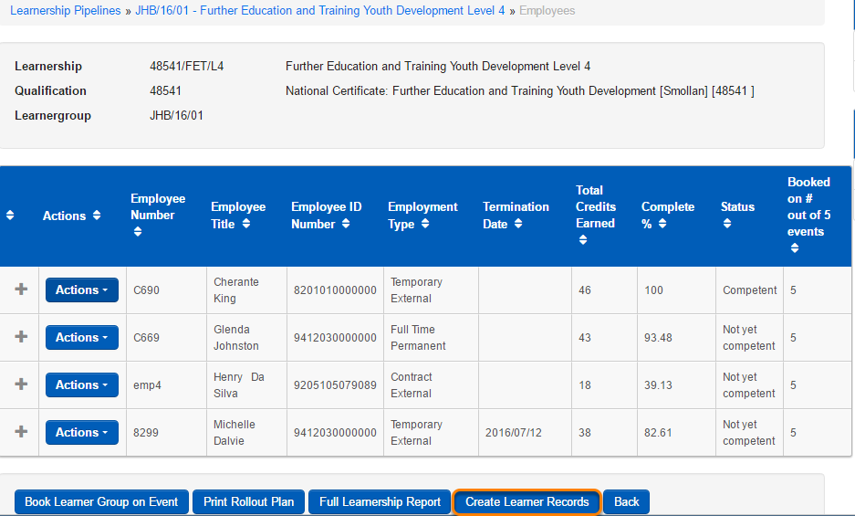
STEP 4 (Create Learner Records):
After learners have been booked on the events, learner records for all the learners can now be created.
The following learner records are automatically created for all the learners in the Learnership Pipeline when clicking on the Create Learner Record button:
- A Qualification learner record that will show total progress of the learner on the Learnership Qualification.
- A Programme learner record will indicate the progress on the Programme.
- Training learner records for all the interventions (Theoretical Training and POE submission).
How to View Learner Records
- Using the Learnership Pipeline Screen:
- System Administration | Modules | eLearning | Learning Management | Learnership | Pipelines | Programmes | Select a Programme | Employee Learner Records
- Using the Manage Employees Screen:
- Manage Employees | Select an Employee | Employee Development | Learner Records
How to Update Employee Attendance
HOW DID I GET HERE?
System Administration | Modules | Event Management | Training Scheduling | Manage Training Attendance Register
After the learners have been booked and scheduled on an event and training has started. The attendance should be captured for the learners.
Attendance is captured by a System/Learnership Administrator.
STEP 5: Update the Attendance Register per Event
STEP 5: (Attendance Register):
After learner records have been created in STEP 4 the attendance on training events can be captured.
Note: Classroom Training Intervention's Attendance Type and Competent fields can only be updated in the attendance register and NOT from the Learnership Pipeline Module.
Update the following fields in the attendance register for the whole event (that can stretch over more than one day):
- Attendance Type:Attended, No Show, Cancelled and Not Selected
- Competent: Competent, Not yet Competent,
- Facilitator Comment.
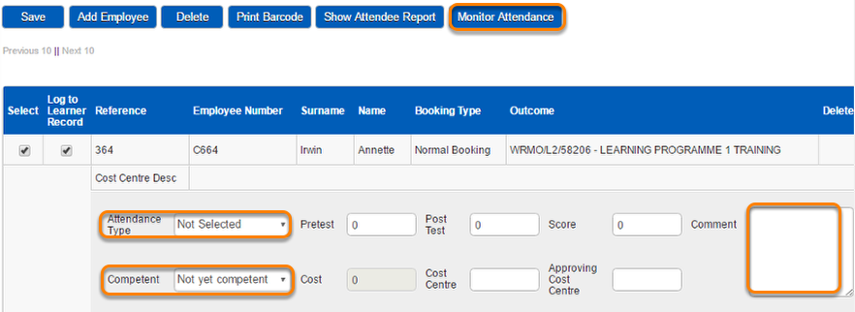
Update the Attendance Register per Event per Day

The Monitor Attendance functionality gives the user the opportunity to enter employee attendance per day. This screen will only be populated when the Attendance Type on the Attendance Register is "Attended". The attendance per day will enable capturing data for reporting purposes only.
How to Update Learner Records

HOW DID I GET HERE?
System Administration | Modules | eLearning | Learning Management | Learnership | Pipelines | Programmes | Employee Learner Records
After the attendance for Classroom Interventions have been entered, the POE Submission training intervention's status can now be updated.
STEP 6: How to the Update Learner Record Status

STEP 6: (Update Status for Learner Records):
- The following information can be captured per learner record:
- Assessment: Assessor Name, Assessment Date and Assessor Comment.
- Internal Moderations: Internal moderator Name, Internal moderator Date and Internal moderator Comment.
- External Moderations: External moderator Name, External moderator Date and External moderator Comment.
- Comments: Additional comments.
- Documents: Upload of documents.
- Classroom Training Intervention status Update:
- The user cannot update the status to "Competent" for classroom training interventions from this screen. The status will automatically be set to "Competent" when the complete and competence status for classroom interventions is updated from the Events | Attendance Register or Manage Employee | Learner Records or Attendance Register.
- The user can however update the status to ‘No Book, Absent or TBA’.
- The user cannot update the Status from Competent back to any other status on this screen. In the event that this is needed, the values should be updated from Manage Employee | Learner Records.
- POE Training Intervention status update:
- The user has the opportunity to update the status of the POE submission training intervention learner record to ‘Competent, No Book, Absent or TBA’ on this screen.
- When the Competent option is selected and saved, the Manage Employee learner record will be updated with values: Completed = ‘Y’ and Competent = ‘Y’ and Complete date = Today’s date.
- The user cannot update the Status from Competent back to any other status on this screen. In the event that this is needed, the values should be updated from Manage Employee | Learner Records.
- When a learner record’s status is updated to ‘Completed’ and ‘Competent’ from the learner record or attendance screen, the learnership status will automatically be set to ‘Competent’.
STEP 7: View and Update Employee's Programme Actuals
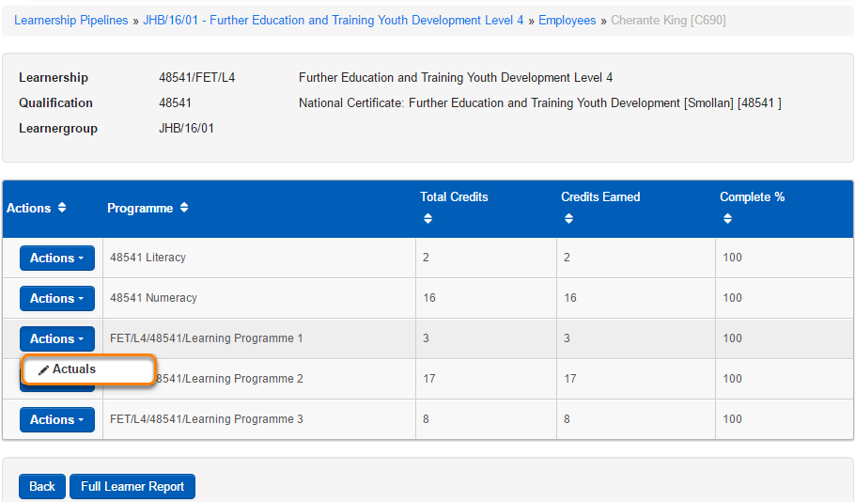
HOW DID I GET HERE?
System Administration | Modules | eLearning | Learning Management | Learnership | Pipelines | Employees | Programmes | Actuals
STEP 7 (View and Update Programme Actuals):
- View actual progress on the Programme by clicking on the “Actuals” link in the Actions drop down list.
- The learner’s programme status update on this screen will work in the same way as updating the status on the learner record discussed in STEP 6.
- A detail progress screen is displayed on screen “Employee Programme Actuals Detail”.
Employee Programme Actuals Detail Screen

Learnership Reports
Attendance Report
A report showing employee event attendance per day for the selected Learnership.

Learner Profile Report
A report showing the detail progress of a learner on a Learnership.

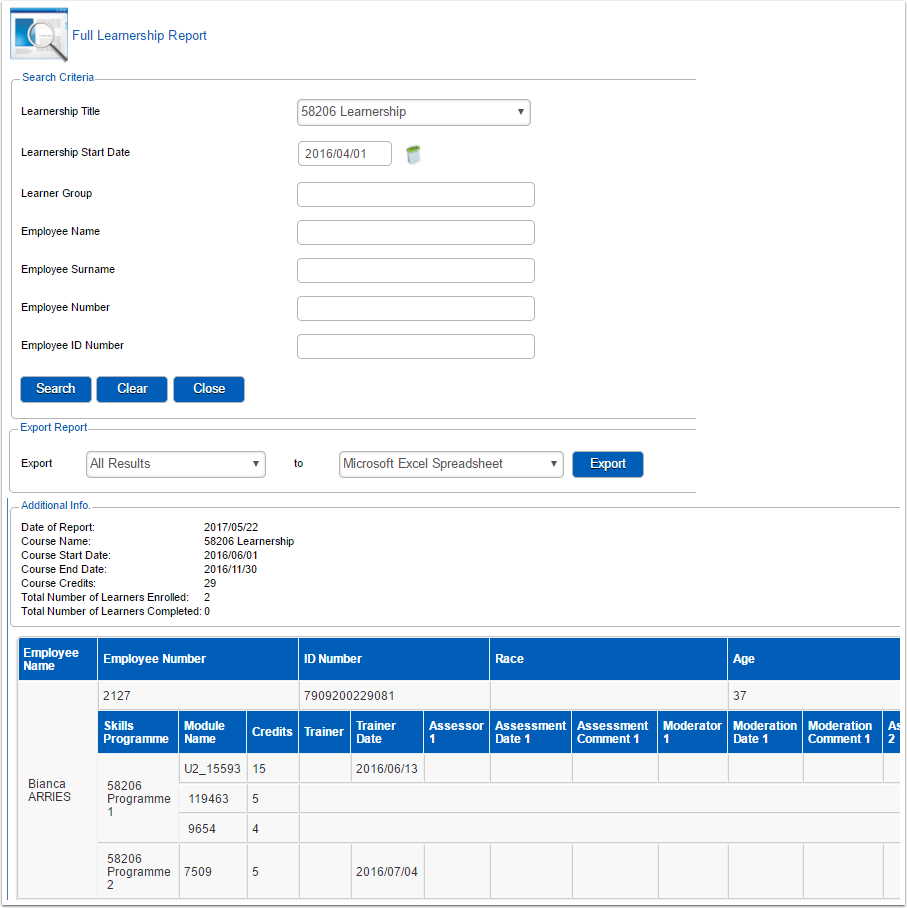
Full Learnership Report
A report showing detail of all the learners on the selected Learnership.
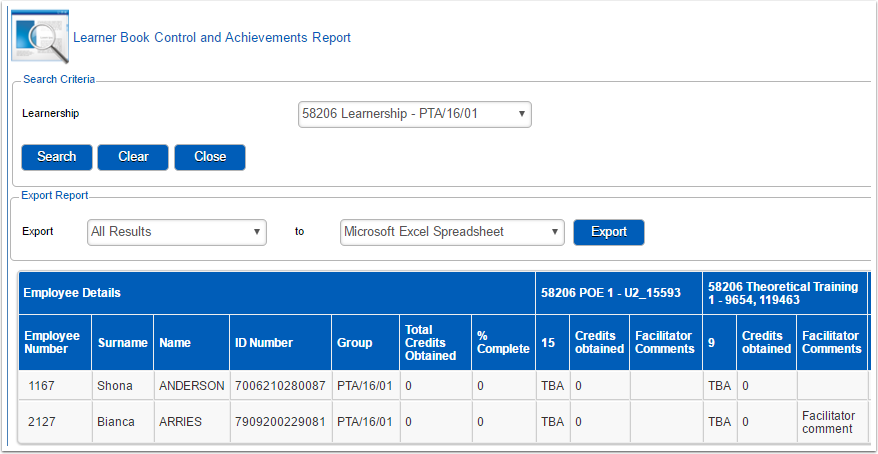
Learner book Control and Achievements Report
A report showing the number of credits obtained and percentage complete for all learners on the selected Learnership.
Rollout Plan Report
A report showing a schedule of all the training programmes on a Learnership with planned dates.

User Manual - Salary Review
1.1 Introduction to Salary Review
This module enables the manager to view his or her budget with regards to salaries. The employees’ performance ratings can be added and the salary can be reviewed accordingly. This module stands loose from the other modules and therefor no data pulls through to Salary Review.
1.2 Requirements and Set-Up
Salary Review should be switched on, on the Signify system:
Path -> System Administration | System Administration | Tools | Configuration | Framework | Configuration Settings | Human Resources | Salary Review

1.3 Required User Roles
- The only role that is required to be given is Salary Review Administrator.
- The Salary Review Administrator will be responsible for downloading the REM Channel Codes and Reporting Lines, completing them and uploading both (this will be explained in detail), setup the Period, undo Submissions and move Managers and Employees.
- The Salary Review Administrator Role can be found at System Administration | Users | Manage Users | Employee search | Role Assignment

2.1 Step 1: Define an Active Period
WHY: This section assists the administrator in adding an Active Period
WHERE: From the system portal, click System Administration | Modules | Salary Review | Period

- If there is no active Period, click on Add to create a new active period

- The newly created Period can be Viewed and Edited

- Complete all applicable fields
- Mandatory fields include:
- Period
- Start Date
- End Date
- Global Increase Percentage
- Code of Conduct - Title, Description and Acceptance Text

2.2 Step 2: Download and Upload of REM Channel Codes Template
WHY: This section assists the administrator in downloading the REM Channel Codes, completing them and uploading them
WHERE: From the system portal, click System Administration | Modules | Salary Review | Period | Download REM Channel Codes
2.2.1 Download REM Channel Codes Template
- These codes must be downloaded first
- Click on “Download REM Channel Codes Template”

- Complete the Template
- These are the remuneration brackets and once uploaded it will be plotted on the graph

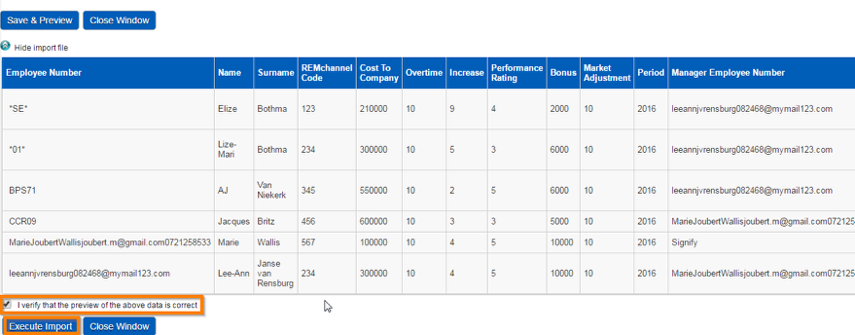
2.2.2 Upload REM Channel Codes Template
- Click on “Upload REM Channel Codes Template”

- A page will open where you are prompted to choose the file
- Choose the template that you completed and saved
- Click then Save and Preview

- If the data is correct, tick the verify box and select Execute Import

2.3 Step 3: Download and Upload of Reporting Lines Template
WHY: This section assists the administrator in downloading the Reporting Lines Template, completing them and uploading them
WHERE: From the system portal, click System Administration | Modules | Salary Review | Period | Download Reporting Lines Template
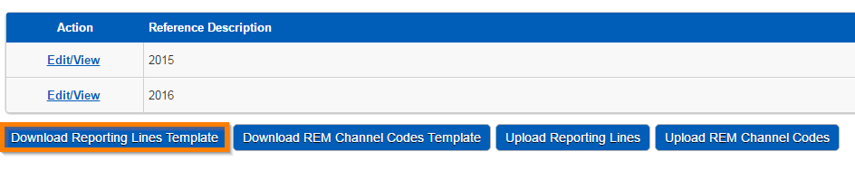
2.3.1 Download Reporting Lines Template
- The most recent template will download with information regarding the last uploaded template
- Click on “Download Reporting Lines Template”
- Complete the Template with the following information:
- Employee number
- Name
- Surname
- REM Channel Code
- Cost to Company
- Overtime
- Increase
- Performance Rating
- Bonus
- Market Adjustment
- Period
- Manager employee number
- Manager Name
- Manager Surname

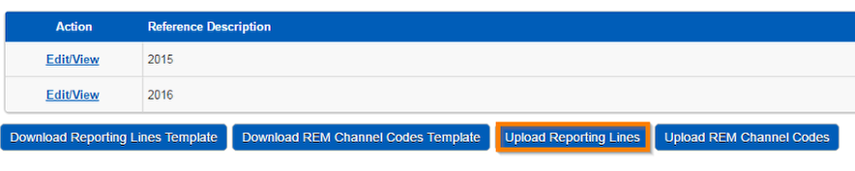
2.3.2 Upload Reporting Lines Template
- After completing the template, save a copy.
- Click on “Upload Reporting Lines Template”
- A page will open where you are prompted to choose the file
- Choose the template that you completed and saved
- There are two options choose from:
- Upload entire list and remove existing data
- Upload only this information and keep existing data as is
- Click then Save and Preview


- If the data is correct, tick the verify box and select Execute Import
2.4 Step 4: Ratings
WHY: This section assists the manager to see the summary information of the employees reporting to him as well as the subordinate managers and employees.
WHERE: From the system portal, click System Administration | Modules | Salary Review | Ratings
2.4.1 Code of Conduct
- Accept the Code of Conduct

- You will be prompt to confirm your password

- On the screen that is shown, all the imported data from the template will display
2.4.2 Summary Information Tab
- On this page all the employees that report to you as a manager are displayed on this page
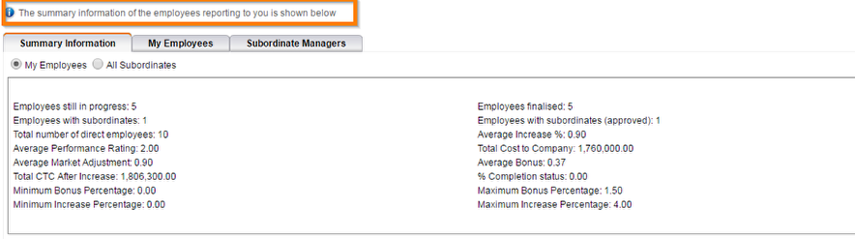
- A graph of the Cost To Company (CTC) of the employees and on which Quartile the employee fall into are shown

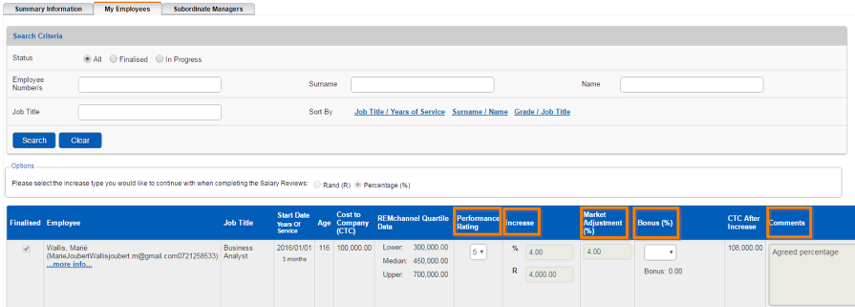
2.4.3 My Employees Tab
- The Manager’s employees are displayed on this page
- The increase type can be selected in Rand (R) or Percentage (%)
- The “Performance Rating”, “Increase”, “Market Adjustment” and “Bonus” does not pull through from the “Reporting Lines Template”
- These fields needs to be completed and the “Comment” field is mandatory.
- If all the fields are completed, click “Save”
- These saved data will be shown on the “Summary Information” page
2.4.4 Subordinate Managers Tab
- A list of the subordinate managers with their employees are displayed on this page
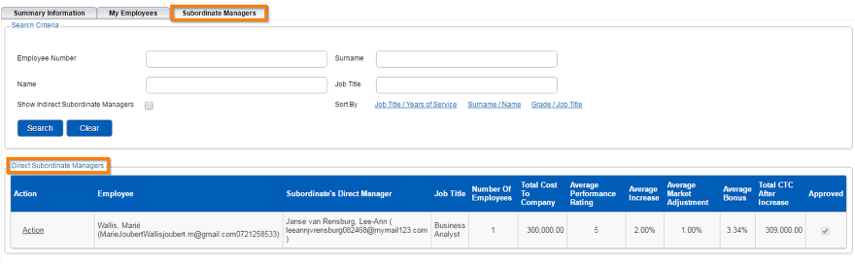
- Click on “Action” and select View Subordinate

- The Subordinate’s Manager can see who the Manager is with all their employee’s ratings for example:
- Direct Manager = Manager A
- Employee = Manager B
- Manager B = Employee A

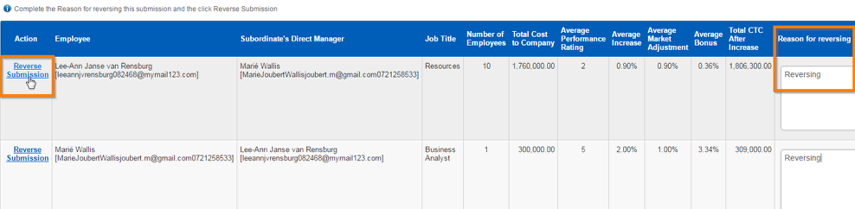
2.5 Step 5: Undo Submissions
WHY: This section assists the administrator to undo submissions that was wrongfully submitted.
WHERE: From the system portal, click System Administration | Modules | Salary Review | Undo Submissions
- Once a submission is made, it can be reversed
- A reason for reversing the submission is mandatory
- Cases where a reversing occurs will be when an employee needs to be moved from one manager to another
2.6 Step 6: Move Managers and Employees
WHY: This section assists the administrator to move managers and employees.
WHERE: From the system portal, click System Administration | Modules | Salary Review | Move Managers and Employees
- Here you can select an Employee and move them from one Manager to another
- This can only be done when NO SUBMISSION has been made
- Select an employee you wish to move
- Select the new manager by clicking on the hand icon

2.7 Step 7: Override Employee Salary Ratings
WHY: This section assists the manager to override his subordinate employees' ratings as well as his own employees without reversing a submission.
WHERE: From the system portal, click System Administration | Modules | Salary Review | Override Employee Salary Ratings
- A Manager can override his subordinate’s employees’ ratings as well as his own employees without reversing a submission
- “The reason for overriding” field is Mandatory
- On an employee, you can change the ratings percentages and submit
