eLearning - PATHWAYS
How to work with Pathways. A learning pathway is described as a carefully constructed route, taken by a learner through a range of e-learning activities. A pathway consists of digestible chunks and acts as a roadmap, guiding learners on a learning path. A pathway allows the user to build knowledge progressively.
- User Manual V8.8
- Using the Pathway Treeview
- Create a Category
- Create a Pathway (Detail Tab)
- Publish a Pathway to the Portal (Detail Tab)
- Toolbox: Types of Pathway Steps
- Build a Pathway
- Pathway Preview Tab
- Working with Pathway Steps (popular steps)
- Pathway Target Audience Tab
- SCORM Library
- Pathway Invoices
- Assignment Management
- Due Dates and Notifications
- Quick Reference Guides and Practical Exercises
- FAQ's
- Videos
User Manual V8.8
Using the Pathway Treeview
In this article, we will learn how to work with the pathway treeview. This module will be discussed from an Administrator’s perspective.
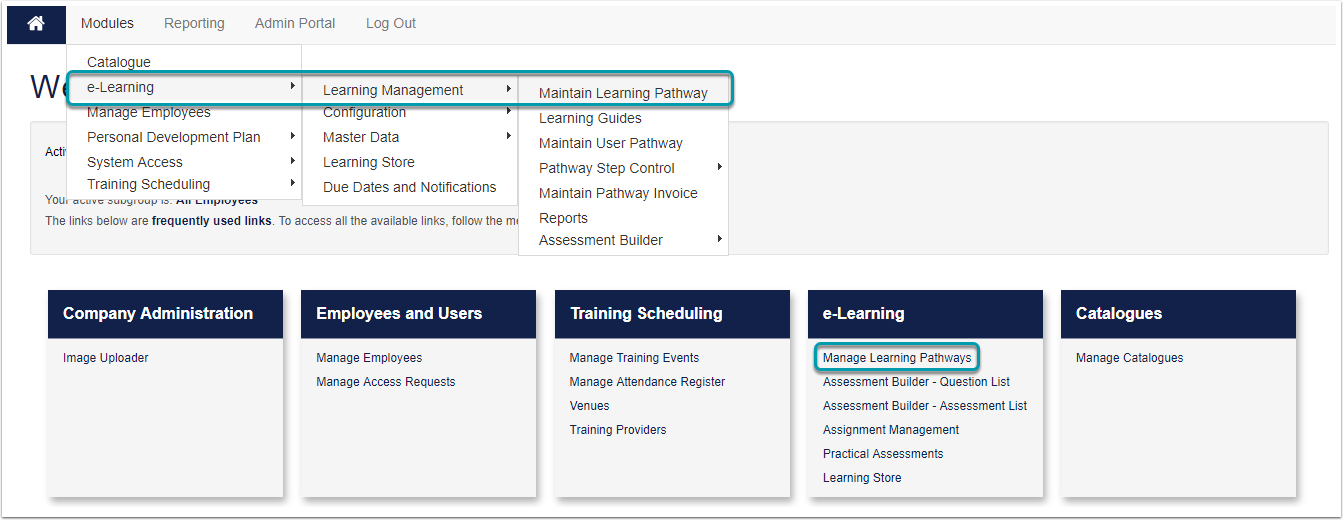
Accessing the Learning Pathway Module
Log into the Signify system. From the Home page navigate to the System Administration link in the left-hand menu. Navigate to the Maintain Learning Pathway module by using either of the paths shown below.
Working with the Treeview
Pathways are automatically grouped by their placement on the pathway tree structure. Recently functionality was added, which allows the user to drag a pathway to a new tree node or category.
The tree structure consists of Categories and Pathways. The Pathway Treeview is illustrated below.

Focus Areas: Learning Pathway screen
| Area | Description |
|---|---|
| 1. Search | The search is used to look for any pathway or category you cannot see on the treeview immediately. |
| 2. Add Main Category | When this button is selected, a new Category or folder is added to the treeview. A Pathway can be created in a Category. |
| 3. Pathway Legend | The legend summarizes the meaning of the images displayed next to a category or pathway. |
| 4. Treeview | A folder-like structure similar to the File Explorer on your computer. Categories and Pathways are displayed in the Treeview. |
Search

The following fields are available when searching within a pathway:
- Description:
- This is the name of the pathway or category.
- Published Status:
- The published status of the pathway or category.
- Example: All, not active, published to people in this schema only, published to all schemas.
- Development Status:
- The development status of the pathway or category.
- Example: All, Under Construction, Being Checked, Can be Published, Temporarily Out of Service.
- Parent Node:
- The category in which a pathway is.
- Type:
- The type of category or pathway.
- Example: All, Ad Hoc, Programme, Standard, Template Pathway.
- Programme:
- List of all the programmes in the library.
- Unit Standard:
- List of Unit Standards in the library.
- Search Button:
- Executes the search according to the criteria entered.
- Clear Button:
- Clears the Search Criteria.
Buttons and Legend

Buttons
- Add Main Category: Adds the highest level category.
- Link Existing: Link an existing pathway or category to the selected category.
- Print: Prints an image of the Pathway Treeview.
- Refresh: Refreshes the Pathway Treeview structure.
Legend
- Category Not Published: A gold lock is displayed if the category or pathway is not published.
- Category Published: A gray/blue lock is displayed if the category or pathway is published.
- Target Audience Applied: A man with a red shirt is displayed when a Target Audience is applied to a category or pathway
- No Target Audience Applied: A man with a blue shirt is displayed when a Target Audience is not applied to a category or pathway
Actions available on a Category or Pathway

- Edit: Click on Edit to edit the category or pathway.
- Add Category: Only available on categories. Adds a lower level category on the selected category.
- Add Pathway: Only available on categories. Adds a pathway to the selected category.
- Copy: Copies the selected category or pathway to a category.
Create a Category
What is a Category? A pathway category is similar to a folder on your computer. You can add a category inside a category and you can add a pathway to a category. Categories can be used to group similar pathways together.
Click ON the branch/node where you want to add your new Category. The branch you selected will be highlighted. Next, click on the Add Main Category button. This will add a Category to the highest level of the Pathway Treeview. If you want to add a Category within a Category, click on Add Category next to the selected Category.

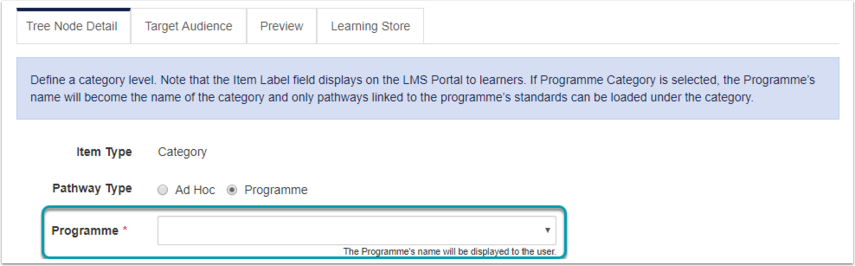
Complete the Tree Node Detail Tab
The Tree Node Detail tab contains important information related to the Category. Some of the information can be displayed on the LMS portal for an end-user.

Focus: To quickly create a Pathway Category, complete only the numbered fields.
After clicking on the Save button, click Back to List to view the Category on the Pathway Treeview.
If the Category is not displayed immediately, click the "Refresh" button to update the screen.

Overview of fields
Below is an overview of fields used when creating a new Category.
| Field | Overview |
|---|---|
| Item Type | Category |
| Pathway Type | Ad Hoc or Programme. When Programme is selected a list of Programmes created in the library is made available. Once selected this cannot be changed. |
| Item Label | The name of the node (category) as it will be displayed on both the pathway tree structure and where the category is published to. |
| Short Description | An optional description of the intent with the Category. This is displayed on the LMS portal. |
| Published Status | Not Active - Not visible to users; Publish to people in all schemas - Visible to all learners/employees in all schemas. Publish to people in this schema only - Only visible to learners/employees in the current schema; |
| Development Status | This is a Category administration status. The pathway administrator can use this status to manage pathways internally. This status has no system impact. |
| Item Order | This is the order in which the Category will be displayed on the Treeview. |
| Priority | This is the display priority of this Category on the LMS Portal. |
| Upload Image | For the image to be displayed at its best make sure the image dimensions are Height: 300 by Width: 200 px |
| Show as shortcut on LMS portal | When not selected, this item will only appear when searching, or when drilling down in categories where 'Show as shortcut on LMS portal' was selected. |
Pathway Type explained
Ad Hoc Categories can have any name and any pathways linked to them.
When the Pathway Type selected is Programme, a drop-down containing all available Programmes in the library will be displayed. Programme Categories can only have Standards linked to the Programme in the library used as Pathways.
Create a Pathway (Detail Tab)
How did I get here?
From the portal, click System Administration | e-Learning | Learning Management | Maintain Learning Pathway
How to Create a Pathway Node
Click ON the Category where you want to add your new branch. The branch you selected will be highlighted. Next, click on Add Pathway.

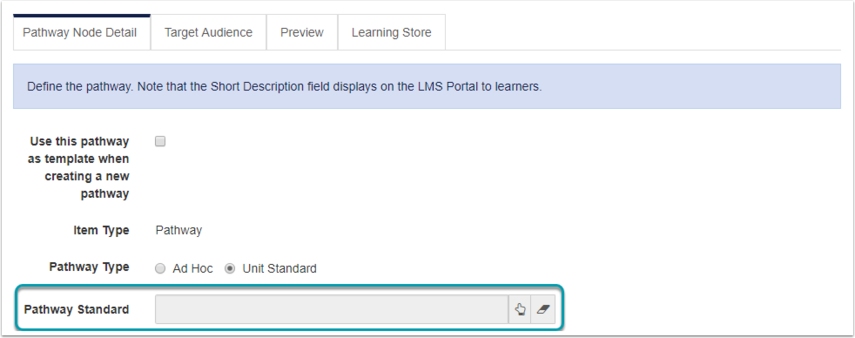
Pathway Node Detail tab
The Pathway Node Detail tab contains important information related to the Pathway. Some of the information can be displayed on the LMS portal for a learner/employee.

Focus: To quickly create a Pathway, complete only the numbered fields.
After you click the Save button, click on the Preview tab to start adding Pathway steps.
Overview of fields
Below is an overview of fields used when creating a new Pathway.
| Field | Overview |
|---|---|
| Use this pathway as template when creating a new pathway | Any Pathway can be used as a template pathway. Only one Pathway can be selected as a template pathway at any given time. |
| Item Type | Pathway |
| Pathway Type | The Type of Pathway to be created. Ad Hoc or Standard can be selected. Once selected this cannot be changed. |
| Item Label | The name of the Pathway as it will be displayed on both the pathway tree view and where it will be published to. |
| Short Description | An optional description of the intent of the Pathway. This description is displayed on the LMS portal. |
| Description Title | The title of the description of the pathway displayed when the learner/employee opens the pathway from the LMS portal. |
| Description | A more detailed description can be provided for the learner/employee to view on the LMS portal. |
| Item Status | Not Active - Not visible to users; Publish to people in all schemas - Visible to all users in all schemas. Publish to people in this schema only - Only visible to users in the current schema. |
| Development Status | This is a Pathway administration status. The pathway administrator can use this status to manage pathways internally. This status has no system impact. |
| Item Order | This is the order in which the Pathway will be displayed within the Category on the Treeview. |
| Priority | This is the display priority on the LMS Portal of this Pathway. |
| Upload Image | For the image to be displayed at its best make sure the image dimensions are Height: 300 by Width: 200 px |
| Show as shortcut on LMS portal | When not selected, this item will only appear when searching, or when drilling down in categories where 'Show as shortcut on LMS portal' was selected. |
| Auto Start Pathway | When this option is selected an interactive Pathway Step will start automatically when an end learner/employee opens a pathway. This option can only be selected for Pathways with one step which meets specific requirements. The system automatically validates if the step type in the pathway qualifies as an interactive step. |
Pathway Type Explained
Ad Hoc Pathways can have any name.
When the Pathway Type selected it Standard, a list of Standards will become available for selection. When the Category for the Pathway is a Programme Category, only Standards linked to that Programme in the Library will be available for selection. When the Category for the Pathway is an Ad Hoc Category, any Standard can be selected. When a Standard is selected, the learner will receive a Standard learner record upon completion of the Pathway.
Publish a Pathway to the Portal (Detail Tab)
Why publish a Pathway? To make it available to a learner or selected group of learners.
Note: For this section, it is assumed that you already have an understanding of how to create and edit a Pathway.
How do you know your Pathway is ready to publish?
Ask yourself the following questions:
- Is the direct and/or indirect Category published?
- Does the Pathway include all the steps I want the learner to complete?
- Are the steps in the correct order?
- Have the Prerequisites been setup correctly?
- Have I confirmed that Log To Learner Record is checked on the steps I want to report on? Is Log to learner record checked on the assessment?
- Has a Pilot group completed the Pathway to confirm there are no spelling errors on the steps or in the content?
- Is the Target Audience setup and have I refreshed it?
If the answer is Yes to all, you are ready to publish your Pathway.
Note: The steps followed in this article can be completed to publish a category as well.
How to publish your Pathway
Login to the Signify HR system. From the Home page navigate to the System Administration link in the My Quick Start Menu. Navigate to the Maintain Learning Pathway module as shown below.

On the Pathway Treeview, find and expand the Category nodes and then click ON the pathway you want to publish.
Click on the Pathway Node Detail tab when the Pathway opens.

Focus: To quickly publish a Pathway, update only the numbered fields.
After you click the Save button, go to the LMS portal and confirm that your Pathway is displayed on the portal.
The pathway takes between 10 - 15 minutes before the Portal is refreshed and the Pathway is displayed.
Overview of fields
Below is an overview of fields used when publishing a Pathway.
Before you begin to update the fields, confirm that you are :
- Working on the correct Pathway and
- On the Pathway Node detail tab.
| Field | Overview |
|---|---|
| Item Status | Update the item status to:
|
| Development Status | This is an Administration status and does not have an effect on if the Pathway is published, but make sure to update the Development Status to Can be Published when you are ready to publish the Pathway. |
| Priority | Update the Priority value to the order you want the Pathway to be displayed on LMS Portal. |
| Show as shortcut on LMS portal | When not selected, this item will only appear when searching, or when drilling down in categories where 'Show as shortcut on LMS portal' was selected. |
| Auto Start Pathway | When this option is selected an interactive Pathway Step will start automatically when an end user opens a pathway. This option can only be selected for Pathways with one step. |
Get Started: Publish a Pathway and view it from the Portal.
Toolbox: Types of Pathway Steps
To assist the pathway administrator in guiding the learner/employee through content several types of pathway steps are available. Each step will be discussed in an individual article. This article provides a list of all the available Pathway Steps.
| Pathway Step | Examples |
|---|---|
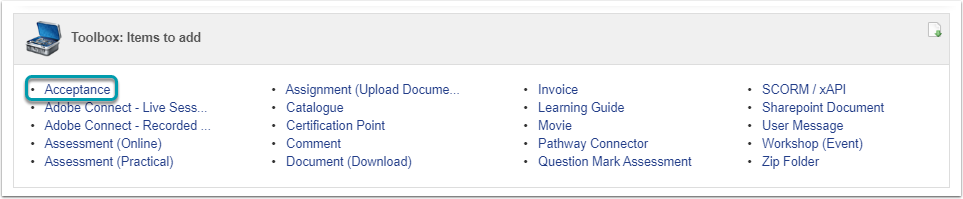
| Acceptance | The learner/employee accepts the terms and conditions for a specific course. |
| Adobe Connect - Live Sessions | The learner/employee views an Adobe LIVE session as part of their course. |
| Adobe Connect - Recorded Sessions | The learner/employee views an Adobe Connect session as part of their course. |
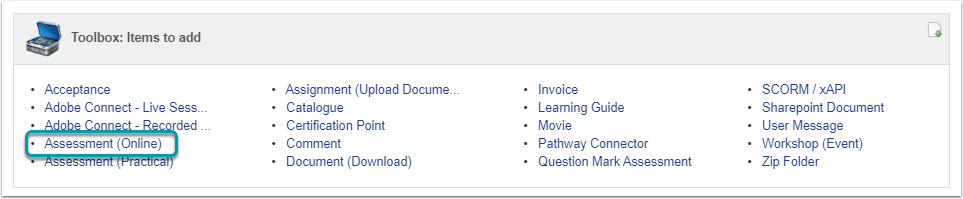
| Assessment (Online) | The learner/employee completes an online assessment on theory material which forms part of the course. |
| Assessment (Practical) | The learner/employee is evaluated practically and the result is uploaded as a learner record. |
| Assignment (Upload Document) | The learner/employee uploads assignments or POE documents as part of their course. |
| Catalogue | The learner/employee views a product catalogue. |
| Certification Point | The learner/employee completes prerequisite pathway steps and receives a certification point. The learner/employee can download a certificate for the course they completed. This is usually the last step in a pathway. |
| Comment | The learner receives an outline of instructions or outcomes for the course. This is usually the first step in a pathway. |
| Document (Download) | The learner downloads a document, such as theoretical material or a module outline document. |
| Invoice | The learner completes information required to receive an invoice for the course they are completing. |
| Learning Guide | The learner/employee downloads a learning guide document saved in the Signify Learning Guides module. |
| Movie | The learner/employee watches a movie. |
| Pathway Connector | The learner/employee can access a refresher course or a course which proceeds the course they just completed. |
| Question Mark Assessment | The learner/employee completes an assessment created in Question Mark through the course on Signify. |
| SCORM / xAPI | The learner/employee completes an interactive learning package. For examples of SCORM packages make sure to view some of the content developed by Signify: https://www.signify.co.za/elearning.html |
| Sharepoint Document | The learner/employee downloads a document saved to SharePoint. |
| User Message | The learner/employee can provide feedback on their experience of the course. |
| Workshop (Event) | The learner/employee can book themselves on a classroom event. |
| Zip Folder | The learner can download several documents or images in a zipped package. |
Build a Pathway
In the process of creating a pathway, it is good to know which steps are available. Make sure to read through the Toolbox: Types of Pathway Steps article and think about how these steps can be used in courses practically.
A practical example is that a business wants employees to complete an induction/orientation course. The HR Department wants to create and distribute the course via a pathway in Signify.
Follow these steps to create the course as a pathway.
Decide on the Course Content
In layman's terms, identify what the learner should do as part of the course.
Below is an example of a few items to include.
- Complete and pass a test.
- Upload a portfolio of evidence/supporting documentation.
- Download induction material.
- Accept the terms and conditions for the induction course.
- Download an Induction certificate at the end.
Order the Course Content
On a piece of paper write out the order of these items until they make sense.
Add additional items such as a course outcome list or if the employee should provide feedback on the course.
Below is an example of the Induction course content, rearranged in a logical order.
- Course Outline.
- Accept the course Terms and Conditions.
- Download the course material.
- Upload a portfolio of evidence/supporting documentation.
- Complete and pass the induction test.
- Download the Induction certificate.
Pair the course content with pathway steps.
| Course Outline | Pathway Step |
|---|---|
| 1. Course Outline | Comment |
| 2. Accept the course Terms and Conditions | Acceptance |
| 3. Download the course material | Document (Download) |
| 4. Upload a portfolio of evidence/supporting documentation | Assignment (Upload Document) |
| 5. Complete and pass the induction test | Assessment (Online) |
| 6. Download the Induction certificate | Certification Point |
Create the Pathway in Signify
How to get there:
From the portal, click System Administration | e-Learning | Learning Management | Maintain Learning Pathway
Read the following article on how to create a Pathway to create the Pathway: Create a Pathway (Detail Tab)
The proceeding articles will elaborate on how to add each type of pathway step.
Pathway Preview Tab
Overview of the Preview Tab
The Pathway Preview tab is where the Pathway Administrator works to create the pathway. The Pathway Category and Pathway details are created in preparation for the Pathway. The Pathway is the main course and desert of the e-Learning module.
Understanding the layout of and functionality available on a pathway screen is important to help a pathway designer be as efficient as possible.
Focus Areas: Pathway Preview tab

Back to the Treeview
Click on the Maintain TreeView link to go back to the Pathway Treeview. After creating a Pathway, it is good to confirm that the Pathway was created in the correct Category. You can also confirm this by reviewing the Breadcrumb trail.
View Modes: Preview as User and Edit Pathway
The system remembers which mode you last accessed the Pathway in as an Administrator, so make sure to switch back to Edit Pathway before you navigate away from the Pathway.
The Pathway Preview tab has two view modes the Administrator can use when building and testing a pathway. Edit mode and View mode.
Edit Mode
Edit mode is the default mode when viewing a Pathway for the first time. It is used by administrators when creating and editing the pathway.
How will you know you are working in Edit mode? Make sure to look out for the following:
- The Preview as User button is displayed - Click on this button to view the Pathway as a User
- View/Edit Mode is set to Edit
- You can see the Legend with options such as Edit Item, Remove-Item, etc.

Preview as User
View mode is used by Administrators to view the Pathway through the eyes of a regular user.
How will you know you are working in View mode? Make sure to look out for the following:
- The Edit Pathway button is displayed - click on this button to edit the Pathway
- Track Mode is set to User Mode
- View/Edit Mode is set to View
- You can see the Legend with very limited options - only Edit Item and View/Update/Rollback Item is available


Edit Item:
- Click on this icon next to a step to edit the step details.
- Only the details of the step are editable, the step type cannot be changed after the step is created.
Remove Item:
- Click on this item next to a step to delete a step from the pathway.
Pre Requisites:
- Click on this icon to add prerequisites for a step.
- These prerequisites are always dependent on steps preceding the current step. Where a prerequisite was added to a step, that prerequisite becomes part of the step and the user cannot continue unless the prerequisites have been met.
- Pre Requisites can only be added from the second step onwards.
Add Item in position:
- Insert a new step in the position of the current step.
- The current step and all subsequent steps will be moved one step up.
Update Pathway Step Order:
- To update the Pathway step order click on the up or down arrows as indicated below.

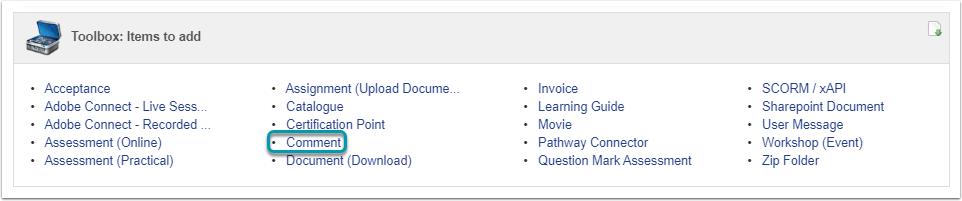
Toolbox
The toolbox is the heart of pathway design and is used to control the type of step added to the pathway.

General Guidelines
The following general guidelines should be kept in mind when using the Toolbox:
- When a toolbox item (e.g. Comment) is selected, it creates a new step and this step is always added at the end of the pathway.
- When a toolbox item is selected, the system will open a screen requiring information pertaining to the particular step e.g. if Comment was selected, the details of the comment must be completed.
- Once a step of a certain kind has been selected, the step type cannot be changed. If the incorrect step type was selected, the step must be deleted and a new step of the correct type must be added.
Text box element:
- Some of the fields available in the Toolbox can be formatted in terms of font color, font size, font type etc. Even images can be loaded into these fields.
- Care must however be taken because the formatting tools available to these fields are limited.
- Do NOT copy and paste large blocks of formatted text from other programs (Word or Excel, for example) straight into these fields. The existing formatting in these blocks of text will cause the field’s own formatting to misbehave.
- Always copy text from other programs to Window’s Notepad (to remove any pre-existing formatting) and from Notepad into the toolbox element’s field. Then apply the required formatting IN the field.
- Text typed into these fields is NOT checked for spelling.
Toolbox Items to add
When adding a new step to a pathway, consider the following:
- What type of content do you want the user to have access to?
- Where in the Pathway do you want the step to be displayed?
- What information will the user need in order to get the most out of the Pathway step?
The different types of steps is discussed in more detail in the next section.
Get Started: Click on the Comment item in the Toolbox and complete the required details to create your first Pathway step.
Add a Prerequisite
Prerequisites are used to manage the order in which pathway steps are completed. When a Prerequisite has been set up, the learner is required to meet the requirements of the proceeding step before gaining access to the next step.
How to create Prerequisites for a Pathway Step

Find the step you want to add a Prerequisite to and click on the Prerequisite icon. The Prerequisite list screen will open.
Get Started: Click on the Prerequisite item next to a Pathway step and complete the required details to add a Prerequisite.
Prerequisite List screen (No Prerequisites)

Prerequisite Detail screen

The Prerequisite Detail page contains two fields:
Pathway Item:
- This drop down contains a list of all steps which can be selected as a Prerequisite for this step.
- Only steps which require some interaction with the learner with a measurable outcome will be displayed in the list.
- Examples of steps which can be used as Prerequisites include a document, acceptance, SCORM, online assessment.
Status:
- The Status values available for selection will change depending on the Pathway Item selected.
Click on the Save button to save the selected Prerequisite.
Click Back To List to view the list of Prerequisites for this pathway step.
More than one Prerequisite can be added to a pathway step by repeating the process.
Prerequisite List screen (Prerequisites added)
The Prerequisite item added to the step is added to the Prerequisite list.

Existing Prerequisites can be deleted by selecting the check box next to the item you want to delete, and clicking the Delete button.
To get back to the Pathway Preview tab, click on the Close button.
How the Administrator sees a Pathway step with Prerequisites
Prerequisites not met
The image below shows a Pathway step where the Prerequisite has not been met yet.

Prerequisites met
The image below shows a Pathway step where the Prerequisite has been met.

How a learner sees a Pathway step with Prerequisites
Prerequisites not met
The image below shows a Pathway step where the Prerequisite has not been met yet.

Prerequisites met
The image below shows a Pathway step where the Prerequisite has been met.

Maintain User Pathway
How did I get here?
From the portal, click System Administration | e-Learning | Learning Management | Maintain Learning Pathway | Select Edit on the Pathway you are working on
How to access Maintain User Pathway
Sometimes it happens that a user is unable to complete a pathway step in the system. If this happens, the Maintain User Pathway functionality allows the Pathway Administrator to update the step status on behalf of the pathway user.

Click on the Maintain User Pathway button to open the Pathway Employee List. Click on the Search button to return a list of employees who attempted the pathway within the specified dates.

Click on the name of the person whose pathway step you want to edit. The Pathway item list will open. This page contains a list of all pathway steps and indicates the status of the user for that specific pathway step. Use the search functionality to search for a specific learner/employee.

Click on the Refresh Pathway Item Statuses button to ensure the latest statuses are displayed. Click on the step you want to edit to view more detail regarding that step.

The Pathway Item Status can be updated from here.
- Click on the Status drop-down to update the Pathway Item Status.
- Click on the Save button to apply the change.
To return to the Pathway:
- Click on the Close button on the Pathway Item Detail Page to return to the Pathway Item List.
- Click on the Back To List button to return to the Pathway Employee List.
- Click on the Close Window button to return to the Pathway.
- For pathway steps where a learner record was created, a checkbox is displayed: Remove this item from the learner record on Save or Rollback.
- When this checkbox is selected, and Save or Rollback is selected, the learner record is removed.
Try It Out:
View Progress
How did I get here?
From the portal, click System Administration | e-Learning | Learning Management | Maintain Learning Pathway | Select the Pathway you are working on
How to access View Progress
As part of the Learning and Development Department, you may want to view the progress of learners/employees for a specific pathway. The View Progress button allows you to do just that.

Click on the View Progress button to open the Employee Pathway Progress page. Use the search functionality to search for a specific learner/employee.

This page or report displays a list of employees who have attempted this pathway. Some employee information is displayed to the left and then the pathway steps are listed to the right. The status of the specific pathway step is displayed for that learner/employee.
What can you do on this page?
- You can search for a specific employee
- Print the Employee Pathway Progress Report to PDF
- Export the search results to Excel
To Return to the Pathway:
- Click on the X at the top of the window to close the window.
Working with Pathway Steps (popular steps)
How to use a Comment Step
The Comment step is used to display information to the user. When the user has viewed the step, it is seen as completed.
Pathway Toolbox
From the Toolbox, click on the Comment hyperlink. The Comment Detail screen will open.
Comment Detail
Comment steps are often used to give a welcome message or specific information at certain points in the pathway. No interaction from the learner’s side is possible except to view the step information.

Focus: To quickly create a Comment Step, complete only the numbered fields.
After you click the Save button, the step will be added to the Pathway. Click the Close button to return to the Pathway.
Overview of fields
Below is an overview of fields used when adding a Comment step.
| Field | Overview |
|---|---|
| Custom Main Header | This value is displayed at the top of the Pathway step. Use a verb to communicate simple and clear instructions to the Learner. |
| Reference Description | The heading displayed inside the Pathway step. |
| Description | Provide information which will add value for the learner. |
| Lock Pathway Step | When this checkbox is selected, the Pathway step is not available to the learner, but it remains in the pathway. |
Comment step for the learner
The image below shows an example of an Comment step previewed as a user.
When the user opens the step, it is marked as viewed.

How to use a Document (Download) Step
The Document step lets the learner download a document uploaded to the Pathway by an administrator. Examples of documents used for this step include terms and conditions, reading material, manuals, user guides, SOP, etc. The user is expected to download the document to complete the step.
Pathway Toolbox

From the Toolbox, click on the Document (Download) hyperlink. The Document Detail screen will open.
Document Detail

Focus: To quickly create an Document Step, complete only the numbered fields.
After you click the Save button, the step will be added to the Pathway. Click the Close button to return to the Pathway.
Overview of fields
Below is an overview of fields used when adding an Document step.
| Field | Overview |
|---|---|
| Custom Main Header | This value is displayed at the top of the Pathway step. Use a verb to communicate simple and clear instructions to the Learner. |
| Reference Description | The heading displayed inside the Pathway step. |
| File Name | Choose the file you want the learner to download. |
| Description | A more detailed description of why the learner must download the document. |
| Allow Not Logged In Download | Allows a learner who is not logged into the system, to download the document via the link they receive by SMS or email. |
| Lock Pathway Step | When this checkbox is selected, the Pathway step is not available to the learner, but it remains in the pathway. |
Document Step for the learner
The image below shows an example of a Document (Download) step previewed as a user.
When the user opens the Document step, the date and time the document was downloaded are recorded against the Pathway step details for that learner.

Try It Out: Click on the Document (Download) item in the Toolbox and complete the required details to create a Pathway step.
How to use an Acceptance Step
The Acceptance step is used to display a message with information to the user. The user is then required to accept a statement in order to complete the step.
Pathway Toolbox
From the Toolbox, click on the Acceptance hyperlink. The Acceptance Detail screen will open.
Acceptance Detail

Focus: To quickly create an Acceptance Step, complete only the numbered fields.
After you click the Save button, the step will be added to the Pathway. Click the Close button to return to the Pathway.
Overview of fields
Below is an overview of fields used when adding an Acceptance step.
| Field | Overview |
|---|---|
| Custom Main Header | This value is displayed at the top of the Pathway step. Use a verb to communicate simple and clear instructions to the Learner. |
| Reference Description | The heading displayed inside the Pathway step. |
| Acceptance Title | The phrase displayed next to the checkbox. This is the sentence or phrase the learner must accept. |
| Description | A more detailed description of why the learner must accept the step and what the impact is if they do not accept. |
| Lock Pathway Step | When this checkbox is selected, the Pathway step is not available to the learner, but it remains in this pathway. |
| Log to Learner Record | When this checkbox is selected, the step can be logged to the learner record of a learner. This will serve as proof that the learner accepted the Pathway step. When this checkbox is selected, the option will become available to select a Training Intervention against which the learner record will be logged. |
Acceptance Step for the learner
The image below shows an example of an Acceptance step previewed as a user.
The moment a learner ticks the acceptance check box below, the user is asked to confirm that the acceptance will be permanent. Once the acceptance is confirmed, the acceptance tick box below will not be editable anymore.

Try It out: Click on the Acceptance item in the Toolbox and complete the required details to create a Pathway step.
How to use an Online Assessment Step
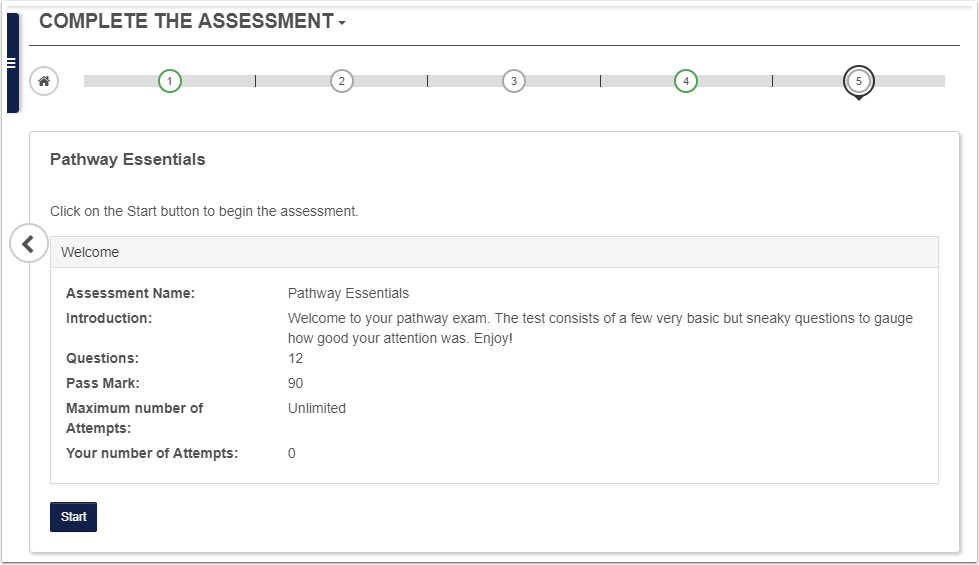
The Online Assessment step is used to link an assessment to a pathway. This assessment is created in the Assessment Builder. The assessment guides the user through a structured set of questions. The user is expected to answer the questions one-by-one. An assessment is sometimes used to gauge a user’s knowledge after downloading and studying material from a previous Pathway step.
Pathway Toolbox
From the Toolbox, click on the Assessment (Online) hyperlink. The Assessment Detail screen will open.
Assessment Detail

Focus: To quickly create an Online Assessment, complete only the numbered fields.
After you click the Save button, the step will be added to the Pathway. Click the Close button to return to the Pathway.
Overview of fields
Below is an overview of fields used when adding an Online Assessment step.
| Field | Overview |
|---|---|
| Custom Main Header | This value is displayed at the top of the Pathway step. Use a verb to communicate simple and clear instructions to the Learner. |
| Assessment | On other pathway steps this is called the Reference Description. The heading displayed inside the Pathway step. |
| Description | A more detailed description of what the learner can expect in the assessment as well as what the outcome means. |
| Reset all employee assessment attempts | Resets all previous assessment attempts made on this Assessment step. All assessments across all pathways will be reset. The number of attempts set on the assessment itself, will be available to the user again. |
There is no Log to Learner Record option when creating an Online Assessment Pathway step. For Online Assessments, this value is set on the Assessment itself in the Assessment Builder module.
Online Assessment Step for a learner
The image below shows an example of an Online Assessment step previewed as a user.
Try It Out: Click on the Assessment (Online) item in the Toolbox and complete the required details to create a Pathway step.
How to use a SCORM Step
A Sharable Content Object Reference Model is a collection of standards and specifications for web-based e-learning. It defines communications between client-side content and a host system called the run-time environment, which is commonly supported by a learning management system. SCORM also defines how content may be packaged into a transferable ZIP file called "Package Interchange Format.
Pathway Toolbox
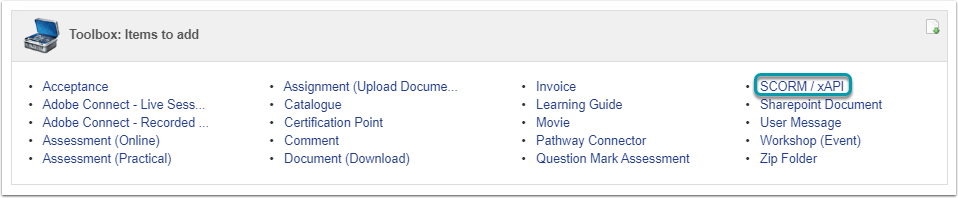
From the Toolbox, click on the SCORM / xAPI hyperlink. The SCORM Detail screen will open.
SCORM Detail

Focus: To quickly create a SCORM Step, complete only the numbered fields.
After you click the Save button, the step will be added to the Pathway and the window will close.
Overview of fields
| Field | Overview |
|---|---|
| Step Header | This value is displayed at the top of the Pathway step. Use a verb to communicate simple and clear instructions to the Learner. |
| Description Header | The heading displayed inside the Pathway step. |
| Description | A more detailed description of what the learner can expect in the SCORM content. |
| Course | Select the course from the SCORM library. |
| Preview | Click on the Preview button to preview the selected SCORM content . |
| Lock Pathway Step | When this checkbox is selected, the Pathway step is not available to the learner, but it remains in this pathway. |
There is no Log to Learner Record option when creating a SCORM Pathway step. For SCORM, this value is set on the SCORM content itself in the SCORM Library.
How do I add a SCORM file to the course list?
If you want to upload a SCORM package for the first time, refer to these articles for more information:
Add Content / Add a SCORM file to the library
Signify develops SCORM content in-house. For examples of content our team has created, you can navigate to our website: https://www.signify.co.za/elearning.html
SCORM Step for a learner
The image below shows an example of a SCORM step previewed as a user.

Try It Out: Click on the SCORM/xAPI item in the Toolbox and complete the required details to create the pathway step.
How to work with the Assignment (Document upload) Step
The Assignment item is used to inform a user that he has to submit documentation (making up a portfolio of evidence) in support of his completion of a certain number of pathway steps.
Pathway Toolbox
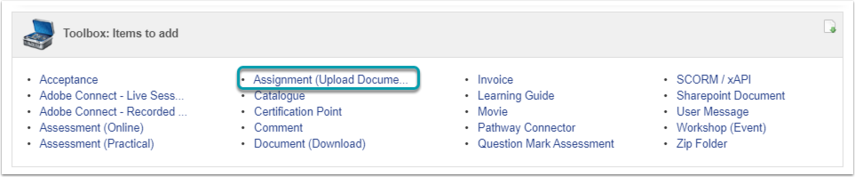
From the Toolbox, click on the Assignment (Upload Document) hyperlink. The Assignment Detail screen will open.
Assignment Detail

After you click the Save button, the step will be added to the Pathway. Click the Close button to return to the Pathway.
Overview of fields
Below is an overview of fields used when adding an Assignment step.
| Field | Overview |
|---|---|
| 1. Custom Main Header | This value is displayed at the top of the Pathway step. Use a verb to communicate simple and clear instructions to the Learner. |
| 2. Heading | On other pathway steps this is called the Reference Description. The heading displayed INSIDE the Pathway step. |
| 3. Description | A more detailed description of what the learner can expect in the assignment as well as what the outcome means. |
| 4. Log to Learner Record | Determines if the completion of this step is logged to a learner's training records.
Note: Only assignment documents linked to a learner record, can be assessed and moderated. |
Try It Out: Click on the Assignment step-item in the Toolbox and complete the required details to create a Pathway step.
Assignment Step for a user/learner
Open the Assignment from the Pathway summary screen.
- The following functionality is available for learners to upload assignments or documents:
- Add: The learner can upload multiple documents as long as the step status is not ‘Submitted’ nor ‘Competent’. The Add button will be disabled when the pathway status is ‘Submitted’ or ‘Competent’.
- Delete: The Delete document option will be available when the document is not locked.
- Download: The learner can download a document to his PC. The downloaded document will be saved in the Downloads folder.
- Submit for Review: This button will only be enabled when one or more documents have been uploaded in the pathway step and the learner did not submit the documents for review.
- View Comments: Opens a feedback screen showing the comments made by assessors and moderators on the assignment step.
The image below shows an example of an Assignment step previewed as a learner.

How to Submit Assignment for Review
After the learner uploaded the POE and other documents it can be submitted for review by an Assessor.
The following actions will apply when the Submit for Review button is clicked by the learner:
- The following confirmation message will display: "You are about to submit your assignments for review. In doing so, you confirm that all your uploaded documents will be locked and cannot be deleted. You will also be prevented from uploading any additional documents until your assignments have been reviewed."
- After the learner confirms the submission of documents the following will happen:
- The documents uploaded on the step up to date will be locked.
- The Add and Submit for Review buttons are disabled.
- Once a document was locked by the Submit for Review option, it cannot be deleted by the learner unless the Learning Administrator or Assessor 'opens' the pathway step to the 'Re-submit', 'General Action Required' or 'Remedial' status.
- The pathway step status will be changed to SUBMITTED which locks the pathway step for further uploads/deletions by the learner. The pathway step can only be unlocked by an Assessor or Learning Administrator via the Assignment Control Panel.
- The learner record Completed Status is set to "Yes" and the Competent Status is set to "No".
- There is no restriction on downloading documents from the assignment pathway step for a learner.
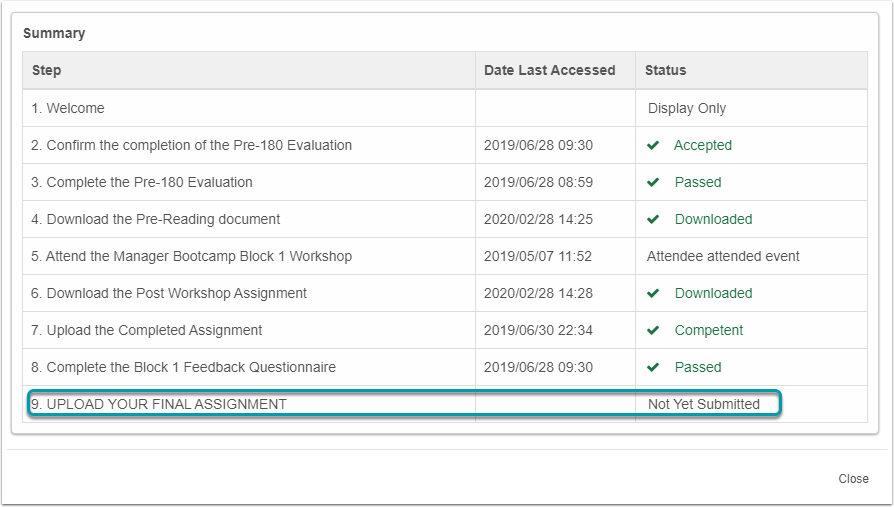
The image below shows an example of an Assignment step after the Submit for Review button is clicked.

How to use a Movie Step
System Movies contain content intended to be watched by the learner to enrich their knowledge of a certain field or product.
Pathway Toolbox

From the Toolbox, click on the Movie hyperlink. The Movie detail screen will open.
System Movie Detail screen

Focus: To quickly create a System Movie Step, complete only the numbered fields.
After you click the Save button, the step will be added to the Pathway. Click the Close button to return to the Pathway.
To create a Movie file, read the The HTML Video Element article. When you click on the link it will open in a new page.
Options available when adding a System Movie
Choose File
To upload a new System Movie file, click on Choose File.

Select System Movie
A System Movie can be re-used in pathways. Once the System Movie file is uploaded, it is saved to a list of System Movies. The Select System Movie Tab, displays a list of System Movies uploaded on the LMS previously.

Overview of fields
| Field | Overview |
|---|---|
| Custom Main Header | This value is displayed at the top of the Pathway step. Use a verb to communicate simple and clear instructions to the Learner. |
| System Movie File Path | Choose the Movie file you want to use. |
| Reference Description | The heading displayed inside the Pathway step. The Reference Description of this step is the same as the name of the Movie file and cannot be edited. |
| Description | A more detailed description of what the learner can expect in the Movie file. |
| Startup Page | The filename of the Startup file of the Movie file. When adding a Movie Step for the first time, this field must be entered manually. It is good practice to name the startup file of yuor system movie startup.html |
| Local PC Path | This refers to a central location (e.g. a shared network drive) where the zipped file can be stored (in addition to being uploaded on the step itself) allowing users to access and run the file from there instead of the file being downloaded to their own computers before being able to run. |
| Interactive | Can be checked or unchecked. This option indicates whether the System Movie is interactive or not, but does not enable the movie to be interactive. This, to a degree, manages the expectations of the user with regards to the nature of the content. |
| Log to Learner Record | When this checkbox is selected, the step can be logged to the learner record of a learner. This will serve as proof that the user has completed requirements for the step. When this checkbox is selected, the option will become available to select a Training Intervention against which the learner record will be logged. |
| Lock Pathway Step | When this checkbox is selected, the Pathway step is not available to the learner, but it remains in this pathway. |
Startup File
The file the LMS will try to use as the startup file in the zipped folder is known as the Startup file. If, for example, a zipped folder containing 2 or 3 other files as well as an HTML page, is uploaded to the System Movie File Path, a startup page needs to be selected in order to indicate from what file the content will begin to display – which in this case will be the HTML file that will enable the rest of the videos/movies to run as required.
Movie Step for a learner
The image below shows an example of a Movie step previewed as a user.

Try It Out: Click on the movie item in the Toolbox and complete the required details to create a Pathway step.
How to use a Learning Guide Step
The Learning Guide item is used to make Learning Guides available to the learner. The learner is expected to download and review the documents in order to complete the pathway.
Documents displayed in this pathway element are distinguished from normal documents in that they originate from the Learning Guides module or library. They are therefore of a somewhat more permanent and controlled nature.
When a learner opens the Learning Guide step, a learner record is not created, but the document download date is captured.
Pathway Toolbox

From the Toolbox, click on the Learning Guide hyperlink. The Learning Guide Detail screen will open.
Learning Guide Detail

Focus: To quickly create a Learning Guide Step, complete only the numbered fields.
After you click the Save button, the step will be added to the Pathway. Click the Close button to return to the Pathway.
Overview of fields
Below is an overview of fields used when adding a Learning Guide step.
| Field | Overview |
|---|---|
| Custom Main Header | This value is displayed at the top of the Pathway step. Use a verb to communicate simple and clear instructions to the Learner. |
| Reference Description | Select the Learning Guide from the list of available Learning Guides. |
| Description | A more detailed description of why the learner must download the document. |
| Allow Not Logged In Download | Allows a learner who is not logged into the system, to download the document via the link they receive by SMS or email. |
| Lock Pathway Step | When this checkbox is selected, the Pathway step is not available to the learner, but it remains in the pathway. |
Learning Guide Step as a learner
The image below shows an example of a Learning Guide step previewed as a user.
When the user opens the Learning Guide step, the date and time the document was downloaded are recorded against the Pathway step details for that learner.

Try It Out: Click on the Learning Guides item in the Toolbox and complete the required details to create a Pathway step.
How to use an Invoice Step
The Invoice step is used where payment is required before a learner can continue with a pathway.
Pathway Toolbox

From the Toolbox, click on the Invoice hyperlink. The Learning Guide Detail screen will open.
Invoice Detail

Focus: To quickly create an Invoice Step, complete only the numbered fields.
After you click the Save button, the step will be added to the Pathway. Click the Close button to return to the Pathway.
Overview of fields
| Field | Overview |
|---|---|
| Custom Main Header | This value is displayed at the top of the Pathway step. Use a verb to communicate simple and clear instructions to the Learner. |
| Reference Description | The heading displayed inside the Pathway step. |
| Invoice Title | This is the title of the invoice displayed to the user. It is recommended that the name of the pathway is used for this. |
| Description | Provide information which will add value for the learner. |
| Amount (excl VAT) | The total cost of the pathway/course. |
| VAT Percentage | The percentage of VAT added to the total cost of the course. The VAT Percentage value cannot be edited on the Invoice Detail screen. The value is fixed at 15%. |
| Lock Pathway Step | When this checkbox is selected, the Pathway step is not available to the learner, but it remains in the pathway. |
Invoice Step as a Learner
The image below shows an example of an Invoice Step previewed as a learner.
Complete the Invoice Details

View the invoice details and download the Invoice

When the invoice details are saved by the learner, the details are fixed and cannot be edited again. The learner can click on the Print Invoice button to print a copy of the invoice.
The invoice step WILL NOT prevent the learner from proceeding to the next step. To prevent the learner from moving on to the next step(s) in the pathway, add the invoice step as a prerequisite. Read more on How to create Prerequisites for a Pathway Step
How the Invoice Step works
The learner can complete the details of the person to who the invoice is made out to. Information such as the address, contact detail, purchase order voucher and their company’s VAT registration number (if relevant) must be supplied. After the information is saved, the tax invoice will be displayed.
The following actions must take place before the invoice will be seen as paid in the system:
- The learner can print the invoice and is expected to make payment as arranged.
- Once paid, the learner has to inform the pathway administrator of his payment after which the administrator will trace and confirm the payment and mark the invoice as paid. For more information read the following article: Maintain User Invoice
- If subsequent pathway steps had a payment of the invoice as a prerequisite, these steps will then become available and the learner can continue with his pathway.
Try It Out: Click on the Invoice item in the Toolbox and complete the required details to create a Pathway step.
How to use a Certification Point Step
The Certification Point item is used to do the following:
- To convey messages to the learner for example The learner has successfully completed the pathway.
- Create a learner record if there are prerequisites loaded on this step.
No interaction from the learner’s side is possible except to take note of what is being communicated.
Pathway Toolbox
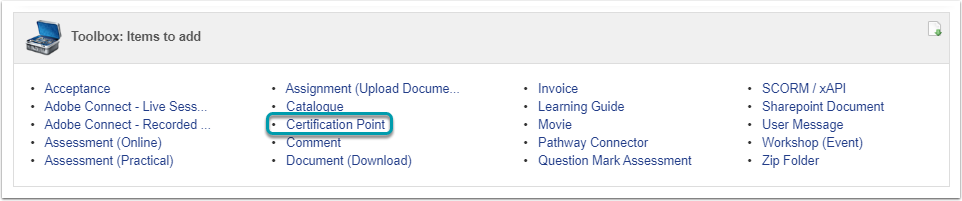
From the Toolbox, click on the Certification Point hyperlink. The Certification Point detail screen will open.
Certification Point Detail
Certification Point steps are often used to either indicate a milestone in their learning journey or to indicate that the learner has completed the requirements for the course.

Focus: To quickly create a Certification Point Step, complete only the numbered fields.
After you click the Save button, a prompt will be displayed asking if you want to maintain Prerequisites.

Click on the Yes button to proceed.
Read the article Add a Prerequisite for steps on adding Prerequisites to a Pathway step. When you click on the link a new tab will be opened containing the article.
After you added the Prerequisite, click the Close button to return to the Certification Point Detail screen. Click the Close button to return to the Pathway.
Overview of fields
| Field | Overview |
|---|---|
| Custom Main Header | This value is displayed at the top of the Pathway step. Use a verb to communicate simple and clear instructions to the Learner. |
| Certification Point | On other pathway steps this is called the Reference Description. The heading displayed inside the Pathway step. |
| Description | A more detailed description of why what the learner has achieved and why they have reached the certification point. |
| Lock Pathway Step | When this checkbox is selected, the Pathway step is not available to the learner, but it remains in the pathway. |
| Log to Learner Record | When this checkbox is selected, the step can be logged to the learner record of a learner. This will serve as proof that the learner met all requirements for the Certification Point. When this checkbox is selected, the option will become available to select a Training Intervention against which the learner record will be logged. |
Log to Learner Record Explained
In order to keep a learner record which will be displayed on the Training History report, Log to Learner Record must be checked.

Options available to Log to Learner Record:
Training Intervention
- Only Certification Point Training Interventions are available for selection.
- The name of the Training Intervention will become the Title of the Learner Record.
Unit Standard
- If this is an Ad Hoc Pathway all Unit Standards will be available for selection.
- If this is a Standard Pathway, only the Standard selected for the Pathway will be available for selection.
Certification Point Step for a learner
The first time the user views the step
The image below is an example of a Certification Point step previewed as a learner when the Prerequisites have not been met.
The step after Prerequisites have been met
Click here for more information on How to allow the Learner to download a certificate from a pathway step

Try It Out: Click on the Certification Point item in the Toolbox and complete the required details to create a Pathway step.
Pathway Target Audience Tab
Target Audience: Org Condition
The purpose of the Org Condition is to add a learner based on their location in the Organisation Structure.
Follow the steps illustrated in this section to add a learner based on the Org Condition.
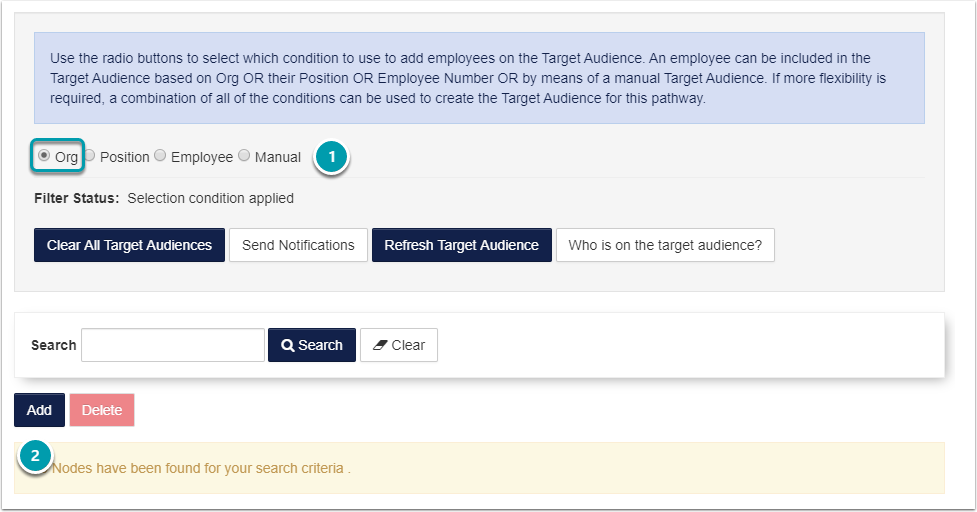
1. Click on the Org Condition radio button.
2. Click on the Add button. The Organisation Nodes screen opens.

3. Enter the Org Name you are looking for.
- Any of the other search fields can be used to locate the Org Node you are looking for.
4. Click on the Search button.
5. Select the Org Node you want the Target Audience to be applied to.
- Note that you can select multiple Org Nodes.
6. Click on the Select button to add the selected Org Nodes to the Target Audience.
7. Click the Close button to return the Target Audience tab of the Pathway.
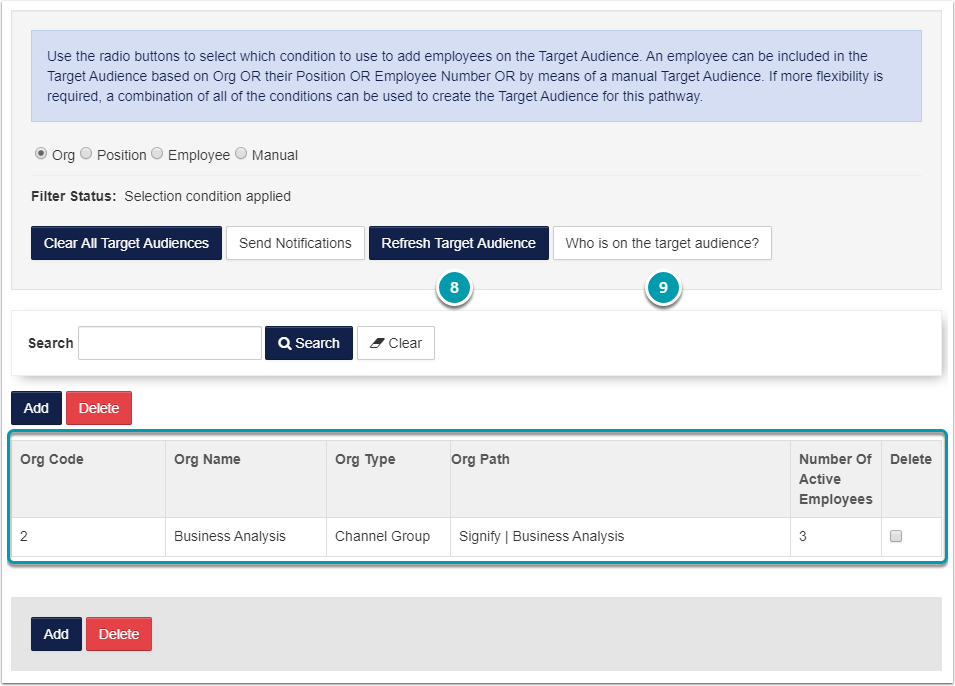
The selected Org Node will be displayed on the list screen.
8. Click on the Refresh Target Audience button to apply the change.
9. Generate the Who is on target audience report to confirm the change delivered the desired results.
Target Audience: Position Condition
The purpose of the Position Condition is to add a learner based on the Position have within the Organisation.
As all Positions are linked to a Job, the Job List is used to select the Positions linked to a Job.
Follow the steps illustrated in this section to add a learner based on the Position Condition.
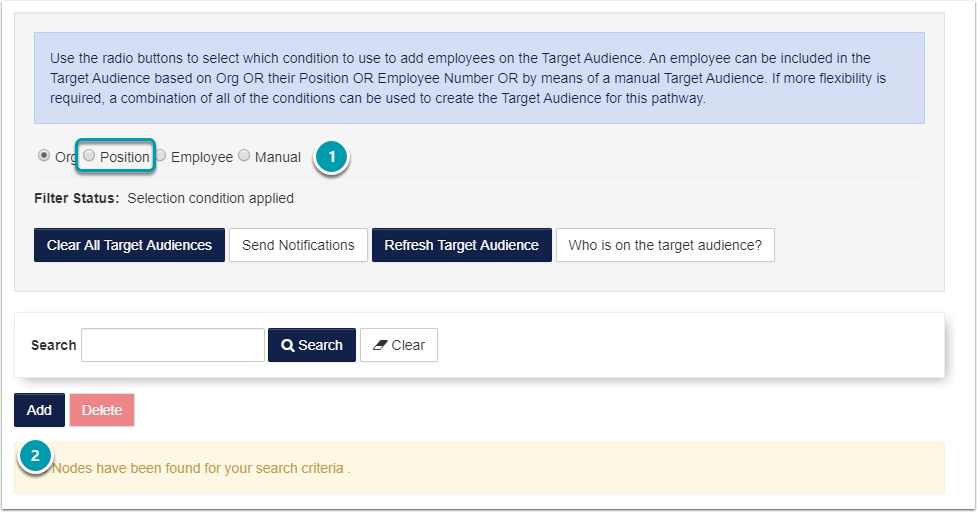
1. Click on the Position Condition radio button.
2. Click on the Add button. The Job List screen opens.

3. Enter the details for the JobTitle you are looking for and click on the Search button.
4. Select the Job Title you want the Target Audience to be applied to.
- Note that you can select multiple Job Titles.
5. Click on the Select button to add the selected Job Title to the Target Audience.
6. Click the Close button to return the Target Audience tab of the Pathway.
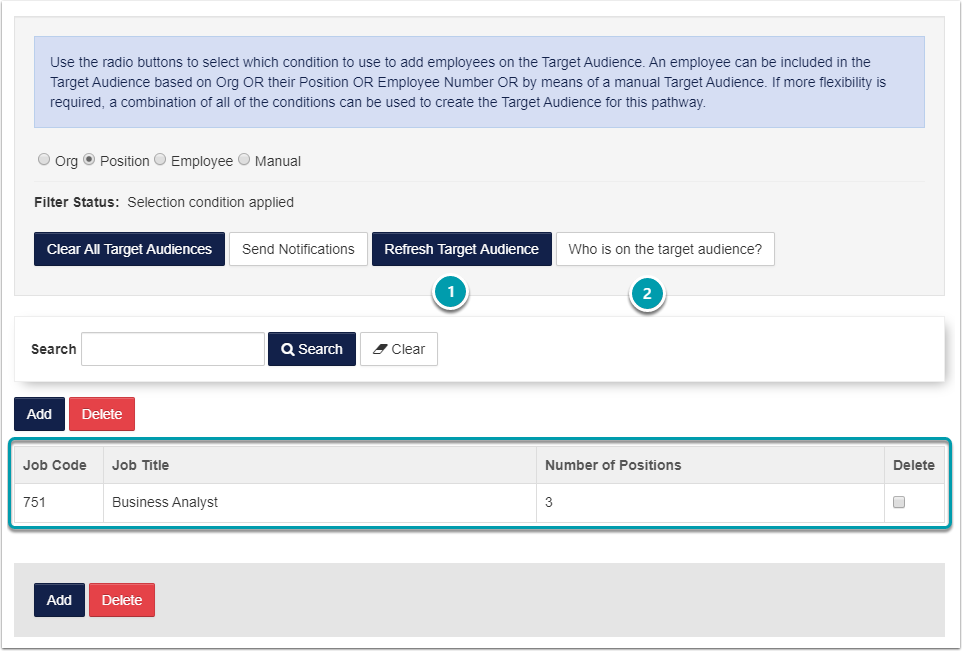
The selected Job Title will be displayed on the list screen.
7. Click on the Refresh Target Audience button to apply the change.
8. Generate the Who is on target audience report to confirm the change delivered the desired results.
Target Audience: Employee Condition
The purpose of the Employee Condition is to add any learner within the Organisation.
Follow the steps illustrated in this section to add a learner based on the Employee Condition.
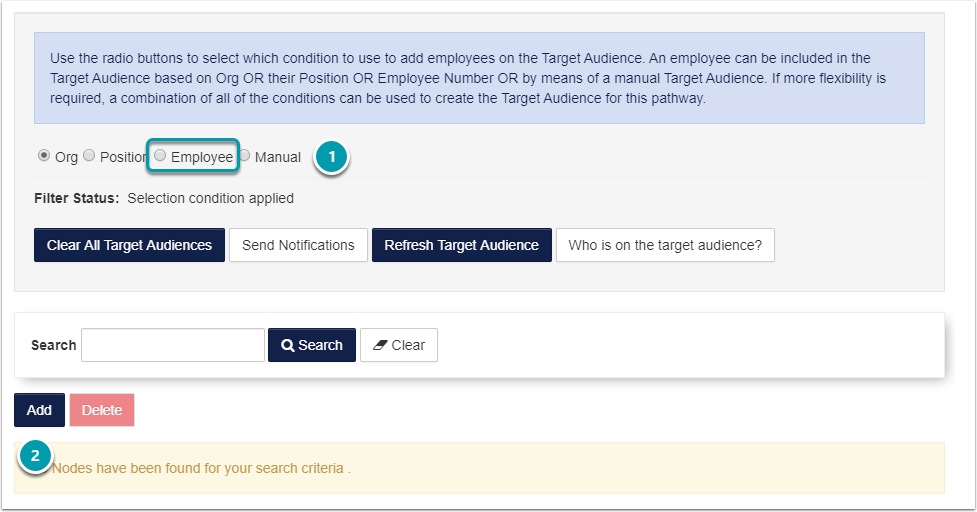
1. Click on the Employee Condition radio button.
2. Click on the Add button. The Employee Search screen opens.
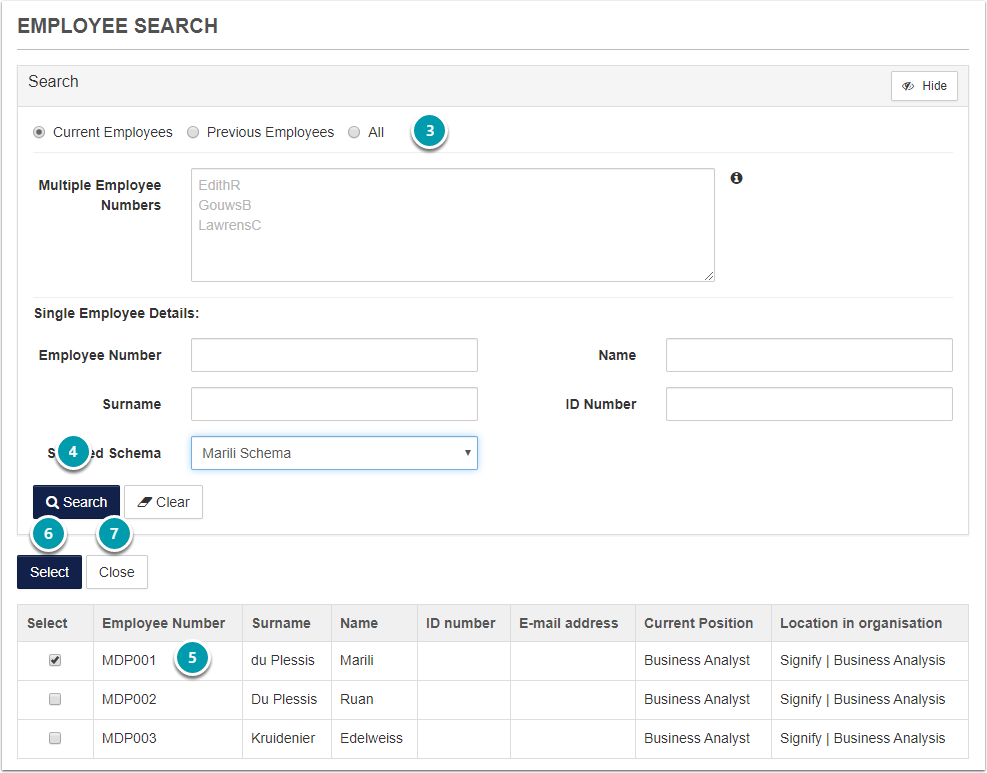
3. Enter the details for the Employee you are looking for.
4. Click on the Search button.
5. Select the Employee you want the Target Audience to be applied to.
- Note that you can select multiple Employees.
6. Click on the Select button to add the selected Employee to the Target Audience.
7. Click the Close button to return the Target Audience tab of the Pathway.
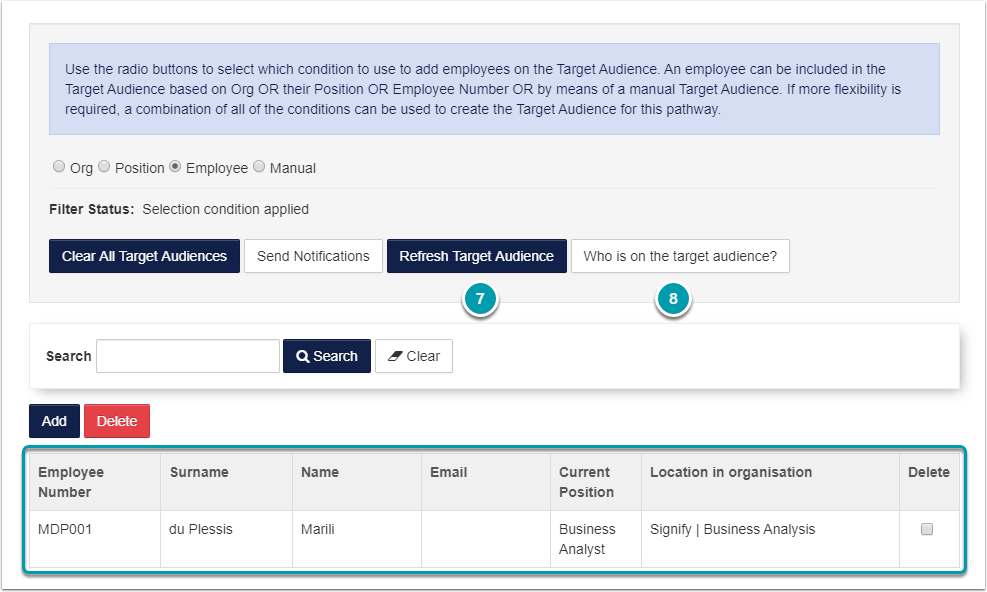
The selected Employee will be displayed on the list screen.
7. Click on the Refresh Target Audience button to apply the change.
8. Generate the Who is on target audience report to confirm the change delivered the desired results.
Target Audience: Send Notifications
After the Pathway has all the required steps and is approved by Management, it is time to inform the learners that a new pathway is available to them. PTA001, the Pathway Target Audience email is sent from the Send Notifications screen.
Navigate to the Pathway
How did I get here? Administration Portal | e-Learning | Maintain Learning Pathway
Select the Pathway which the email will be sent for.
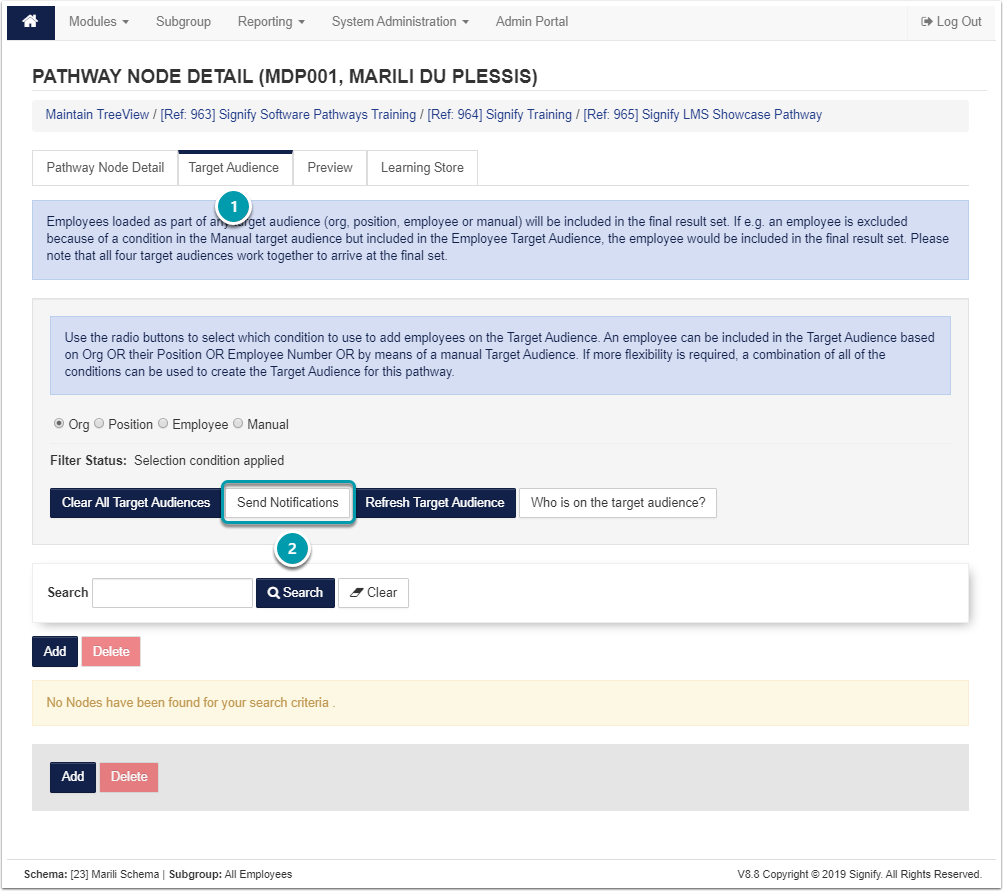
1. Click on the Target Audience Tab.
2. Click on the Send Notifications button.
Send Notifications
Refresh the Target Audience before sending any notifications.
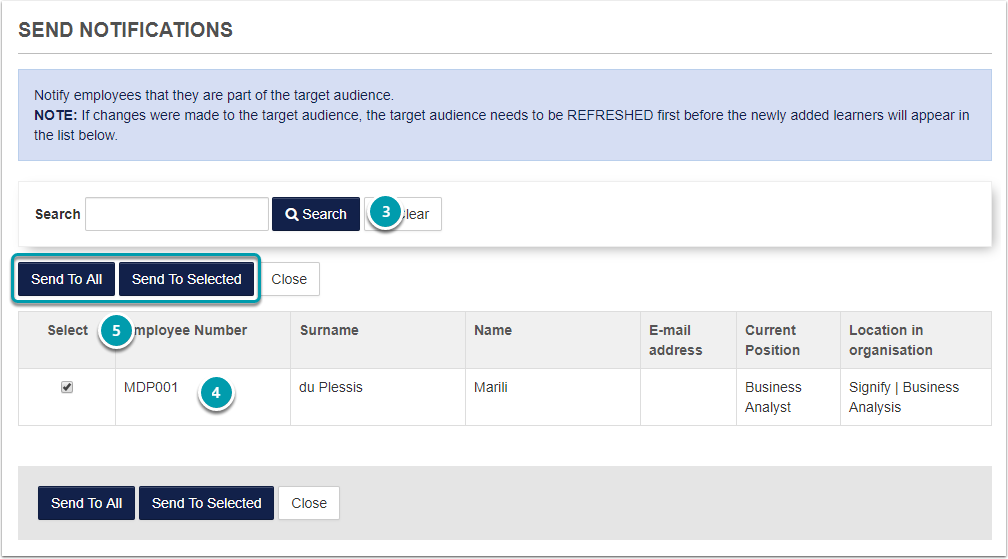
3. Enter search criteria and click on the Search button if the notification.
4. Select the learners to whom the notifications need to be sent.
5. Click Send To All or Send To Selected
Notifications can only be sent to learners who have valid email addresses. If the learner has an invalid email address or if the email address is blank, the notification will not be sent.
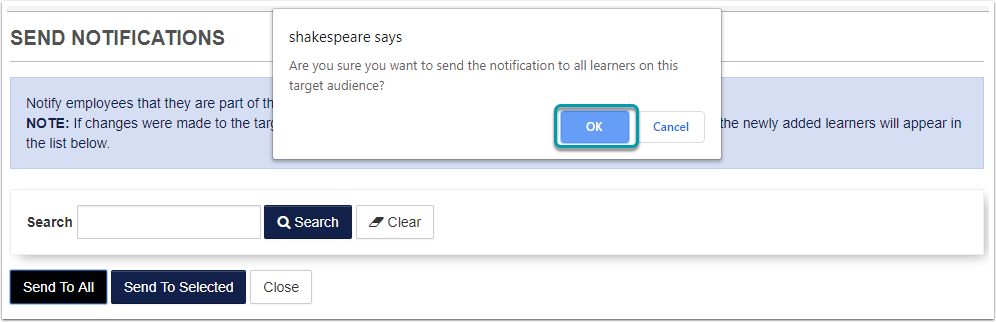
Send To All
When Send To All is selected, the notification will be sent to all learners who form part of the Target Audience.
A confirmation prompt is displayed before the notifications are sent to all the learners.
Click on the OK button to send the notification to all learners on the Target Audience.
Send To Selected
When Send To Selected is selected, the notification will only be sent to the selected learners who for part of the Target Audience.
Once the notification is sent, click on the Okay button to return to the Pathway Target Audience tab.

SCORM Library
Add Content / a SCORM file to the library
A little more information about SCORM:
The SCORM element allows the use of interactive SCORM compliant content in which a user is expected to actively participate by watching a movie, navigating through pages, answering questions, completing assessments etc.
SCORM content is created in external, 3rd party software and is opened in its own viewer the same way a MS Word document is opened by MS Word.
- The SCORM content is completely independent from the LMS which only provides the link to the content.
- When completed, the LMS is provided with the user’s SCORM results which are recorded.
- If a problem is experienced with SCORM content not opening, not running properly etc. kindly contact the local IT support or the SCORM content provided for support.
- Also take into account that since the SCORM content is used over a network, normal network protocols, firewalls, bandwidth etc. could affect the performance of SCORM content.
Understanding SCORM results:
Each SCORM file sends through certain parameters which are used to gauge the completion (or not) if the SCORM file, whether the learner passed (or not) etc. What the result is and how it is interpreted by the LMS is dependent on what kind of SCORM you are working with. Below is a table explaining how the LMS interprets the most common scenarios those of SCORM with and without an accompanying assessment.
The SCORM file’s result can be written to the user’s learner records if the option is selected.
What does it all mean?
SCORM is one of the most popular methods of e-learning. The SCORM file can be uploaded to the LMS, and the LMS can then track the progress of the user within the SCORM content.
Which types of SCORM are supported on the Signify LMS?
Various kinds of SCORM packages/content can be created, depending on the authoring tool used or the preference of the content designer.
Signify Supports the following types of SCORM files:
- SCORM 2004 (Edition 1 - 3)
- SCORM 1.1 and 1.2
- xAPI (also called Experience API or Tin Can API)
For more information regarding what SCORM is and what it can do, navigate to SCORM.com.
How did I get here? Modules | e-Learning | Learning Management | Scorm Library

The Scorm Library allows the Administrator to manage all SCORM files in the system. The library ensures that when a Scorm file is replaced it is replaced in all pathways. It allows the Administrator to view details related to SCORM attempts and results.
To add a SCORM file, click on the Add Content button.
Add Course

Focus: To quickly upload a SCORM package, complete only the numbered fields.
Overview of fields
| Field | Overview |
|---|---|
| Name | This is the name of the SCORM content. This is the name Pathway Administrator will see when they select to add a SCORm step. The learner will see this name in the pathway. |
| Content Server | This is the server to which the content will be saved. |
| Choose File | Select the SCORM file you want to upload to the library. |
| Log to Learner Record | When Log to Learner Record is checked, a learner record will be created once the learner has attempted the SCORM. When Log to Learner Record is unchecked, no learner record will be created. |
| Training Intervention | This is the Training Intervention which will be logged as a learner record, if Log to Learner Record was selected. |
| Has Assessment | Check this box if the SCORM package has an assessment. |
| Allow Redo After Completion | When checked, the learner will be allowed to redo the SCORM after they have completed it. When unchecked, the learner will only be allowed to attempt the SCORM file once. |
| Max Attempts | When Allow Redo After Completion is checked, the Maximum Number of Attempts can be indicated in the Max Attempts field. |
| Keep Score | First: Keep the first completed attempt. Last: Keep the last completed attempt. Best: Keep the best outcome, taking the pass status first into account and then the score. For more information on how the selected score relates to the complete and competent status, click on the question mark icon. |
| Is Active | When checked, the SCORM file will be available for selection on a Pathway. When unchecked, the SCORM file will not be available for selection on a Pathway. |
SCORM Content Administration
Once the SCORM file is uploaded to the SCORM library, the Administrator can view details related to the SCORM, by clicking on the package name.

The Administrator can view which Pathways the SCORM is linked to as well as the Registrations (learners who have attempted the SCORM). Recent activity is also displayed on this screen.

If you want to upload a SCORM course to a pathway, refer to these articles for more information:
Signify develops SCORM content in-house. For examples of content our team has created you can navigate to our website: https://www.signify.co.za/elearning.html
Try it Out: Upload a SCORM package to the SCORM library.
Pathway Invoices
How to create an Invoice Template
The Invoice template is used when:
- A Pathway Administrator selects a Pathway Invoice Step from the Toolbox and
- when the learner generates the invoice from the pathway on the LMS portal.
Invoice Template Page
How did I get here? System Administration | Modules | e-Learning | Master Data | Invoice Template
On the Invoice Template screen, click on the Create button. Only one invoice template can be created.

Invoice Template Detail

Click here for more information on How to use an Invoice Step. This article also shows what the learner when see when generating the invoice.
Overview of Fields
| Field | Overview |
|---|---|
| Invoice Number Format | Number formats explained: The following placeholders can be used:
Examples: yyINV000: 18INV026 (invoice 26, year 2018) MMM-0000_HHmm: Feb-0002_1649 (invoice 2, February, 4:49 PM) \\M\\yINV_000: MyINV_894 (invoice 894, placeholders escaped) |
| Company Information | More information about the company who is issuing the invoice. |
| Bank Details Description | Banking Details of the company who is issuing the invoice. |
| Footer Description | Footer description on the Invoice. |
| Invoice Number Description | Text displayed next to the invoice number. |
| Invoice Date Description | Text displayed next to the invoice date. |
| Client Contact Description | Text displayed next to the client contact description. |
| Client Description | Text displayed next to the client description. |
| Client Vat Description | Text displayed next to the client vat description. |
Saved Invoice Template
Once the invoice template is saved, it can be edited again if required.

How to mark an Invoice Step as paid
How did I get here? System Administration | Module | e-Learning | Learning Management | Maintain Pathway Invoice
Maintain User Invoice

Focus: To update the Invoice status to Paid complete the numbered steps.
The Invoice Status can have one of three values: Paid, Cancelled, Not Paid.
Click on the View Invoice hyperlink to view a copy of the invoice generated for the learner.
Click here to View the Invoice Step as a User.
Assignment Management
for Learners
The Assignment Control Panel List will show the following information per learner:
- Action button drop down for editing (edit, upload, download or delete documents) and viewing comments
- Employee Name, Surname and Employee Number
- Pathway Name and Pathway Step Name
- Learner Record Name, only if the Log to Learner Record status has been set to TRUE on the pathway step
- Tick mark to show the assignments have been assessed
- The number of assignment documents uploaded

The colour coded icons will show the progress and status of the assignment pathway steps and learner records:
- Default Status (black): Documents may have been uploaded, but documents have not been submitted yet.
- Submitted (blue): The learner uploaded and submitted assignments on the pathway step.
- Feedback Provided (orange): The Assessor provided feedback on the pathway and changed the pathway step status to Re-submit, General Action Required or Remedial.
- Not Yet Competent (red): The assessor found the learner Not Competent on the assignment i.e. the learner did not pass the assignment.
- Competent (green): The assessor found the learner competent.
Click on the colour coded icons in the list to view more information on the status of each pathway step or learner record.
3. Add a New Assignment Pathway Step Record by Assessor
If the learner does not have access to the LMS Portal and no assignment record exists in the Assignment Control Panel List for the learner, an Assessor can add the assignment pathway step record on behalf of the learner.
When the Add New Assignment button (on the previous screen) is clicked the following pop up screen will display. Choose the learner name and pathway step for creating the assignment pathway step record.
To add the physical documents or assignments go to the next article Assignment Details - Documents Screen.

4. Edit: How to edit, add, delete and download documents on the selected assignment pathway step.
After selecting the Edit in the Actions drop down on the Assignment Control Panel for a specific learner, the Assignment Details screen will open. How to work with assignment documents will be discussed in the article Assignment Details - Documents below.
5. Comments: View Comments made by Assessors and Moderators
A pop up screen will display all comments made by Assessors and Moderators on the assignment pathway step. These comments are also visible to the learner on the pathway step.

Assignment Details - Documents Screen
- After selecting the Edit link in the Actions drop down on the Assignment Control Panel for a specific learner assignment, the Assignment Details - Documents tab will open. See screen image below.
- This screen shows a list of existing documents on the selected assignment. The following functionality will allow the assessor to manage documents.
- Update Status button: Update the assignment pathway step status to one of the following values: Submitted, Resubmit and General Action Required. The assessor has the opportunity to send an email to the learner with the updated status. The Resubmit and General Action Required statuses will open the pathway step for the learner to upload more documents e.g. when documents are corrupt or the incorrect documents were uploaded. The Submitted status will close or disable the pathway step for the learner so that no more documents can be uploaded on the pathway step via the LMS Portal.
- The Documents tab functionality:
- Add documents
- Download documents in the list
- Delete documents which are not locked
- Edit documents:
- Lock documents - documents cannot be deleted.
- Show or hide documents for the learner.
- View comments button: View comments made by assessors and moderators on the assignments.

Assignment Details - Assessments
After the Assessor has downloaded and evaluated the assignment documents, he/she can enter the results in the Assessment tab on the Assignment Details screen. See screen image below.
The Assignment Details | Assessment tab screen shows a list of existing assessments as well as the following functionality that will allow an assessor to manage assessments.
- Add a new assessment: How to add or edit an assessment will be discussed in the next article.
- Actions:
- Delete assessments: All assessment can be deleted.
- Edit assessments: Only the latest assessment will be editable
- View comments button: View comments made by assessors and moderators on the assignments
The assessments will be sorted with the latest assessment at the top of the list.
Why is the Assessments tab disabled?
The Assessments tab will only become available for editing once documents were added and the pathway step's "Log to Learner Record" setting is TRUE.

Add or Edit an Assessment
The Assessor Feedback screen below will open when clicking on the Add button or Edit link on the Assignment Details - Assessments screen.
- The following fields and functionality are available on the Assessor Feedback screen.
- Assessor Name: The Assessor can be selected from a predefined list of assessors. An assessor should be registered as a user in the system and be configured in the assessor master data.
- Assessment From and To Dates
- Pathway Step Status:
- The pathway step status can be updated to Remedial, Competent or Not Yet Competent.
- The Remedial Pathway Step status will open/enable the pathway step for the learner to upload more documents.
- The Competent or Not Yet Competent Pathway Step statusses will lock/disable the pathway step for the learner. The learner will not be able to upload more documents.
- Remedial and Not Yet Competent Pathway Step status: The learner record competent status will be updated to "No".
- Competent status: The leaner record competent status will be updated to "Yes".
- Score: Any Alpha-numeric value can be entered.
- Attempt Number: Numeric value should be entered.
- Comments: Feedback or comments made by the Assessor.
- Send email: An email with comments can be sent to the Learner if the Send Email indicator is checked.
Note: The learner's email address should be configured for emails to be sent.
An example of the assessor feedback email to the learner can be viewed in one of the next articles.

Example of Assessor Feedback Email sent to Learner

Assignment Details - Moderation
The Internal and External Moderations tabs are available to view moderation outcomes and feedback from moderators. The assessor will only be able to view the information on these tabs.
Why are the Internal and External Moderations tabs disabled?
These tabs will only become available once documents were added and the pathway step's "Log to Learner Record" setting is TRUE.

Due Dates and Notifications
What can I do with the Due Dates and Notifications module?
Set due dates for pathway steps
Due dates can be set for pathway steps based on the condition selected for the plan.
Setup notifications to be sent for pathway steps
- Notify a learner via SMS or email.
- Set if a notification should be sent for a pathway step.
- Set Reminder notifications to be sent.
Send a summary email
Send an email that contains an overview of the steps and their respective due dates.
Create Due Date plans for pathways
Create a Due Date plan for a pathway and specify the:
- Plan owner
- Wet who is responsible for the plan
- Recipients
- Set who is included in the plan
- Condition for the plan:
- Appointment Requirement
- Specific Date
- Training Requirement
- Notification Schedule
- Set when notifications will be sent
Simulate a Due Date plan
Select a simulated start date to confirm the due dates set make sense.
How to use the Due Dates and Notifications List
What needs to be ready before you start?
- Due Date and Notification rights for the user who should setup the plan;
- The pathway should be complete the step order should be finalized;
- Prerequisites should already be setup in the Pathway ;
- The Learners who should be included in the plan should already be on the Pathway Target Audience or in a Subgroup.
How did I get here?
From the portal click on System Administration | Modules | e-Learning | Due Dates and Notifications
What is the purpose of the Due Dates and Notifications list?
The Due Dates and Notifications screen can be seen as a Due Date Plan library. Due Date Plans can be created from this page and any Due Date Plans created on a specific pathway are displayed in this list.
The terms Due Date Plan and Notification Plan are used interchangeably in this article and throughout the module.
Search
The first time the page opens, the Search is Hidden. Click on the Show button to expand the search. If no plans have been created, the No results found message is displayed.

When a plan has been created, it is displayed in the table below the search. Search results are returned in the table to easily take action when the plan in question is found.

Table
The table contains a list of all Due Date Plans created on the current schema. The plan name, valid dates, plan condition, group, and status are displayed in the table. Actions which can be performed on the plan are also available when the Actions button is selected.

| Column Heading | Explained |
|---|---|
| Notification Plan | The name of the Notification Plan/Due Date Plan. |
| Notification Plan Valid Between | The Notification Plan period, the period within which notifications will be sent for the Due Date Plan. |
| Plan Condition | The Condition selected for the plan, there are three conditions available:
|
| Group | The group selected to receive the notifications. This can be the Pathway Target Audience or a subgroup. |
| Status | The status of the Due Date Plan. |
There are several Actions available to manage a Due Date Plan:
- Edit: Edit the Due Date Plan details, the due dates, or set which notifications should be sent to the learner.
- Delete: Delete the Due Date Plan.
- Details: View the details of the Due Date Plan.
- Copy: Copy the Due Date plan for the same or another pathway.
- Send Summary Email: Sends a summary email of all the due dates and steps to the Due Date Plan group.
- Due Date Simulation: Simulate the Due Date Plan to confirm it is set up to notify learners on the desired dates.
- Export Recipients: Export the recipient list to see who was notified and included in the Due Date Plan.
Page Help
Refer to the Page Help option in the top right of the screen for a bit more information on what is assumed to be in place and what the next steps are in terms of a Due Date Plan.

How to add a Due Date Plan
Where can I add a Due Date Plan?
Due Date Plans can be added in two ways:
- from the Due Dates and Notifications list and
- from the pathway
The main difference is the navigation.
How did I get here?
From the portal click on System Administration | Modules | e-Learning | Due Dates and Notifications
On the Due Dates and Notifications Screen, click on the +Due Date Plan button.

How did I get here?
From the portal click on System Administration | Modules | e-Learning | Learning Management | Maintain Learning Pathway
- Find the Pathway the Due Date plan should be created for.
- On the Pathway Preview tab, click the View Due Date Plans button.

Complete the General Tab Details
How can I quickly create a Due Date Plan?
When creating a Due Date Plan the fields listed below are mandatory:
- Pathway
- Plan Name
- Plan Owner
- Recipients - select either Target Audience or Group/Subgroup
- Conditions: Due date based on
- Schedule Run Days - select either Everyday or Week Days Only
To assist in reducing the details required when creating a plan, some fields are completed by default.
Plan Details section

Pathway
- If the plan is created from the Due Dates and Notifications list, the pathway needs to be selected.
- If the plan is created from the pathway, the pathway is pre-selected.
Active
- When all the plan details are completed and the due dates and notifications are configured set the plan to active to ensure notifications are sent to learners.
- Notifications will only be sent for active plans.
Plan Name
- To make it as easy as possible to create a plan, the Plan name is pre-populated with the name of the pathway and the words Due Date Plan at the end.
- The plan name can be changed.
- Make sure to use plan names that will make sense not only when creating the plan but long after the plan is used.
Plan Owner
- The plan owner has defaulted to the user who creates the plan.
- Any other user can be set as the plan owner.
- When selecting a plan owner, make sure the user has the Pathway Administrator Role and the Due Dates and Notifications permission on that role.
- The Plan Owner will be notified in the following cases:
- When learners did not receive their Due Date Plan notifications
- Changes were made to a pathway linked to a notification plan (excluding the step order changed)
Recipients section

The next step when creating a Due Date Plan is selecting which group should receive the notifications.
Target Audience:
- When the Pathway has a Target Audience, the Who is on Target Audience report can be generated, to confirm all the learners are loaded on the Target Audience.
Group/Subgroup:
- Only one subgroup can be selected at a time.
Conditions section

After selecting the Recipients, further conditions can be added to narrow down who is included in the Due Date Plan.
There are three conditions available. Each condition is elaborated on in separate articles, available using the links below.
Appointment Requirement Condition
Training Requirement Condition
Notification Schedule

Notifications are only sent for active plans.
Notify Manager:
- When checked, the manager will receive an email indicating that the due date was missed by employees in their subgroup.
Schedule Run Days:
- Days on which the notifications should be sent.
- Notifications can be sent every day or on weekdays only.
Try it out: Click on the + Due Date Plan button and create a plan for an existing pathway.
How to use the Appointment Requirement Condition
Appointment Requirement Condition
The Appointment Requirement condition has three options available.
- Start Date In Group
- Start Date In Position
- Start Date In Company
For each option, a number of days can be specified or a specific date can be set.
Where can I find the Start Date?
To View

To view the Start Date in Group/Company/Position Navigate to Manage Employees | Employee Profile | Personal Information. In the Appointment Information block, the Start Dates are displayed.
To Edit
To edit the Start Date in Group/Company/Position click on the Edit Appointment Information hyperlink. This will open the Appointment History of the learner. The appointment dates can be edited here.
When to use the Appointment Requirement Condition?
The Appointment Requirement condition is most often used for orientation/induction courses.
Start Date In Group

When the Start Date in Group is selected, a number of days can be specified or a specific date can be set.
Start Date In Company

When the Start Date in Company is selected, a number of days can be specified or a specific date can be set.
Start Date In Position

When the Start Date in Position is selected, a number of days can be specified or a specific date can be set.
Try it out: When creating a new Due Date Plan, select the different Start Date options available before saving the plan.
How to use the Specific Date Condition
Specific Date Condition

When to use the Specific Date Condition?
When learners need to complete a course that starts on a specific date
Quick Reference Guides and Practical Exercises
A list of Quick reference Guides and Practical Exercises:
Click on the Download links to download the documents.
| Name | |
|---|---|
| Pathways - Practical Exercises | |
| Movie Step - Quick Reference Guide | |
|
|

FAQ's
How to allow the Learner to download a certificate from a pathway step
There are a few steps need to followed to ensure the learner can print the certificate from the Pathway.
The following must be true in the Pathway from an Admin perspective:
- A training intervention (not a unit standard) is linked to the Certification Point step in the Pathway

- Prerequisites are setup for the Certification Point step.

- The Certification Point Step is not locked.

The following must be true on the Training Intervention library:
In the Printing of Certificates section on a Training intervention:
- Allow learner to print certificate must be checked.
- Select the appropriate option for when the learner may print the certificate.
- Select the Certificate Template from the drop down
- Complete the Certificate Display Name if the Certificate has a display name other than the name of the training intervention, incorporated in the design.
Changes to the training intervention must be save to be applied.

The following must be true for the learner:
- All prerequisites for the Certification Point step have been met.

Take Note
When a training intervention is set to allow a learner to print a certificate, the learner will be able to print the certificate in ANY pathway where they have access to that specific Certification Point training intervention.
Videos
eLearning Video
Click on the link below for a demo of Signify's LMS Module.
Learning Management System Video