# Pathway Target Audience Tab

# Target Audience: Org Condition

<div id="bkmrk-"></div>The purpose of the Org Condition is to add a learner based on their location in the Organisation Structure.

Follow the steps illustrated in this section to add a learner based on the Org Condition.

<div data-article-id="1150820" data-workflow="false" id="bkmrk--0"><div data-article-id="1150820" data-workflow="false"><div data-article-id="1150820" data-workflow="false"><div data-role="steps-container"><div></div><div></div></div></div></div></div>[![image-1616881381730.png](https://signature.signifyhr.co.za/uploads/images/gallery/2021-03/scaled-1680-/wxWQL1BRkQu3tw7Q-image-1616881381730.png)](https://signature.signifyhr.co.za/uploads/images/gallery/2021-03/wxWQL1BRkQu3tw7Q-image-1616881381730.png)

<div data-article-id="1150820" data-workflow="false" id="bkmrk--2"><div data-article-id="1150820" data-workflow="false"><div data-role="steps-container"><div></div><div></div></div></div></div>1\. Click on the **Org** **Condition** **radio** button.

2\. Click on the **Add** button. The **Organisation Nodes** screen opens.

<div data-article-id="1150820" data-workflow="false" id="bkmrk--3"><div data-article-id="1150820" data-workflow="false"><div data-role="steps-container"><div></div><div>![](https://media.screensteps.com/image_assets/assets/002/901/010/original/d041494c-0480-485c-917b-e4789e092b4c.png)</div><div></div></div></div></div>3\. Enter the **Org Name** you are looking for.

<div data-article-id="1150820" data-workflow="false" id="bkmrk-any-of-the-other-sea"><div data-article-id="1150820" data-workflow="false"><div data-role="steps-container"><div>- Any of the other search fields can be used to locate the Org Node you are looking for.

</div></div></div></div>4\. Click on the **Search** button.

5\. **Select** the **Org Node** you want the Target Audience to be applied to.

<div data-article-id="1150820" data-workflow="false" id="bkmrk-note-that-you-can-se"><div data-article-id="1150820" data-workflow="false"><div data-role="steps-container"><div>- Note that you can select **multiple** Org Nodes.

</div></div></div></div>6\. Click on the **Select** button to add the selected Org Nodes to the Target Audience.

7\. Click the **Close** button to return the Target Audience tab of the Pathway.

<div data-article-id="1150820" data-workflow="false" id="bkmrk--4"><div data-article-id="1150820" data-workflow="false"><div data-article-id="1150820" data-workflow="false"><div data-role="steps-container"><div></div><div></div></div></div></div></div>[![image-1616881398062.png](https://signature.signifyhr.co.za/uploads/images/gallery/2021-03/scaled-1680-/RSOsaz8itQdbOWLy-image-1616881398062.png)](https://signature.signifyhr.co.za/uploads/images/gallery/2021-03/RSOsaz8itQdbOWLy-image-1616881398062.png)

<div data-article-id="1150820" data-workflow="false" id="bkmrk--6"><div data-article-id="1150820" data-workflow="false"><div data-role="steps-container"><div></div><div></div></div></div></div>The selected **Org Node** will be displayed on the list screen.

8\. Click on the **Refresh Target Audience** button to apply the change.

9\. Generate the **Who is on target audience** report to **confirm** the change delivered the desired results.

<div id="bkmrk--7"><div><svg class="svg-icon" data-icon="link" role="presentation" viewbox="0 0 24 24" xmlns="http://www.w3.org/2000/svg"></svg></div></div><p class="callout info">**Try It Out:** Navigate to a Pathway Target Audience tab and select an Org Node to be added to the Org Condition.</p>

# Target Audience: Position Condition

<div id="bkmrk--8"></div>The purpose of the Position Condition is to add a learner based on the Position have within the Organisation.

As all Positions are linked to a Job, the Job List is used to select the Positions linked to a Job.

Follow the steps illustrated in this section to add a learner based on the Position Condition.

[![image-1616881429600.png](https://signature.signifyhr.co.za/uploads/images/gallery/2021-03/scaled-1680-/M1Qq2GMXtgIpQTnJ-image-1616881429600.png)](https://signature.signifyhr.co.za/uploads/images/gallery/2021-03/M1Qq2GMXtgIpQTnJ-image-1616881429600.png)

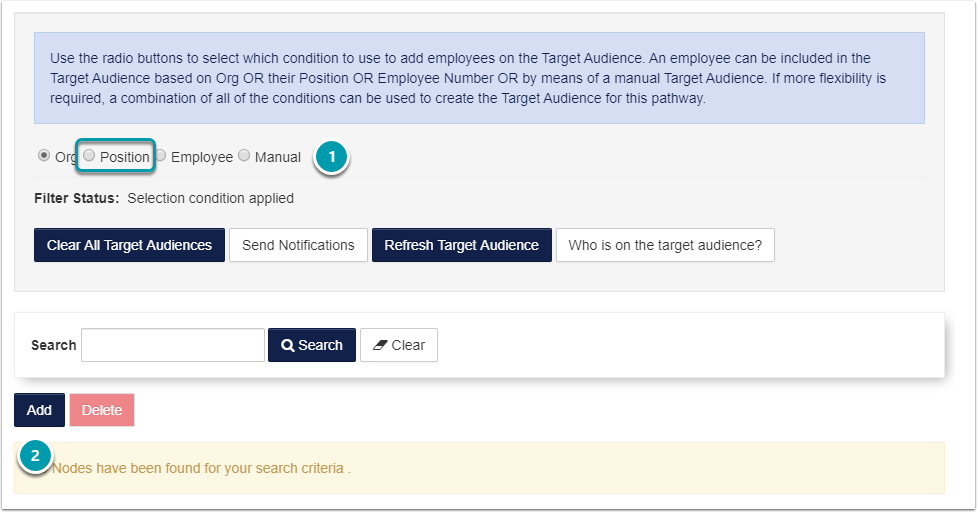
1\. Click on the **Position Condition** radio button.

2\. Click on the **Add** button. The **Job List** screen opens.

<div id="bkmrk--10">![](https://media.screensteps.com/image_assets/assets/002/901/024/original/7d7591af-3a7c-4bdf-b014-100dbdd87781.png)</div>3\. Enter the details for the **JobTitle** you are looking for and click on the **Search** button.

4\. **Select** the **Job Title** you want the Target Audience to be applied to.

<div id="bkmrk-note-that-you-can-se-0"><div>- Note that you can select **multiple** Job Titles.

</div></div>5\. Click on the **Select** button to add the selected **Job Title** to the Target Audience.

6\. Click the **Close** button to return the Target Audience tab of the Pathway.

[![image-1616881440215.png](https://signature.signifyhr.co.za/uploads/images/gallery/2021-03/scaled-1680-/Dwy1VQxqNYT5uRsC-image-1616881440215.png)](https://signature.signifyhr.co.za/uploads/images/gallery/2021-03/Dwy1VQxqNYT5uRsC-image-1616881440215.png)

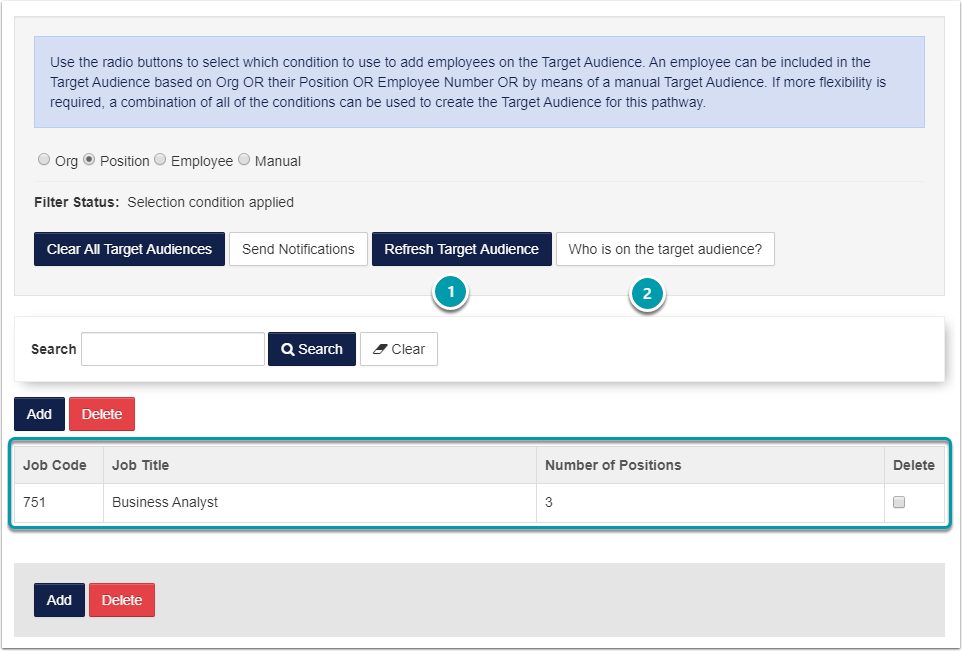
The selected **Job Title** will be displayed on the list screen.

7\. Click on the **Refresh Target Audience** button to apply the change.

8\. Generate the **Who is on target audience report** to **confirm** the change delivered the desired results.

<div id="bkmrk--12"><div><svg class="svg-icon" data-icon="link" role="presentation" viewbox="0 0 24 24" xmlns="http://www.w3.org/2000/svg"></svg></div></div><p class="callout info">**Try It Out:** Navigate to a Pathway Target Audience tab and select a Job Title to be added to the Position Condition.</p>

# Target Audience: Employee Condition

<div id="bkmrk--13"></div>The purpose of the Employee Condition is to add any learner within the Organisation.

Follow the steps illustrated in this section to add a learner based on the Employee Condition.

[![image-1616881488358.png](https://signature.signifyhr.co.za/uploads/images/gallery/2021-03/scaled-1680-/G12zUC1nQvIdRpYm-image-1616881488358.png)](https://signature.signifyhr.co.za/uploads/images/gallery/2021-03/G12zUC1nQvIdRpYm-image-1616881488358.png)

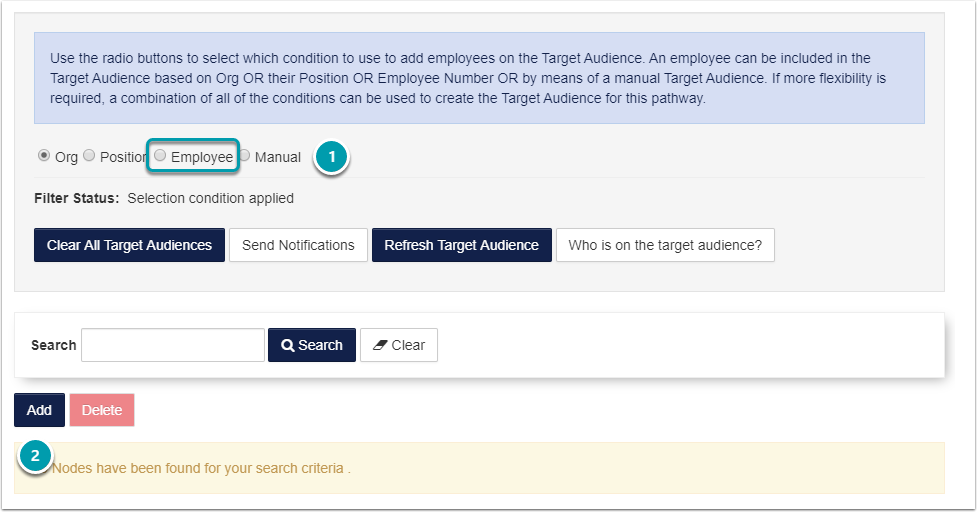
1\. Click on the **Employee Condition** radio button.

2\. Click on the **Add** button. The **Employee Search** screen opens.

[![image-1616881504137.png](https://signature.signifyhr.co.za/uploads/images/gallery/2021-03/scaled-1680-/xe527UVhwBIwcUWA-image-1616881504137.png)](https://signature.signifyhr.co.za/uploads/images/gallery/2021-03/xe527UVhwBIwcUWA-image-1616881504137.png)

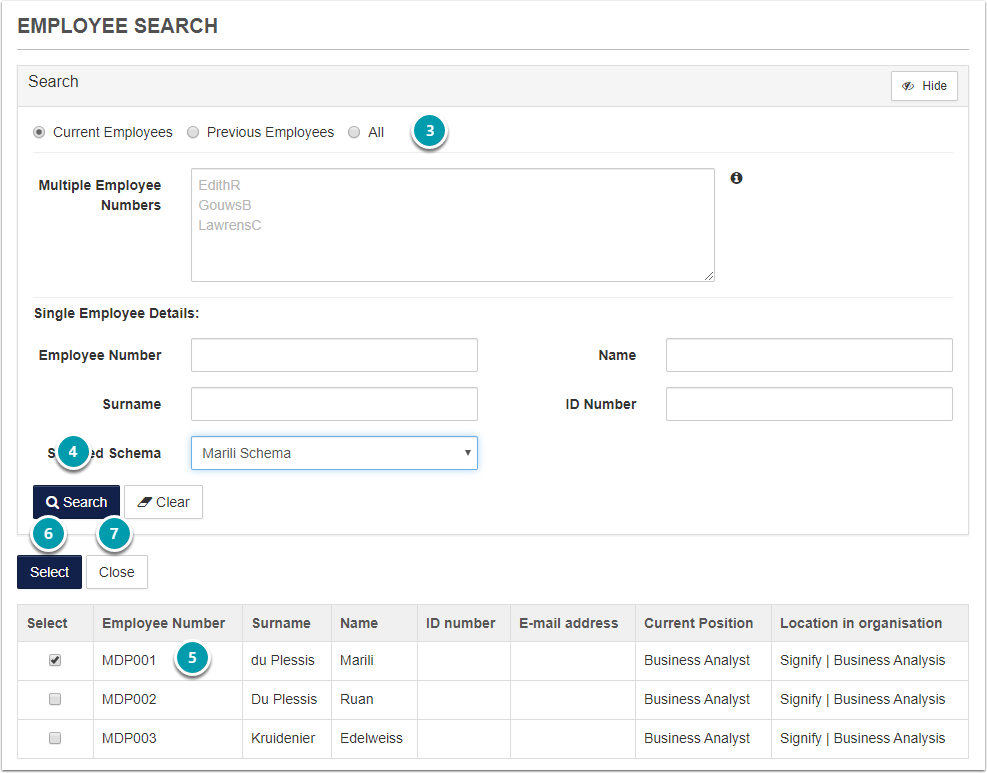
3\. Enter the details for the **Employee** you are looking for.

4\. Click on the **Search** button.

5\. **Select** the **Employee** you want the Target Audience to be applied to.

<div id="bkmrk-note-that-you-can-se-1"><div>- Note that you can select **multiple** Employees.

</div></div>6\. Click on the **Select** button to add the selected **Employee** to the Target Audience.

7\. Click the **Close** button to return the Target Audience tab of the Pathway.

[![image-1616881514407.png](https://signature.signifyhr.co.za/uploads/images/gallery/2021-03/scaled-1680-/kxFWiW3twqa3VVVV-image-1616881514407.png)
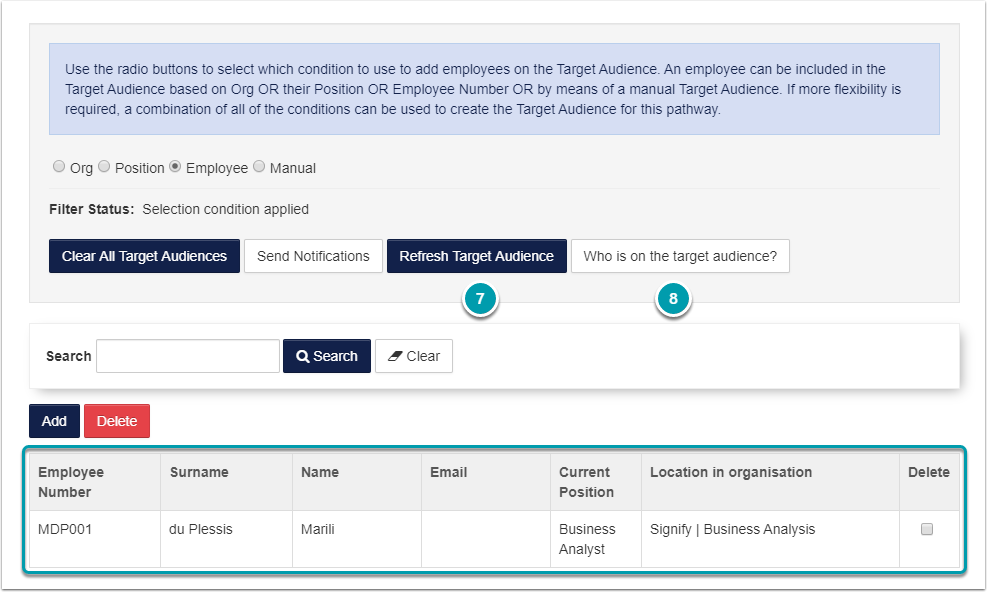
](https://signature.signifyhr.co.za/uploads/images/gallery/2021-03/kxFWiW3twqa3VVVV-image-1616881514407.png)

The selected **Employee** will be displayed on the list screen.

7\. Click on the **Refresh Target Audience** button to apply the change.

8\. Generate the **Who is on target audience report** to **confirm** the change delivered the desired results.

<div id="bkmrk--17"><div><svg class="svg-icon" data-icon="link" role="presentation" viewbox="0 0 24 24" xmlns="http://www.w3.org/2000/svg"></svg></div></div><p class="callout info">**Try It Out:** Navigate to a Pathway Target Audience tab and select an Employee to be added to the Employee Condition.</p>

# Target Audience: Send Notifications

<div id="bkmrk--18"></div>After the Pathway has all the required steps and is approved by Management, it is time to inform the learners that a new pathway is available to them. PTA001, the Pathway Target Audience email is sent from the Send Notifications screen.

## <svg aria-label="Heading anchor" enable-background="new 0 0 20 20" height="16" role="img" viewbox="0 0 20 20" width="16" xmlns="http://www.w3.org/2000/svg"></svg>Navigate to the Pathway

**How did I get here?** Administration Portal | e-Learning | Maintain Learning Pathway

Select the Pathway which the email will be sent for.

[![image-1616881581880.png](https://signature.signifyhr.co.za/uploads/images/gallery/2021-03/scaled-1680-/dkXcaEMEXStjcD6I-image-1616881581880.png)
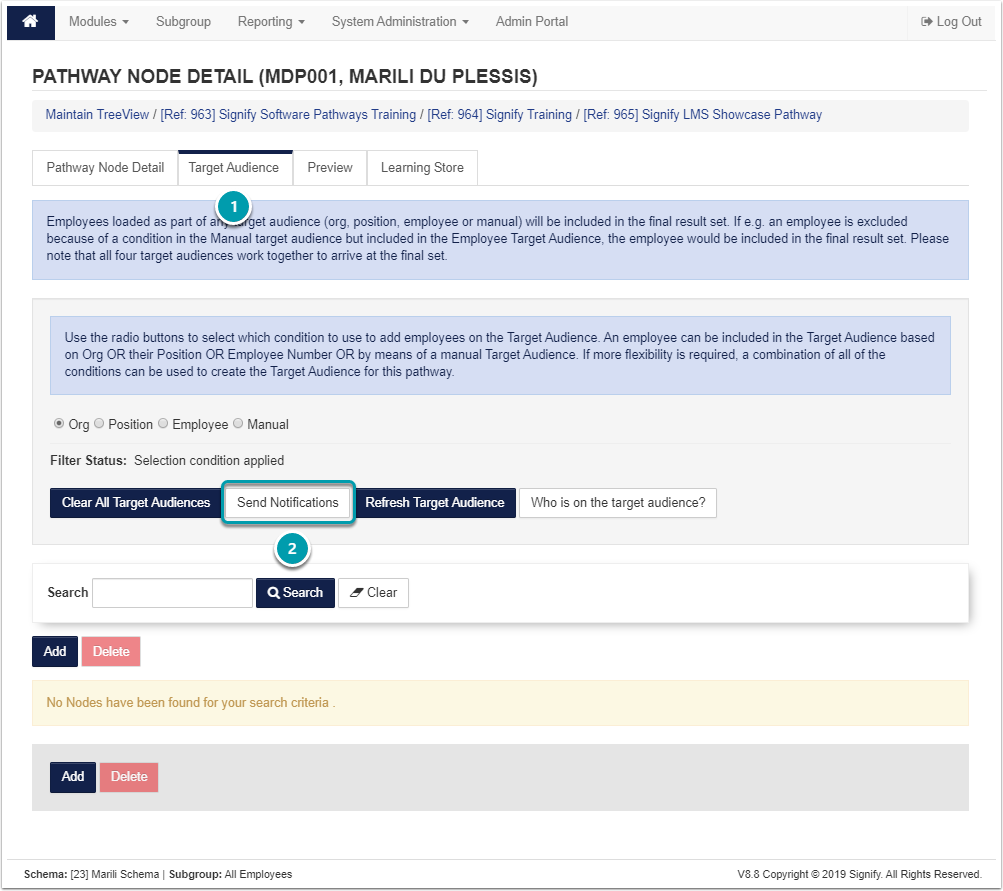
](https://signature.signifyhr.co.za/uploads/images/gallery/2021-03/dkXcaEMEXStjcD6I-image-1616881581880.png)

1\. Click on the **Target Audience** Tab.

2\. Click on the **Send Notifications** button.

## <svg aria-label="Heading anchor" enable-background="new 0 0 20 20" height="16" role="img" viewbox="0 0 20 20" width="16" xmlns="http://www.w3.org/2000/svg"></svg>Send Notifications

**Refresh** the **Target Audience** before sending any notifications.

[![image-1616881592303.png](https://signature.signifyhr.co.za/uploads/images/gallery/2021-03/scaled-1680-/J3JUTpdX359jn7Pm-image-1616881592303.png)
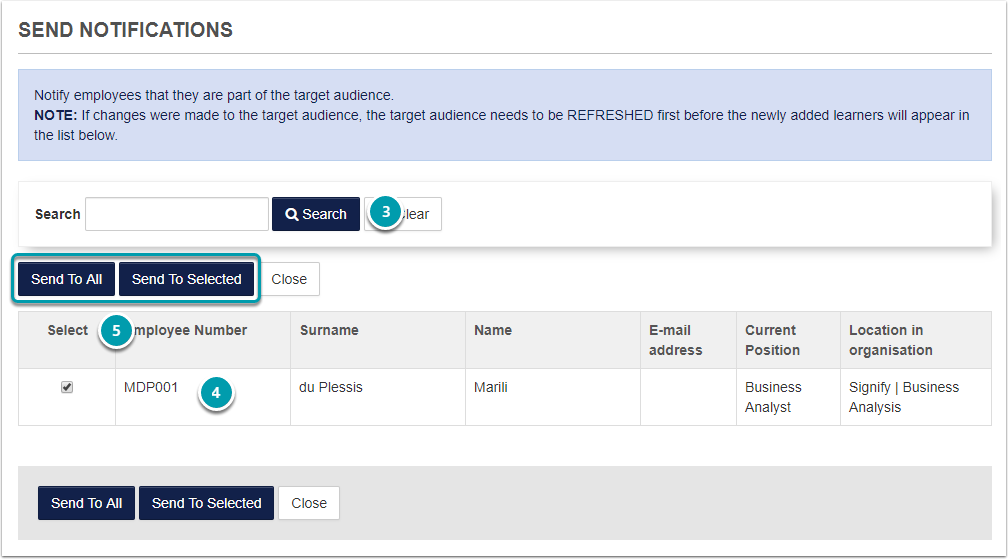
](https://signature.signifyhr.co.za/uploads/images/gallery/2021-03/J3JUTpdX359jn7Pm-image-1616881592303.png)

3\. Enter search criteria and click on the **Search** button if the notification.

4\. **Select** the learners to whom the notifications need to be sent.

5\. Click **Send To All** or **Send To Selected**

Notifications can **only** be **sent** to learners who have **valid** **email** addresses. If the learner has an invalid email address or if the email address is blank, the notification will not be sent.

## <svg aria-label="Heading anchor" enable-background="new 0 0 20 20" height="16" role="img" viewbox="0 0 20 20" width="16" xmlns="http://www.w3.org/2000/svg"></svg>Send To All

When Send To All is selected, the notification will be sent to all learners who form part of the Target Audience.

A confirmation prompt is displayed before the notifications are sent to all the learners.

Click on the OK button to send the notification to all learners on the Target Audience.

<div data-step-uuid="93edb4eb-cd54-4a5b-814c-497e6d923963" id="bkmrk--21"><div data-step-uuid="93edb4eb-cd54-4a5b-814c-497e6d923963"><div></div><div></div></div></div>[![image-1616881606163.png](https://signature.signifyhr.co.za/uploads/images/gallery/2021-03/scaled-1680-/SockDEbncpkaz19r-image-1616881606163.png)](https://signature.signifyhr.co.za/uploads/images/gallery/2021-03/SockDEbncpkaz19r-image-1616881606163.png)

<div data-step-uuid="93edb4eb-cd54-4a5b-814c-497e6d923963" id="bkmrk--23"><div></div></div>## <svg aria-label="Heading anchor" enable-background="new 0 0 20 20" height="16" role="img" viewbox="0 0 20 20" width="16" xmlns="http://www.w3.org/2000/svg"></svg>Send To Selected

When Send To Selected is selected, the notification will only be sent to the selected learners who for part of the Target Audience.

Once the notification is sent, click on the Okay button to return to the Pathway Target Audience tab.

<div data-step-uuid="12baed7d-5080-4863-81ee-5e938bb5a093" id="bkmrk--24"><div data-step-uuid="12baed7d-5080-4863-81ee-5e938bb5a093"><div></div><div>![](https://media.screensteps.com/image_assets/assets/002/901/510/original/73da8d28-9daa-423b-95eb-279f36aaaee5.png)</div><div></div></div></div><div id="bkmrk--25"><div><svg class="svg-icon" data-icon="link" role="presentation" viewbox="0 0 24 24" xmlns="http://www.w3.org/2000/svg"></svg></div></div><p class="callout info">**Try It Out:** Navigate to a Pathway and add yourself to the Target Audience. Refresh the Target Audience and send the notification to your own email address.</p>