Manage Employees
- How to Import Employees Using Excel
- How To Set Up A Welcome Email
- How To Create Subgroups
- How To Download a Learner Certificate For Administrators
- How To Download a Learners Certificate For Users
- How To Re-Appointment a User
- How To Add a Learner Record To An Employee
- How To View a Users Assessment Attempts/Results
How to Import Employees Using Excel
1. Before you start
Important: Before you start with this manual ensure that your Region settings are correct, otherwise the Excel (.csv) files will not work correctly.
1.1. How to get there?
- On your desktop click on Search (1).
- Then type Region & language settings (2).
- Click on Region & language settings (3) or press Enter. A new window will open.

- In the new window click on Additional date, time & regional settings (4). Another new window will open.
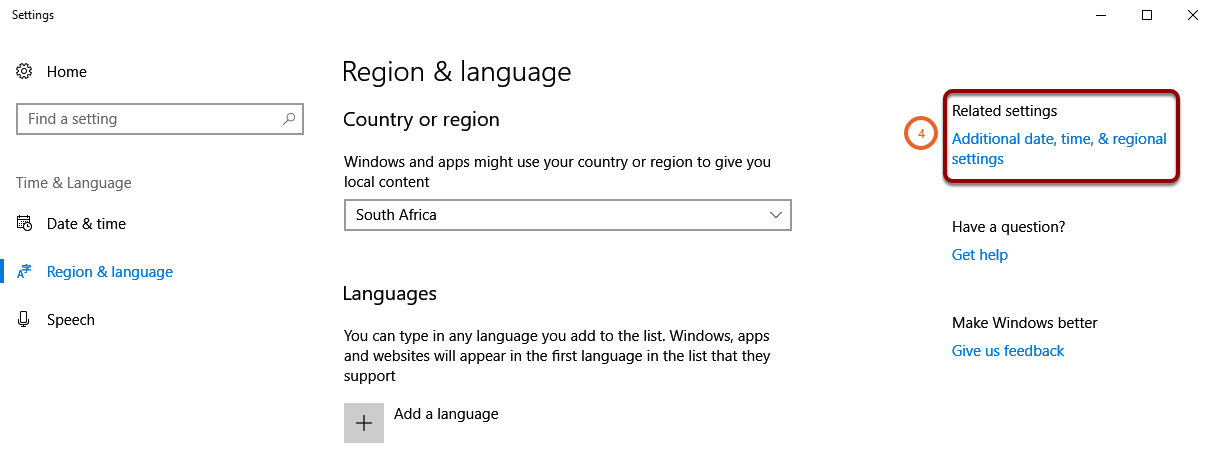
- In the new window navigate to and click on Region (5). A new window will open.
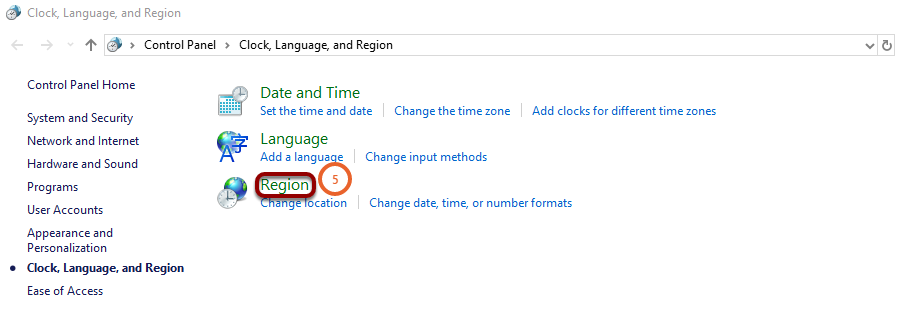
- In the Region window click on Additional Settings... (6). A new window will open.

1.2. What to do?
- In the new window ensure that the Decimal symbol (7) is a full stop (.).
- Ensure that the List separator (8) is a comma (,).
- Click Apply (9) and close all the windows.

2. How to get there?
Click on System Administration (1). With your cursor hover over System Administration (2) then click on Import Data (3)


3. What to do?
3.1. Download a sample file on Signify

- Click Download sample file (3) in the new window.

- The sample file will download in your browser (4).

3.2. Create an employee import (.csv) file in Excel
3.2.1. Enter the employee data in an Excel document (.xlsx)
- Open the sample file downloaded above (4).
- Select the entire first row (1) in the sample file.
- Copy the entire row (2).

- Create a New Microsoft Excel Worksheet (3).

- Open the new work sheet and Paste (4) the entire first row copied above into your new Excel documents First (5) row.
- Enter all the employee data in the mandatory columns.
- These columns are all mandatory:
- Column A: Employee Number.
- Column B: Surname.
- Column C: Full Name.
- Column O: OrgLevel1_Description.
- Column BC: Job Title.
- Column BM: Employment Type Description.
- Column EL: SchemaID.

3.2.2. Save the Excel document as a (.csv) file
Save the new Excel document as a .csv file:
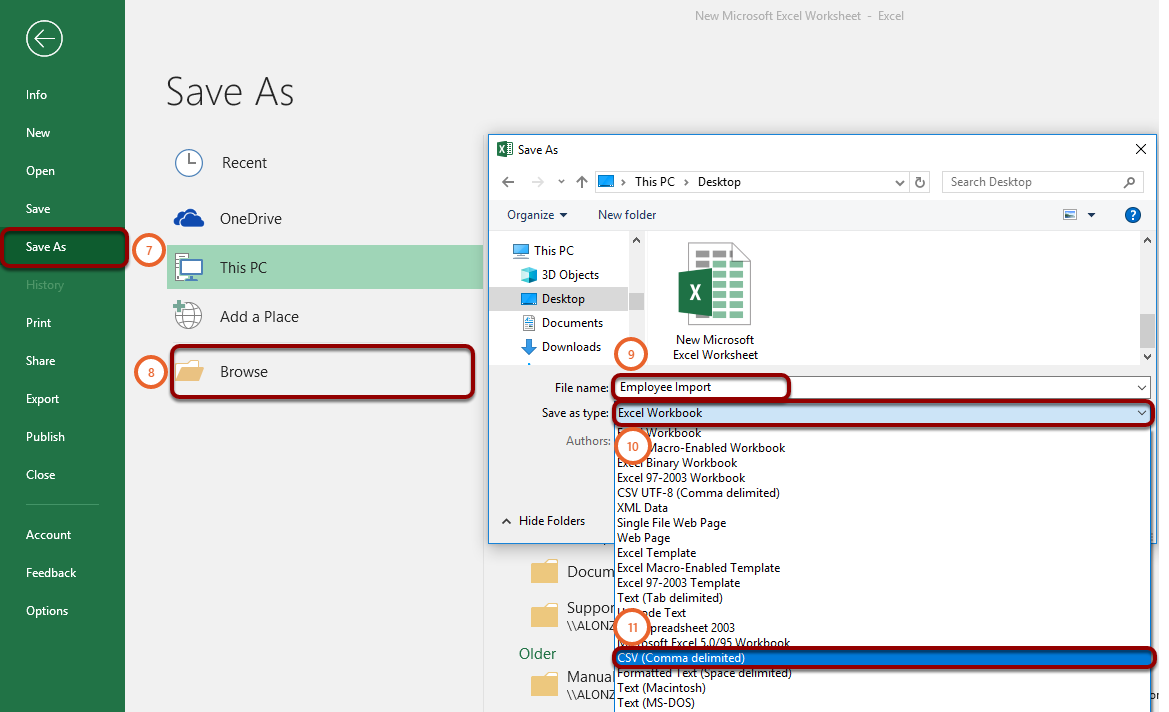
- Click on File (6).
- Navigate to Save As (7).
- Click on Browse (8).
- Insert the File name (9) of your (.csv) file.
- Click on the drop down (10).
- Select CSV (Comma delimited) (11).
- When asked, Do you want to keep using this format, click on yes (12).


3.3. Importing the (.csv) file
3.3.1. Execute Mock Import
Click on this link on instructions on how to get there.

- Click Import file (3) in the new window.

- A new window will load.
- In the new window navigate and click on Choose File (1).
- A Windows file explorer windows will open.

- Search your computer for the Employee Import file that you saved as a (.csv) in Section 2.2.2.
- Select that file (2).
- Click on open (3).

- Click on Save & Preview (4).
- The page will refresh and new options will be available.

- Tick the box I verify that the preview of the above data is correct (5).
- Then click on Execute Mock Import (6).
The system will not allow you to continue if the tick box (5) is not ticked.

If there are errors in the Import:
- Correct the errors in the original Microsoft Excel (.xlsx) employee import document Section 2.2.1.
- Save as a (.csv) file Section 2.2.2.
- Execute the Mock Import again.
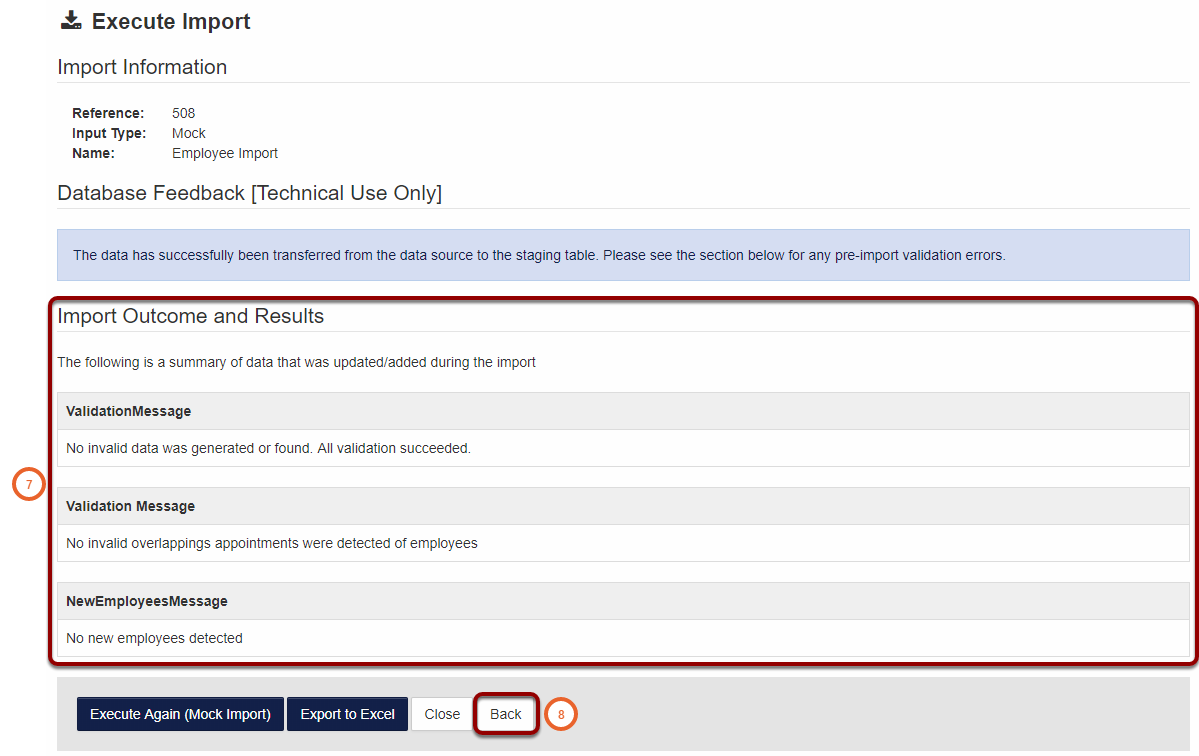
If there are no errors (7):
- Click Back (8).
- Then move to section 2.3.2.
3.3.2. Execute actual import
Note: before continuing with this section, first perform a Mock Import in Section 2.3.1 and insure no errors occur.
Click on this link on instructions on how to get there.

- Click Import file (3) in the new window.
- A new window will load.

- Click on Choose File (4) again and select the employee import file (.csv) that you saved in Section 2.2.2.
- Click Save & Preview (5).
- Tick the box I verify the preview of the above data is correct (6).
You will not be able to continue if the tick box is not ticked.
- Click on Execute Import (7).

- The page will load and a new page will appear.
- Check if there were no errors for the import (13).
- Click on Execute Again (Actual Import) (14).
- Wait for the import to complete.

3.4. Post Import Validations
Use this guide to ensure the employee data imported was correct and that it is correctly displayed on the system.
3.4.1. Organisation Structure
3.4.1.1. How to get there?
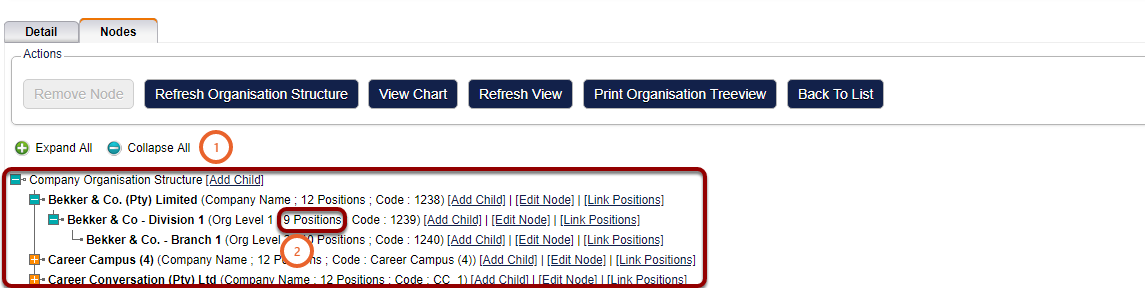
Click on System Administration (1). With your cursor hover over Modules (2) then Organisation Structure (3) then Administration (4) then click on Organisation Structure (5).


3.4.1.2. What to do?
- Ensure that all the node have been created correctly (1).
- Check that the correct number of Positions (2) display.
3.4.2. Job Profiler
3.4.2.1. How to get there?
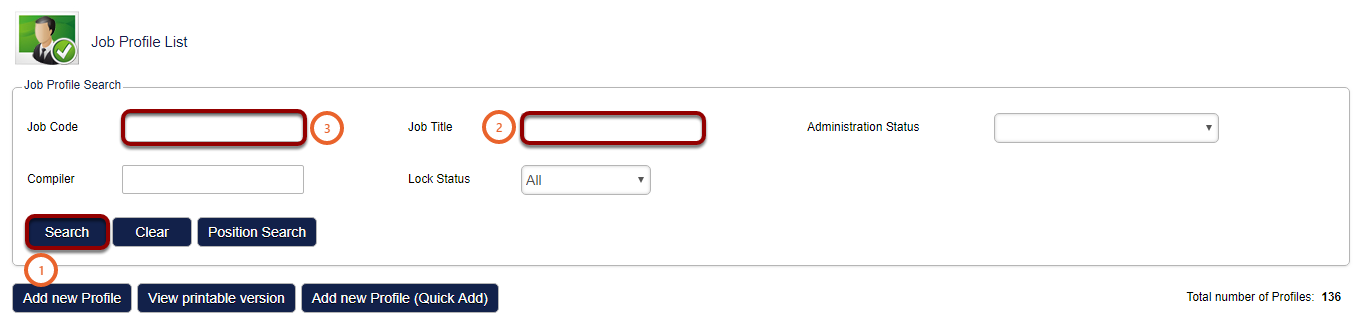
Click on System Administration (1). With your cursor hover over Modules (2) then Job Management (3) then click on Job Profiler (4).


3.4.2.2. What to do
Search (1) for the Job Titles (2) and Job Codes (3) that you have imported to ensure that the jobs and positions have been created properly.
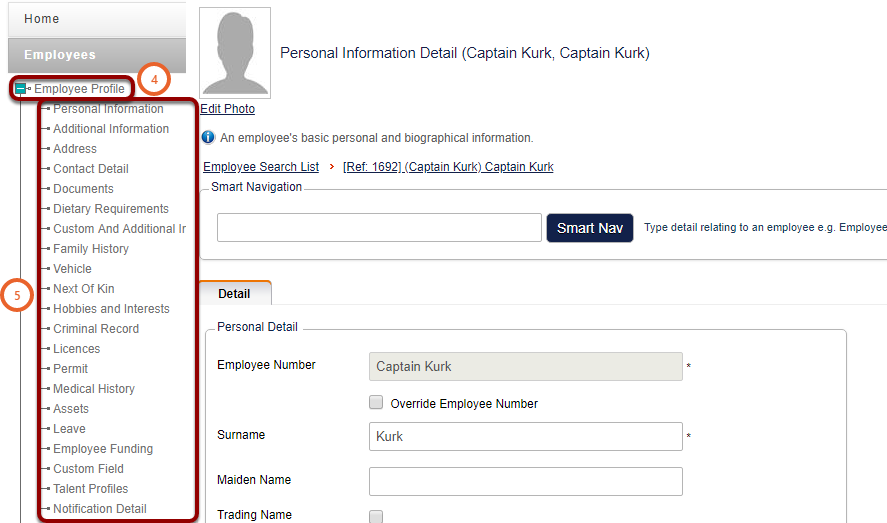
3.4.3. Manage Employees
3.4.3.1. How to get there?
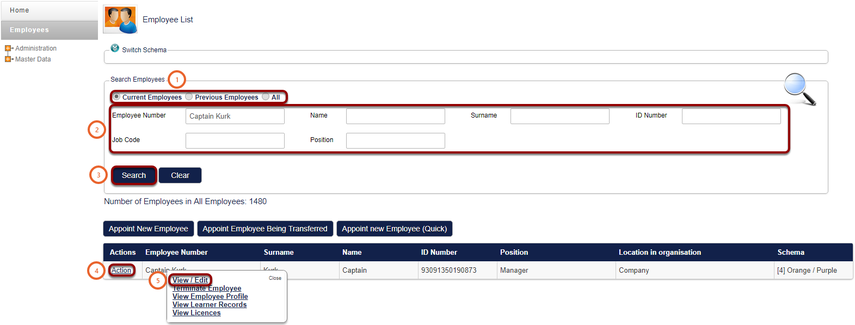
Click on System Administration (1). With your cursor hover over Modules (2) then click on Manage Employees (3).


3.4.3.2. What to do?
When searching for employees remember to select the correct box (1).
- A Search for your employees (2).
- Click on Search (3).
- Navigate to and click on Action (4). A small window will open.
- Click on View / Edit (5) on this window.
- Click on the plus icon Organisational Assignment (1).
- Navigate to Appointment History (2).
- Confirm that the appointments are all correct (3).
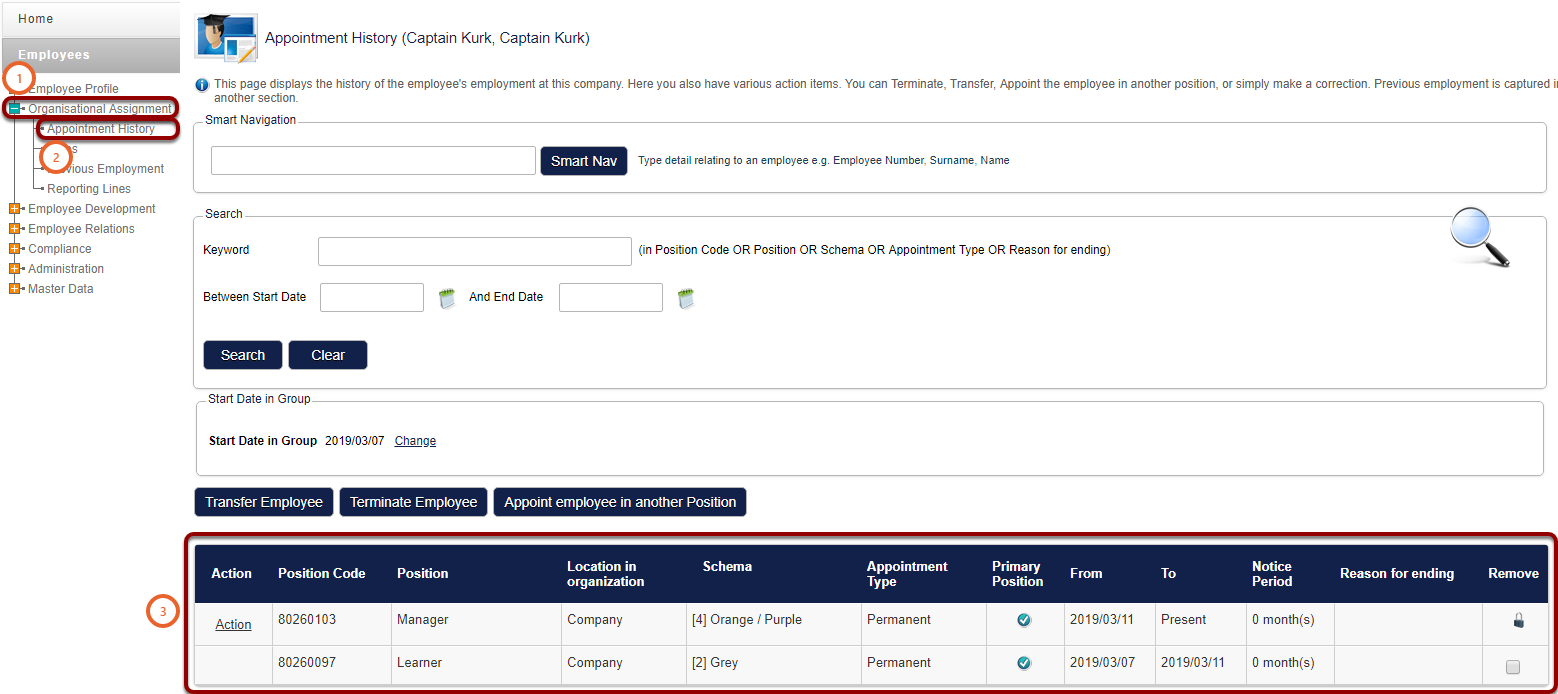
- Click on the plus icon at Employee Profile (4).
- Confirm that the details are correct (5).
How To Set Up A Welcome Email
Welcome email set-up
How to get there?
On your Home screen click on System Administration (1), With your cursor hover over the System Administration (2), then navigate to Notifications (3) | Emails (4) | Notification - Templates (5).


What to do?
- From the drop down menu search and select System Access (1).
- Click on the Search button (2).
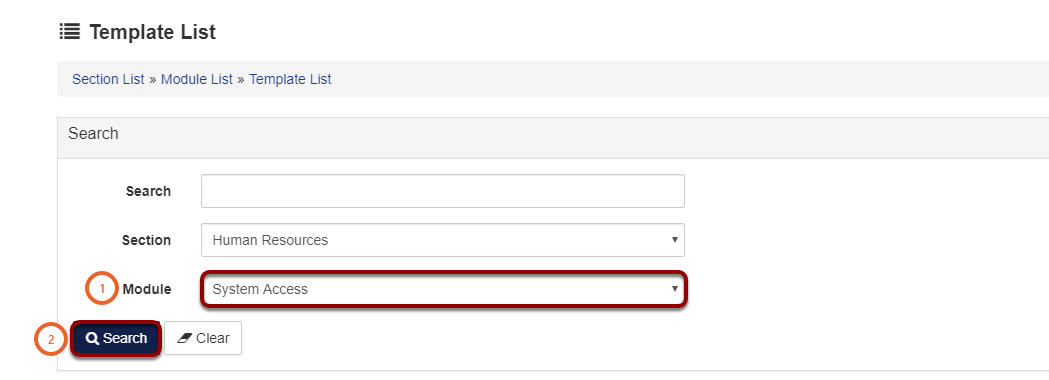
- Search through the list for the SECURITY_ADMIN_PASSWORDRESET_WELCOME (3) email, this is the welcome email.
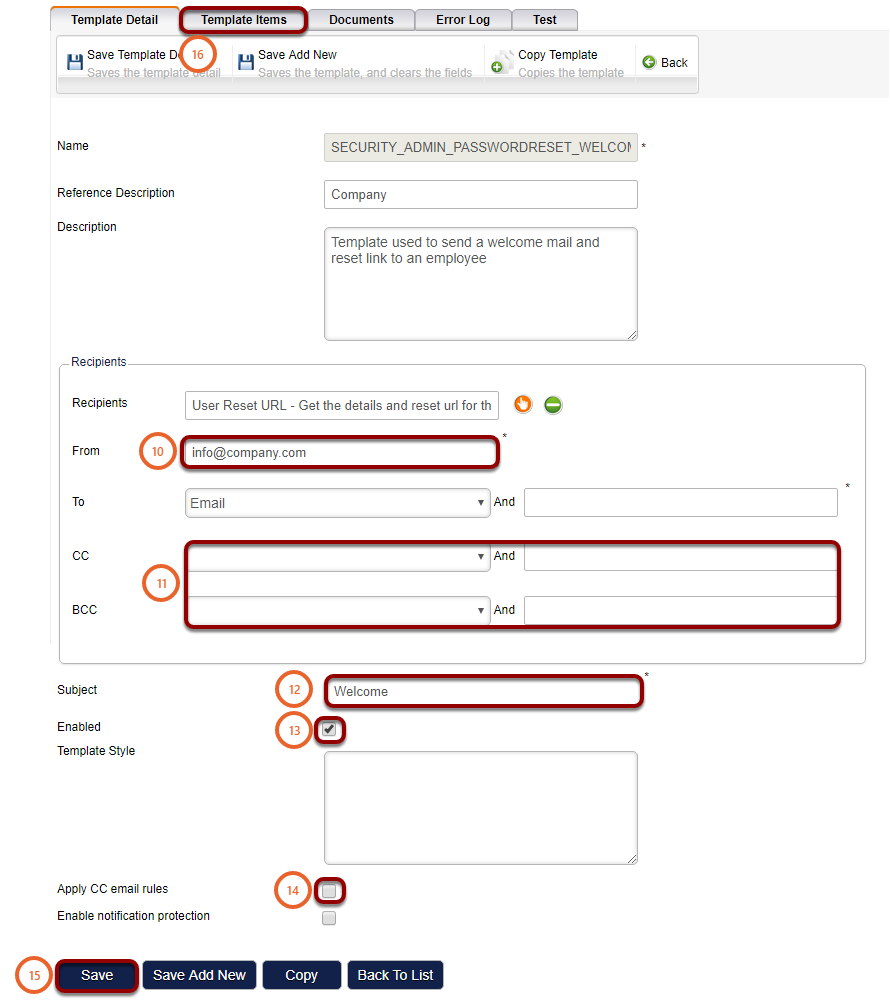
- From this screen you will be able to Select the subject for your email (4).
- You can edit the From E-mail Address (5).
- Remember to enable the email by clicking on the tick box (6).
- You will also be able to Copy and Preview (7) the email.
- For more options click on Action (8), a small window will open.
- Click on View / Edit (9).

- Enter the From email (10).
- Set up the CC and BCC rules by clicking on the drop down and selected Email and then entering the email address in the next field (11).
- Type in the Subject of your email (12).
- Remember to tick the tick box to Enable the welcome email (13).
- If you entered CC and BCC rules the tick box Apply CC email rules (14) must be ticked.
- Remember to click on the Save (15) button to save all your settings.
- Click on Template Items (16) to edit the email template.
- You will be directed to a new window.
Important: Do not edit any information other than the instruction given above, unless you are sure what to do, otherwise the welcome emails may not be sent.
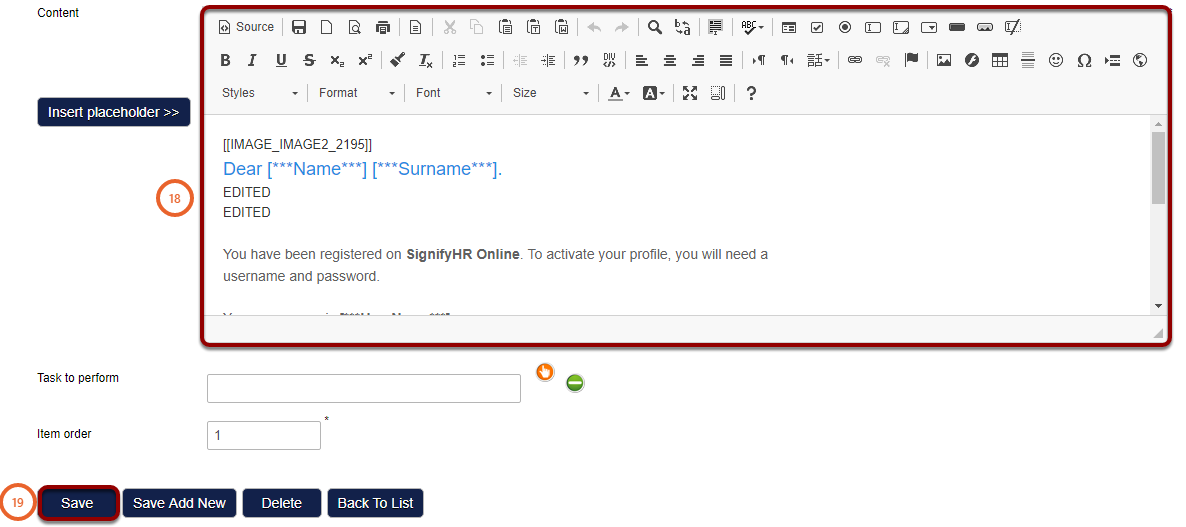
- In the new window click on Body (17) to edit the welcome email body.
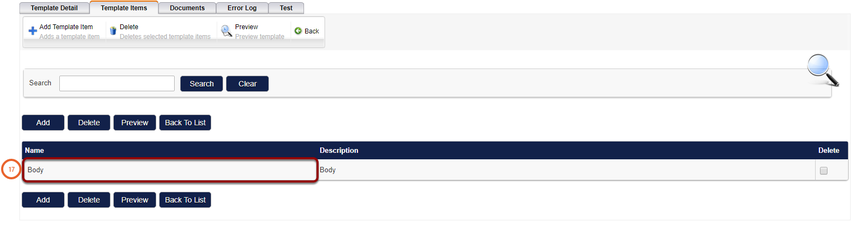
- Enter your email Content (18) below.
- Remember to click on Save (19) to save your work.
Please do not hesitate to contact support at support@signify.co.za for any assistance.
Sending welcome email to new users
When users have been imported with Excel
How to get there?
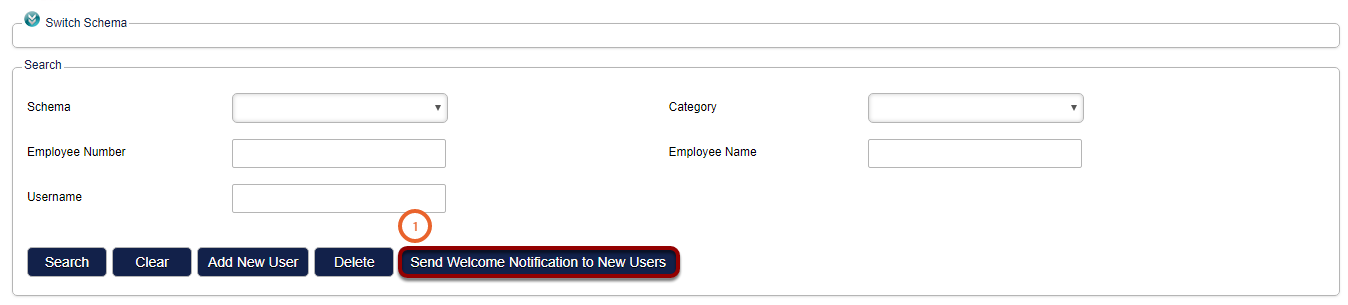
Click on System Administration (1), with your cursor hover over System Administration (2), then navigate to Users (3) | Manage Users (4).


What to do?
- If you would like to ignore users before a specific date, then tick the box at Ignore users created / imported before this date (2). Select the before date in field (3).
It is important to untick the tick box (2) when no users should be ignored.
The options that can be selected when sending a welcome email are:
- Send the welcome message to all users (4).
- The welcome notification will be sent to:
- All users who have not received it before.
- And that were created / imported after the date specified above (if applicable).
- Click on Confirm to continue.
- The welcome notification will be sent to:
- Send the welcome message only to users that I have selected. (5)
- The welcome notification will be sent to:
- Only users that have been selected.
- And who have not received it before.
- And that were created / imported after the date specified above (if applicable).
- Click on Select Users to continue.
- The welcome notification will be sent to:
- Send the welcome message to all users, but exclude users that I have selected. (6)
- The welcome notification will be sent to:
- All users who have not received it before.
- And that have not been excluded.
- And that were created / imported after the date specified above (if applicable).
- Click on Select Users to continue.
- The welcome notification will be sent to:
Click on Click on Continue To Next Step (7) to continue.
Important: If the user has already received a welcome email, they will not receive one again irrespectively of what option is selected below.

- Search for the user you would like to select by typing their Username (8).
- Use the tick box Select Username (9) to select all the visible employees (9).
- Or select the users one by one by ticking the tick box (10).
- You can see the number of Users Selected (11).
- Click on Clear Users (12) to clear all the Users Selected (11).
- Click on Continue To Next Step (13) when all the users were selected.

- Tick I confirm that my selection is correct (14).
- Click Export Users That Will Receive Notification (15) to save the list.
- Click on Send Welcome Notifications (16).

When appointing new employee (Quick)
How to get there?
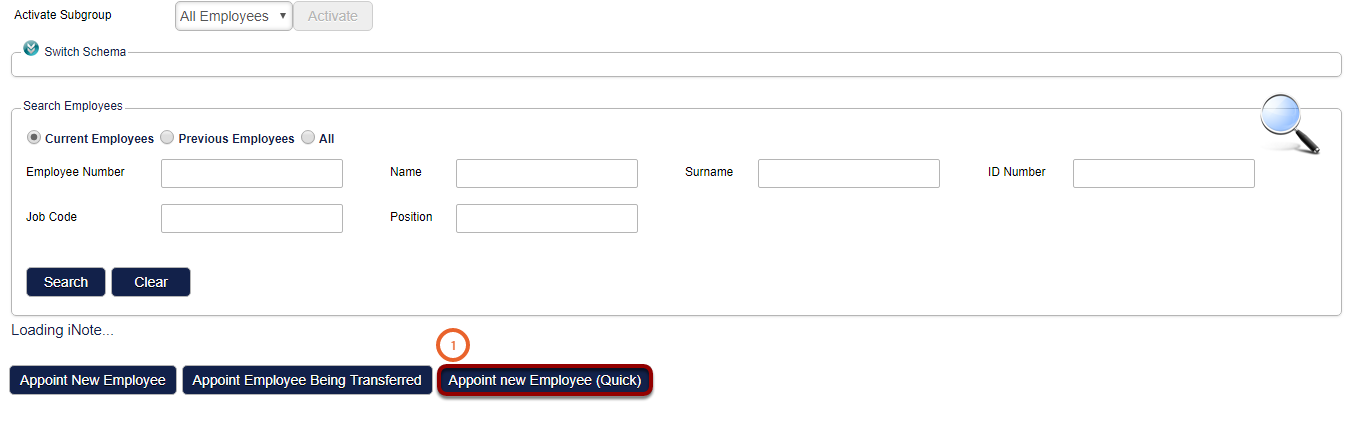
Click on System Administration (1), then with your cursor hover over Modules (2) and click on Manage Employees.


What to do?
- Click on Appoint new Employee (Quick) (1).
Important: You will only be able to send the welcome email when using the quick appoint option (1)
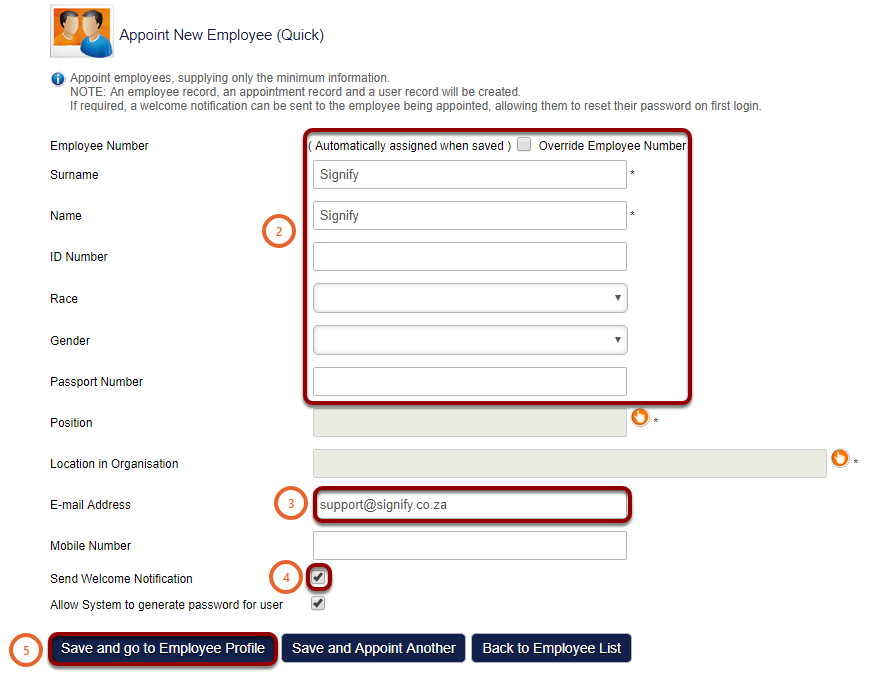
- Enter the employees details (2).
- Enter a valid E-mail Address (3) for the employee.
- Select the box Send Welcome Notification (4).
- Click on Save and go to Employee Profile (5).
How To Create Subgroups
How to get there?
Click on System Administration (1), then Click on Subgroup (2).


What to do?
- Click on Create (1) to create a new subgroup

- Enter the subgroup Description (2).
- If you want to select an existing category:
- Select Category (3).
- From the drop down (4) select the existing category.
- If you would like to create a new category:
- Select New Category (5).
- Enter the name for your new category (6).

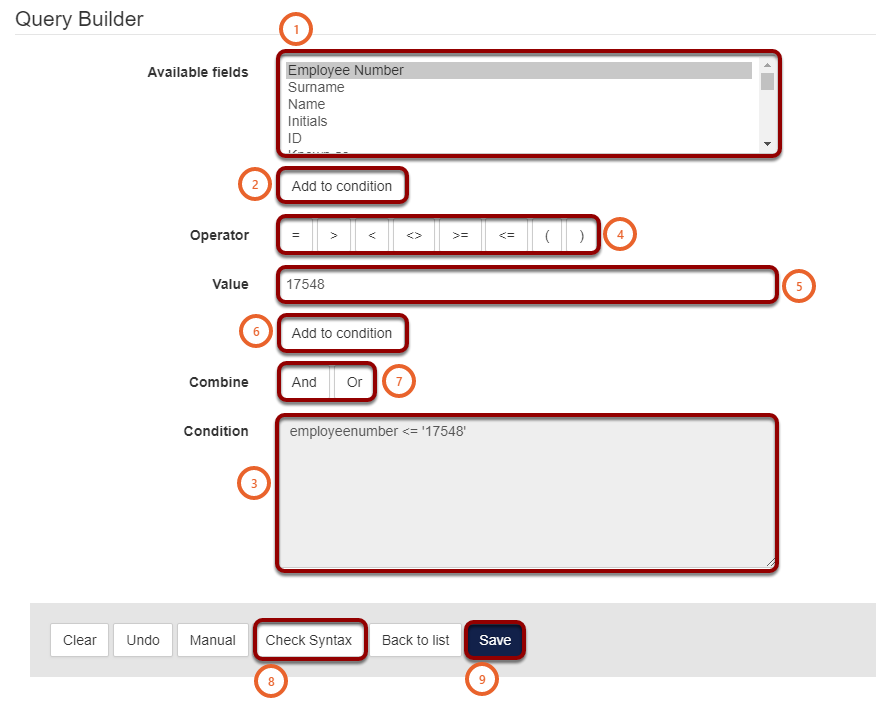
Add subgroup conditions
Subgroup conditions define which employees should be included in the subgroup.
- Select from the Available fields (1) the field that would be used to define who should be included in the subgroup. E.g. Employee Number.
- Click on Add to Condition (2).
- The condition will be added to the Condition field (3).
- Click on the Operator (4) you would like to use.
- Enter the Value (5).
- Click on Add to Condition (6) to add the requirement to the Condition field (3).
NOTE: Exact values have to be provided. Should a value that is not on the system be used, the script will still validate however, as the Value does not exist, the system will not link any employees to the subgroup.
- You can combine conditions by using And or Or buttons (7).
And (7) is used to specify two/more conditions that an employee meet in order to be included. E.g. if an employee is part of Gauteng branch managers, And they are part of Limpopo branch managers they will be included. This also implies that employees who only form part of one group will not be included.
Or (7) is used when an employee should be included in the subgroup if they are part of one condition or another. E.g. if an employee is part of Gauteng branch managers, Or if they are part of Limpopo branch managers they will be included. This also implies that employees from both groups will be included. There is no limit on the number of OR conditions that can be added.
- When the Conditions are complete click on the Check Syntax button (8).
- If there are no errors in your syntax then click on Save (9).
Test the subgroup
How to get there?
Click on System Administration (1), then with your cursor hover over Modules (2) and click on Manage Employees (3).


What to do?
- From the Activate Subgroup drop down select the (More...) (1) option.
- A new window will open.

- Use the Subgroup field (2) to search for the subgroup.
- Click on Search (3).
- Then select your Subgroup (4).
- Click on Select (5).


- Click on the Activate button (6) to activate the subgroup.
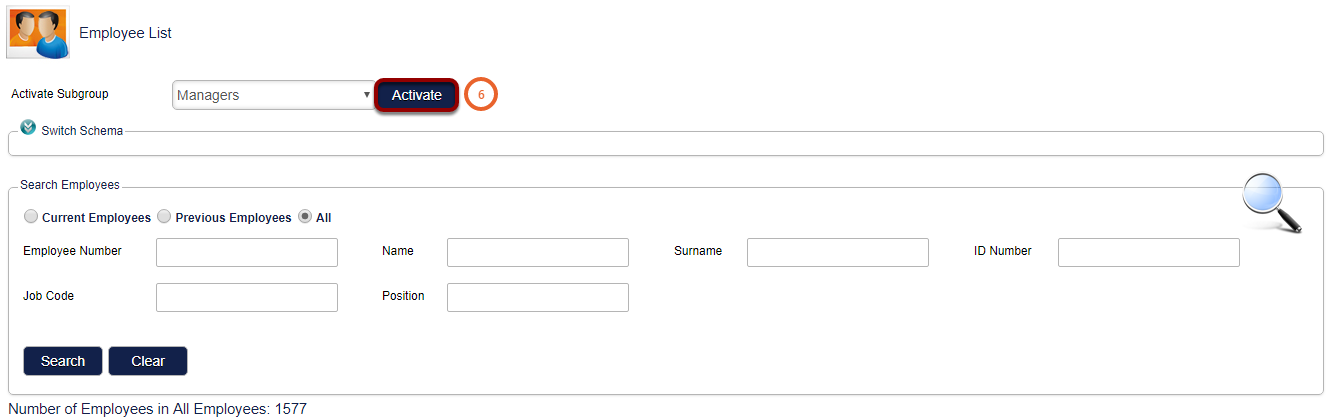
- Search for the employees (7) that should be in the subgroup you created to ensure that the subgroup has worked.
Note: Remember to switch your subgroup back to All Employees.
How To Download a Learner Certificate For Administrators
How to get there?
Click on System Administration (1), then with your cursor hover over Modules (2) | Manage Employees (3).


What to do?
- Search for the user using the search boxes and click on Search (1).
- Navigate to the user and click on Action (2).
- A new windows will open.
- Click on View / Edit (3).

- You will be navigated to a new screen.
- On the left click on the plus icon at Employee Development (4).
- Navigate to Learner Records (5).

- Click on Action (6) for the desired learner record.
- A new window will open.
Note: Only a certification type learner record will allow you to download a certificate.

- Click on Download Certificate (7).
- The certificate will start to download in your browser.

- Click on the certificate to view (8).

How To Download a Learners Certificate For Users
A Pathway Certification Step
- Navigate to and click on LMS Portal (1).

- Click on the e-Learning Programmes (2) tab.

- With your cursor hover over the pathway (3).
- Click on Launch (4).

- Navigate to the last step in the pathway (5).
- Or click on the Certification step (6)
Note: To download your certificate all the prerequisites of the pathway must be met and the pathway must be completed.

- Click on the Certification Point (7).
- Your certificate will download in your browser.
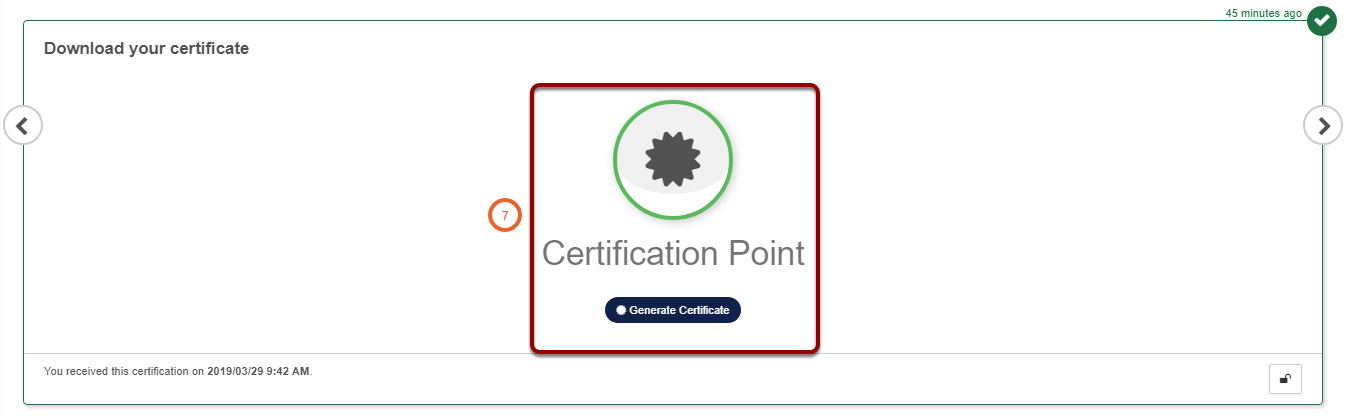
- Double click on your certificate to view (8).

My Achievements
- Click on LMS Portal (1)

- Option 1:
- Navigate to the My Achievements tab (2).
- Click on COURSES (3).
- Then Navigate to and click on the certificate icon (4).
- Option 2:
- Click on All Certificate (5).
- A new window will open.
- Click on Download Certificate (6)
Your certificate will download in your browser.
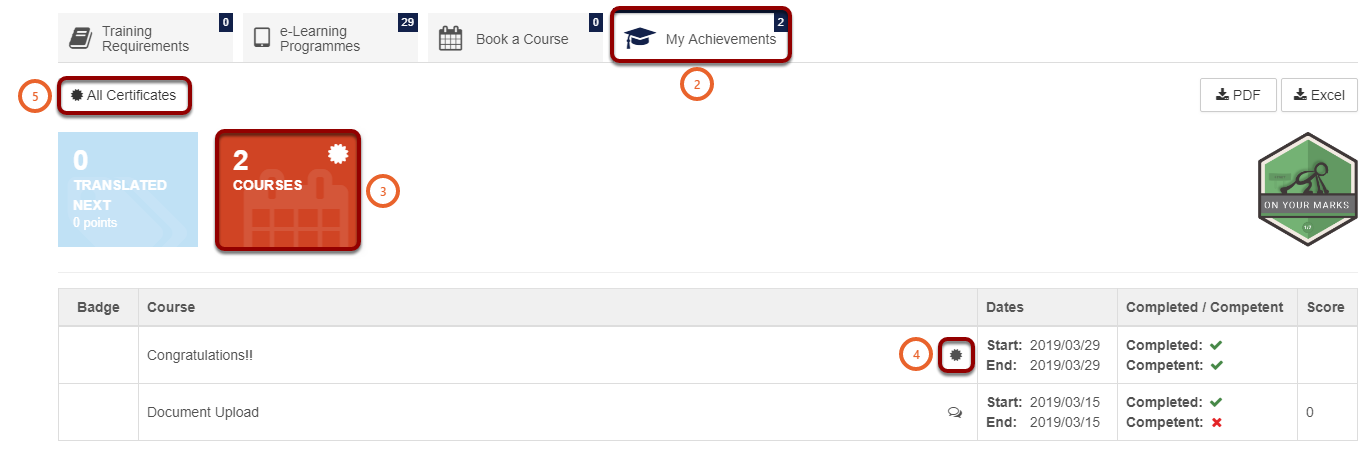

- Double click on your certificate to view (7).

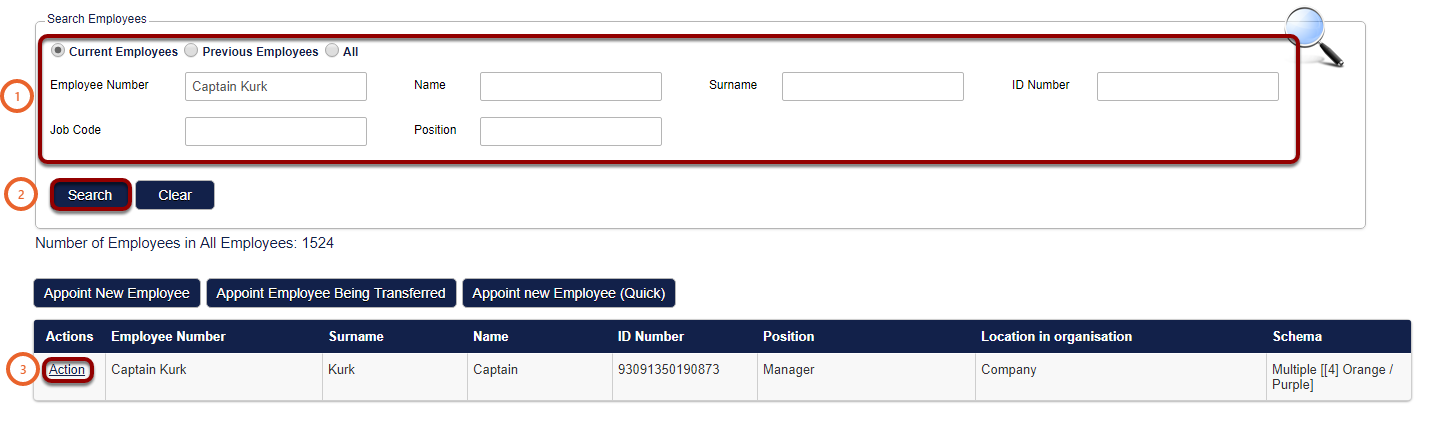
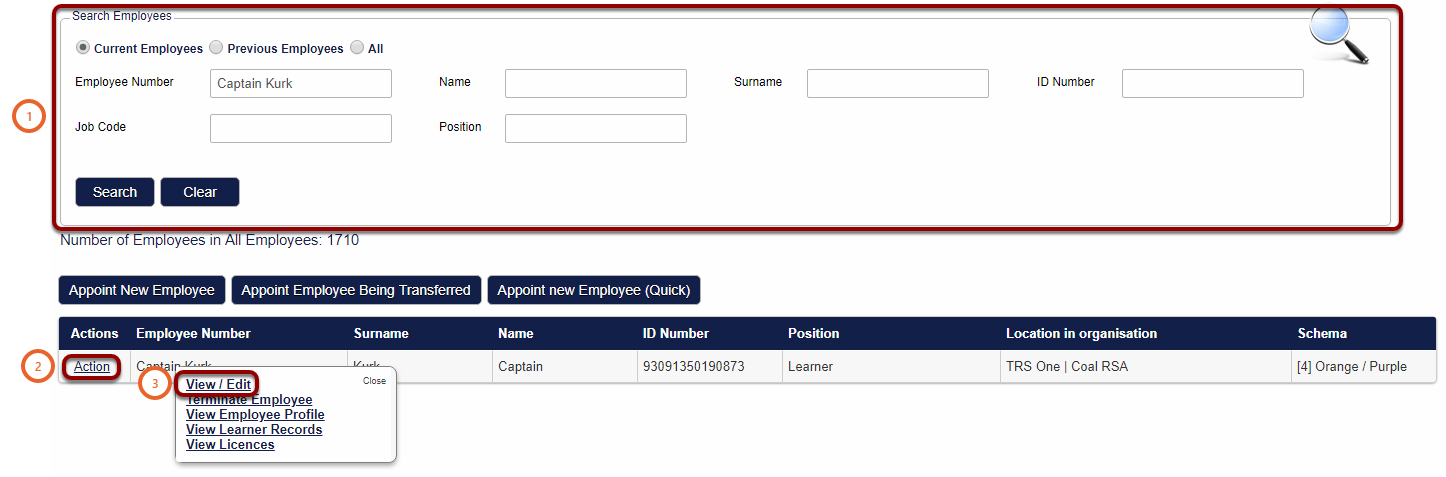
How To Re-Appointment a User
How to get there?
Click on System Administration (1), with you cursor hover over Modules (2) | Manage Employees (3).


What to do?
- Use the search criteria to find the user (1).
- Click on Search (2).
- Navigate to the user and click on Action (3).
- A new window will open.
- Click on View / Edit (4)

- On the left of the screen click on the plus icon at Organisational Assignment (5).
- Then click on Appointment History (6).
- Click on Action (7) for the appointment you would like to amend.
- A new window will open.
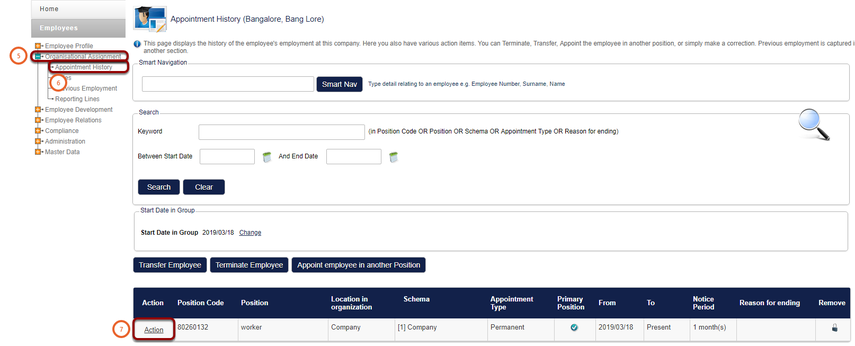
- Click on Make Correction (8).

- Select the users Position (9) by click on the hand symbol.
- From the drop down menu select the Appointment Type (10).
- Insert the Appointed From and To (11) fields.
- Click on Save (12) to save the users appointment.

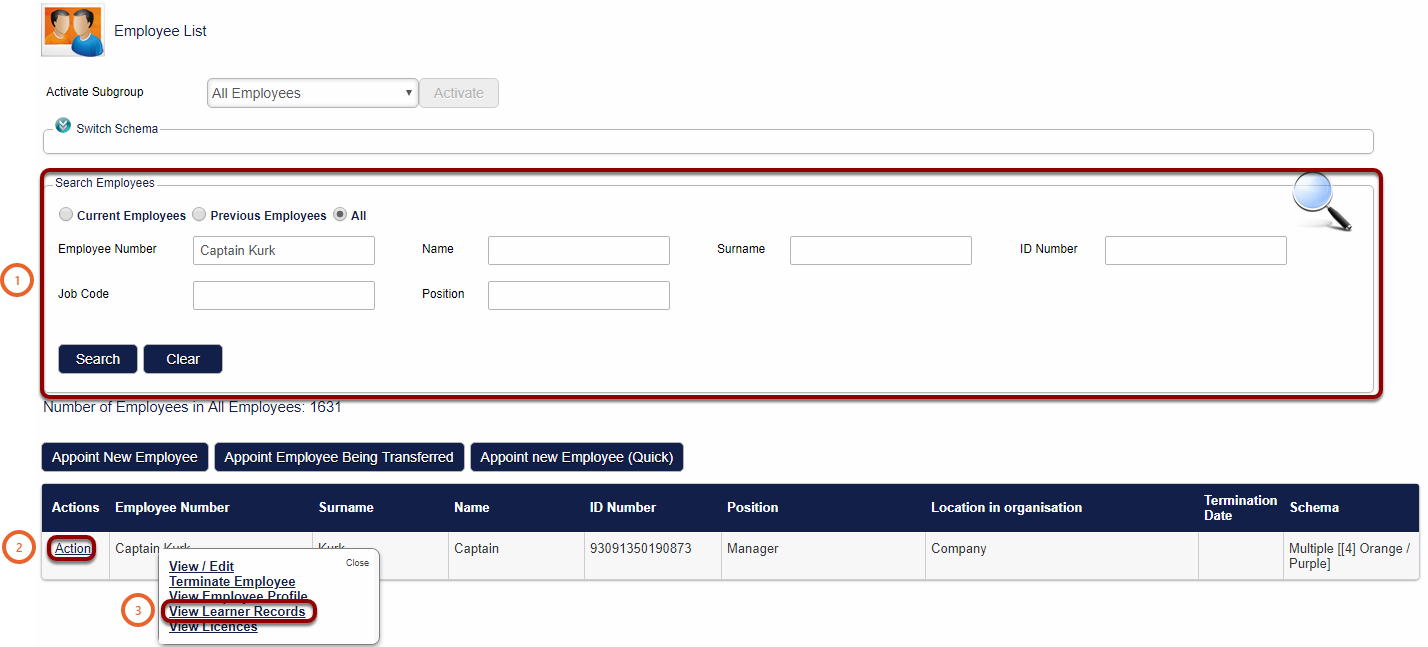
How To Add a Learner Record To An Employee
How to get there?
Click on System Administration (1), then with your cursor hover over Modules | Manage Employees.


What to do?
- Use the search criterias (1) to find the employee.
- Click on Action (2) at the employee.
- A small window will open.
- Then click on View Learner Records (3).
- Click on the Add (4) button to create a new learner record.

- Select the type (5) of learner record you would like to create.
- Click on the hand icon at Training Title (6) and select the training intervention.
- Choose the Start and End dates (7) for the learner record. (the End date is the expiry date of the learner record).
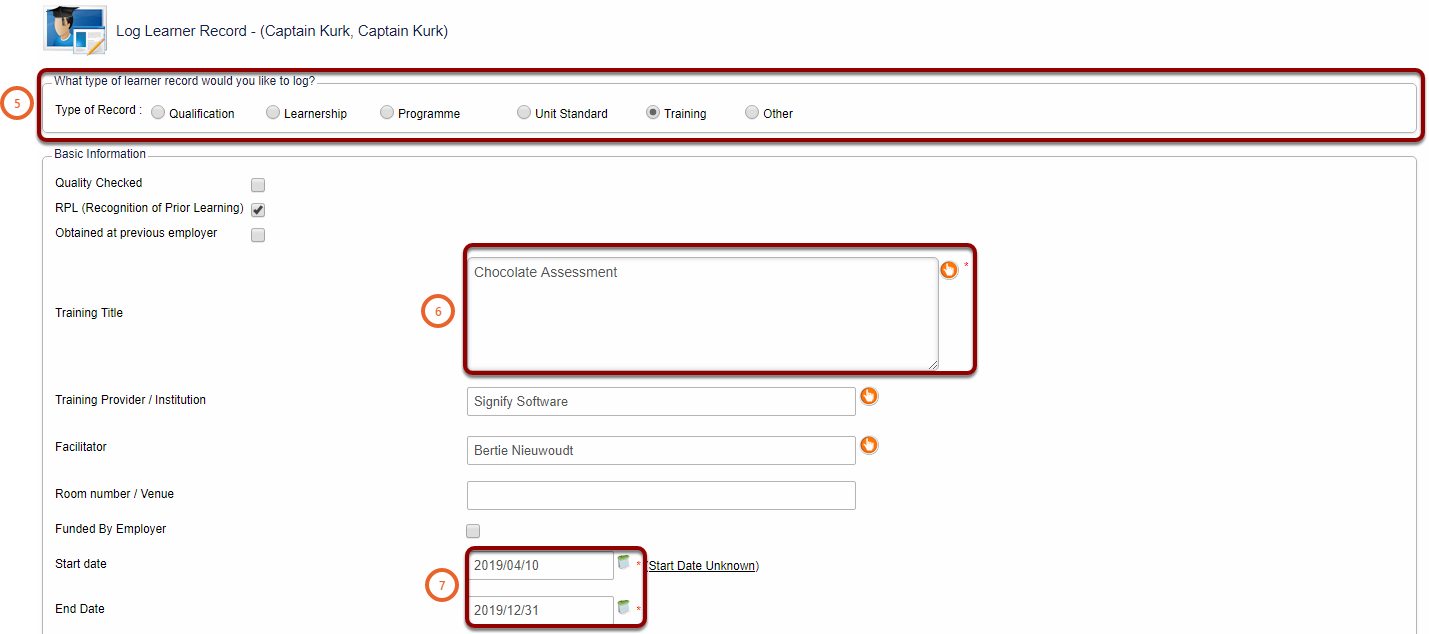
- Select the tick boxes Training Complete and Competent (8) if applicable.

- Click on Save Learner Record (9).

How To View a Users Assessment Attempts/Results
How to get there?
Click on System Administration (1), then with your cursor hover over Modules (2) | Manage Employees (3).


What to do?
- Use the search criteria to search for the user (1).
- Click on Action (2) for the relevant user.
- Then click on View / Edit (3)
- Click on Employee Development (4).
- Then Navigate to and click on Assessment List (5).
- On this screen all the users assessments that were attempted are displayed.
- Click on the Please select (6) drop down and click on View attempts for more detailed information.
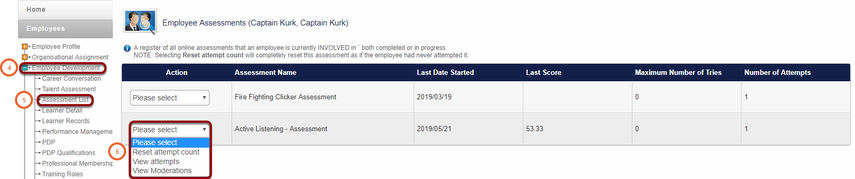
- Here you can print the assessment attempt by clicking on Export to PDF (7).
- Click on View Details (8) to view the users answers.

There are various reports that can be loaded to view assessment attempts. Please contact support@signify.co.za to ask for assistance.