FREQUENTLY ASKED QUESTIONS
FAQ's
- Badges
- Documents
- Job Profiler
- Manage Employees
- How to Import Employees Using Excel
- How To Set Up A Welcome Email
- How To Create Subgroups
- How To Download a Learner Certificate For Administrators
- How To Download a Learners Certificate For Users
- How To Re-Appointment a User
- How To Add a Learner Record To An Employee
- How To View a Users Assessment Attempts/Results
- Manage Users
- How To Reset a Users Password
- How To Copy Administrator Rights To Another User
- How To Assign Reporting Rights
- How To Disable A User
- Mobile Application
- Pathways
- How To Create a Movie Step
- How To Upload An Image
- How To Publish a Pathway
- How to Generate a Shareable a Pathway Link
- Performance Management
- Schemas
- SCORM
- System
- Themes
Badges
How to Set Up Badges
How to configure Training Level
How to get there?
Click on System Administration (1), then with your cursor hover over System Administration (2) | Database (3) | Training Levels (4).


What to do?
On this screen you can view the default training levels set up. You can edit the existing levels or add new levels by clicking on the Create Training Level (1).
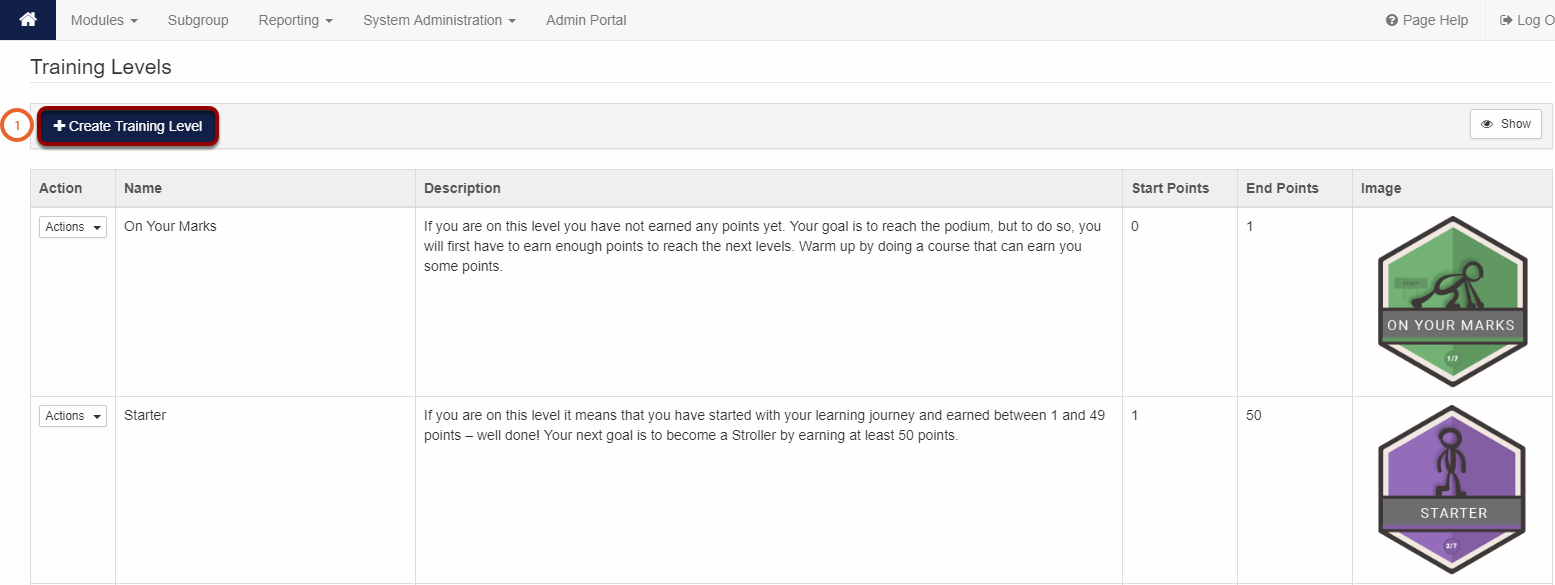
- Click on Actions (2).
- Then click on Edit (3).
OR
- Click on Create Training Level (4).

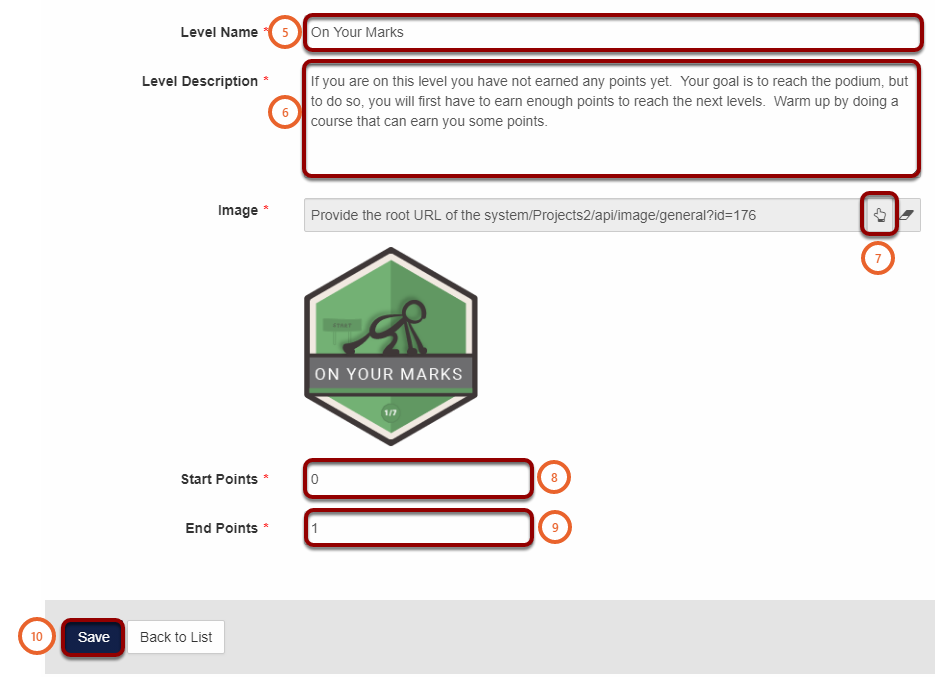
- Enter the Level Name (5).
- Ender a detailed Level Description (6).
- Click on the Hand icon (7) to access your badge images or to upload an image.
- Enter the Start Points (8). This is the minimum badge point required to unlock this level.
- Enter the End Points (9). This is the minimum points required to move to the next level.
- Then Click on Save (10).
Note: The End Points (9) of the first level should be equal to the Start Points (8) for the next level.
For example:
| Training Level | Start Points | End Points |
|---|---|---|
| Level 1 | 0 | 50 |
| Level 2 | 50 | 100 |
| Level 3 | 100 | 150 |
How to add a badge to a training type
How to get there?
Click on System Administration (1), then with your cursor hover over System Administration (2) | Database (3) | Programmes (4) OR Qualification (5) OR Unit Standards (6) OR Training Interventions (7).


What to do?
You can add badges to these training types:
- Programmes.
- Qualifications.
- Unit Standards.
- Training Interventions.

- Click on Select Image (2) to select an image from the library or to upload an image.
- Select one of the radio buttons When they have been found competent OR When they have completed the course (3).
- Enter the Maximum Points that a user can obtain for this badge (4).
- Enter the Score that the user must achieve to receive the Maximum Points (5). The user will receive the Maximum Points if they receive this score at (5) or higher.
- Enter the Minimum Points that a user can obtain (6).
- Enter the Minimum Score (7). If the user receives this Minimum Score (7) they will receive the minimum points.
- Enter the value For how long the points will be valid for (8).
- Tick the Show score distribution graph for this course on Achievements page (9), if you would like the score distribution graph to be visible.
- Tick the Show Leaderboard on Achievements page (Names will be shown) (10), if you would like the Leaderboard to be visible.
- Click on Save (11).
Note: If the user receives a score between the maximum score (5) and the minimum score (7), the system will calculate a Badge point between the maximum (4) and minimum (6) badge points and the score the user received.

How to Set Up Campaigns and Leaderboards
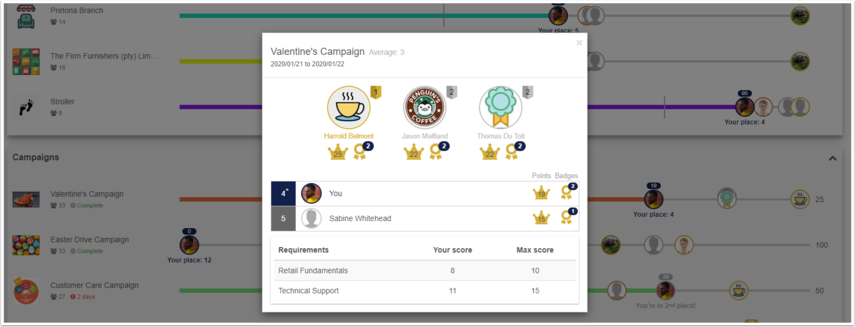
Leaderboards have been revised, and the LMS Portal now includes an additional Campaigns Leaderboard section. The Campaigns Leaderboard will enable any employee, who forms part of the campaign, to track their progress, points and badges as well as their leaderboard position against other employees in the campaign.
Campaign Leaderboards
How to get there?
Tip: Click on System Administration (1), then with your cursor hover over System Administration (2) | Database (3) | Leaderboards (4) | Campaign Leaderboards (5).


What to do?
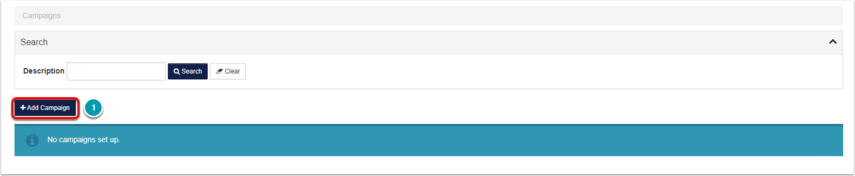
Click on the Add Campaign (1) button to create a Campaign Leaderboard.
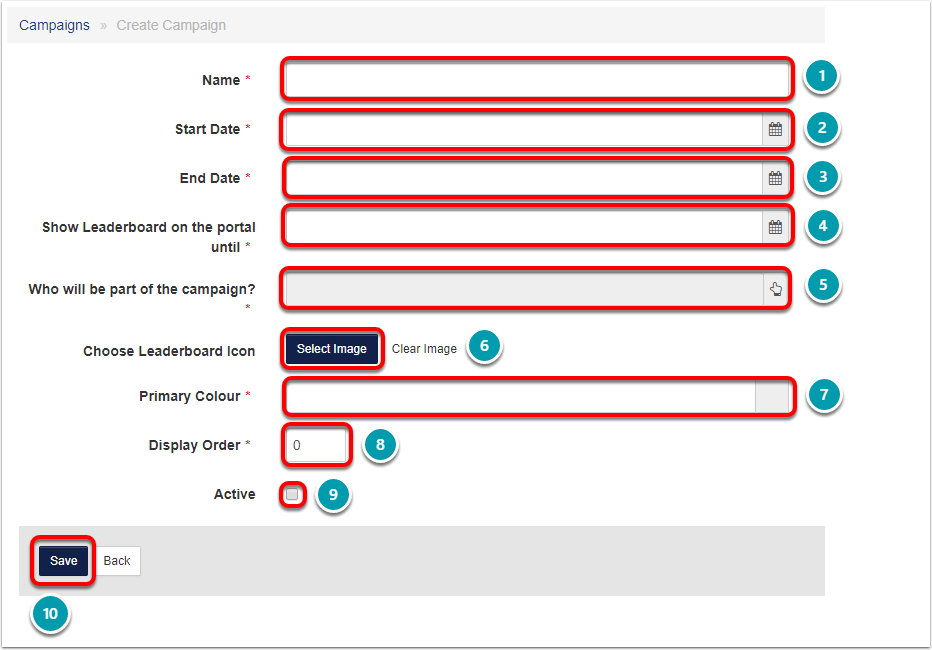
- This is the name of the Campaign, for example, Heineken Campaign.
- From when will this campaign be available to the target audience.
- Until when will this campaign be available to the target audience.
- This is the date that the leaderboard will show on the portal with the results.
- When this is selected, the list of subgroups is displayed. The Organisation Structure subgroups need to be displayed first for selecting. Only one subgroup can be selected to be linked to the campaign.
- This will be the icon showing next to the campaign on the portal. The images can be pre-loaded or uploaded directly. The preferable image size is 240px x 240px which is the same as the badges image dimensions.
- This is the colour of the progress bar. This will be a colour picker or you can add the colour codes.
- This display order will be used on the Campaign Leaderboard.
- This determines whether the campaign should be displayed on the Campaign Leaderboard.
- Select the Save button to save the Leaderboard.
Note: When the End Date(3) is reached, the training done, will no longer be taken into account for the leaderboard. Nothing will be changed on the leaderboard, thus positions will no longer move.
When an employee started the training between the start and end date but completed the training after the end date, they will not be taken into account.
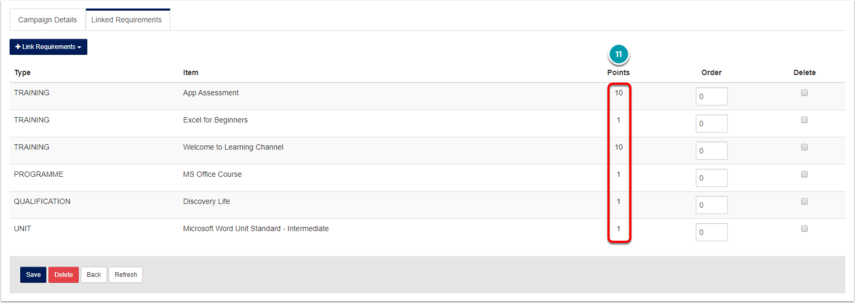
Information: Once the Campaign Details have been saved, the Linked Requirements tab will become available.
Link Requirements:
The following training can be selected to link as requirements:
- Training Interventions
- Units
- Programmes
- Qualifications
Information: When the training requirements are set and the campaign has started and visible, these requirements can be changed. A message will be displayed on the training requirements tab to indicate what will be changed.

Note: The Points (11) allocated per linked Requirements cannot be changed here. To change the point allocated navigate to the relevant training intervention, programme, qualification or unit standard.
Note: Campaigns are not Schema specific. For example, if the target audience includes employees from another schema, they will still see the leaderboard on their own schema.
General Leaderboards
How to get there?
Tip: Click on System Administration (1), then with your cursor hover over System Administration (2) | Database (3) | Leaderboards (4) | General Leaderboards (5).


What to do?
On the General section, the default values for the leaderboards will be:
- Job Leaderboard
- Job Family Leaderboard
- Organisational Unit Leaderboard
- Parent Organisational Unit Leaderboard
- Topmost Organisational Unit Leaderboard
- Training Level Leaderboard
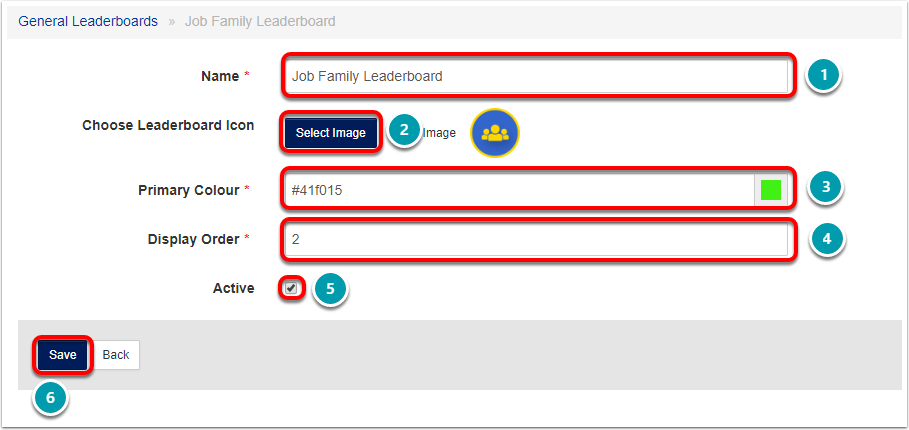
Select one of the leaderboard to edit it.

- This is the name of the Campaign, for example, Job Family Leaderboard.
- This will be the icon showing next to the leaderboard on the portal. The images can be pre-loaded or uploaded directly. The preferable image size is 240px x 240px which is the same as the badges image dimensions.
- This is the colour of the progress bar. This will be a colour picker or you can add the colour codes.
- This display order will be used on the General Section.
- This determines whether the leaderboard should be displayed on the General Section.
Select the Save (6) button to save the settings.
Information: The settings will be moved from System Administration | Tools | Configuration | Framework | Human Resources | Learning to this master data page. This will determine what is displayed on the LMS Portal.
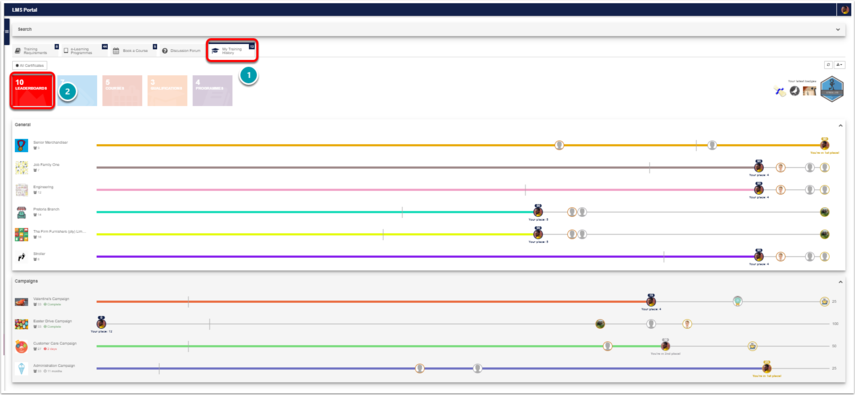
My Achievements tab
When the Leaderboards are setup and active they will display on the LMS Portal (1) under the My Achievements tab in the Leaderboards (2) section.
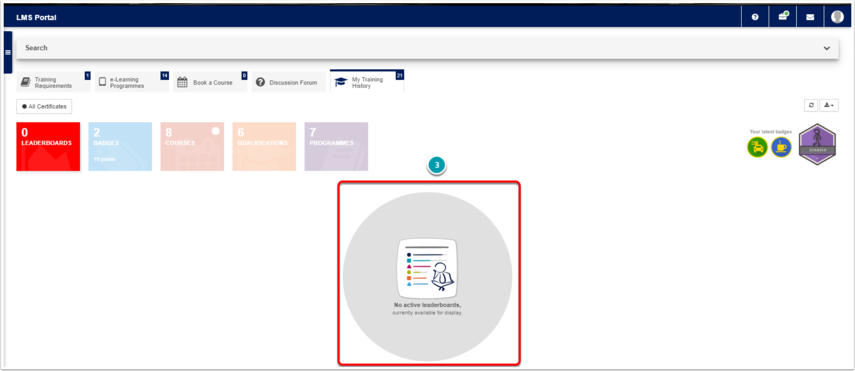
The following screen (3) will display when there are not active Leaderboards
A user will be able to export the leaderboards page to Excel or PDF (4).
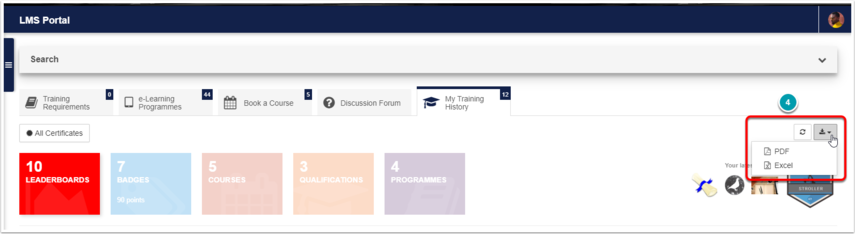
When selecting a Leaderboard the user will be able to see more details on the Leaderboard.

Documents
Documents Upload and Download Using Pathways
Creating a Training Intervention
Before a document can be uploaded a Training Intervention needs to be created.
How to get there?
Click on System Administration (1). With your cursor hover over System Administration (2) and navigate to Database (3) then click on Training Interventions (4). Then click on Add (5).


What to do?
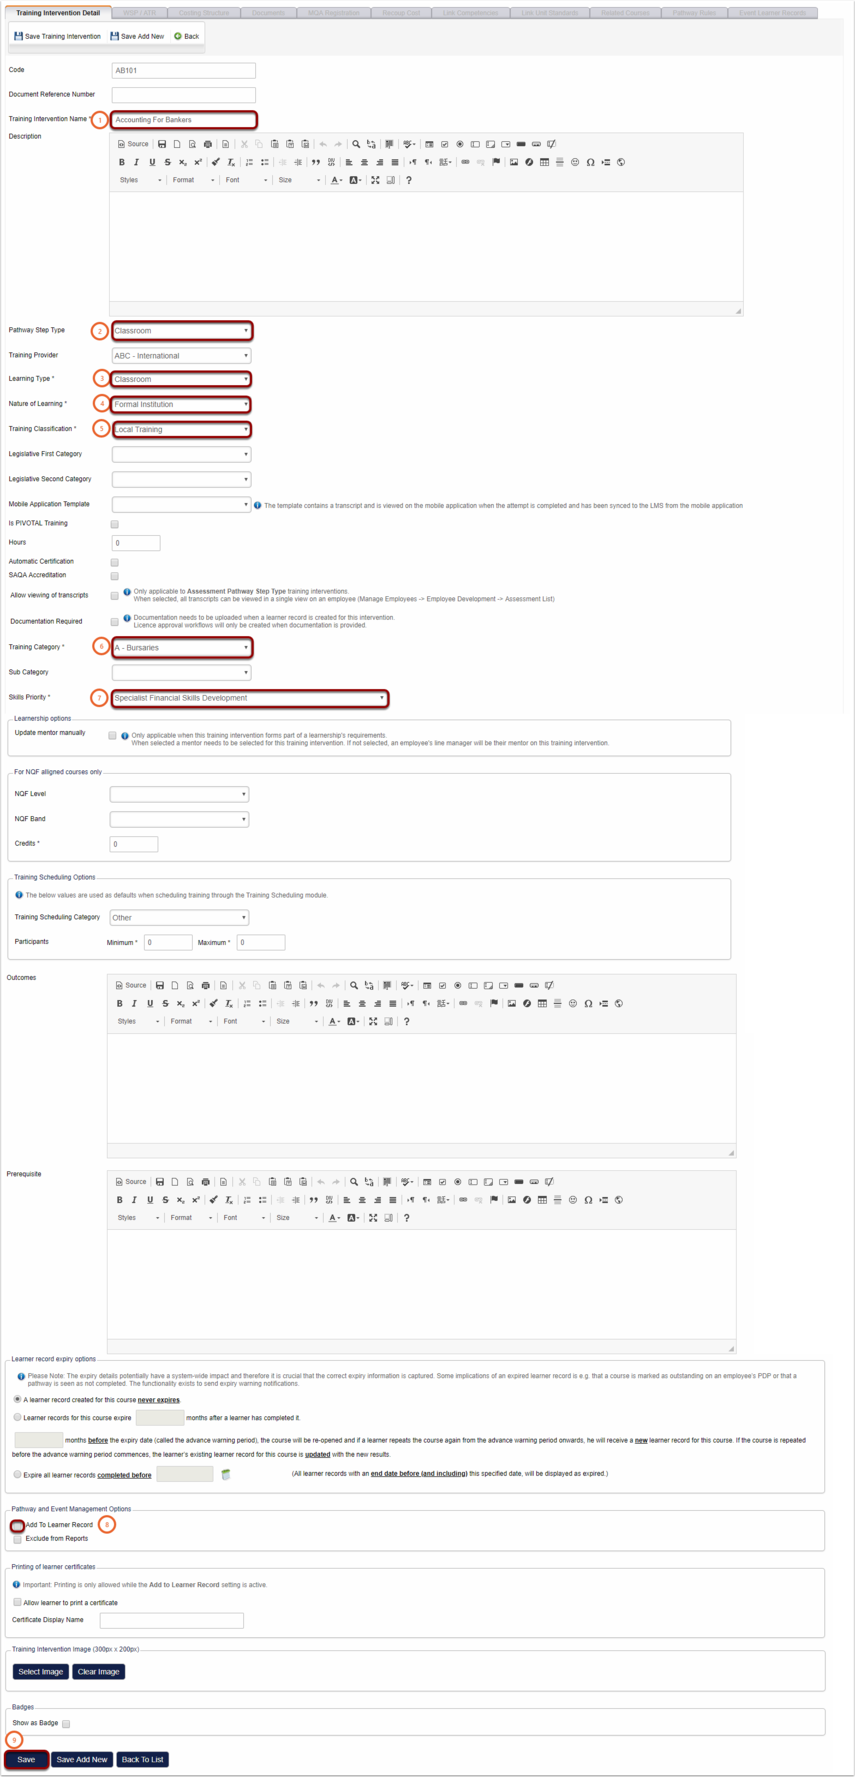
All the following fields are mandatory and needs to be selected or entered:
- Fill in the Intervention Name (1), this will help you to find the intervention later.
- Select from the drop down the Pathway step Type (2).
For a document upload the Pathway Step Type needs to be Assignment.
- Select your Learning Type (3).
- Choose the Nature of Learning (4).
- Select from the drop down list your Training Classification (5).
- Select your Training Category (6).
- Choose your Skills Priority (7).
- Make sure the Add To Learner Record (8) box is ticked.
- Then click Save (9) to save this intervention.
Creating a Pathway With An Assignment Step
How to get there?


What to do?
Select the pathway you want to use for the document upload and add an Assignment step.
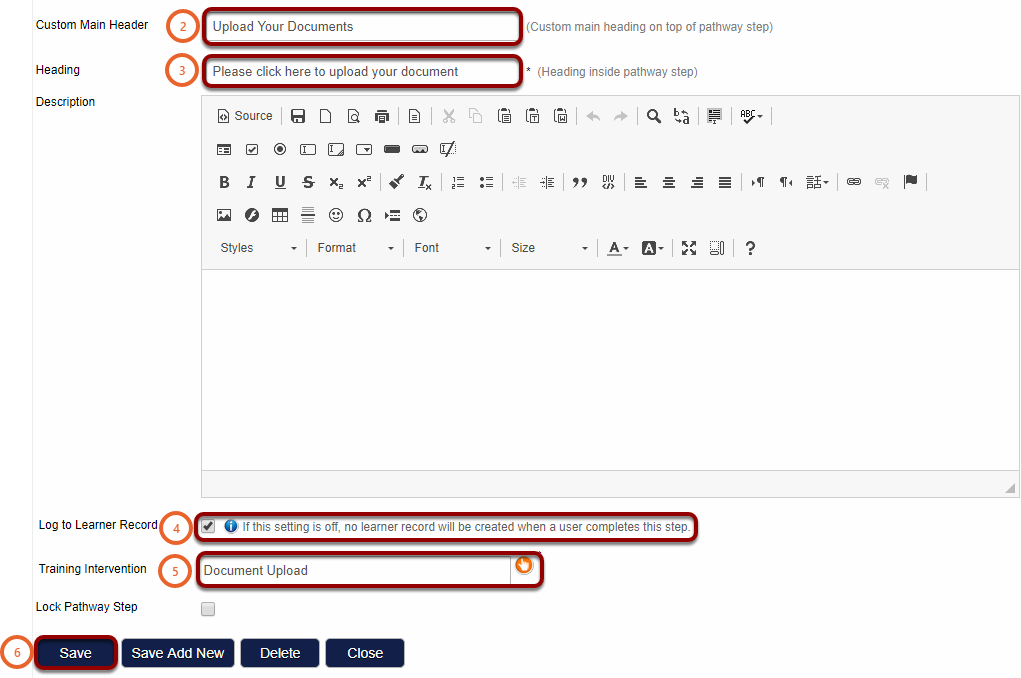
- Click on Assignment (Upload Documents) (1) to create the Upload Documents pathway step. A new window will open.
- On the new window insert the Custom Main Header (2).
- Insert the Heading (3).
- Tick the box Log to Learner Record (4).
- Search for the Training Intervention (5) you have created for your document uploads.
- Select Save (6).

How The User Can Upload a Document
When the assignment pathway step was created and your user is on the Target Audience, then the user should be able to see the pathway and upload their documents.
Log in to the Signify system with your Username and Password then:

- Click on Start (3) to open the pathway.

- On the Upload Your Documents pathway step click on the Add (4) button to upload your documents.
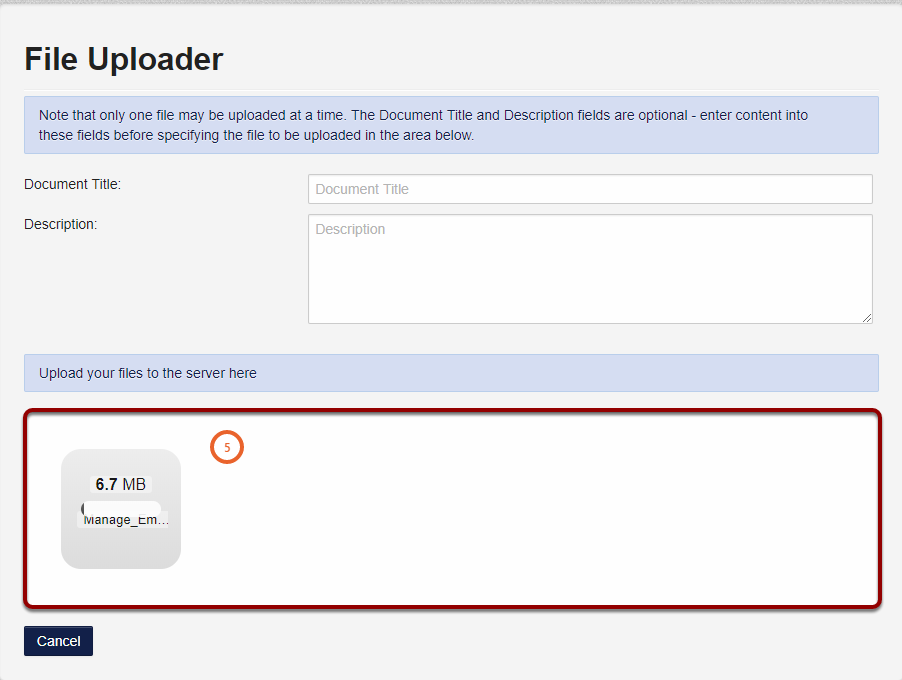
- A new pop-up window will load.

- On the File Uploader window, click on the field (5) and select you document on your computer.
- Wait for the file to upload, you will be redirected to the pathway.
- Click on Actions (6) to download your document or to upload a new one.
- When you are sure your document is correct click on Submit for Review (7).
Note: When you have clicked on Submit for Review (7) you will not be able to upload a new document and you will not be able to delete the old document. Only the system administrator will be able to edit documents.

- Read through the terms displayed and click on Confirm (8).
- A learner record will be created for the document and the administrator will be able to view your document.

How the Administrator can edit or delete an uploaded document
How to get there?
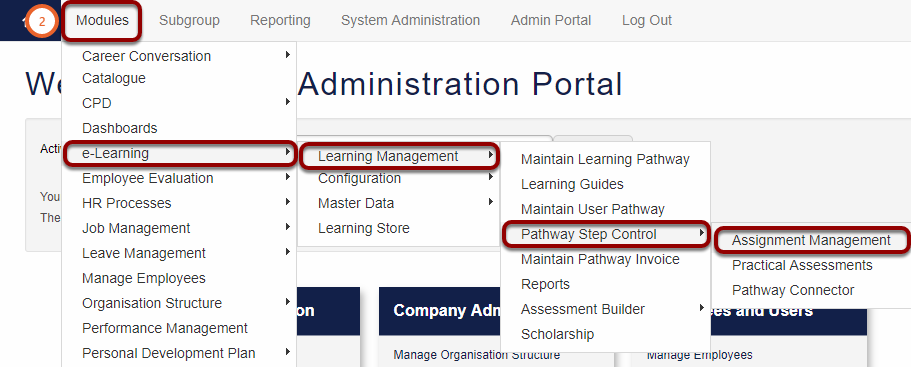
Click on System Administration (1). With your cursor hover over Modules (2) then Navigate to e-Learning | Learning Management | Pathway Step Control | Assignment Management.

What to do?
Search for the user and the pathway step were you would like to edit or delete the document.
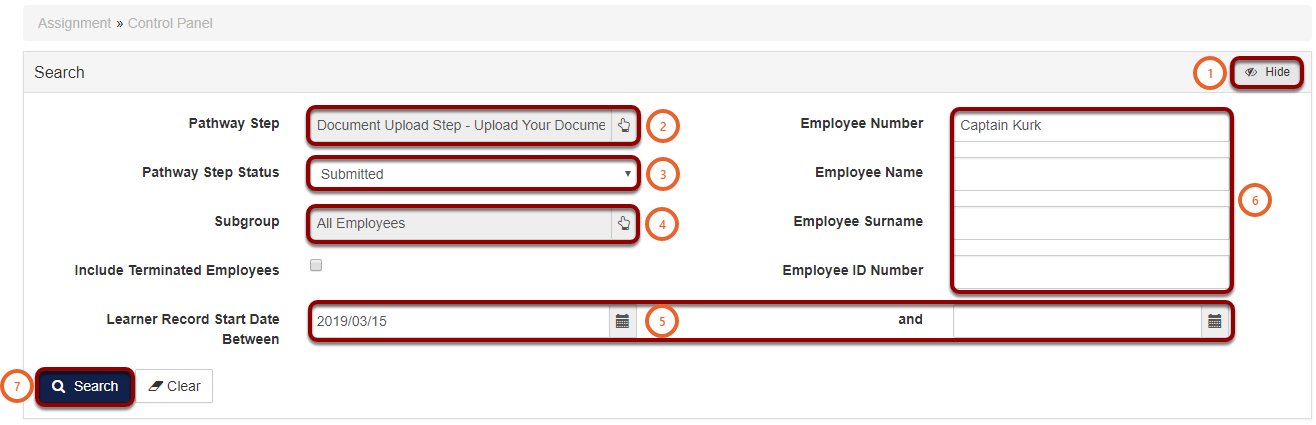
- To search click on the Hide/Show (1) button.
- Select the Pathway Step (2).
- Select the Pathway Step Status (3) from the drop down list.
- Select the Subgroup (4).
- Choose the date when the learner record was created, Learner Record Start Date Between (5).
- Enter the users details as required (6).
- Then click on Search (7).
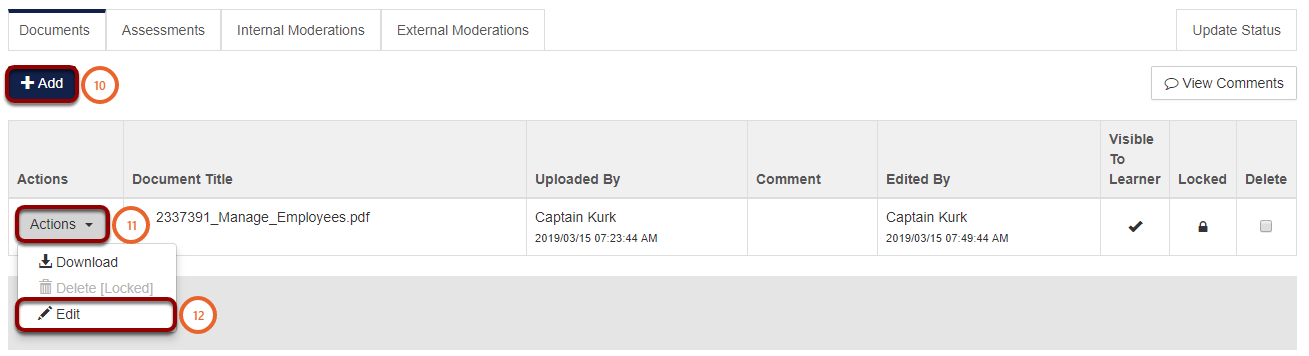
- Click on Actions (8) then Edit (9) to edit or delete this Assignment.

- You can click on Add (10) to add a document to this assignment.
- Click on Actions (11) then Edit (12) to edit or delete this document.
Note that the Delete button is locked, follow the steps below to unlock the button.
- Click on the tick box Locked (13) to unlock the delete button.
- Then click on Save (14).
The document can now be deleted. When a document is deleted it is permanent and cant be recovered.

Create a Pathway With a Document (Download) Step
How to get there?


What to do?
Select the pathway you want to use for the document download and add a Document (Download) step.
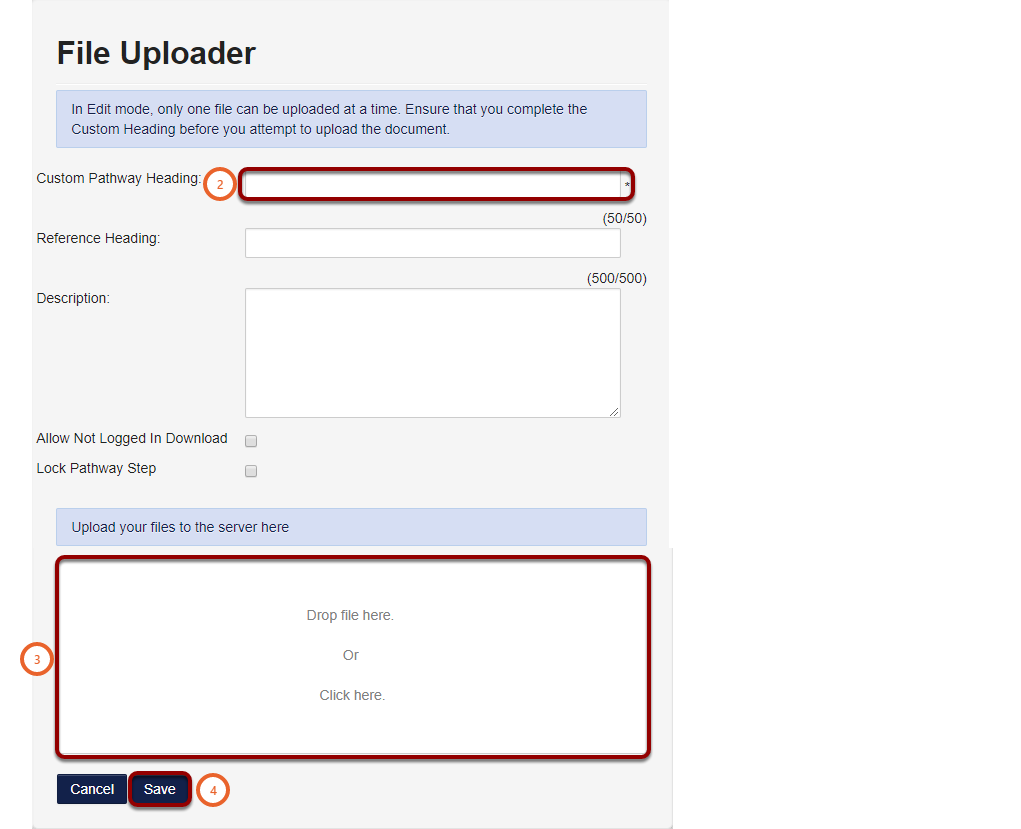
- Click on Document (Download) (1) to create the Document (Download) pathway step. A new window will open.
- On the new window insert the Custom Pathway Heading (2).
- Click on this field or drop file here to upload a file (3).
- Click on Save (4).

How The User Can Download a Document
By Using a Pathway Step
When the Assignment pathway step was created and your user is on the Target Audience, then the user will be able to see the pathway and download the documents.
Log in to the Signify system with your Username and Password then:
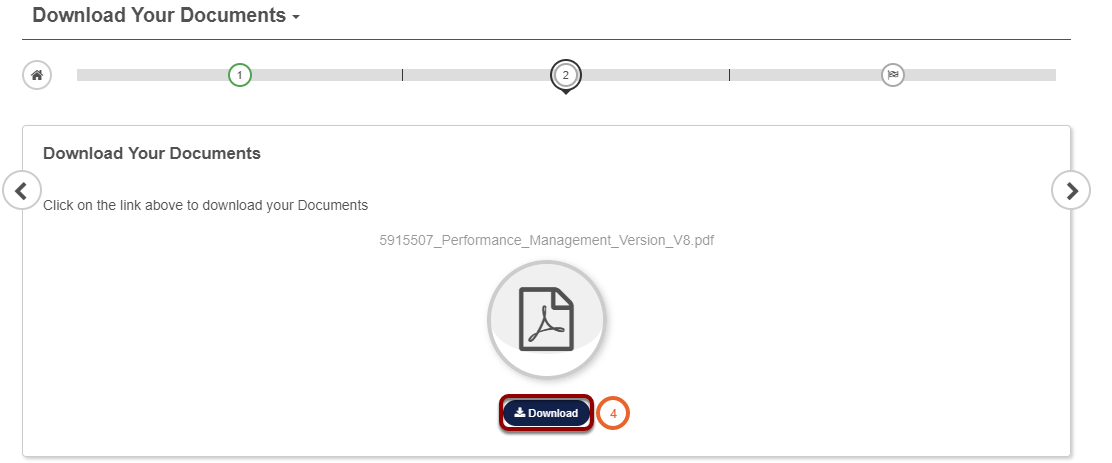
- Click on Start (3) to open the pathway.

- On the Download Your Documents pathway step click on the Download (4) button to download your documents.
- Your document will download in your browser (5).
By Using My Achievements
Log in to the Signify system with your Username and Password then:

- The user can now click on the document to download it on your browser (5).

Job Profiler
How To Add a Programme To a Job Profile
How to get there?
Click on System Administration (1), then with you cursor hover over Modules (2) | Job Management (3) | Job Profiler (4).


What to do?
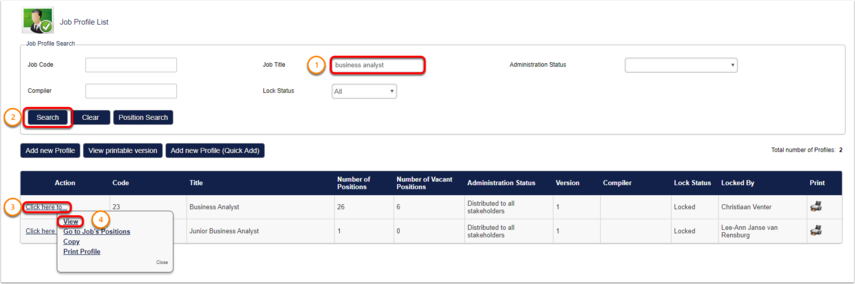
- Insert the title of the Job Profile (1).
- Click on the Search (2) button to search.
- Select the Click here to...(3) to access the drop down.
- Click on the View (4) button.
Note: Before you will be able to edit the Job Profile you will have to select Unlock Profile (5).
Tip: If you select the Unlock Profile Button you will have locked the Profile for other administrators and you user name(6) will be displayed next to the Locked text.
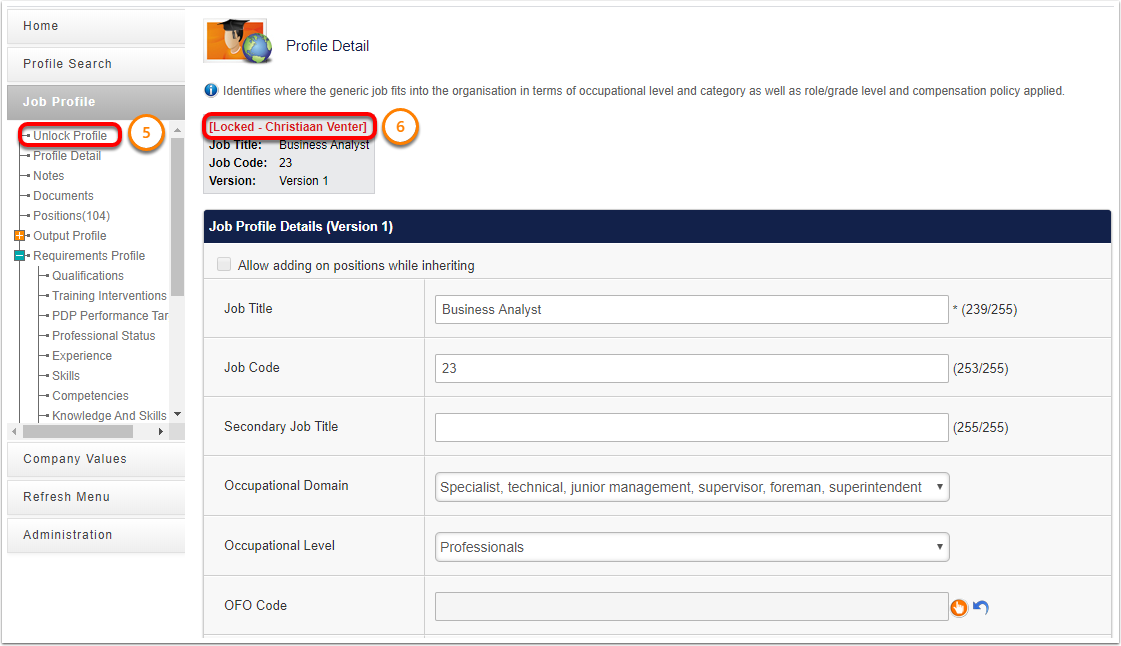
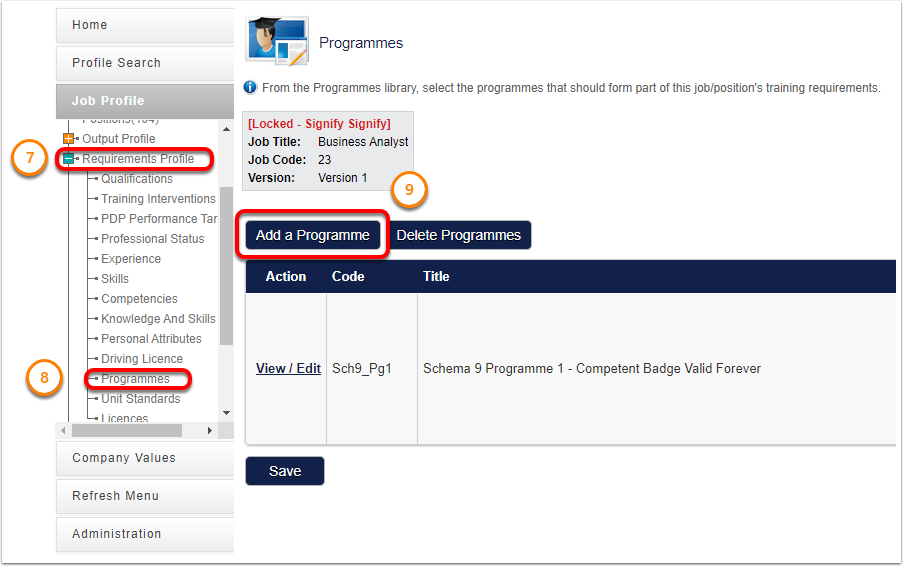
- Once the Job Profile is unlocked expand the Requirements Profile (7).
- Select Programmes (8).
- Click on the Add a Programme (9) button.
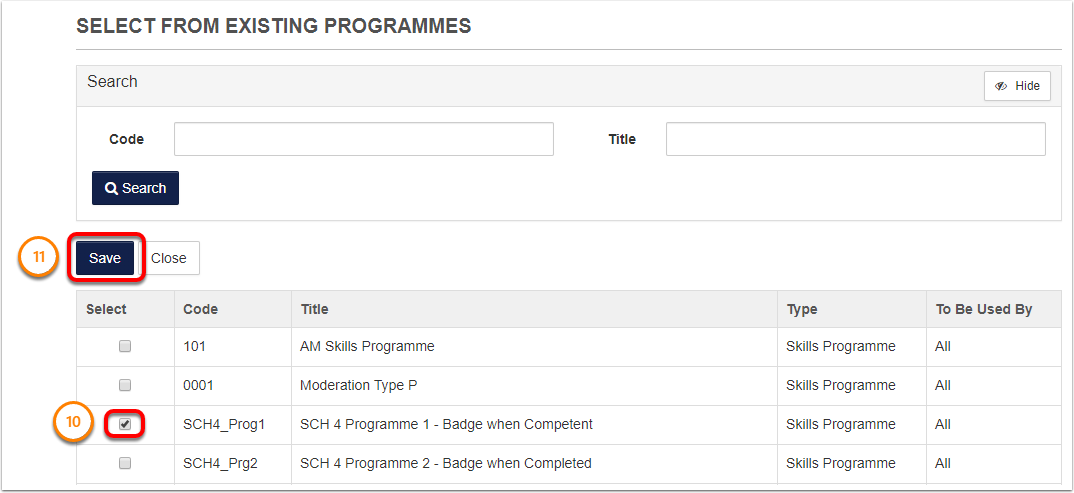
- Select the Programme that you would like to add (10).
- Then click on Save (11).
Manage Employees
How to Import Employees Using Excel
1. Before you start
Important: Before you start with this manual ensure that your Region settings are correct, otherwise the Excel (.csv) files will not work correctly.
1.1. How to get there?
- On your desktop click on Search (1).
- Then type Region & language settings (2).
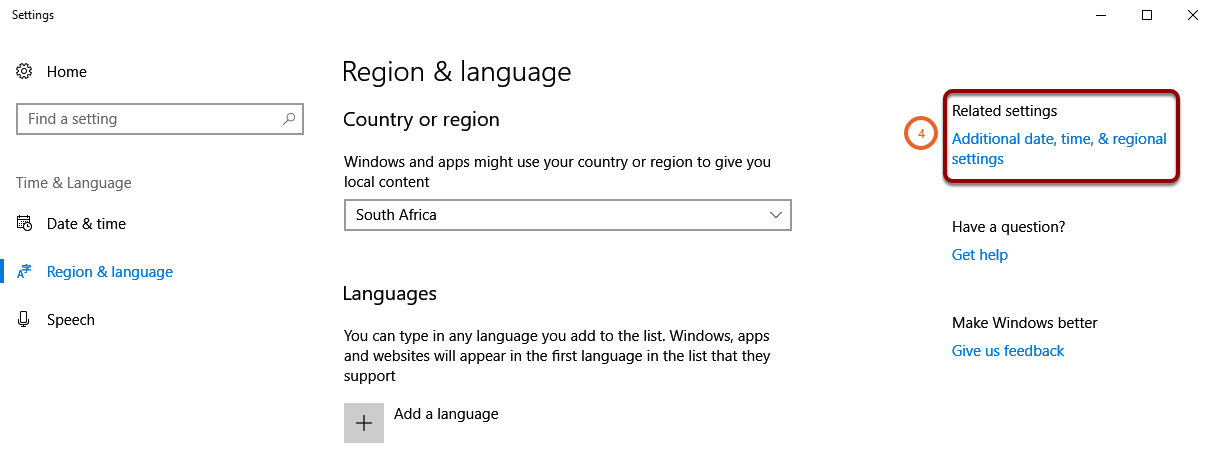
- Click on Region & language settings (3) or press Enter. A new window will open.

- In the new window click on Additional date, time & regional settings (4). Another new window will open.
- In the new window navigate to and click on Region (5). A new window will open.
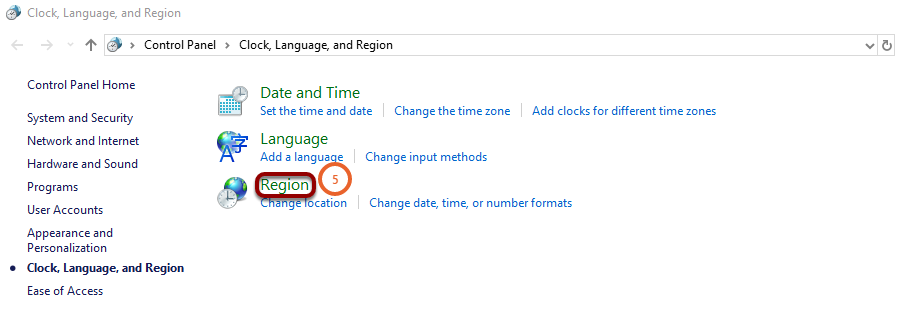
- In the Region window click on Additional Settings... (6). A new window will open.

1.2. What to do?
- In the new window ensure that the Decimal symbol (7) is a full stop (.).
- Ensure that the List separator (8) is a comma (,).
- Click Apply (9) and close all the windows.

2. How to get there?
Click on System Administration (1). With your cursor hover over System Administration (2) then click on Import Data (3)


3. What to do?
3.1. Download a sample file on Signify

- Click Download sample file (3) in the new window.

- The sample file will download in your browser (4).

3.2. Create an employee import (.csv) file in Excel
3.2.1. Enter the employee data in an Excel document (.xlsx)
- Open the sample file downloaded above (4).
- Select the entire first row (1) in the sample file.
- Copy the entire row (2).

- Create a New Microsoft Excel Worksheet (3).

- Open the new work sheet and Paste (4) the entire first row copied above into your new Excel documents First (5) row.
- Enter all the employee data in the mandatory columns.
- These columns are all mandatory:
- Column A: Employee Number.
- Column B: Surname.
- Column C: Full Name.
- Column O: OrgLevel1_Description.
- Column BC: Job Title.
- Column BM: Employment Type Description.
- Column EL: SchemaID.

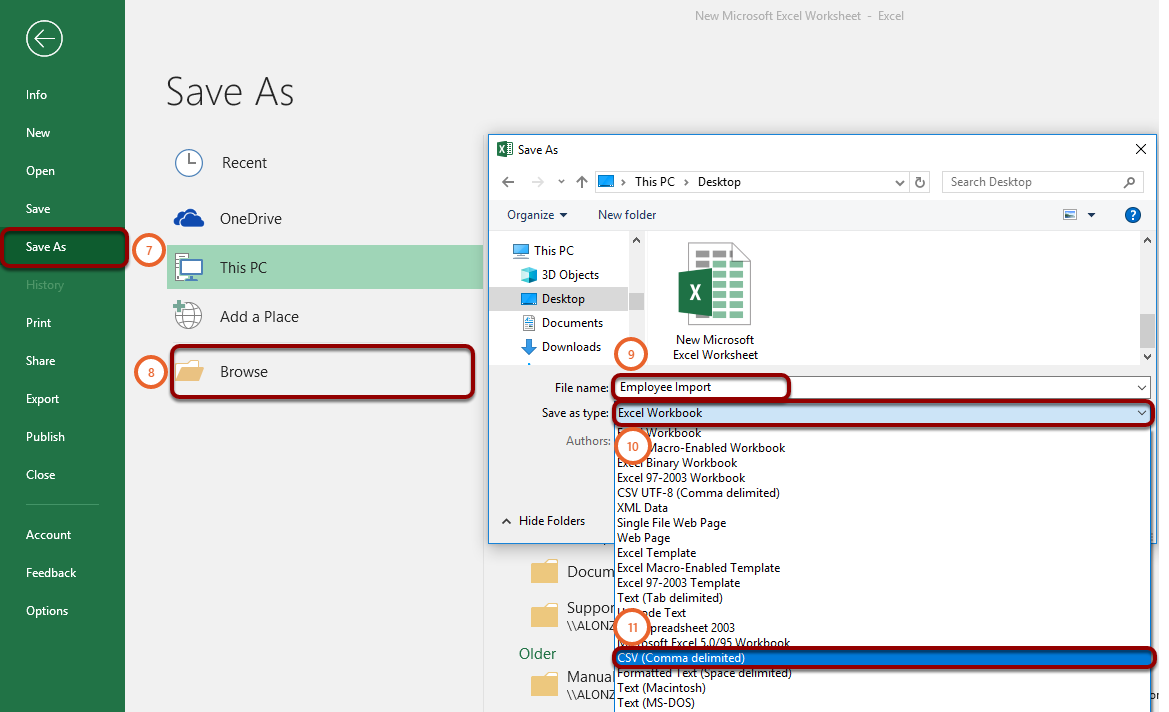
3.2.2. Save the Excel document as a (.csv) file
Save the new Excel document as a .csv file:
- Click on File (6).
- Navigate to Save As (7).
- Click on Browse (8).
- Insert the File name (9) of your (.csv) file.
- Click on the drop down (10).
- Select CSV (Comma delimited) (11).
- When asked, Do you want to keep using this format, click on yes (12).


3.3. Importing the (.csv) file
3.3.1. Execute Mock Import
Click on this link on instructions on how to get there.

- Click Import file (3) in the new window.

- A new window will load.
- In the new window navigate and click on Choose File (1).
- A Windows file explorer windows will open.

- Search your computer for the Employee Import file that you saved as a (.csv) in Section 2.2.2.
- Select that file (2).
- Click on open (3).

- Click on Save & Preview (4).
- The page will refresh and new options will be available.

- Tick the box I verify that the preview of the above data is correct (5).
- Then click on Execute Mock Import (6).
The system will not allow you to continue if the tick box (5) is not ticked.

If there are errors in the Import:
- Correct the errors in the original Microsoft Excel (.xlsx) employee import document Section 2.2.1.
- Save as a (.csv) file Section 2.2.2.
- Execute the Mock Import again.
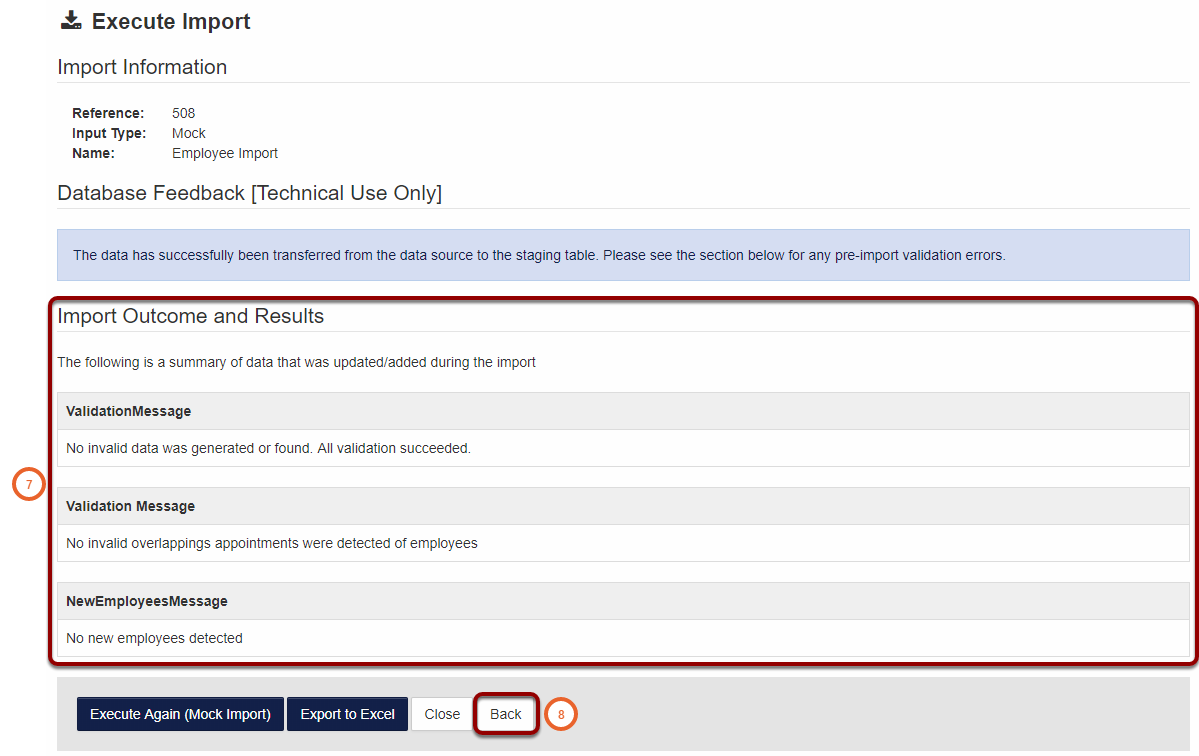
If there are no errors (7):
- Click Back (8).
- Then move to section 2.3.2.
3.3.2. Execute actual import
Note: before continuing with this section, first perform a Mock Import in Section 2.3.1 and insure no errors occur.
Click on this link on instructions on how to get there.

- Click Import file (3) in the new window.
- A new window will load.

- Click on Choose File (4) again and select the employee import file (.csv) that you saved in Section 2.2.2.
- Click Save & Preview (5).
- Tick the box I verify the preview of the above data is correct (6).
You will not be able to continue if the tick box is not ticked.
- Click on Execute Import (7).

- The page will load and a new page will appear.
- Check if there were no errors for the import (13).
- Click on Execute Again (Actual Import) (14).
- Wait for the import to complete.

3.4. Post Import Validations
Use this guide to ensure the employee data imported was correct and that it is correctly displayed on the system.
3.4.1. Organisation Structure
3.4.1.1. How to get there?
Click on System Administration (1). With your cursor hover over Modules (2) then Organisation Structure (3) then Administration (4) then click on Organisation Structure (5).


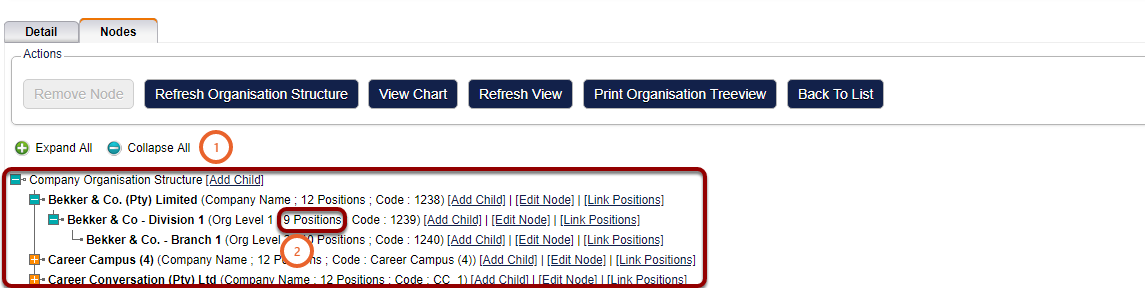
3.4.1.2. What to do?
- Ensure that all the node have been created correctly (1).
- Check that the correct number of Positions (2) display.
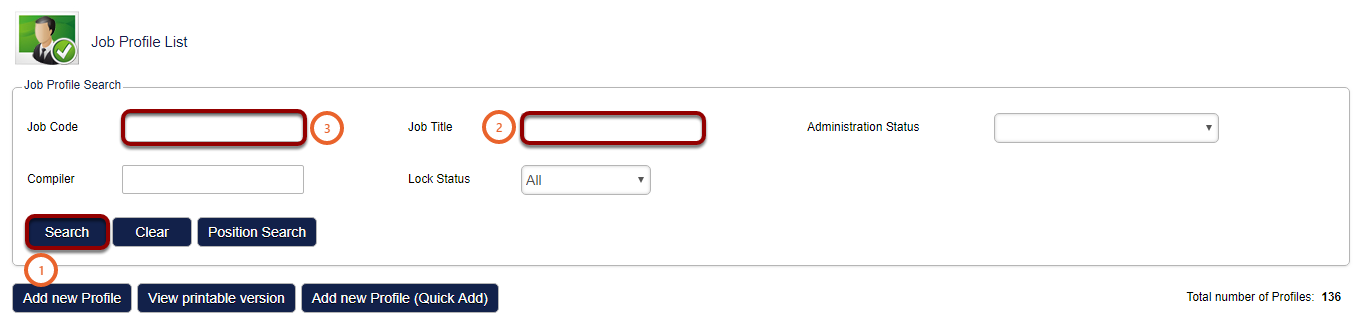
3.4.2. Job Profiler
3.4.2.1. How to get there?
Click on System Administration (1). With your cursor hover over Modules (2) then Job Management (3) then click on Job Profiler (4).


3.4.2.2. What to do
Search (1) for the Job Titles (2) and Job Codes (3) that you have imported to ensure that the jobs and positions have been created properly.
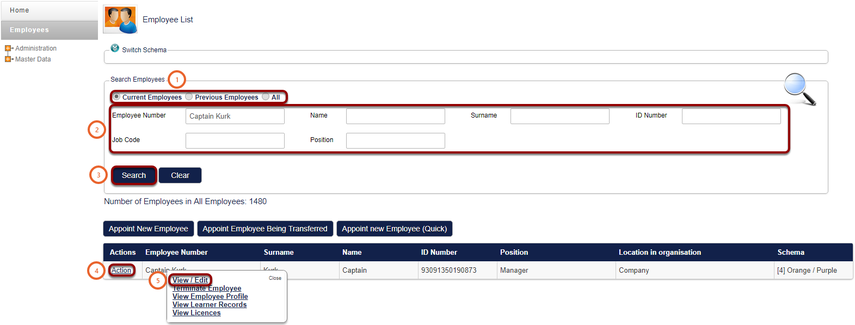
3.4.3. Manage Employees
3.4.3.1. How to get there?
Click on System Administration (1). With your cursor hover over Modules (2) then click on Manage Employees (3).


3.4.3.2. What to do?
When searching for employees remember to select the correct box (1).
- A Search for your employees (2).
- Click on Search (3).
- Navigate to and click on Action (4). A small window will open.
- Click on View / Edit (5) on this window.
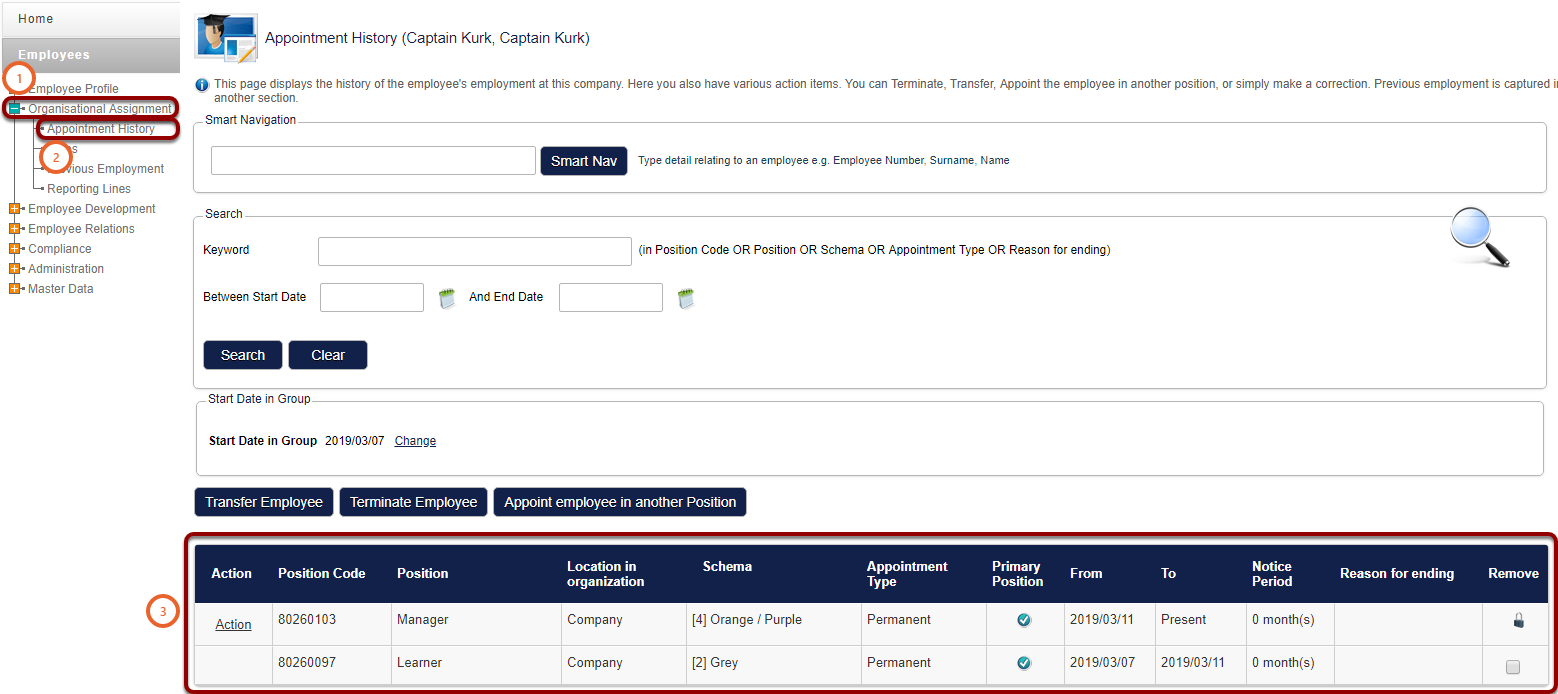
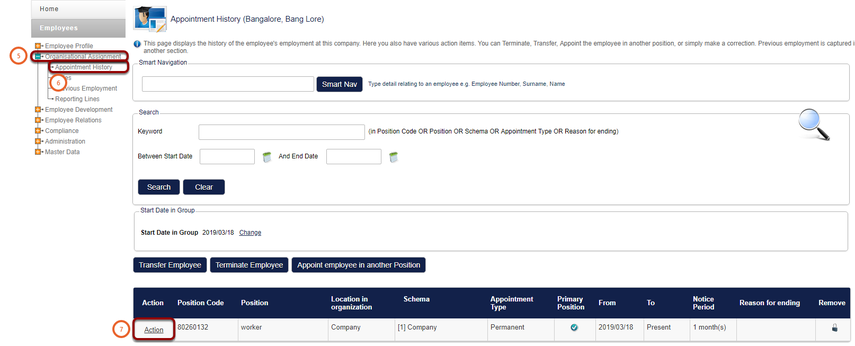
- Click on the plus icon Organisational Assignment (1).
- Navigate to Appointment History (2).
- Confirm that the appointments are all correct (3).
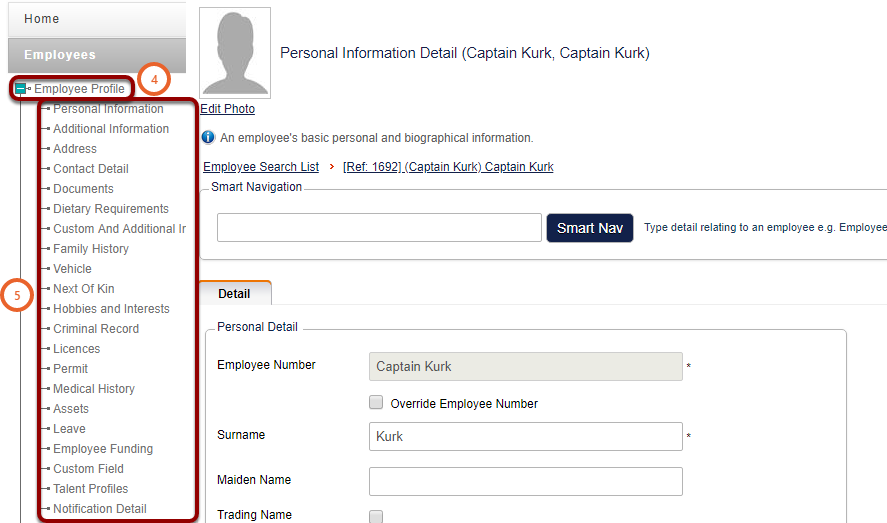
- Click on the plus icon at Employee Profile (4).
- Confirm that the details are correct (5).
How To Set Up A Welcome Email
Welcome email set-up
How to get there?
On your Home screen click on System Administration (1), With your cursor hover over the System Administration (2), then navigate to Notifications (3) | Emails (4) | Notification - Templates (5).


What to do?
- From the drop down menu search and select System Access (1).
- Click on the Search button (2).
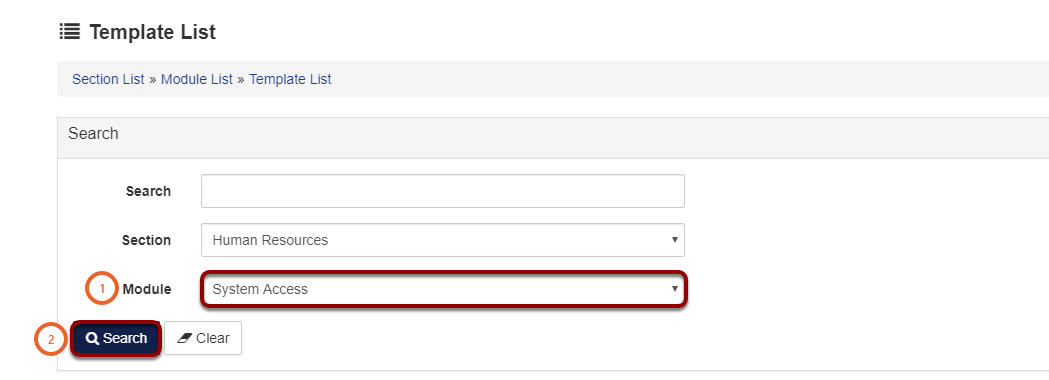
- Search through the list for the SECURITY_ADMIN_PASSWORDRESET_WELCOME (3) email, this is the welcome email.
- From this screen you will be able to Select the subject for your email (4).
- You can edit the From E-mail Address (5).
- Remember to enable the email by clicking on the tick box (6).
- You will also be able to Copy and Preview (7) the email.
- For more options click on Action (8), a small window will open.
- Click on View / Edit (9).

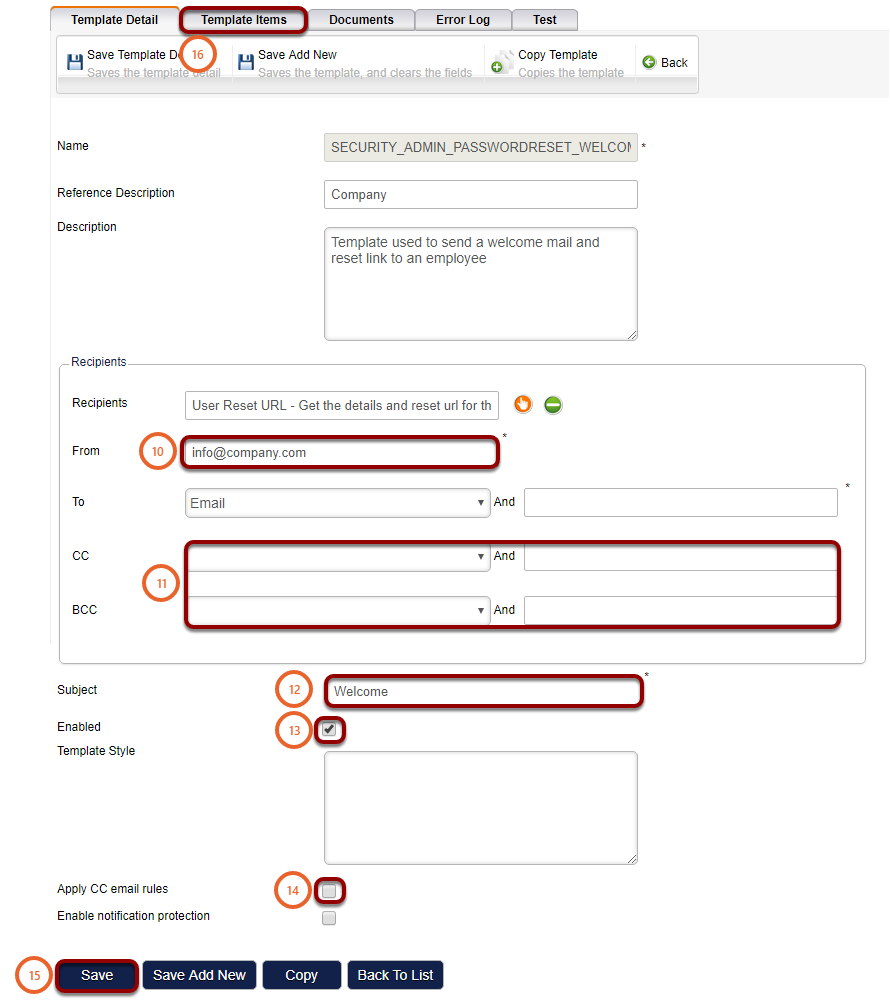
- Enter the From email (10).
- Set up the CC and BCC rules by clicking on the drop down and selected Email and then entering the email address in the next field (11).
- Type in the Subject of your email (12).
- Remember to tick the tick box to Enable the welcome email (13).
- If you entered CC and BCC rules the tick box Apply CC email rules (14) must be ticked.
- Remember to click on the Save (15) button to save all your settings.
- Click on Template Items (16) to edit the email template.
- You will be directed to a new window.
Important: Do not edit any information other than the instruction given above, unless you are sure what to do, otherwise the welcome emails may not be sent.
- In the new window click on Body (17) to edit the welcome email body.
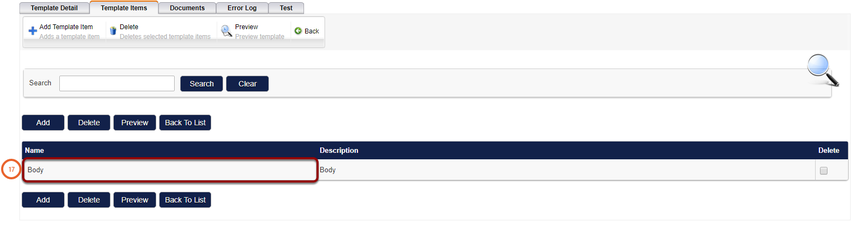
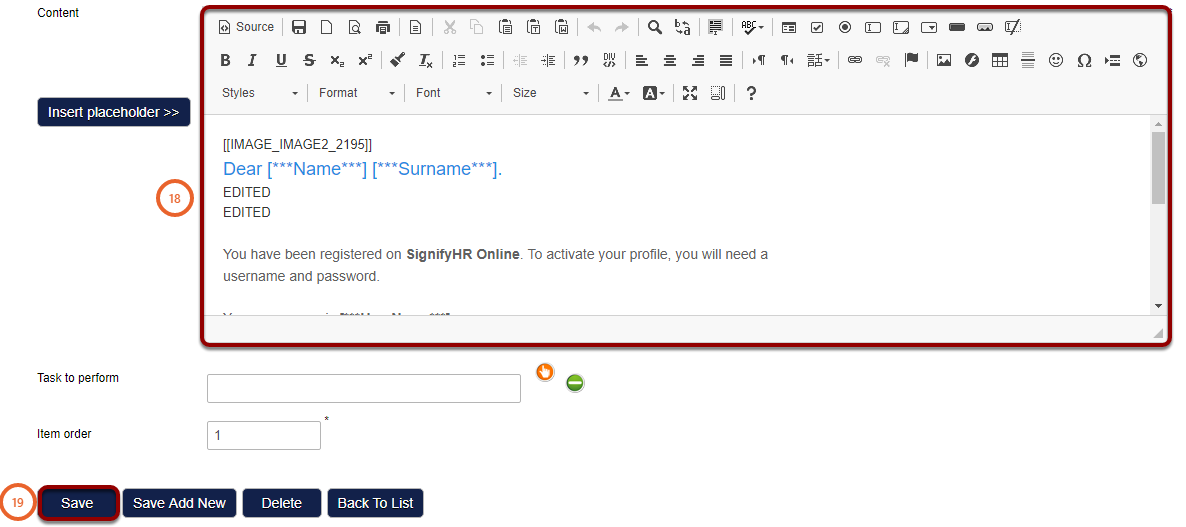
- Enter your email Content (18) below.
- Remember to click on Save (19) to save your work.
Please do not hesitate to contact support at support@signify.co.za for any assistance.
Sending welcome email to new users
When users have been imported with Excel
How to get there?
Click on System Administration (1), with your cursor hover over System Administration (2), then navigate to Users (3) | Manage Users (4).


What to do?
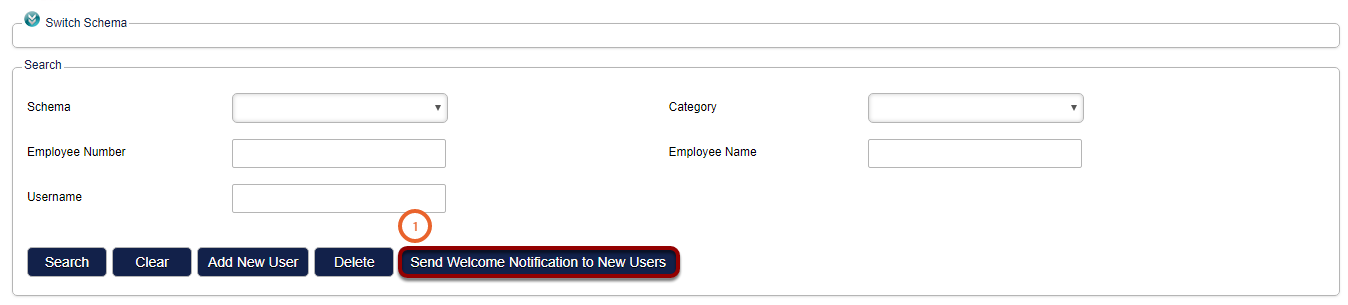
- If you would like to ignore users before a specific date, then tick the box at Ignore users created / imported before this date (2). Select the before date in field (3).
It is important to untick the tick box (2) when no users should be ignored.
The options that can be selected when sending a welcome email are:
- Send the welcome message to all users (4).
- The welcome notification will be sent to:
- All users who have not received it before.
- And that were created / imported after the date specified above (if applicable).
- Click on Confirm to continue.
- The welcome notification will be sent to:
- Send the welcome message only to users that I have selected. (5)
- The welcome notification will be sent to:
- Only users that have been selected.
- And who have not received it before.
- And that were created / imported after the date specified above (if applicable).
- Click on Select Users to continue.
- The welcome notification will be sent to:
- Send the welcome message to all users, but exclude users that I have selected. (6)
- The welcome notification will be sent to:
- All users who have not received it before.
- And that have not been excluded.
- And that were created / imported after the date specified above (if applicable).
- Click on Select Users to continue.
- The welcome notification will be sent to:
Click on Click on Continue To Next Step (7) to continue.
Important: If the user has already received a welcome email, they will not receive one again irrespectively of what option is selected below.

- Search for the user you would like to select by typing their Username (8).
- Use the tick box Select Username (9) to select all the visible employees (9).
- Or select the users one by one by ticking the tick box (10).
- You can see the number of Users Selected (11).
- Click on Clear Users (12) to clear all the Users Selected (11).
- Click on Continue To Next Step (13) when all the users were selected.

- Tick I confirm that my selection is correct (14).
- Click Export Users That Will Receive Notification (15) to save the list.
- Click on Send Welcome Notifications (16).

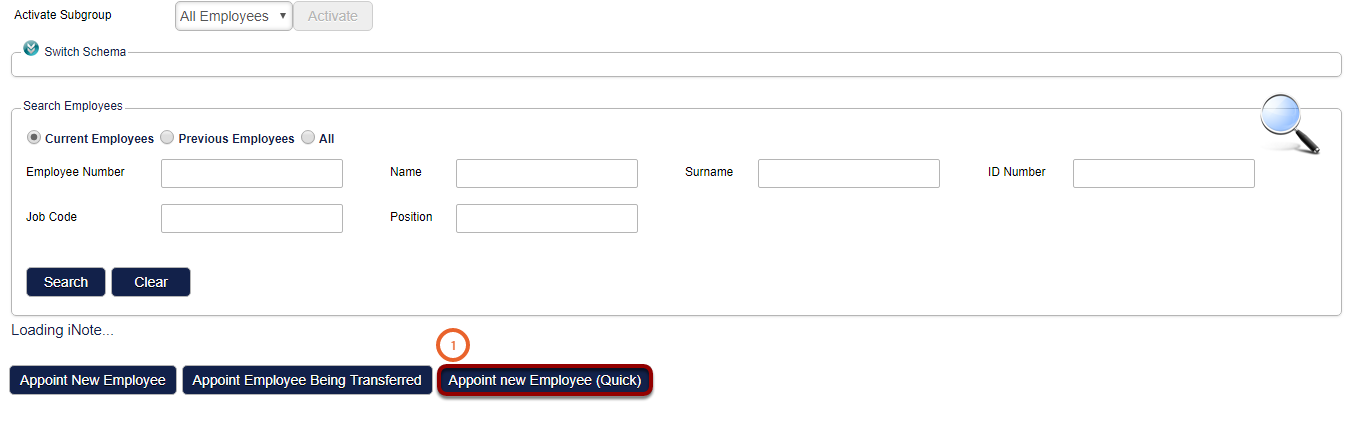
When appointing new employee (Quick)
How to get there?
Click on System Administration (1), then with your cursor hover over Modules (2) and click on Manage Employees.


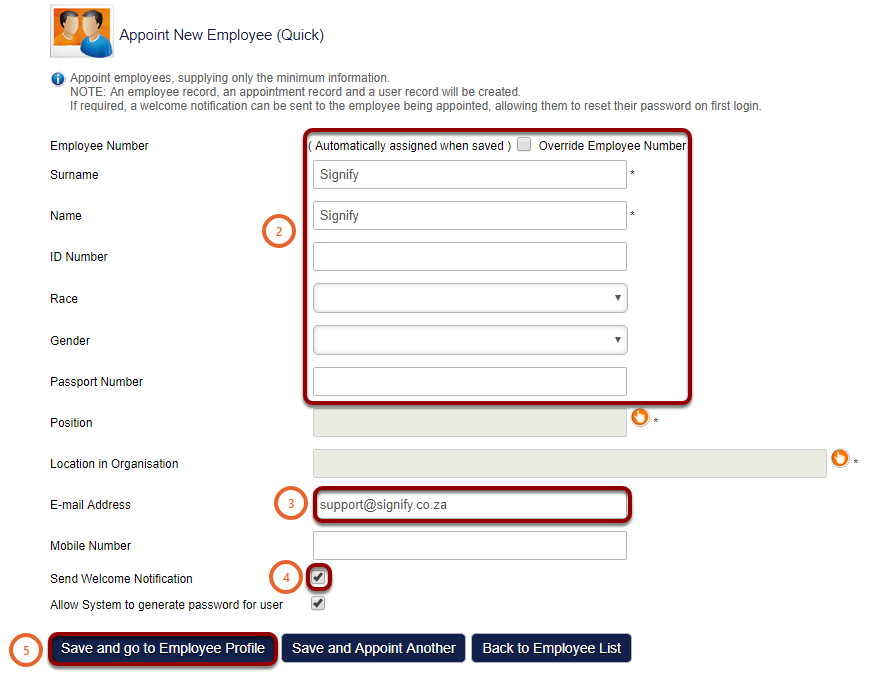
What to do?
- Click on Appoint new Employee (Quick) (1).
Important: You will only be able to send the welcome email when using the quick appoint option (1)
- Enter the employees details (2).
- Enter a valid E-mail Address (3) for the employee.
- Select the box Send Welcome Notification (4).
- Click on Save and go to Employee Profile (5).
How To Create Subgroups
How to get there?
Click on System Administration (1), then Click on Subgroup (2).


What to do?
- Click on Create (1) to create a new subgroup

- Enter the subgroup Description (2).
- If you want to select an existing category:
- Select Category (3).
- From the drop down (4) select the existing category.
- If you would like to create a new category:
- Select New Category (5).
- Enter the name for your new category (6).

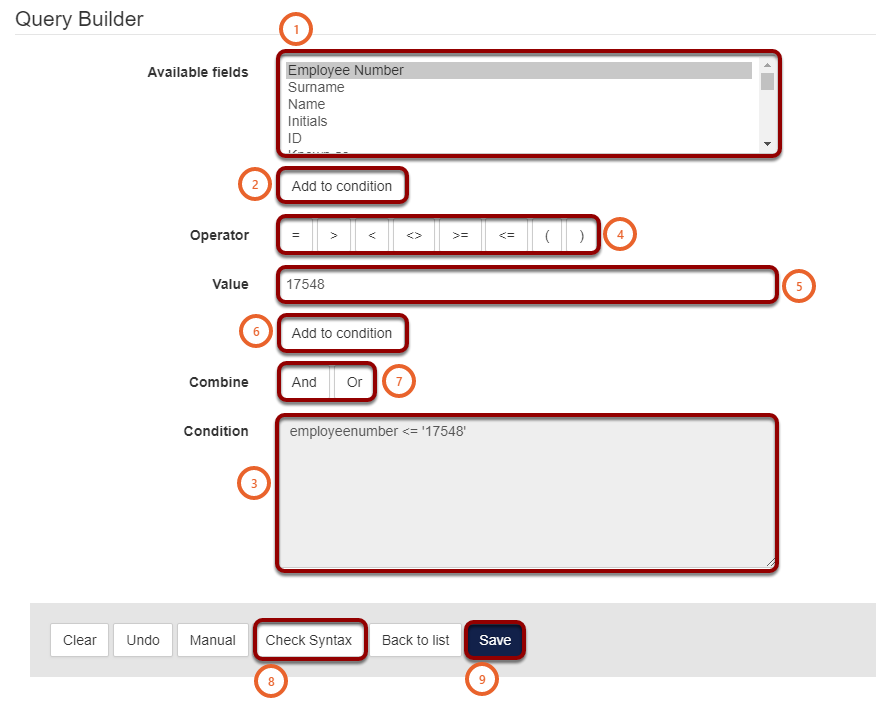
Add subgroup conditions
Subgroup conditions define which employees should be included in the subgroup.
- Select from the Available fields (1) the field that would be used to define who should be included in the subgroup. E.g. Employee Number.
- Click on Add to Condition (2).
- The condition will be added to the Condition field (3).
- Click on the Operator (4) you would like to use.
- Enter the Value (5).
- Click on Add to Condition (6) to add the requirement to the Condition field (3).
NOTE: Exact values have to be provided. Should a value that is not on the system be used, the script will still validate however, as the Value does not exist, the system will not link any employees to the subgroup.
- You can combine conditions by using And or Or buttons (7).
And (7) is used to specify two/more conditions that an employee meet in order to be included. E.g. if an employee is part of Gauteng branch managers, And they are part of Limpopo branch managers they will be included. This also implies that employees who only form part of one group will not be included.
Or (7) is used when an employee should be included in the subgroup if they are part of one condition or another. E.g. if an employee is part of Gauteng branch managers, Or if they are part of Limpopo branch managers they will be included. This also implies that employees from both groups will be included. There is no limit on the number of OR conditions that can be added.
- When the Conditions are complete click on the Check Syntax button (8).
- If there are no errors in your syntax then click on Save (9).
Test the subgroup
How to get there?
Click on System Administration (1), then with your cursor hover over Modules (2) and click on Manage Employees (3).


What to do?
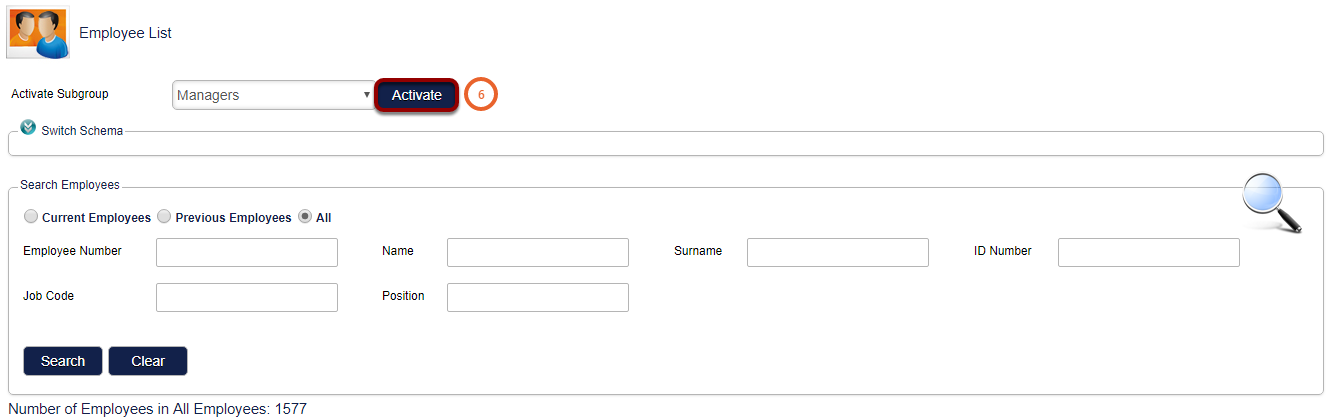
- From the Activate Subgroup drop down select the (More...) (1) option.
- A new window will open.

- Use the Subgroup field (2) to search for the subgroup.
- Click on Search (3).
- Then select your Subgroup (4).
- Click on Select (5).


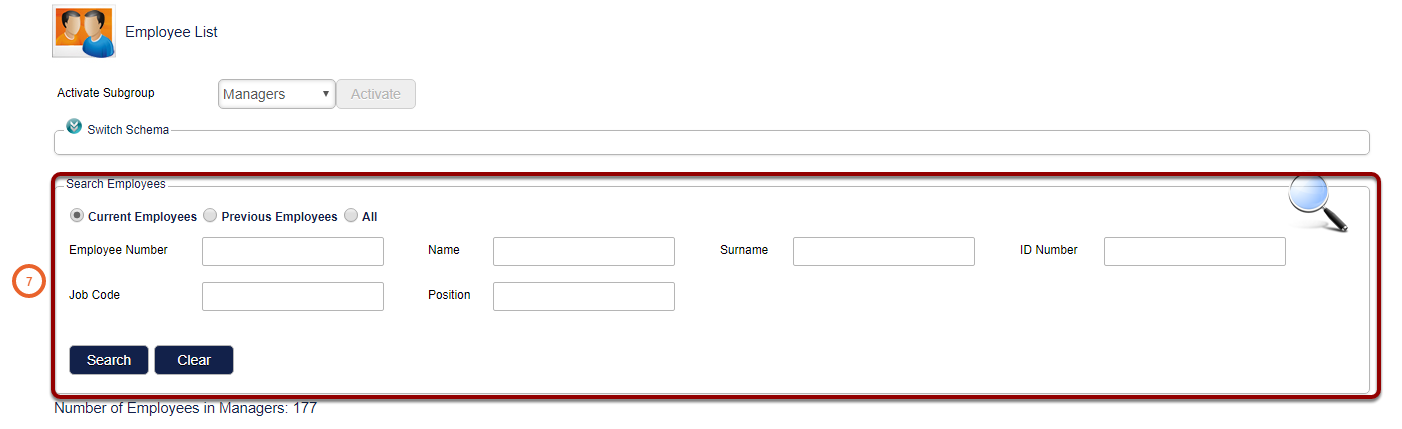
- Click on the Activate button (6) to activate the subgroup.
- Search for the employees (7) that should be in the subgroup you created to ensure that the subgroup has worked.
Note: Remember to switch your subgroup back to All Employees.
How To Download a Learner Certificate For Administrators
How to get there?
Click on System Administration (1), then with your cursor hover over Modules (2) | Manage Employees (3).


What to do?
- Search for the user using the search boxes and click on Search (1).
- Navigate to the user and click on Action (2).
- A new windows will open.
- Click on View / Edit (3).

- You will be navigated to a new screen.
- On the left click on the plus icon at Employee Development (4).
- Navigate to Learner Records (5).

- Click on Action (6) for the desired learner record.
- A new window will open.
Note: Only a certification type learner record will allow you to download a certificate.

- Click on Download Certificate (7).
- The certificate will start to download in your browser.

- Click on the certificate to view (8).

How To Download a Learners Certificate For Users
A Pathway Certification Step
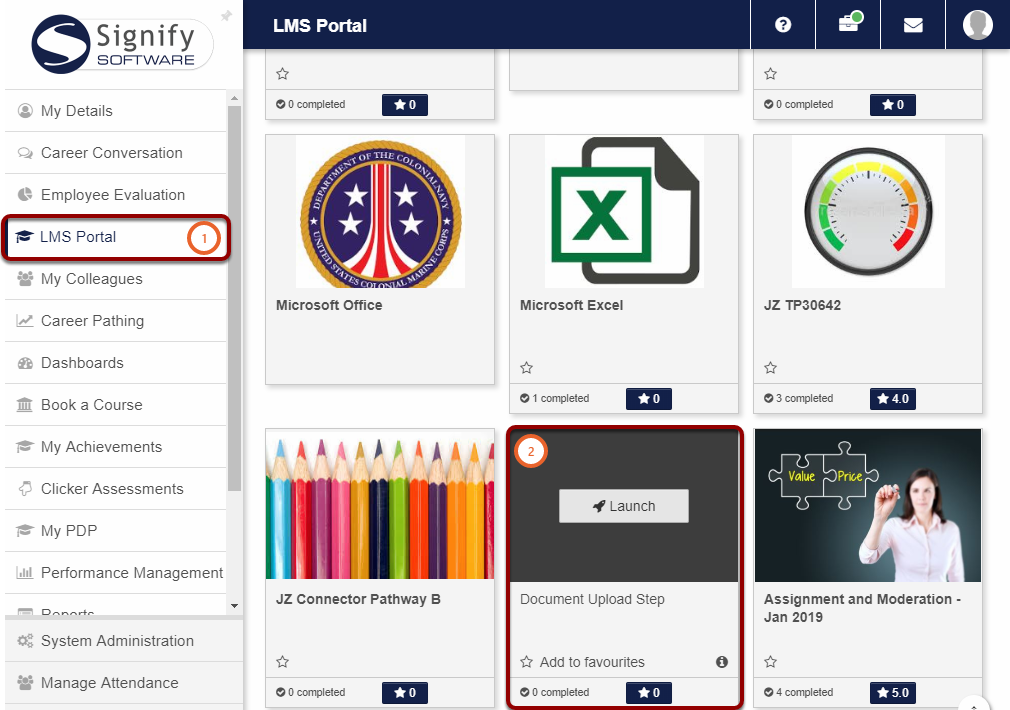
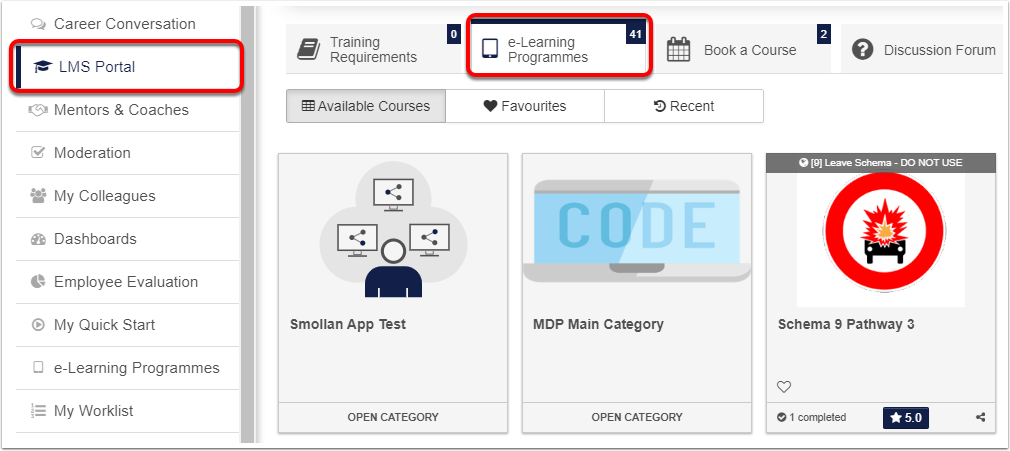
- Navigate to and click on LMS Portal (1).

- Click on the e-Learning Programmes (2) tab.

- With your cursor hover over the pathway (3).
- Click on Launch (4).

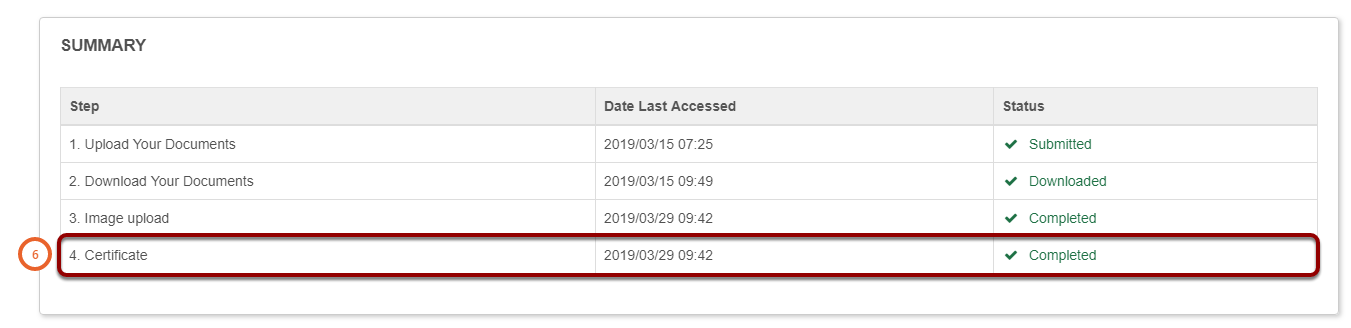
- Navigate to the last step in the pathway (5).
- Or click on the Certification step (6)
Note: To download your certificate all the prerequisites of the pathway must be met and the pathway must be completed.

- Click on the Certification Point (7).
- Your certificate will download in your browser.
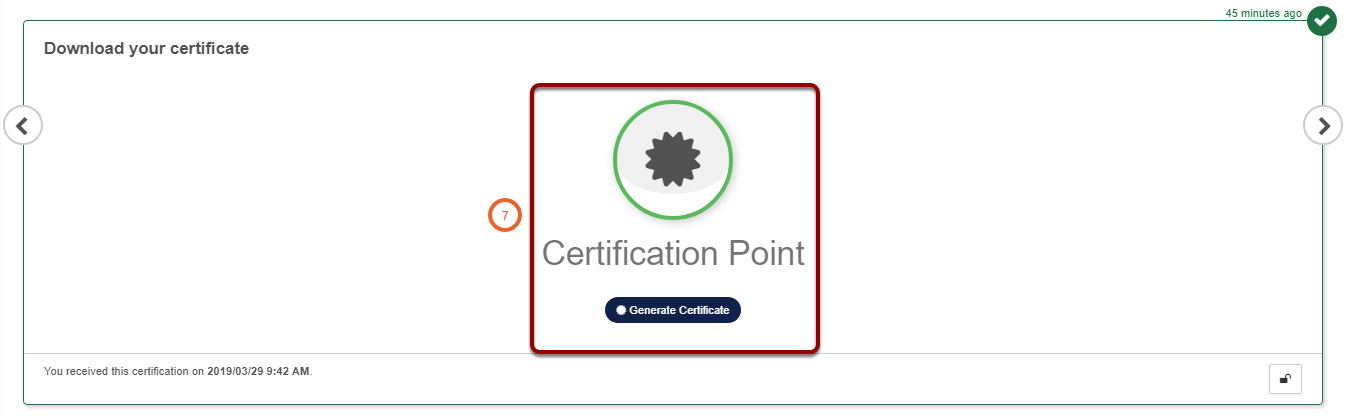
- Double click on your certificate to view (8).

My Achievements
- Click on LMS Portal (1)

- Option 1:
- Navigate to the My Achievements tab (2).
- Click on COURSES (3).
- Then Navigate to and click on the certificate icon (4).
- Option 2:
- Click on All Certificate (5).
- A new window will open.
- Click on Download Certificate (6)
Your certificate will download in your browser.
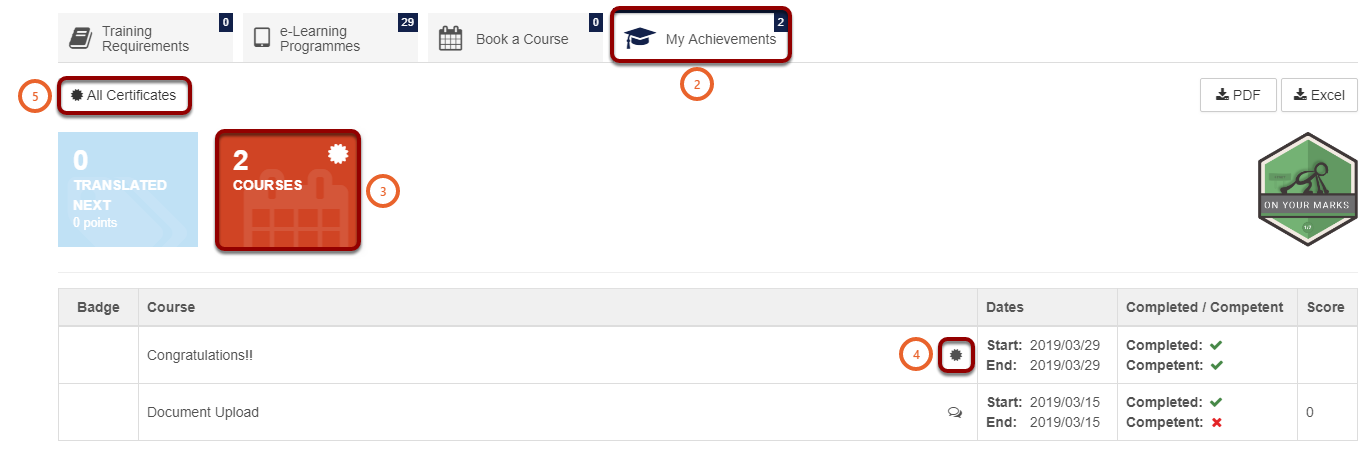

- Double click on your certificate to view (7).

How To Re-Appointment a User
How to get there?
Click on System Administration (1), with you cursor hover over Modules (2) | Manage Employees (3).


What to do?
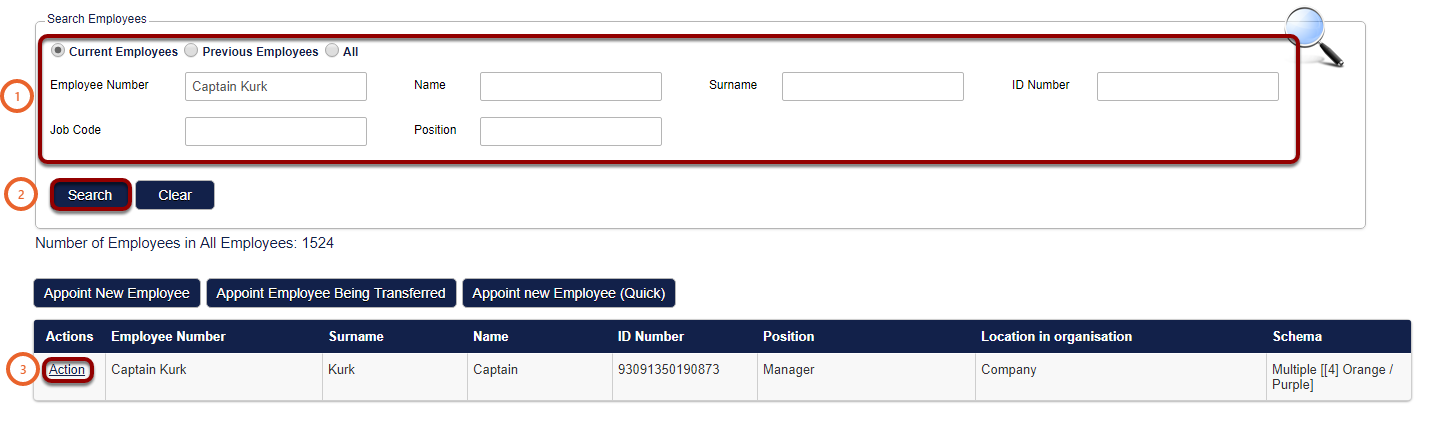
- Use the search criteria to find the user (1).
- Click on Search (2).
- Navigate to the user and click on Action (3).
- A new window will open.
- Click on View / Edit (4)

- On the left of the screen click on the plus icon at Organisational Assignment (5).
- Then click on Appointment History (6).
- Click on Action (7) for the appointment you would like to amend.
- A new window will open.
- Click on Make Correction (8).

- Select the users Position (9) by click on the hand symbol.
- From the drop down menu select the Appointment Type (10).
- Insert the Appointed From and To (11) fields.
- Click on Save (12) to save the users appointment.

How To Add a Learner Record To An Employee
How to get there?
Click on System Administration (1), then with your cursor hover over Modules | Manage Employees.


What to do?
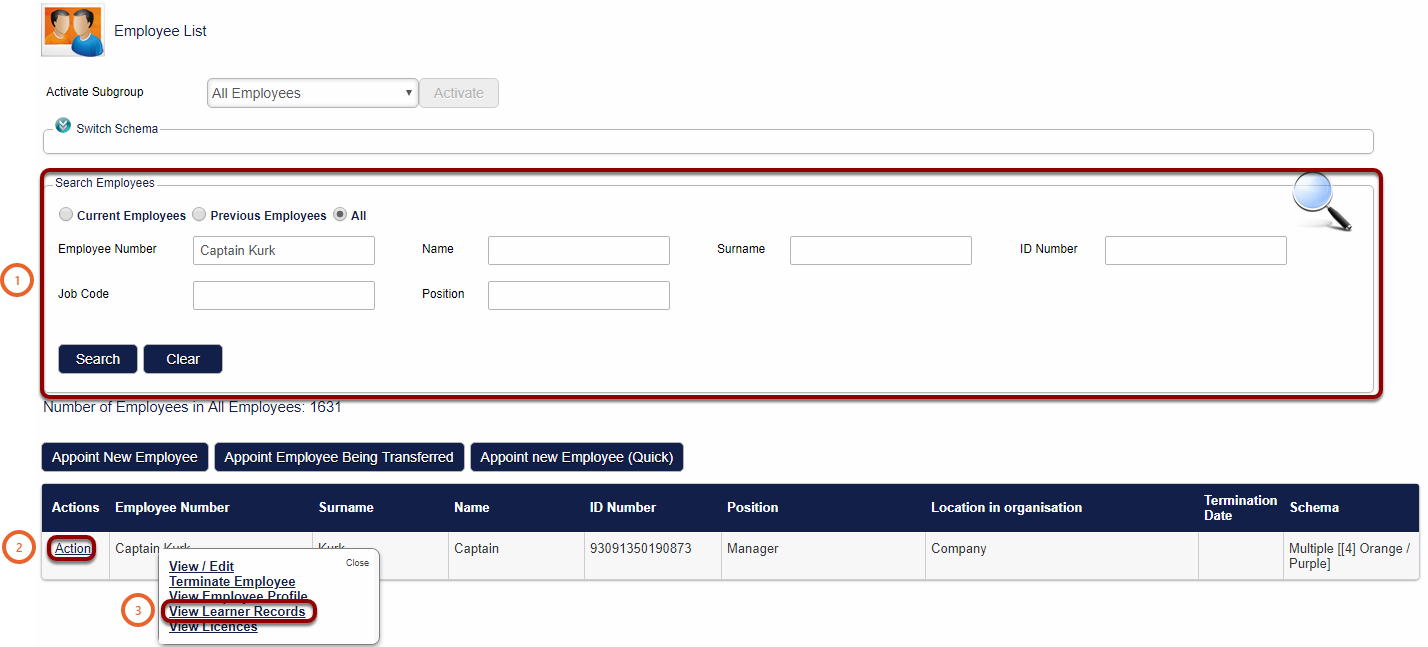
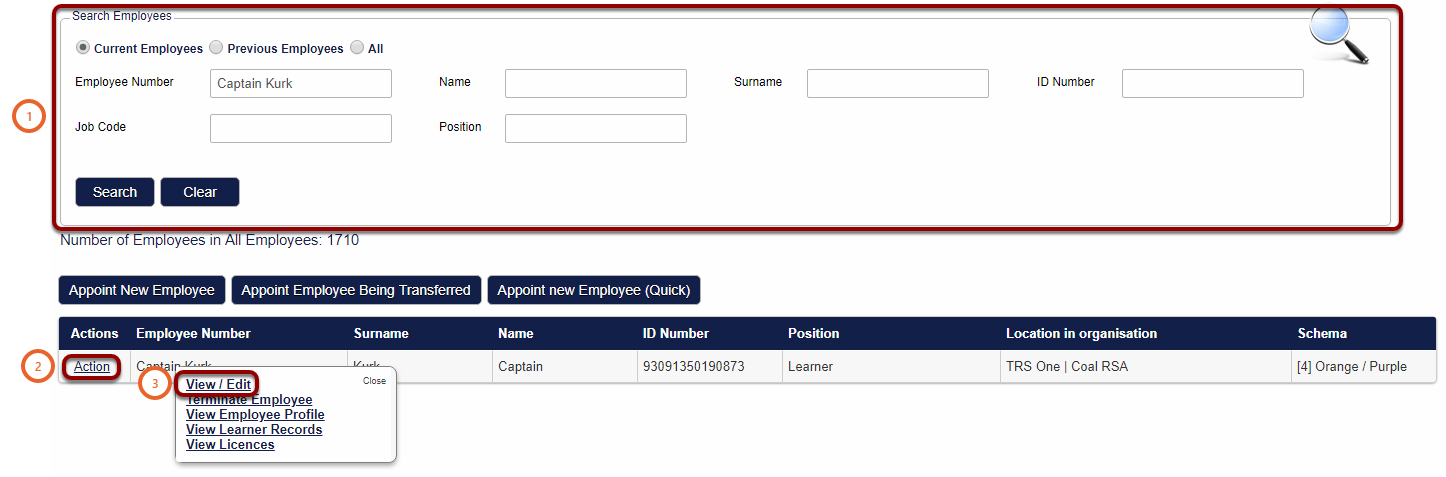
- Use the search criterias (1) to find the employee.
- Click on Action (2) at the employee.
- A small window will open.
- Then click on View Learner Records (3).
- Click on the Add (4) button to create a new learner record.

- Select the type (5) of learner record you would like to create.
- Click on the hand icon at Training Title (6) and select the training intervention.
- Choose the Start and End dates (7) for the learner record. (the End date is the expiry date of the learner record).
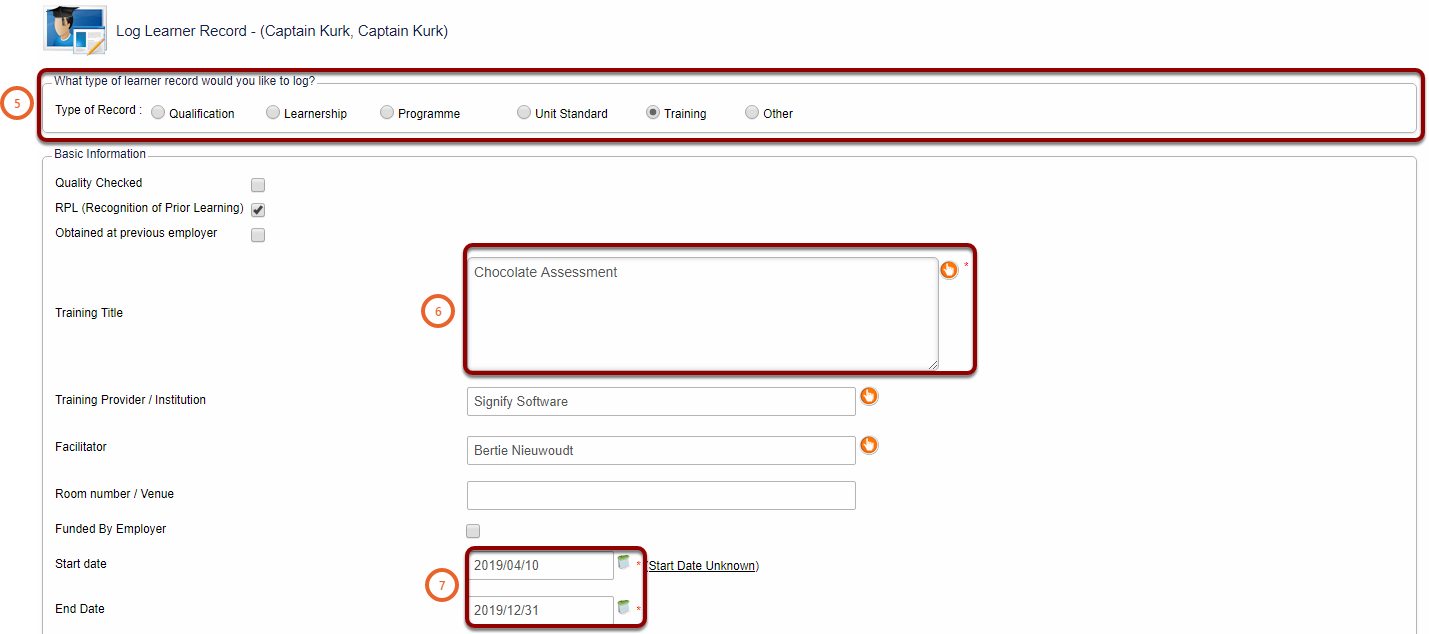
- Select the tick boxes Training Complete and Competent (8) if applicable.

- Click on Save Learner Record (9).

How To View a Users Assessment Attempts/Results
How to get there?
Click on System Administration (1), then with your cursor hover over Modules (2) | Manage Employees (3).


What to do?
- Use the search criteria to search for the user (1).
- Click on Action (2) for the relevant user.
- Then click on View / Edit (3)
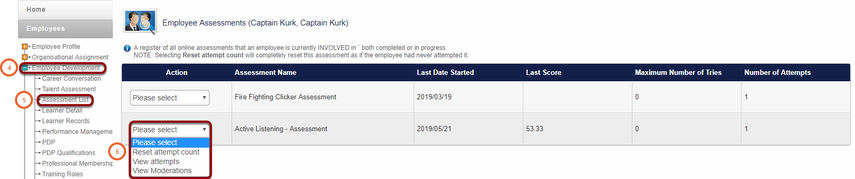
- Click on Employee Development (4).
- Then Navigate to and click on Assessment List (5).
- On this screen all the users assessments that were attempted are displayed.
- Click on the Please select (6) drop down and click on View attempts for more detailed information.
- Here you can print the assessment attempt by clicking on Export to PDF (7).
- Click on View Details (8) to view the users answers.

There are various reports that can be loaded to view assessment attempts. Please contact support@signify.co.za to ask for assistance.
Manage Users
How To Reset a Users Password
From System Administration
How to get there?
Click on System Administration (1). Then with your cursor hover over System Administration (2) then Users (3) then click on Manage Users (4).


What to do?
- Search for your employee by inserting the employee's details using the search box (1).
- Click on Search (2).

- Click on Action (3). A small windows will open.
- Click on View / Edit (4). You will be navigated to a new screen.

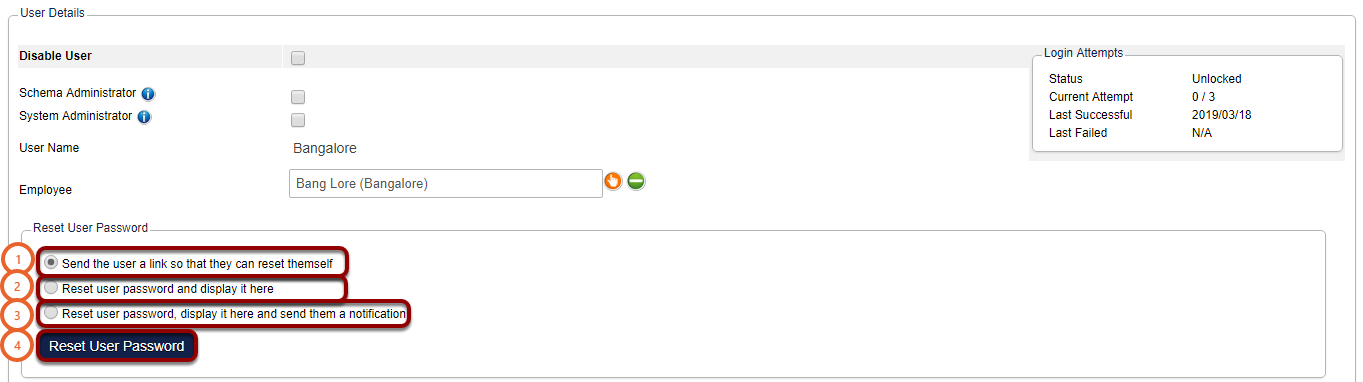
Select one of the three options:
- Send the user a link so that they can reset themself (1).
- Reset user password and display it here (2).
- When this option is selected the new password will display on your screen.
- Reset user password, display it here and send them a notification (3).
- When this option is selected the new password will be displayed on your screen and the employee will receive an email about the password reset.
- Once you have selected your option you can now click on Reset User Password (4).
By Using The Forgot Password Link
- Navigate to the Sign In screen (1).
- Click on Forgot your password button (2).

- Enter your Username (3).
- Then click on Reset Password (4).

- Enter your ID / Passport Number (5).
- Click on Reset Password (6).

- You will be able to enter your New Password (7).
- Confirm your New Password (8).
- Click on Update Password (9).
Please Note: We recommend having characters in a combination of upper and lower case letters, numbers and special characters. For example: P@ssw0rd12#.

How To Copy Administrator Rights To Another User
How to get there?
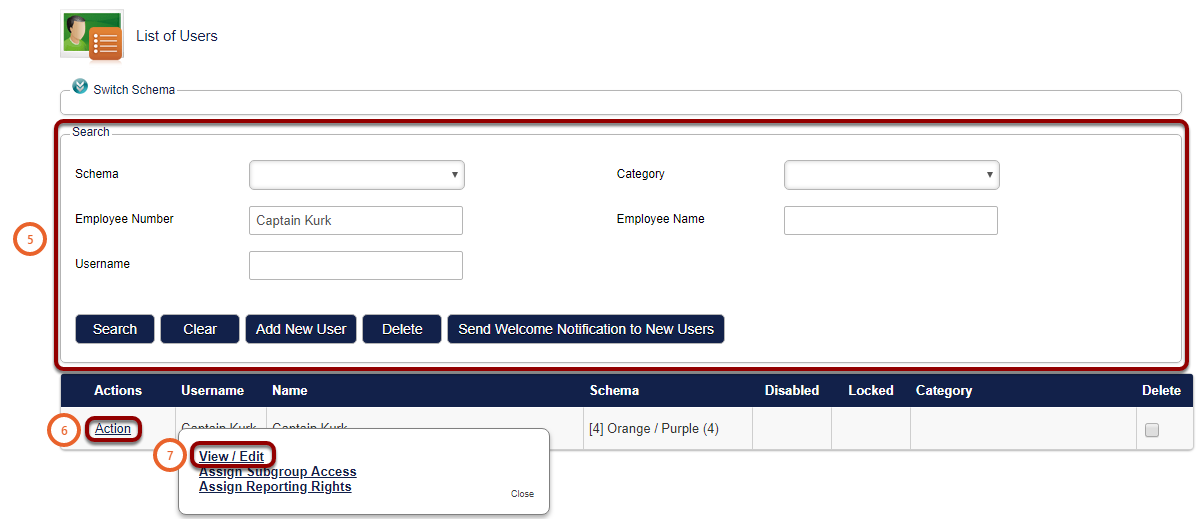
Click on System Administration (1), then with you cursor hover over System Administration (2) | Users (3) | Manage Users (4).
- Using the search dialogue boxes search for a user who has administrator rights and that you would like to copy (5).
- Click on the action button (6).
- A small window will open.
- Select View / Edit (7).
- Navigate to and click on Copy User Rights (8).


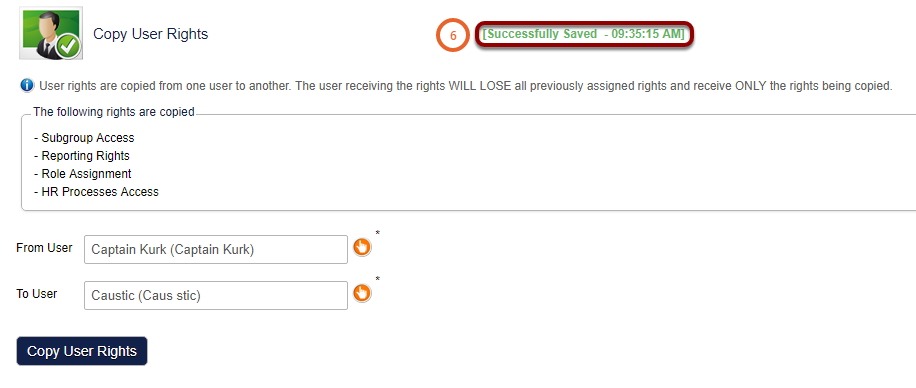
What to do?
- Select the From User (1) the user with the administration rights to be copied.
- Select To User (2) the user that will receive the administration rights.
- Then click on Copy User Rights (3).

Please note: The user receiving the rights WILL LOSE all previously assigned rights and receive ONLY the rights being copied. (4)
- Click on OK (5) when you have read the warning.

- Ensure that the Successfully Saved (6) message displays.
- The rights are now copied please verify that the user has received all the copied rights
Verify that the administrator rights were copied
- Navigate back to the users search menu by clicking on Users (1).

- Using the search dialogue boxes search for the user who received the administrator rights (2).
- Click on Action (3).
- A small window will open.
- Click on View / Edit (4).
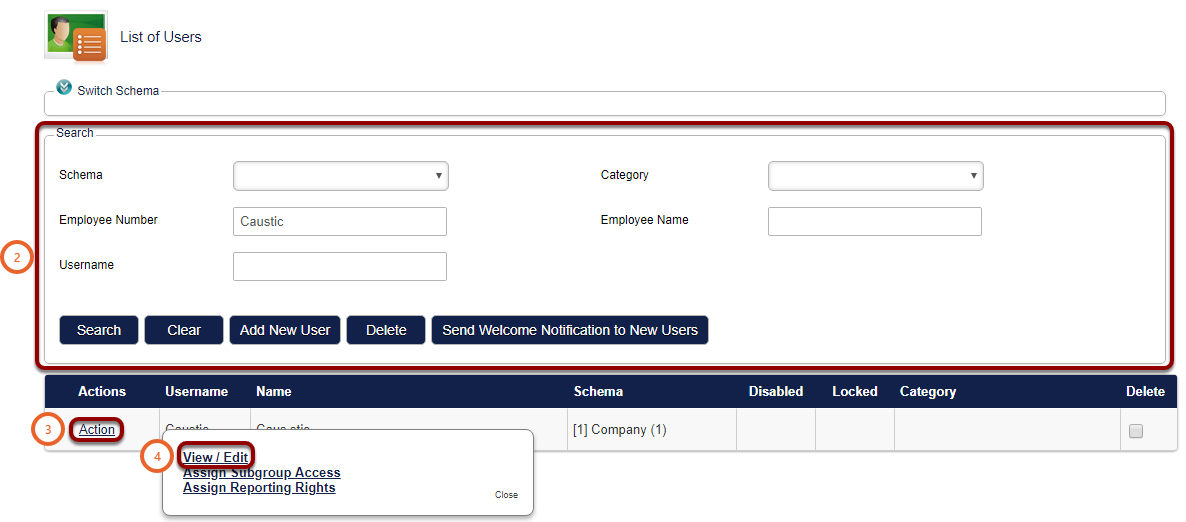
- Navigate to each of the relevant menus to ensure that the rights were copied (5).

How To Assign Reporting Rights
How to get there?
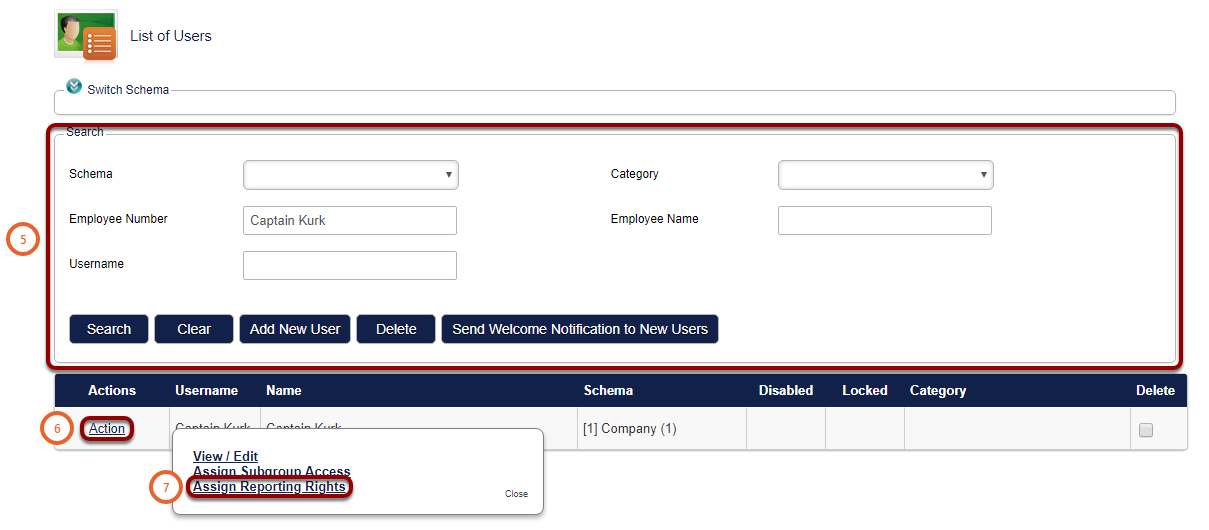
Click on System Administration (1), then with your cursor hover over System Administration (2) | Users (3) Manage Users (4). Use the search criteria (5) to locate the user in question, then click on the Action (6) button. A small window will open, then click on Assign Reporting Rights (7).


What to do?
- Click on the plus button (1) on the category were the report is located and tick the box.
- Then tick the boxes at each report that is required (2) (3) (4) (5).
- Click on Save Permissions (6).
Note: if the user requires access to all the reports below a category then only the tick box on that category is required.

How To Disable A User
How to get there?
Click on System Administration (1), then with your cursor hover over System Administration (2) | User (3) | Manage Users (4).


What to do?
- Use the search criteria (1) to search for a user.
- Click on Action (2) on the relevant user.
- Then click on View / Edit (3).
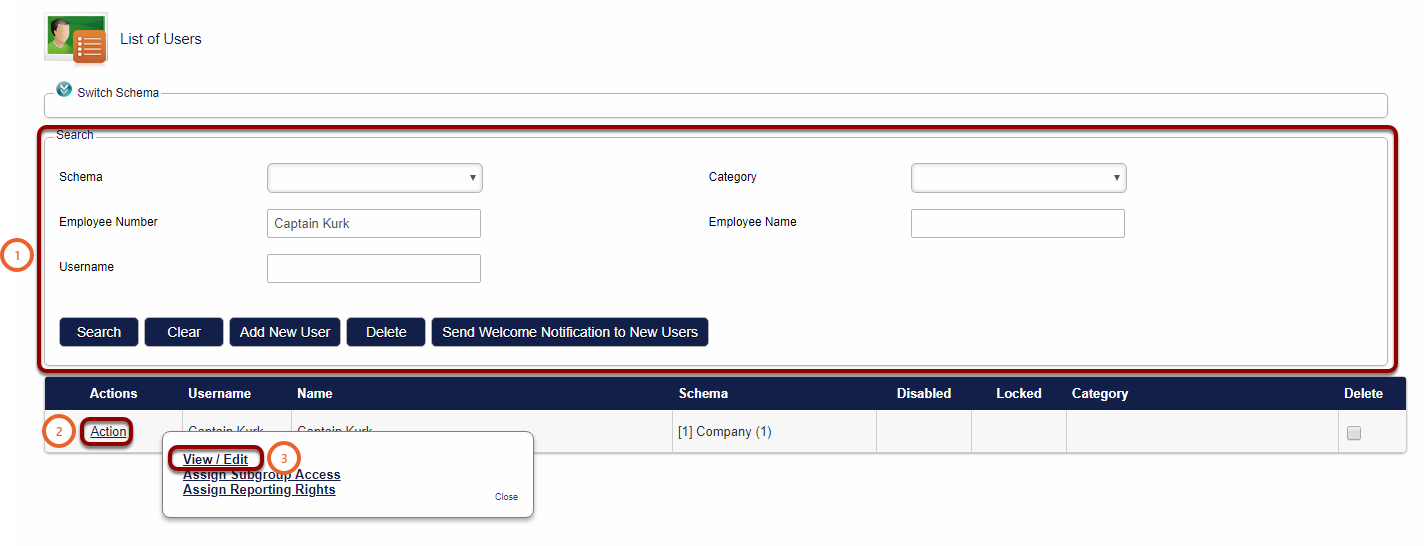
- Select the tick box Disable User (4).
- Then Scroll to the bottom of the page and click on Submit (5).
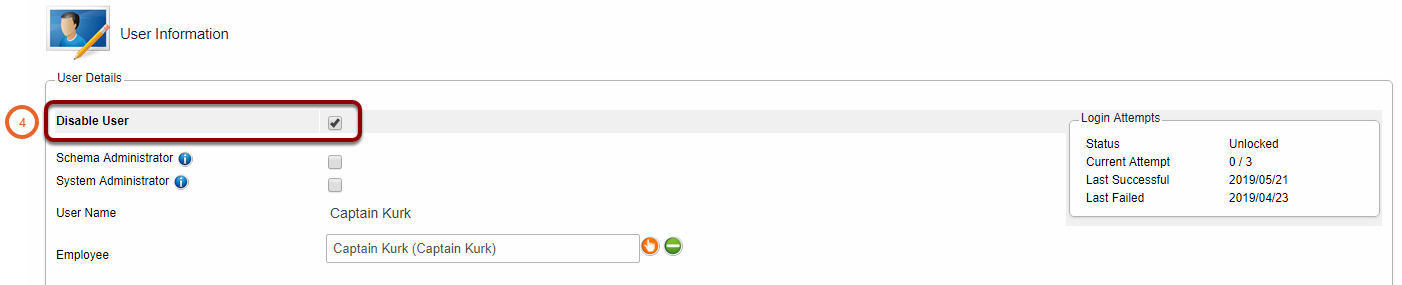

Note: When a user is disabled they will not be able to log in.
Mobile Application
How To Use The Workplace Observation Application Offline
Note: To complete these steps the device you are using must be connected to the internet.
Signing In and Retrieving Theme
- Insert your Company Theme Key (1) provided by your system administrator.
- Enter your Username (2).
- Then enter your Password (3).
- Select the Login (4) button.
Tip: These steps need to be completed when connected to the internet. When the login button is selected the Company Theme is downloaded from the internet.

Preparing Employee Data and Assessments For Offline Use
- Select the button Retrieve latest assessments and employees (1).

- Select your relevant Subgroup for example Employees reporting directly to Joe Black (2).
Note: The subgroup selected is important and must contain the employees to be assessed offline.

- Click on the Assessments (3) button. Here you will select which assessment to download and will then be available offline.

- Click on the download button to download all the assessments (4). Depending on the amount of assessments this might take some time to download.
OR
- Here you can search for an assessment (5).
- Select either assessments for whom you are the assessor OR Show all assessments (6).
- Click on the assessment you would like to access offline (7).

- Click on Download new version (8) to start the download for offline use.

- The assessment available offline will display a Green Circle (8).
- Click on the Back button to return to the home screen (9).
Tip: The legend at the bottom of the screen displaying the colours for offline assessments or assessments that needs to be downloaded (10).

Completing an Offline Assessment
Note: If you have downloaded the correct employee and assessment data by following the steps above your device is now safe to take offline
Tip: Multiple assessment can be completed offline before syncing the assessments to the LMS.
- Select Employee Attempts (1).

- Click on ADD NEW (2) to select an offline assessment.

- Select one of the assessments that are available offline (3).
Note: If the assessment has a Orange or Red circle next to it you will not be able to continue. Only offline assessment will be available

- Search for the employee to be assessed (4).
- Select the employee (5).

- Select Create new attempt (6).
Tip: The assessment will now be launched.

- Complete the assessment by swiping left (7).
- For quick navigation select the menu button (8).

- When the assessment is complete click on the Done Button (9).
- Select the OK button when the pop-up appears (10).
Note: The assessment may be completed, but the results of the assessment have not been uploaded to the LMS.

Syncing the Offline Assessments To the LMS.
Note: To complete these steps the device you are using must be connected to the internet.
- Select Employee Attempts (1).

- Here you will be able to view all the assessment attempts for the day (1).
- To sync all the attempts click on the sync button (2).
- To sync the assessments one by one click on the assessment you would like to sync.
Tip: The legend at the bottom of the screen (3):
- Assessments that were started, but are not complete will display a Red circle.
- Assessments that are complete, but has not yet been synced to the LMS will display a Green circle.
- Assessments that have been synced will display a Blue circle.

- When you have selected an assessment to sync click on Sync Attempt (4).

- Once an assessment is synced click on the assessment to view the transcript of remove the assessment (5).

- Select Open results (6) to view the transcript and to save a copy to the learner record on the LMS.
- Select Remove (7) to remove the attempt from your device.

- You can remove all synced attempts by clicking on the REMOVE SYNCED ATTEMPTS (8) button.
- Then click on the Yes button (9).

Logging Out
Note: For security and to keep the assessments in sync it is very important to log out of the application at the end of every day.
- Click on the Lock Symbol (1) to log out.
- Then click on OK (2).

Pathways
How To Create a Movie Step
How to get there?
Click on System Administration (1), with your cursor hover over Modules (2) then click on e-Learning (3) and select your pathway (4) then click on the Preview (5) tab.


What to do?
Create a .zip video file
- On your desktop click on Search (1).
- Type Notepad (2) in the search field.
- Click on Notepad (3) to open a blank Notepad file.

- Copy the following text in Notepad:
<!DOCTYPE html>
<html>
<body>
<video width="100%" height="90%" controls>
<source src="VideoName.mp4" type="video/mp4">
</video>
</body>
When the video width and height are set as percentages for example:
<video width="100%" height="90%" controls>
The video will automatically resize depending on the device's screen resolutions you use to ensure the video fits your screen.
- Ensure that the video name is typed precisely into this field marked (4) below.

- Select file (5).
- Click on Save As...(6).

- Navigate to your video file you want to upload (7).
- Click on the drop down Save as type: (8) and select All Files (*.*).
- In the File name (9) type Startup.html
- Then click on Save (10).

- Firstly select the Startup.html (11).
- Then press (Ctrl) on your keyboard, while clicking on your video file (12).
- Right click on the files selected and navigate to Sent to (13).
- Click on Compressed (zipped) folder (14).
Before you zip the file you can double click on the Startup.html file and the video will open in your web browser. If this does not work there is something wrong with your (.html) file.
Important: It is important that you select the (.html) first and then your video file, otherwise the video will not play.

- You will now see three files:
- Startup.html (15).
- Your video file (16) (VideoName.mp4).
- Your zip file (17) (VideoName.zip).

Creating a Movie step
- Make sure you are in Edit mode
- Click on Edit Pathway (1) to enter edit mode.

- Click on Movie (2) in the toolbox menu.

- Enter the Custom Main Header (3) for your pathway step.
- Click on Choose File (4) to upload your video.
- Navigate to your (.zip) video file (5).
- Click on Open (6).

- Enter a Description (7) for your video.
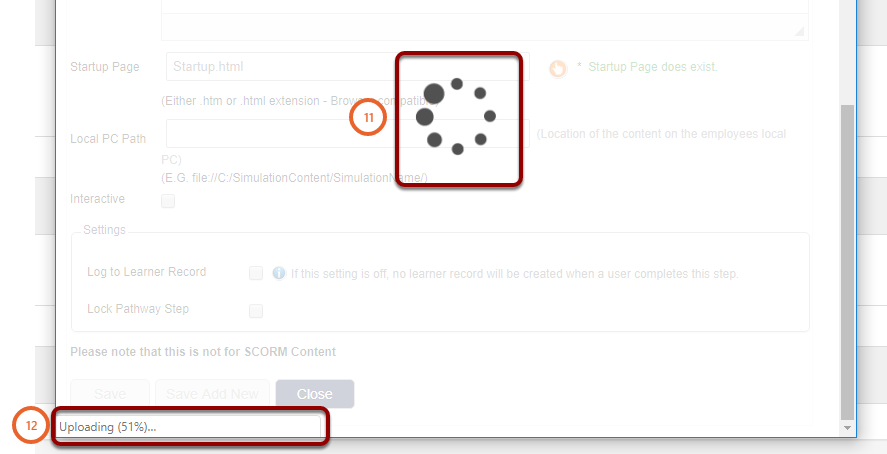
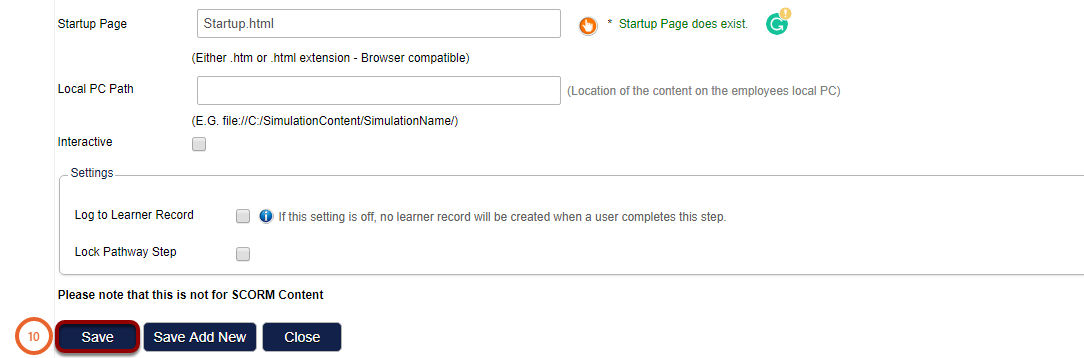
- In the Startup Page field (8) type Startup.html.
- Tick the box Log to Learner Record (9) if you would like to link it to a learner record.
- Click on Save (10).

Important: Do not close the windows until the upload process has been completed (11). Progress indication will be displayed at the bottom of the screen (12).
Test the video to make sure everything is working correctly.
- Enter View mode by clicking on Preview as User (13).

- Navigate to the video step and click on the video (14) to open.
- A new window will open.
- Click on the play icon to ensure the video works.

How To Upload An Image
How to get there?
Click on System Administration (1), then with your cursor hover over System Administration (2) | Tools (3) | Configuration (4).


What to do?
- Click on Framework (1).
- Then Navigate to Image Uploader (2).
- Click on the Add image... (3) button.
- A new file explorer window will open.
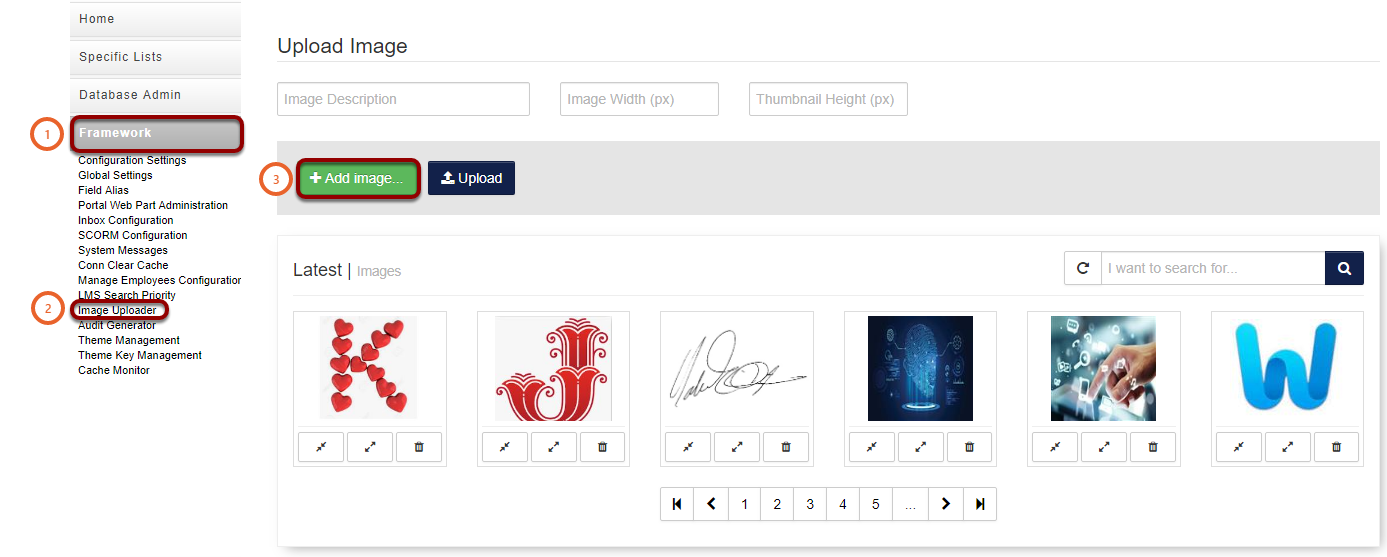
- Navigate to and select your image you would like to upload (4).
- Click on open (5).

- You can now enter a name for your image (6) to make searching easier.
- Click on the Upload button (7) to upload your image.
- A new window will open.

- Two links will appear (8):
- Image Url: (This is the original size image that you have uploaded).
- Thumbnail Url: (This is a smaller size image than what you have uploaded).
- Now you can click on Done (9).

- Click on the icon at (10) to open the Thumbnail in you browser.
- Click on the icon at (11) to open the original size image in your browser.
- Click on the Delete icon (12) to delete your image

You can copy any of these links at step (8) or (13) when you would like to add the image.

Add an image to a pathway step
How to get there
Click on System Administration (1), then with your cursor hover over Module (2) | e-Learning (3) | Learning Management (4) | Maintain Learning Pathway (5), then select the pathway you would like to edit (6).


What to do?
- Click on the Preview (1) tab.
- Ensure you are in Edit (2) mode.
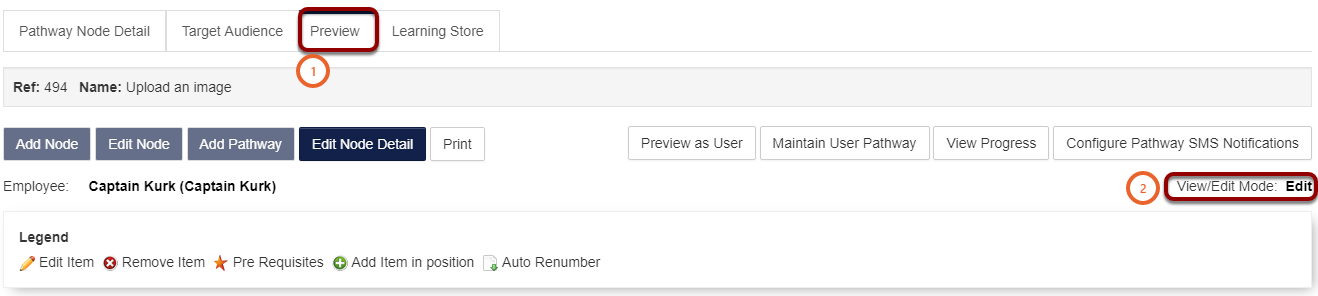
- Click on the edit symbol (3) were you would like to insert the image.
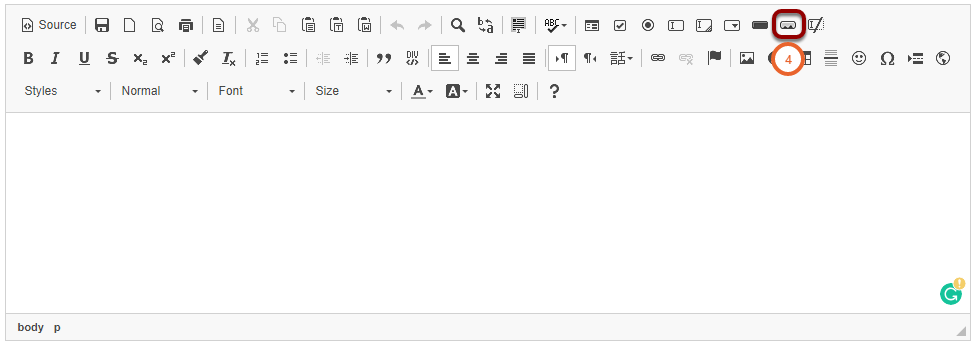
- A new window will open.

- Click on the image symbol (4).
- A new window will open.
- You can edit the dimensions of the image (6).
- Preview the image in the Preview field (7).
- Click on OK (8) when you are done.

- Ensure that the image you inserted is correct (9).
- Then click on Save (10).
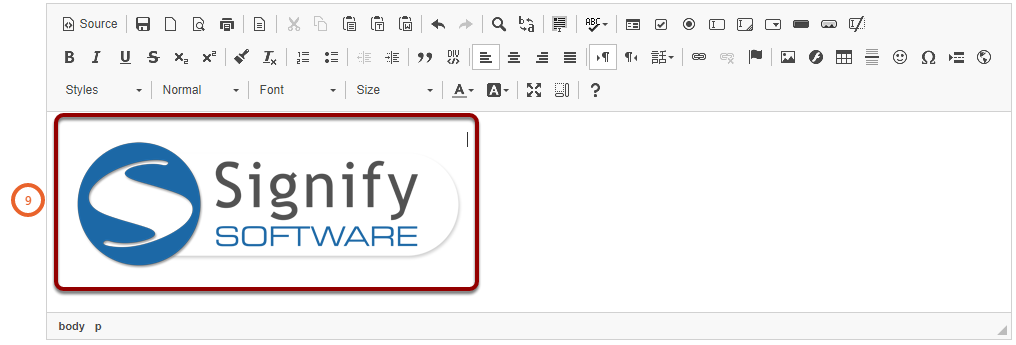
- Ensure that you are happy with the image in the pathway step (11).
How To Publish a Pathway
How to get there?
Click on System Administration (1), then with your cursor hover over Modules (2) | e-Learning (3) | Learning Management (4) | Maintain Learning Pathway (5) | Click on Edit (6) by the pathway in question.


What to do?
Publish the pathway
To publish a pathway and make it accessible to users follow these steps:
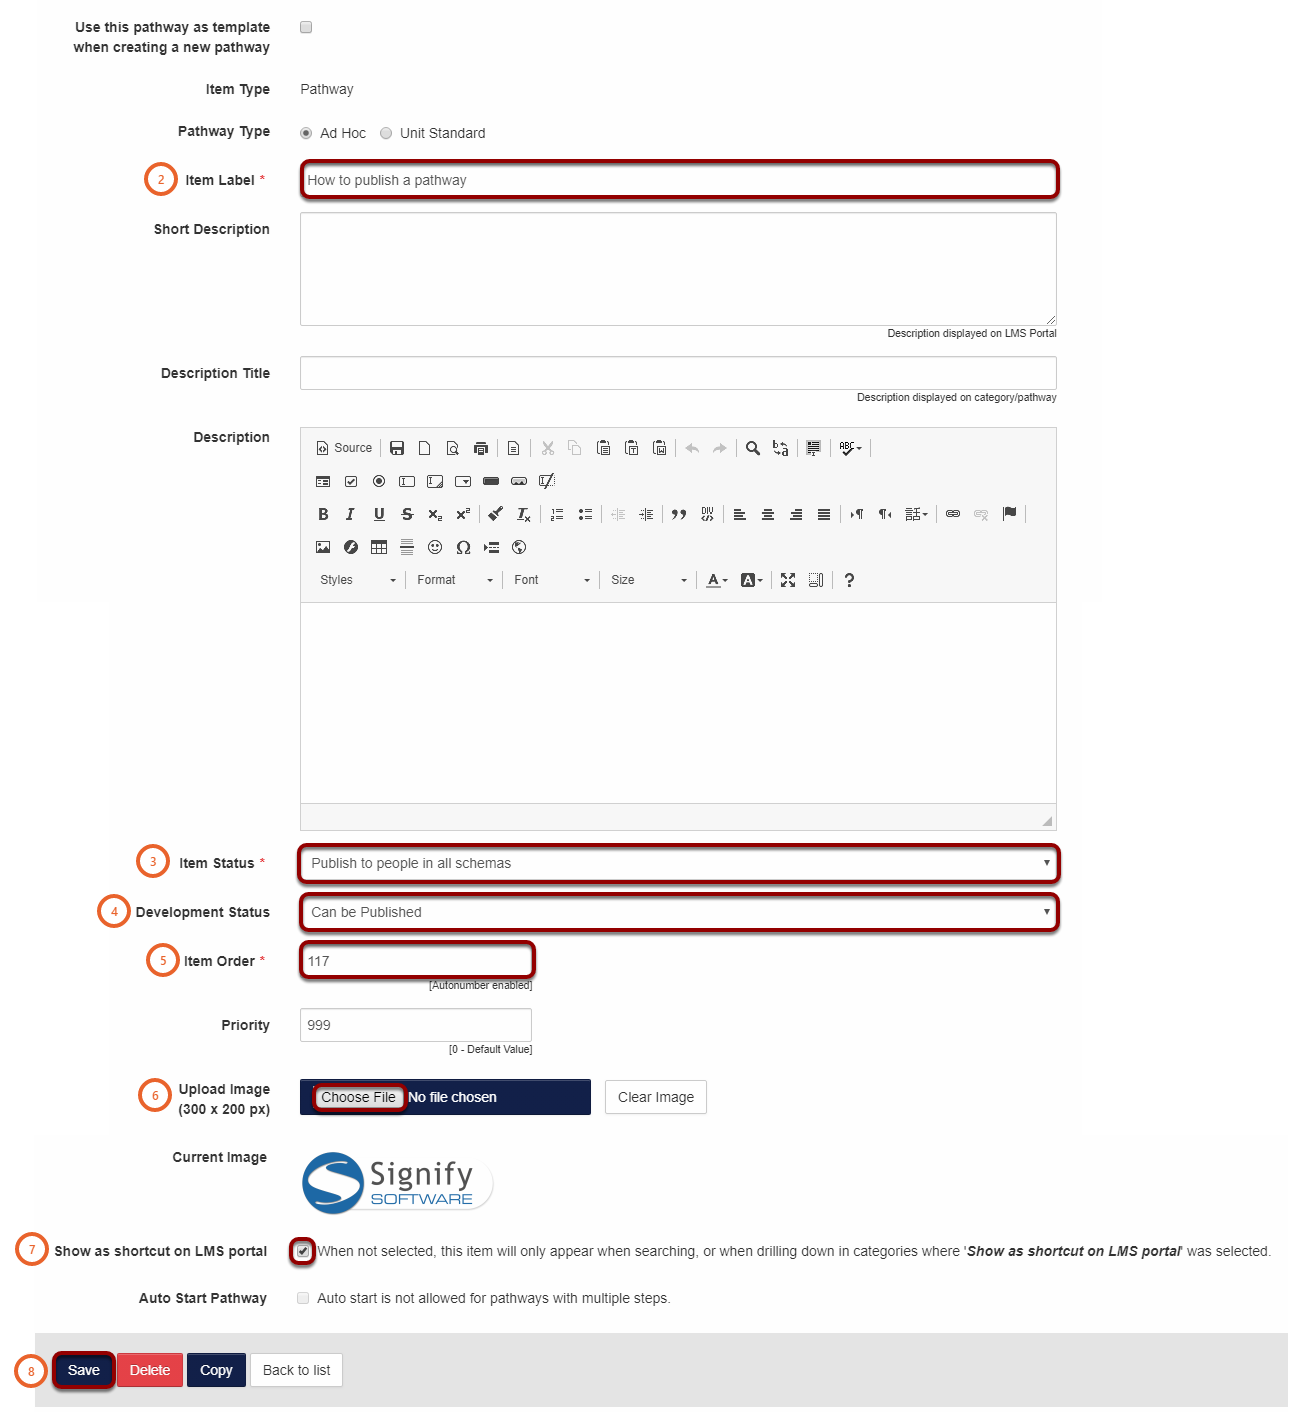
- Click on the tab Pathway Node Details (1).
Note: users have to be added to the target audience for them to access the pathway.

- Enter the pathways Item Label (2), this is the pathway name.
- From the Item Status (3) drop down select one of these options:
- Not Active. (Select this option when the pathway should not be accessed by users).
- Publish to people in all schemas. (This option allows users across all schemas to access this pathway).
- Publish to people in this schema only. (Users only in the current schema will be able to access this pathway).
- From the Development Status (4) drop down select one of these options:
- Under Construction.
- Being Checked.
- Can be Published. (Select this option to publish the pathway).
- Temporarily Out of Service.
- The Item Order (5) will automatically generate, but if you need the pathway to be in a different order you can change it here.
- Click on Choose File (6) to select a picture for the pathway.
- Select the tick box Show as shortcut on LMS portal (7).
- Click on Save (8).
Adding users to the Target Audience
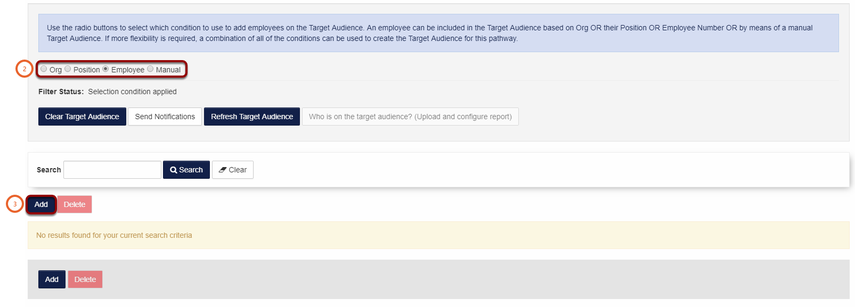
- Click on the Target Audience (1) tab to add users.

Tip: You can add an Org, Position and Employee to a target audience by clicking on the relevant buttons (2). For this example we will add an employee.
- Select Employee (2).
- Click on the Add (3) button.
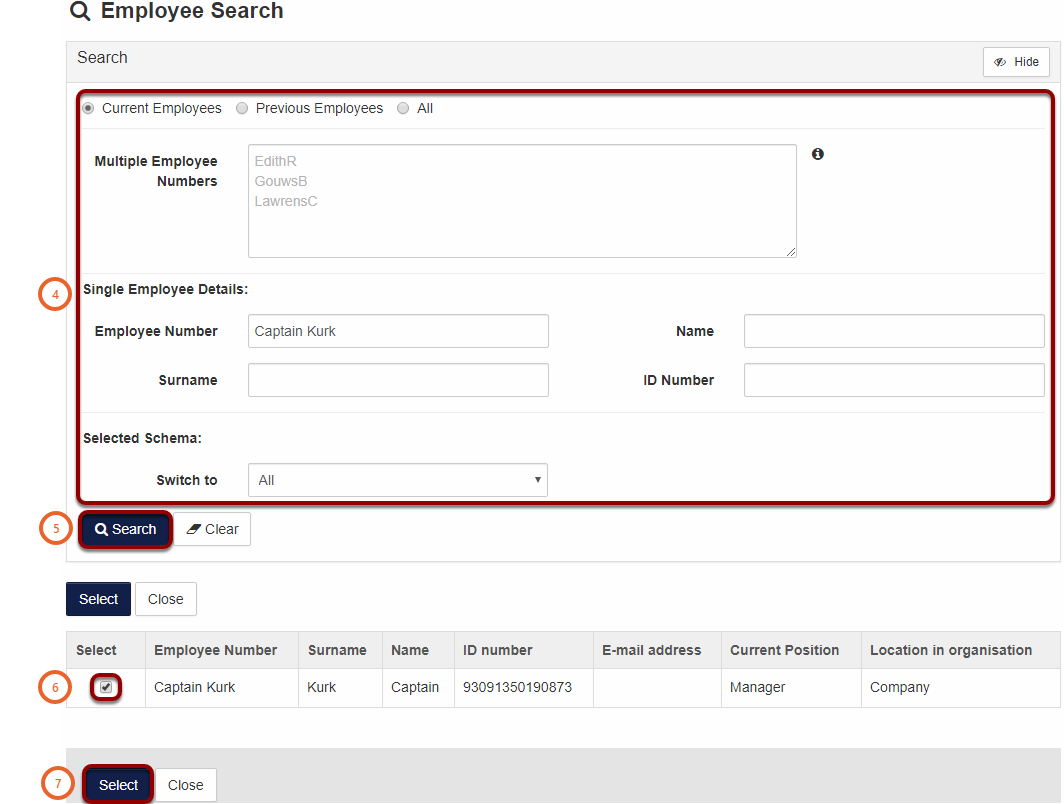
- A new windows will open.
- Use the Search (4) criteria to locate a user.
- Then click on Search (5).
- Navigate to the user and select the tick box (6) to select the user.
- Click on Select (7) to add the user to the target audience.
- Close this window when all the employees have been selected.
Tip: if multiple users needs to be added use the Multiple Employee Numbers (4) field.
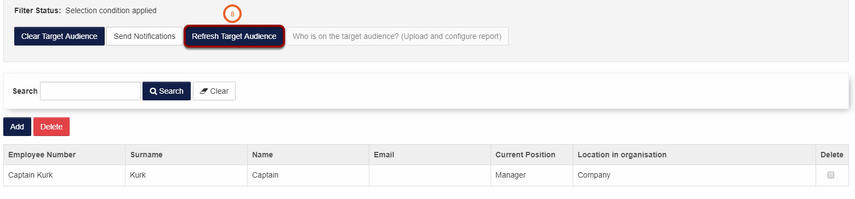
- Click on Refresh Target Audience (8) to apply these settings.
Tip: Click on this link to view the full manual or send an email to support@signify.co.za for any assistance or more information.
How to Generate a Shareable a Pathway Link
System Administration
How to get there?


What to do?
On the pathway preview tab you can select Generate Shareable Link (1).
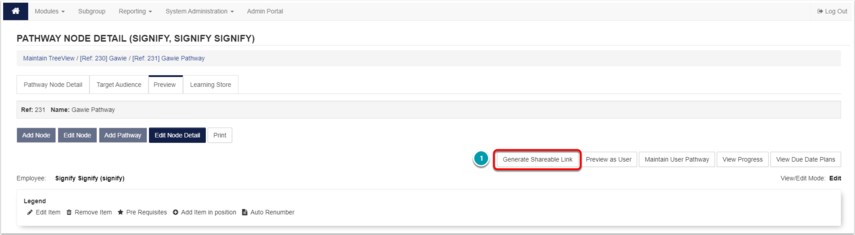
When you select the Generate Shareable Link button a new page opens with a link that can be copied ant send to other users.

Note: A user will only have access to the pathway if loaded on the Target Audience (if applicable), and is logged into the system. If the user is not logged in, the login screen will be displayed.
LMS Portal
How to get there?
What to do?
On the pathway select the share icon (1).

OR
Open the pathway and select the share icon (2) inside that pathway.

When you select the share button a new page opens with a link that can be copied ant send to other users.

Note: A user accessing the link will be requested to log in, if not already logged in. Access to the pathway is dependent on relevant permissions.
Performance Management
How to Create a New Agreement Template
How to get there?
Click System Administration (1), then with your cursor hover over Modules (2) | Click on Performance Management (3) | With your cursor hover over Administration (4) | Click on Templates (5).


What to do?
Adding a new agreement template
- Click on Add (1) to add a new Agreement Template.

- Enter the Name (2) of the template you want to create.
- From the drop down select the template Review Frequency (3).
- Click on Continue (4).


IMPORTANT: Careful consideration must be made before selecting or unselecting the tick box in the step below:
- Include this Review Period's rating in the score calculation (6).
Once this setting is saved you WILL NOT BE ABLE TO CHANGE this setting. You will have to delete the Agreement and start from scratch.
- Select a Description (5) for your review period.
- Tick or Untick the tick box Include this Review Period's rating in the score calculation (6).
- Click on Continue (7).

Adding perspectives, themes and objectives
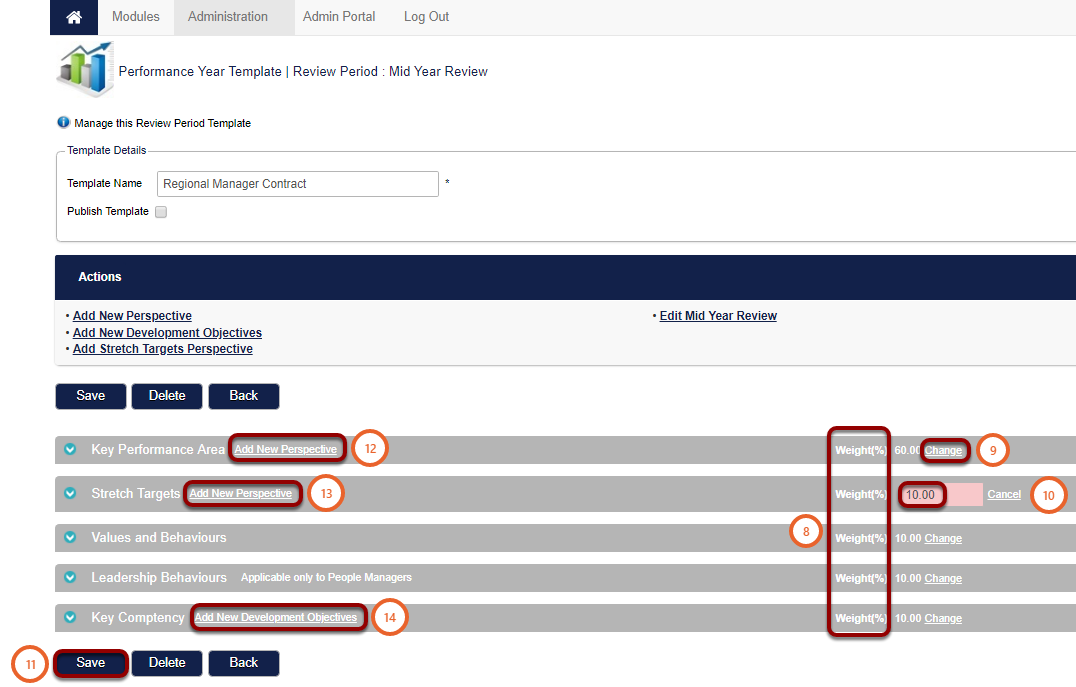
- Ensure that all the main categories Weights(%) (8) add up to 100%.
- Click on Change (9) to edit the Weights.
- Enter the Weight(%) (10) and ensure they add up to 100%. You will not be able to save if the Weights do not add up to 100%.
- Click on Save (11).
- Click on the Add new Perspective (12) / (13) to add perspectives to KPA's or Stretch Targets.
- Click on Add New Development Objectives (14) to add objectives to Key Competency.
For this example we will only be adding perspectives to KPA's. Kindly click on Add new Perspective (12).
- From the Perspective Drop Down (15) select the Perspective.
- Enter the Weight (16).
- Click on Save (17).
- Click on Save Add New (18) if you would like to add another Perspective.
- Click on Close (19) when you are done.

- Ensure the Perspectives added, add up to 100% (20).
- Click on Edit (21) to change the weights per Perspective.
- The next step is click on Add Theme (20).
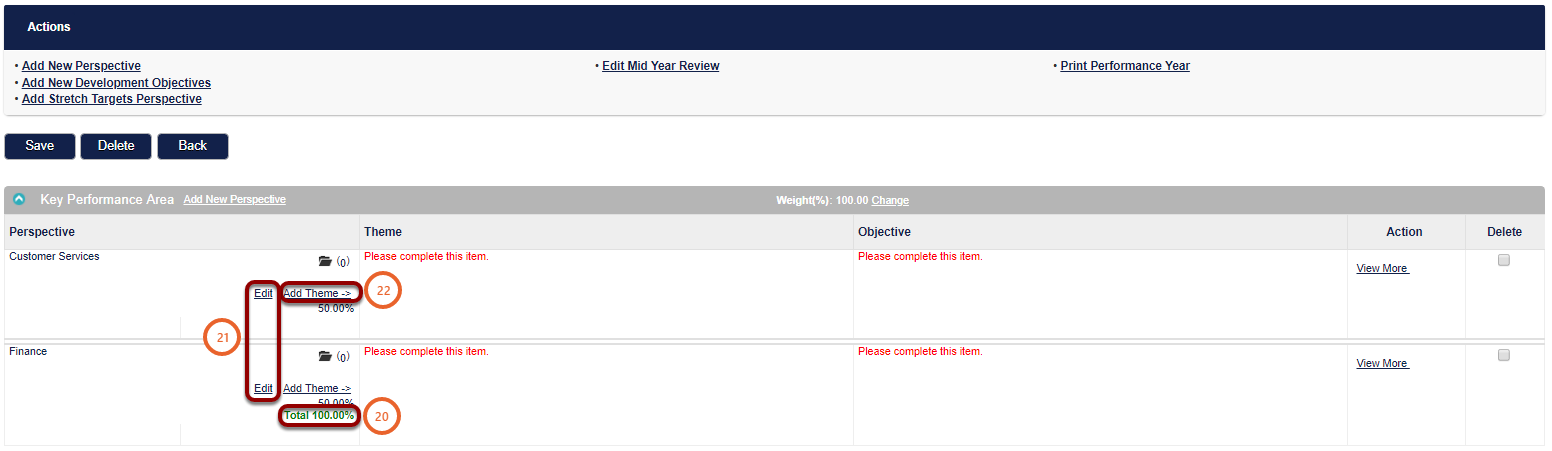
- Click on the Hand Icon (23) to select Themes from the database.
- You can also enter the the Theme in the text box (24) if your theme is not in the database.
- Enter the Weight (25) for the theme.
- Click on Save (26).
- Click on Save Add New (27) if you would like to add another Theme.
- Click on Close (28) when you are done.

- Ensure the Themes added, add up to 100% (29) / (30) for each Perspective.
- Click on Edit (31) to change the weights per Theme.
- The next step is click on Add Objective (32).
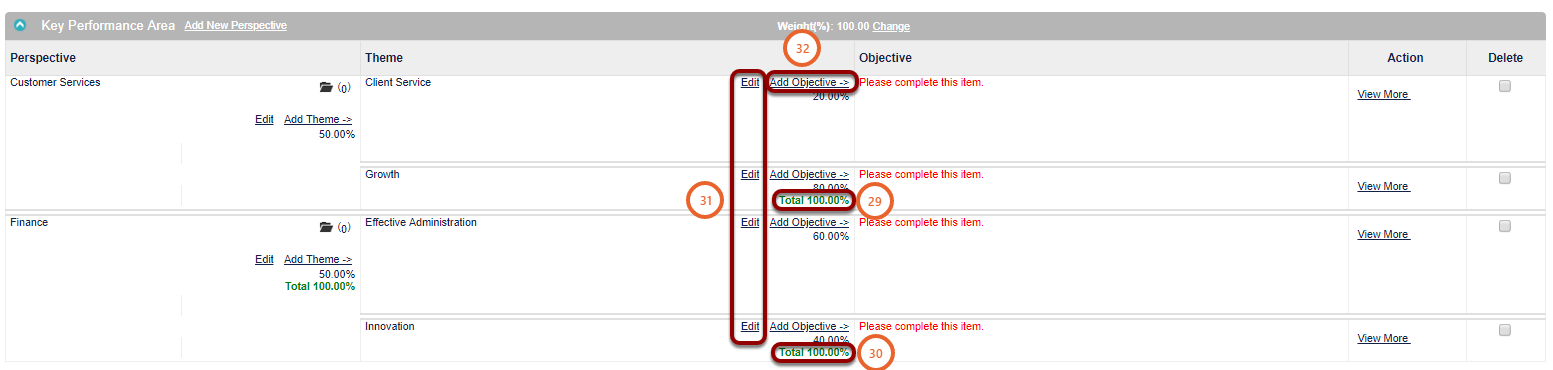
- Enter an Objective in the text box (33) or click on the Hand Icon (34) to select an Objective from the database.
- Enter the Measures (35) for the Objective.
- Enter the Rating Scale (36).
- Enter the Weight (37).
- Select a Due Date (38).
- Click on Save And Close (39).
- Click on Save Add New (40) if you would like to add another Objective.

- Ensure the Objectives added, add up to 100% (41) / (42) / (43) / (44) for each Theme.
- Click on Edit (45) to change the weights per Objective.

Note: Before Publishing the template ensure there are no RED text on the page and all the percentages are GREEN.
- When the Agreement is complete and you would like the Publish the template. Click on the Publish Template tick box (46).
- Then click on the Save (47) button.

More Information
To delete a Theme click on the Delete tick box (48), then select the Delete button (49).

To add a document click on the Folder Icon (50), then click on Add Document (51).
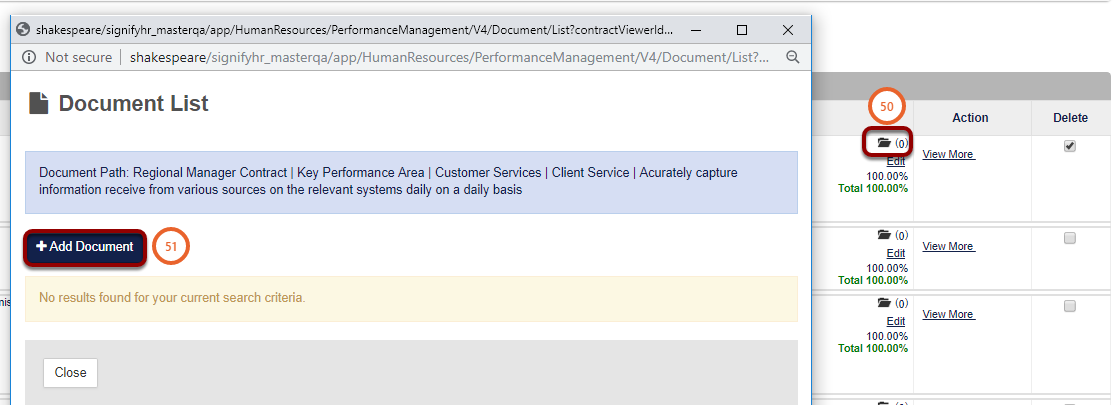
Enter a Description (52) and select your document (53), then click on Close (54).

Schemas
How to Switch Between Schemas
In this quick guide we will explain the following steps:
- How to switch schemas from System Administration.
- How to switch schemas from Manage Employees.
1. From System Administration
1.1. How do I get there?
From your home page, in the left bottom corner, click on System Administration.

1.2. What do I do?
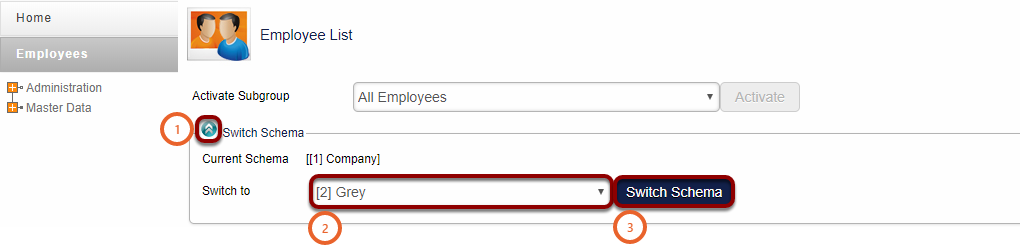
- Hover over the Home icon (1)
- Click on the Switch Schema option (2)

- Select the schema you want to switch to from the drop-down (3)
- Click on the Switch Schema button to switch to the new schema (4)
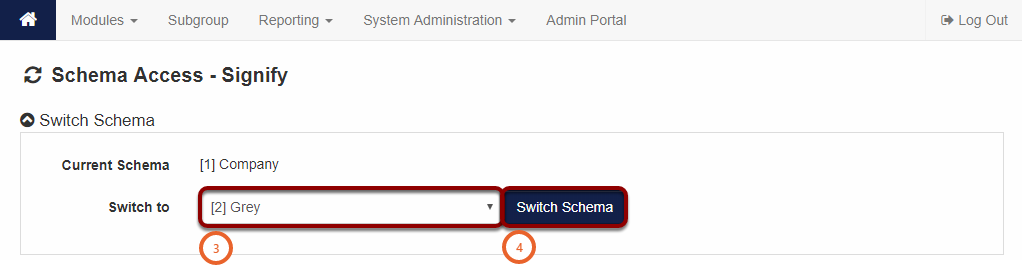
Note the conditions displayed in the pop up screen

2. From Manage Employees
2.1. How do I get there?
From your home page, in the left bottom corner, click on System Administration (1). Hover over the Modules Button (2). Click on Manage Employees (3)


2.2. What do I do?
- Click on the blue circle with the white down arrows in (1)
- Select the schema you want to switch to from the drop down (2)
- Click on the Switch Schema button to switch to the new schema (3)
- You will remain on the same page
Take Note: You will only be able to edit an employee profile when you are working on the schema the employee is appointed on.
How to Create a Schema
How to get there?
Click on System Administration (1), then with your cursor hover over System Administration (2) | Tools (3) | Configuration (4). Finally click on Schema Management (5).


What to do?
In this FAQ we are going to copy the configuration from an existing Schema to the new Schema. If you would like to create a new Schema or there is no Schema on your system please contact our support team for assistance.
Email: support@signify.co.za
Tell: (012) 763 6600
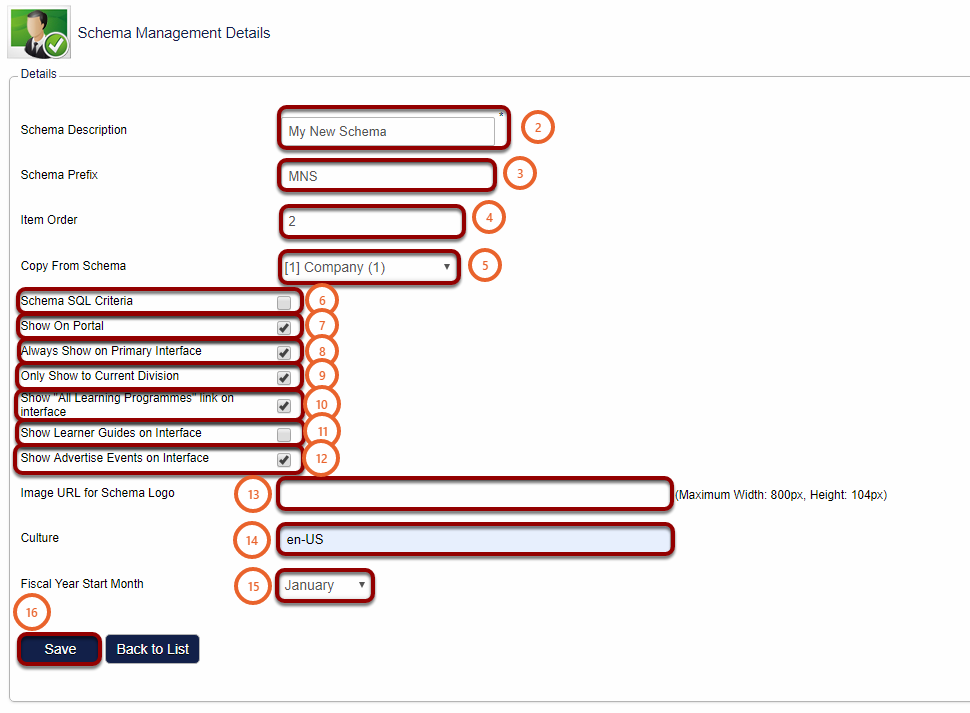
- To add a new Schema click on the Add (1) button.

- Insert your Schema name is the Schema Description (2) field.
- You can enter a short name for your Schema in the Schema Prefix (3) field.
- Item Order (4) is the order in which your Schema will be displayed.
- From the Copy From Schema (5) drop-down the Schema you would like to copy.
- The following boxes should be ticked or unticked respectively:
- Schema SQL Criteria (6) remains UNTICKED.
- Tick the box Show On Portal (7).
- Tick the box Always Show on Primary Interface (8).
- Tick the box Only Show to Current Division (9).
- Tick the box Show "All Learning Programmes" link on interface (10).
- Show Learner Guides on Interface (11) remains UNTICKED.
- Tick the box Show Advertise Event on Interface (12).
- Image URL for Schema Logo (13) LEAVE BLANK.
- Enter en-US in the Culture (14) field.
- Select from the Fiscal Year Start Month (15) drop-down the month the fiscal/financial year of the organisation starts on.
- Click on Save (16).
- Wait for the Schema is Successfully Saved (17) message to appear on the top of the page.
- Click on Back to List (18).


- Confirm that the new Schema is created (19).

How to assign Schema access right on new Schema?
Note: Before switching to the new Schema you need to assign Schema access rights on the new Schema to your user.
With your cursor hover over System Administration (1) | Users (2) | Manage Users (3).

- Search for you user (4).
- Click on Action (5).
- Click on View / Edit (6).

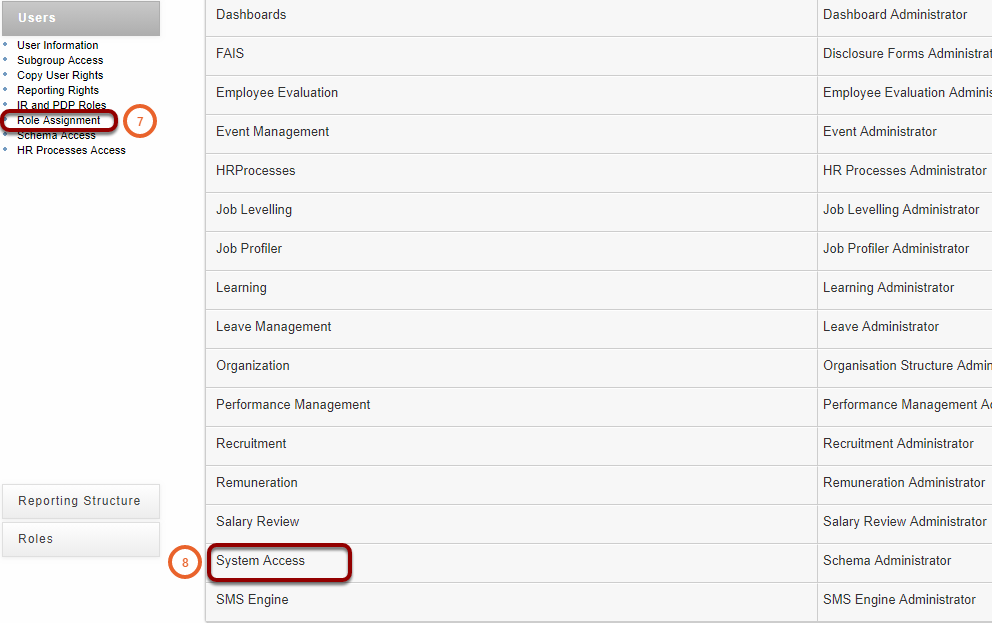
- Click on Role Assignment (7).
- Then click on System Access (8).
- Ensure the Switch Schema (9) tick box is ticked.
- Tick the tick box at your new Schema (10).
- Click on Save (11).

SCORM
New SCORM Engine
A new SCORM engine has been implemented from Version 8.8 onwards.
Please do not hesitate to contact us if you have any questions in this regard, or wish to schedule your upgrade with us.
What are some of the new features?
Robustness
We integrate with the Rustici SCORM engine, one of the leading SCORM engine providers in the world. Many people use this SCORM engine when testing their content in the SCORM cloud (www.scorm.com).
Tracking learning experience
xAPI allows for the tracking of a wide range of learning experiences. For more information in this regard, go to xAPI.com
Centralised SCORM library
From Version 8.8 onwards all your SCORM content can be uploaded and organised in one centralised SCORM library, instead of trying to maintain it from a SCORM pathway step.
Similar to the existing Training Intervention library, SCORM packages can now be loaded into a central library. In other words: load once, use many times. And if there is an updated SCORM package, replace it in one place and have all your pathways automatically updated.
Support for additional eLearning standards
Our previous SCORM engine supported SCORM 1.2 and SCORM 2004. The new SCORM engine supports the following standards:
- SCORM 1.2
- SCORM 2004 (all editions)
- xAPI (Tin Can API)
- AICC
- cmi5
- PENS
Frequently Asked Questions
Do I have to upgrade?
No, you don’t have to upgrade unless you have content that is not supported by our existing SCORM engine.
If you would like to receive the new SCORM player and all its functionality, you would have to upgrade to Version 8.8 or later.
If you would like to experiment with the new SCORM engine, we could upgrade your UAT environment first.
Will my existing SCORM content work?
If your current SCORM packages are functioning correctly, it will work in the new SCORM player. If anything is not working in the new SCORM player, it was probably not working previously - but the error was ignored.
What is the minimum server requirements?
If you are responsible for your own hosting of the system, SQL Server 2014 or later is the minimum requirements for Version 8.8 and the new SCORM player.
What are the benefits of xAPI (Tin Can) in laymen’s terms?
There are quite a few differences between SCORM and xAPI. It is not fair to say that the one is better than the other, but rather that the choice will depend on what you want to achieve from a reporting and analysis point of view. There are many articles explaining the differences between SCORM and xAPI – here is one: SCORM vs xAPI
Examples of informal training that xAPI can track:
- Watching a video.
- Attending a conference.
- Asking a question on a social network.
- Being mentored.
- Turning in assignments.
- Mentoring someone else.
- Writing a blog.
- Attending a class.
- Reading a book.
To learn more on xAPI (Tin Can) visit these links:
System
How To Clear System Cache
How to clear cache in browser (Google Chrome)
- On any page of Google Chrome, on your keyboard, press all these keys at the same time:
- (Ctrl + Shift + Delete).
- A new window will open.
- Select from the Time range (1) drop down All time.
- Tick both the boxes Cookies and other site data (2) and Cached images and files (3).
- Then click on Clear Data (4).

How to clear system cache
How to get there?
Click on System Administration (1), with your cursor hover over System Administration (2) | Tools (3) | Configuration (4).


What to do?
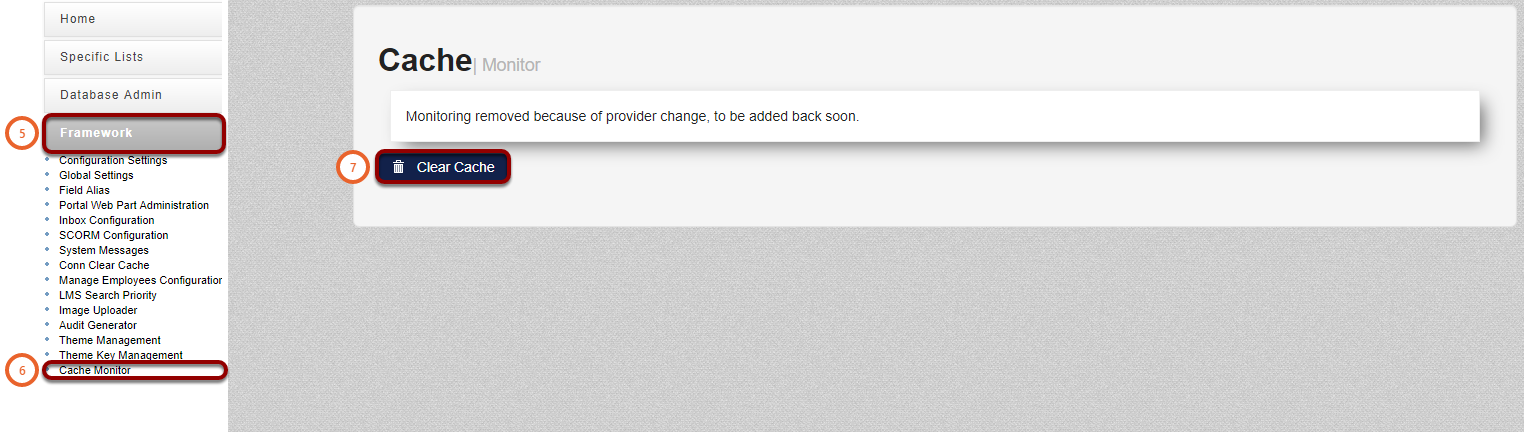
- Click on Framework (5).
- Then click on Cache Monitor (6).
- Now you will be able to click on Clear Cache (7).
The window will refresh every few seconds, but this is normal.
Themes
How To Create a Theme And Link It To a Schema
Creating a new theme
In this quick guide we will explain how you to create your own theme using your own logo and colours of your choice.
How to get there?
With your courser hover over System Administration (2) and navigate to Tools (3), then Configuration (4).
In the new window click on Framework (5).


What to do?
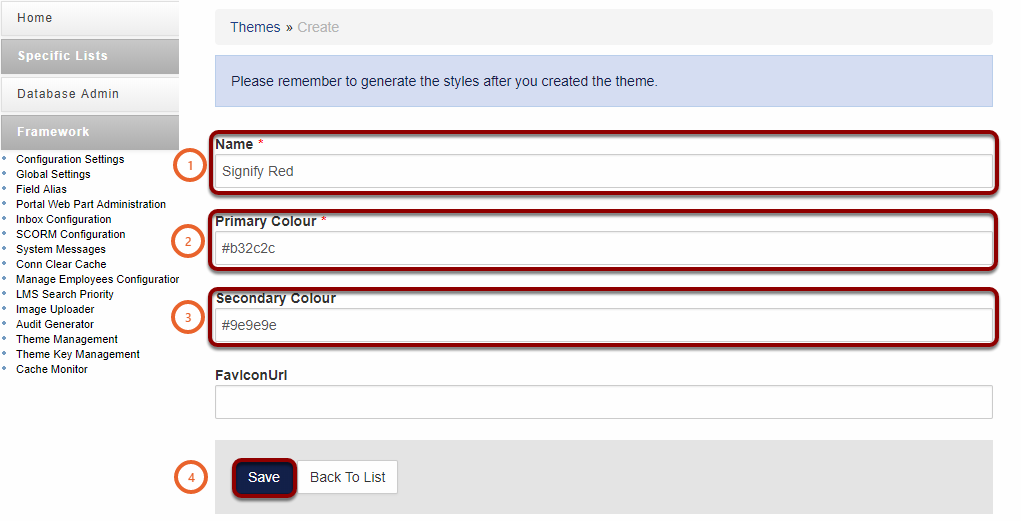
- Type in the Name of your theme (1).
- Insert your Primary Colour (2) for your theme.
- Insert your Secondary Colour (3) for your theme.
You can select your primary and secondary colour using the colour pallet below. Click on the Primary Colour (2) or Secondary Colour (3) field to use the colour pallet.

Your primary and secondary colours must be in Hex format (If you need help to convert your colours to hex, you can navigate to this website https://htmlcolorcodes.com/ ).
- You can now click on Save (4) and the window will refresh with new fields.
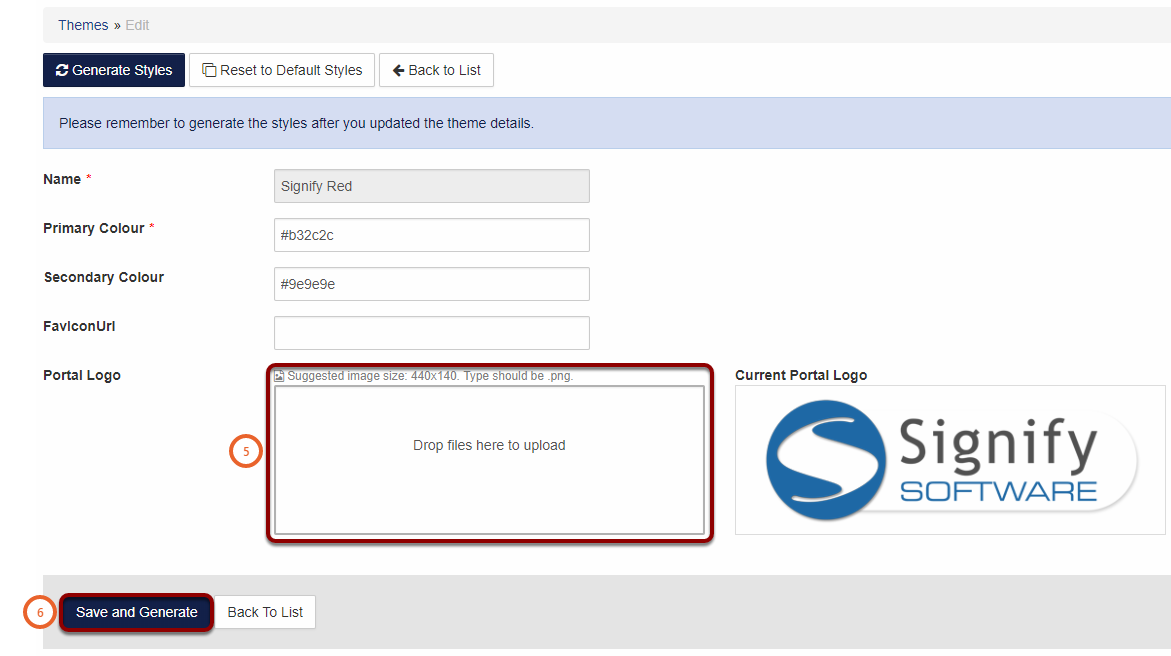
- In the new window navigate to the Portal Logo (5) field. You can either drag and drop your logo into this field or you can click on the field to browse your computer for a logo.
Your image size should be 440x140 and it should be a .png type image.
- Click on Save and Generate (6).
To use your theme you have to link it to a schema, follow the steps below to link your theme.
Linking a theme to a schema
When you have created a theme or want to link an existing theme to any one of your schemas. Follow the steps in this quick and easy guide.
How to get there?
Hover with you curses over System Administration (2) and navigate to Tools (3) then Configuration (4).
On the new window click on Framework (5).


What to do?
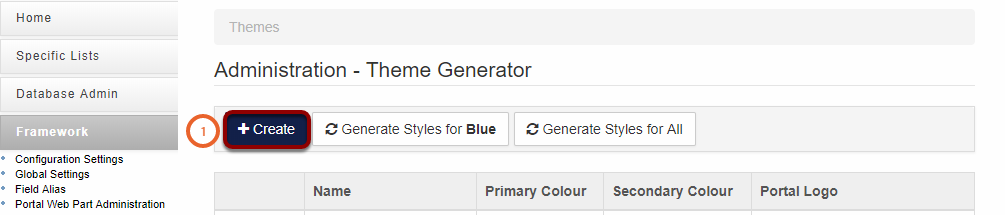
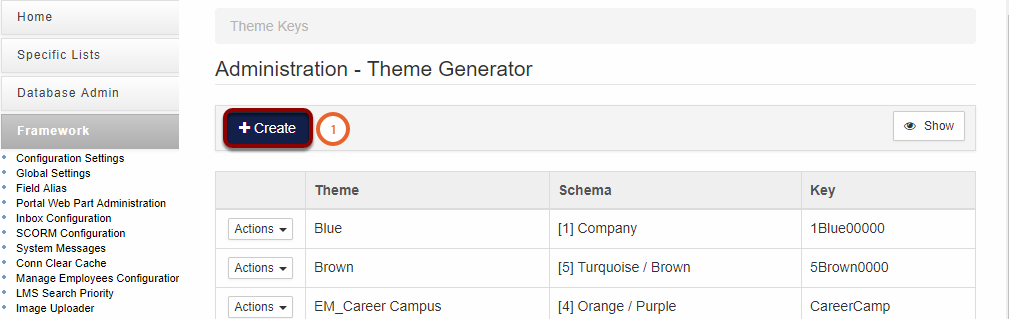
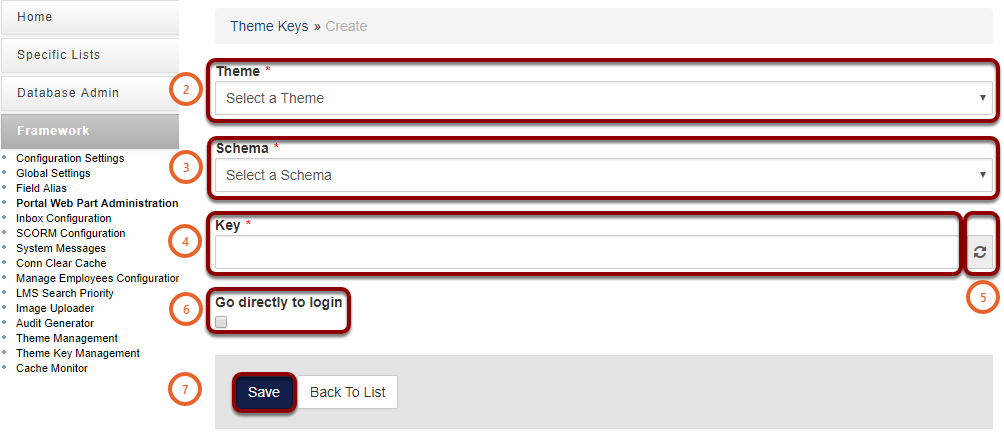
- Click on the Create button (1).
In the new window select the following options:
- Select from the drop down menu your Theme you have created (2).
- Under the Schema drop down menu, select your Schema that you want your theme to be associated with (3).
- In the Key (4) field you can enter your own key e.g. THEME00001.
- Or you can click on the Refresh (5) icon to automatically generate a key.
- Click on the tick box (6) if you want the user to be navigated directly to the log in screen. Otherwise the user will be directed to the Learning Store page.
- Then click on Save (7).
Note: The key must be 10 characters long and only alpha numeric characters are allowed.
How to use your new theme
Use your URL for the Signify portal and add the key created in step 4 above after "/app/" (8).
