# MANAGE EMPLOYEES
The Manage Employees module allows a user not only to create and manage an employee’s records but also serves as a complete organisational reference for everything pertaining to an employee.
# User Manual
# Getting Started
# Introduction to the Manage Employees Module
The *Manage Employees* module allows a user not only to create and manage an employee’s records but also serves as a complete organisational reference for everything pertaining to an employee. Although the actual Signify HR module is mainly concerned with employee records, in this manual we will cover some aspects of the employee life cycle - from his application for a position and his eventual appointment, training records, personal details etc. are addressed although not to the same level of detail.
## Target Audience
Some information in this module is in the domain of the employee and is open to him/her for updating. The rest is mostly confidential and will be managed by HR personnel.
## Prerequisites
- For general employees basic computer skills should suffice.
- For HR personnel, good computer skills should be matched by excellent human resources knowledge.
- Successful completion of the following Signify HR training modules
- Signify HR Login and Landing Page
- Appropriately configured master data for the *Manage Employees* module.
## Other Considerations
Most other modules in the Signify HR Suite rely on accurate personnel and human resource information coming from this module. It is therefore imperative that the sections in this module that are going to be used are well designed, their purpose clear, adequate resources be made available for their maintenance but above all that a firm hand controls and guides what goes in and what goes out of the module.
# Definitions, Abbreviations and Acronyms
Terminology
Definition
PDP
Personal Development Plan
RPL
Recognition of Prior Learning
Schema
The system caters for multiple companies (belonging to the same group of companies) to co-exist in the same database. This enables data sharing, seamless transfer of employee etc. Each company is called a schema in the database.
# How to Access Manage Employees Module
Navigation from the Home page:
- ***System Administration | Modules | Manage Employees*** to open the Manage Employees module.
# The Focus of the Signify HR Modules
# The Life Cycle of an Employee
In this section a short description is given of each module that forms part of the employee life cycle as implemented by the Signify HR system.
As an introduction to this life cycle, view the diagram below that displays these modules.
**Job Profiling**
Define and describe the characteristics of the jobs - and their subsequent positions - that an organisation is going to have. (*Refer to the Job Profiler training manual for more information)*
**Organisation Structure**
Define the hierarchical levels of an organisation and build the organisation structure. Link the appropriate positions from the job profiler module to the organisation. (*Refer to the Organisation Structure training manual for more information)*
**Recruitment & Selection**
Advertise positions in an organisation and manage the applications. *(Refer to the Recruitment & Selection training manual for more information)*
**Employee Administration**
- Appoint employee in a position
- Capture and maintain employee details
- Capture previous work experience
- Employee relations
- Movement
- Report to structures
- Employment equity and reporting
- Service termination
- Compliance management (FAIS, EE, SD, OHS)
- Managing Users
- Employee and Manager Self-service
**Performance Management**
Performance contract; Performance evaluations; Personal Development Plan (*Refer to the Performance Management training manual for more information)*
**Talent Management**
Management of the talents and potential for employees. (*Refer to the Talent Management training manual for more information)*
**Employee Development**
Capture and maintain learner records and history
**Learning Management**
*(Refer to the respective training manuals for more information)*
**Employee Evaluations & Satisfaction Surveys**
Enable employees to do a 360° evaluation.
**Leave Management**
Configure a company’s leave rules and administrate employee leave transactions.
# How to Appoint an Employee
This section assists the System Administrator in adding employees to Signify HR system. There are three options available for appointing an employee. In this section, only the first two options will be discussed.
1. Appoint a new employee
2. Appoint new employee (Quick)
3. Appoint employee being transferred from another company/schema (see article [Appoint Employee being Transferred](http://signify.screenstepslive.com/s/10619/m/75331/l/843270-appoint-employee-being-transferred))
## Open the Manage Employees Module
Navigation from the Home page:
- ***System Administration | Modules | Manage Employees*** to open the Employee List screen.
## Employee List Search
When the screen is opened, the page will be empty i.e. no employee records will be displayed. The search criteria will be linked to your active subgroup. You can provide additional search criteria in the available fields. Note the radio buttons **Current Employees**, **Previous Employees** and **All** to differentiate between terminated and active employees.
Click **Search** to display matching employee records.
## Appoint New Employee
Every employee needs to be set up in terms of his position, personal information, reporting lines etc. Clicking on the **Appoint New Employee** button will allow you to appoint a new employee and ensure that all required information is provided. The Appoint New Employee screen is divided into four main sections:
1. Appointment Detail
2. Personal Information
3. Contact Detail
4. Reporting Lines
See section [Appoint Employee in a Position](http://signify.screenstepslive.com/s/10619/m/75331/l/843268-how-to-appoint-an-employee#appoint-employee-in-a-position) on how to appoint an employee in a position.
The following is a description of all the mandatory fields in this section.
Mandatory Field Name
Description
Position
A position is to be selected or created to appoint the employee. The following prerequisites should apply:
- The position must exist
- The position must be linked to a node in an organisation structure
- The selected organisation structure must be the active structure
See section **Appoint employee in a Position** below for more detail.
Appointment Type
Select an appointment type from a pre-defined master data list.
Appointment From
Provide the date on which the employee will commence his duties. This date will be used to also create a record for the new employee in the Appointment History section.
Start Date in Group
The Start Date in Group will be the date the employee started working at the company
Find a description of all the mandatory fields below:
Mandatory Field Name
Description
Employee Number
If available, provide the employee’s proper employee number. In cases where the employee number is not yet available, use the employee’s National ID number until such time that en employee number becomes available.
While typing any number in this field the system will validate the new number against all numbers already in the database, thereby preventing duplicates.
The employee number used here is the number that will be used to create a USERNAME for the employee. This username will be used by an employee/user to log in to the system.
The functionality to automatically generate employee numbers is available and can be activated if needed. If the automatically generate employee numbers setting is active, an override setting is available to allow the System Administrator to override individual employee numbers if needed.
Surname
The surname for the employee you want to appoint
Name
The name for the employee you want to appoint
ID Number/ Passport Number
The ID number or Passport number should be entered. An optional setting is available to validate if the ID number is a valid South African ID.
Subsidiary
Sometimes a company may want to maintain their own employees in the database as well as records from e.g. contractors that are not employees. In these cases other subsidiaries can be created and these non-employees linked to such a subsidiary. They will then reside in the system but will not appear on any reports etc.
Therefore there should be a subsidiary for company-own employees and if needed other subsidiaries for special-case “employees”.
Find a description of all the mandatory fields below.
Mandatory Field Name
Description
Reporting Lines
The Line Manager is the only mandatory field in the reporting line structure and is used to identify who an employee’s direct line manager is. The Line Manager has to be an existing active employee.
If required the reporting structure can be fine tuned to indicate a separate leave manager, training manager etc. These people will then be required to do specific approvals e.g. for leave applications.
Continue to populate the record with appropriate information. The fields described in the table below are of particular importance and are therefore mandatory.
Click on the **Save and go to Employee Profile** to save the new employee record.
## Appoint New Employee (Quick)
A quick way to appoint an employee with only the minimum information available.
The mandatory fields are Employee Number, Surname, Name, Position and Location in Organisation.
An employee record is saved, an appointment record and a user record will be created.
The following options are available for managing a user's password for the first login:
- A welcome notification can be sent to the employee being appointed, allowing him to reset his own password.
- The Administrator appointing the employee, can set the password for the employee.
Click on **Save and go to Employee Profile** or **Save and Appoint Another** to save the employee record.
## Appoint employee in a Position
The following apply to the appointment of an employee in a position:
- An employee can only be appointed in a vacant position that has been added to the active Organisation Structure.
- The chosen position will be the employee's primary position, if the employee is to be appointed in multiple positions.
When clicking on the hand picker below, the **Select Position Wizard** is displayed.
The **Select Position Wizard** screen is divided into two panels:
- The **Organisational Node List** (on the left)
- The vacant **Positions List** (on the right)
Follow the steps below to complete the position appointment:
1. Select the Organisation node where you want the employee to be appointed on the left.
2. Select a vacant position from the list on the right if it exists.
3. If the applicable vacant position does not exist, you can create a vacant position by clicking on the **Click here to create a new Position in Company** link. The option to add a new position will now be available as shown below.
If the new position is not already linked to a Job Profile, the following screen will be displayed requesting you to create a Job Profile.
Complete the Job Profile details for the new position.
When clicking on the **Save**:
- A new profile and position in Job Profiler will be created and link it to the relevant Organisation Node in the Organisation Structure.
- You will be redirected to the **Appoint New Employee** page. The position field will be populated with the newly created position.
# Create a User Account for the Employee
After saving the new employee record, a function is made available next to the employee number field. This account will enable the employee to log into Signify HR system.
- To create the user account, click **Create as System User.**
- Confirm that you do want to create the user.
- The page then creates the user and returns with the following message.
- The employee number provided when loading the employee becomes the employee’s username and a random password is assigned. This password can and should be changed by the user when he logs in.
# Appoint Employee being Transferred
This section assists the System Administrator in appointing employees being transferred from another company/schema.
## Open the Manage Employees Module
Navigation from the Home page:
- ***System Administration | Modules | Manage Employees*** to open the Employee List screen.
## Appoint an Employee being Transferred
A Signify HR database can be shared amongst a number of different companies within the same group. These companies can be hosted on different Schemas.
When an existing employee is transferred from one schema to another, the person is placed onto a holding list. When **Appoint Employee Being Transferred** is clicked the list is displayed and the employee can be selected into the correct position in his new schema.
The events that took place to get an employee onto the appointment holding list are the following:
- On the ***Appointment History*** page, the employee was transferred to another company (See the [Appointment History](http://signify.screenstepslive.com/s/10619/m/75331/l/859136-organisational-assignment#appointment-history) section for more details)
- The employee was then placed onto the appointment holding list which is either visible to all companies (if *I am not sure* was selected when indicating the company to which the employee was to be transferred) or to a selected company.
Note that employees cannot be transferred until they have reached the date at which they are officially available for a new position. If an employee is available for transferal the following screen is displayed:
- Identify and tick the applicable employee.
- Click **Appoint Selected Employee** to open the regular ***Transfer Employee*** screen.
- Complete all required fields in order to complete the person’s appointment in the destination company.
- Click S**ave and Complete Transfer** to appoint the transferred employee.
- The **Personal Information** screen will open, showing the appointed employee.
# Actions available for an Existing Employee
A couple of primary functions are available for existing employees and will be discussed in detail in this section.
## Open the Manage Employees Module
Navigation from the Home page:
- ***System Administration | Modules | Manage Employees*** to open the Employee List screen.
When the screen is opened, the page will be empty i.e. no employee records will be displayed. The search criteria will be linked to your active subgroup. You can provide additional search criteria in the available fields. Note the radio buttons **Current Employees**, **Previous Employees** and **All** to differentiate between terminated and active employees.
Click **Search** to display matching employee records.
Click on the **Action** link on the employee's record to show the dropdown item list.
## View/Edit
Click on the ***Action | View/Edit*** link OR click on the employee record to access the employee's record. Open the section Employee Details to see all the information available for an employee.
## Terminate Employee
Terminating an employee means making the employee’s records inactive or not visible. No record is physically deleted from the system.
To terminate an employee, follow these steps:
- Locate the employee whose employment is to be terminated from the Employee List screen.
- Click on the ***Action | Terminate Employee*** link.
- The **Terminate Employee** screen is opened as shown below.
- All the positions that will be ended because of the employment termination are listed at the top of the screen.
- Complete the required fields and click **Terminate Employee** to complete the transaction.
- See article **Appointment History** for another way to terminate an employee.
## View Employee Profile
- An Employee Portfolio Report with a summary of employee information will be displayed.
## View Learner Records
A list of learner records is displayed for the selected employee. See the section **Learner Records** for more detail.
## View Licenses
A list of Licence records is displayed for the selected employee. See the section **Licenses** for more detail.
# Employee Information
This section gives an overview of the kinds of detail that can be captured against an employee’s record. We will briefly discuss the additional employee information in the following sections but note that your company may or may not necessarily have each and every section. Whether a section is visible depends on a company’s requirements and the Employee Information Management version installed.
Navigation from the Home page:
- ***System Administration | Modules | Manage Employees*** to open the Employee List screen.
- When the screen is opened, the page will be empty i.e. no employee records will be displayed.
- Click **Search** to display matching employee records.
- Click on the ***Action | View/Edit*** link OR click on the employee record to access the employee's record.
The sections below will be described in separate articles.
- **EMPLOYEE PROFILE**
In this section you can add personal information, address, contact detail, documents, assets and many more, to an employee’s record. See article **Employee Profile** for a more detailed discussion.
- **ORGANISATIONAL ASSIGNMENT**
In this section the focus is on an employee’s work history and reporting structures in the company. To view more detail see article **Organisational Assignment.**
- **EMPLOYEE DEVELOPMENT**
In this section the focus is on an employee’s development in terms of training, training records, development plans and professional profile. See article **Employee Development** for a more detailed discussion.
- **EMPLOYEE RELATIONS**
In this section the focus is on an employee’s work relations. This include Complaints, Disciplinary actions, Disputes etc. To view more detail see article **Employee Relations.**
- **COMPLIANCE**
Organisations that employ FAIS representatives are required to maintain a FAIS representative register and to send changes on the status of representatives to the Financial Services Board (FSB) on a regular basis. The Signify HR FAIS Management module will assist you in the maintenance of the FAIS register, as well as determining if certain fit and proper requirements are met. This module is only available on the Enterprise version.
- **ADMINISTRATION**
General configuration settings for the Employee Management module can be found in this section. To view more detail see article **Employee Administration.**
- **MASTER DATA**
All the Employee Management master data tables can be populated in this section. To view more detail see article **Employee Master Data.**
# Employee Profile
In this section you can add personal information, address, contact detail, documents, assets and many more, to an employee’s record.
Two versions of the Employee Information Management system are available. See indicators in the sections below.
- **Foundation version**. Basic Employee Information Management is required as the foundation for any of the additional modules in the system.
- **Enterprise version**. This module includes all the advanced modules that are not explicitly listed below as a loose standing module - such as FAIS, Leave etc.
Navigation from the Home page:
- ***System Administration | Modules | Manage Employees*** to open the Employee List screen.
- When the screen is opened, the page will be empty i.e. no employee records will be displayed.
- Click **Search** to display matching employee records.
- Click on the ***Action | View/Edit*** link OR click on the employee record to access the employee's record.
Once a record is selected, a list of Employee Profile information is shown on the left side menu bar as shown below.
Note: Whether the Employee Profile items are visible depends on a company’s requirements and the Employee Information Management version installed.
## Personal Information
An employee's basic personal and biographical information.
The HR Administrator can upload a photo of the employee by clicking on the **Edit Photo** link.
The Smart Navigation search functionality is available on the Employee Information screens as shown below. You can search on an Employee Number, Surname, Name or ID Number or part thereof.
The personal information group contains a large number of fields of which only a few are mandatory.
- **Personal Detail (Foundation and Enterprise)**
- Employee Number
- Surname
- Maiden Name
- Trading Name (Tick box)
- Name
- Middle Name
- Other Names
- Initials
- Title (Drop down list)
- Known As
- Home Language (Tick box)
- Income Tax Reference Number
- Image URL
If available, provide the employee’s proper employee number. In cases where the employee number is not yet available, use the employee’s National ID number until such time that en employee number becomes available.
While typing any number in this field the system will validate the new number against all numbers already in the database, thereby preventing duplicates.
The employee number used here is the number that will be used to create a USERNAME for the employee. This username will be used by an employee/user to log in to the system. Also refer to the *Create User Account* field for more information.
The functionality to automatically generate employee numbers is available and can be activated if needed.
If the override employee number functionality is active, an employee number can be assigned by the System Administrator himself.
Surname
The surname for the employee
Name
The name for the employee
- **Biographical Information (Foundation and Enterprise)**
- Global Number
- Gender (Drop down list)
- Race (Drop down list)
- Ethnic Group (Drop down list)
- Citizenship (Drop down list)
- Nationality (Drop down list)
- Birthday
- Age (Calculated)
- Option for Either ID number or Passport
- Social Security Number
- Marital status (Drop down list)
- Marital date (Calendar provided)
- Disabled (Tick box)
- Disability (Drop down list)
- Subsidiary (Drop down list)
The ID number or Passport number should be entered. An optional setting is available to validate if the ID number is a valid South African ID.
Subsidiary
Sometimes a company may want to maintain their own employees in the database as well as records from e.g. contractors that are not employees. In these cases other subsidiaries can be created and these non-employees linked to such a subsidiary. They will then reside in the system but will not appear on any reports etc.
Therefore there should be a subsidiary for company-own employees and if needed other subsidiaries for special-case “employees”.
## Additional Information
Additional Information is a section that enables you to add up to 21 customisable fields. These fields have a drop down list of values and should be populated in the **Manage Employees | Master Data | Configure Additional Information** section.
This section needs to be configured per client (examples below).
- Division Name
- FSC Category
- Hay Category
- Hay code
- Hay Job Level
- Hay Job Title
- Hay Level
- **Home Postal address** (Option: can be populated automatically if Home Postal address is same as Home Physical address)
- Address
- City/Town/Village
- Country (Drop down list)
- Postal Code
- **Business address**
- Region (Drop down list)
- Floor Number (Drop down list)
- Address
- City/Town/Village
- Country (Drop down list)
- Postal Code
- The business address can be populated automatically from the organisation structure
- Some of this information can be updated by an employee from the Employee Self Service module
## Contact Detail
**Available in Foundation and Enterprise version**
- Lists of contact details with local examples provided. The following fields are available:
- Home Telephone Number
- Work Telephone Number
- Mobile Phone Number
- Email Address
- Fax Number
- Skype Name
- Some of this information can be updated by an employee from the Employee Self Service module
## Vehicle
**Available in Enterprise version**
A register of vehicles owned or driven by an employee. This information is important if the employee is to bring the vehicles onto the office premises.
- Make
- Model
- Engine Capacity
- Registration Number
- Benefit type (Drop down list)
- Repayment period (Drop down list)
- Acquired date (Calendar provided)
- Purchased date (Calendar provided)
- Mileage
- Manufacture Year
- New Vehicle (Tick box)
- Sold (Tick box)
- Financed (Tick box)
## Next of Kin
**Available in Enterprise version**
A list of near family members that can be contacted during emergencies.
- Existing employee (Tick box)
- Relationship (Drop down list)
- Name
- Surname
- Other Names
- Gender (Drop down list)
- Title (Drop down list)
- Nationality (Drop down list)
- ID
- Contact Type(Drop down list)
- Date of Birth (Calendar provided)
- Passport Number
- Employee Number
- Next of Kin
- Primary Contact
The contact details, address and documents can also be captured for next of kin.
- Some of this information can be updated by an employee from the Employee Self Service module
- An Emergency Contact Detail report is available for the above.
## Criminal Record
**Available in Enterprise version**
A register of an employee`s criminal offences and related documentation.
- Nature of Offence (Drop down list)
- Sentence imposed/outcome
- Date Sentenced (Calendar provided)
- Sentence Expiry Date (Calendar Provided)
- Police station where case is registered
- Court Name
- Case Number
## Licenses
**Available in Enterprise version**
A list of licenses required by the employee’s position (linked in from his position in Job Profiler) or additionally acquired by the employee. The following categories are available:
- Public Licenses
- Ad Hoc Licenses
- Licenses required by the employee's current job/position
- Licenses required by the employee's previous job/position
Refer to the Licence Manual to view more information.
## Permit
**Available in Enterprise version**
A register of permits registered in an employee's name. Examples are special on-site driving permits, gun permits etc.
## Medical history
**Available in Enterprise version**
A basic medical history summary giving information on an employee's overall occupational health in terms of systems (e.g. respiratory), existing conditions (e.g. IDDM), occupational diseases (e.g. occupational TB) and past referrals to other specialists or health care providers.
- General physical
- Systems
- Existing conditions
- Occupational diseases
- Referrals
- Documents
## Assets
**Available in Enterprise version**
A register of company assets used on a permanent or temporary basis by an employee. Multiple assets such as Notebooks, access cards, furniture, equipment can be linked to employee records as required.
- Type (Drop down list)
- Item (Drop down list)
- Quantity
- Serial Number
- Description
- Date issued (Calendar provided)
- Expected return date (Calendar provided)
- Actual return date (Calendar provided)
- On an employee's resignation HR is notified about company assets due for return
## Leave
**Available in Enterprise version and Leave Module**
See Leave Module Manual for more detail
## Employee Funding
**Available in Enterprise version**
Employee funding is used to keep track of items such as expenditures that require work-back periods.
- Type (Drop down list)
- Amount
- Description
- Date Allocated (Calendar provided)
- Payback Period Start (Calendar provided)
- Payback Period End (Calendar provided)
- Settled (Tick box)
- Settlement Date (Calendar provided)
- Supporting documentation can also be added.
## Custom Field
**Available in Foundation and Enterprise version**
Custom field is a section that enables you to add your own fields (examples below). These fields can be configured in Manage Employees | Master Data | Custom Field Configuration section.
This section needs to be configured per client (example below).
## Notification Detail
**Available in Foundation and Enterprise version**
In this section the HR Administrator are able to add notifications/reminders for an employee (examples below).
## Talent Profiles
**Available in Enterprise version**
Refer to the Talent Management manual for more information.
# Organisational Assignment
In this section the focus is on an employee’s work history and reporting structures in the company.
**Navigation from the Home Page:**
- System **Administration | Modules | Manage Employees** to open the Employee List screen.
- When the screen is opened, the page will be empty i.e. no employee records will be displayed.
- Click Search to display matching employee records.
- Click on the **Action | View/Edit** link OR click on the employee record to access the employee's record.
- Once a record is selected, find the **Organisational Assignment** link on the left side menu bar as shown below.
## Appointment History
This section the history of the employee's employment at this company. Here you also have various action items. You can Terminate, Transfer, Appoint the employee in another position, or simply make a correction.
This section aims to keep history of all the appointments an employee held in different capacities at the current company.
The records shown here are created or changed for the following reasons:
- A new employee is appointed.
- An existing employee is appointed into a position over and above the one already held by him/her.
- One of an employee’s positions is transferred/changed to another. (Not affecting the others).
- An employee is transferred to another position and ALL his current positions have to be ended.
- An employee is transferred to another company (in the same database). This would also end ALL his current positions.
- When an employee’s employment is terminated.
- Making corrections on any of the above.
The screen where all of the above can be accomplished is shown below.
## Appoint Employee in another Position
The following apply to the appointment of an employee in another position:
- An employee can only be appointed in a vacant position that has been added to the active Organisation Structure.
- The option to set the employee's primary position is available, if the employee is to be appointed in multiple positions.
Follow the steps in the article [Appoint employee in a Position](http://signify.screenstepslive.com/s/10619/m/75331/l/843268-how-to-appoint-an-employee#appoint-employee-in-a-position) to complete the appointment process.
## One of the Employee's Positions is Transferred
To end a specific position and transfer the employee to another position, click on the **Transfer to another position** link in the Action drop down list as shown below.
You will have to select a reason for the transfer, indicate if this position is the new primary position and would you like to keep the position vacant after the transfer.
NOTE: This transfer process will end ONLY the selected active position.
## Transferring an Employee (Ending ALL Active Positions)
The Signify LMS system caters for multiple companies/schemas (belonging to the same group of companies). There are two transfer options available as shown on the page below.
- Transferring the employee to another position in the same company/schema
- Transferring the employee to another position in another company/schema
To do a full transfer, ending all active positions, use the **Transfer Employee** button on the Appointment History screen as shown below.
## Transferring the Employee to another Position in the same Company
The **Transfer Employee /Appoint in new Position** screen is divided into two sections to make provision for the two options mentioned previously.
- Tick the radio button indicating that the employee *will stay within* the same company.
- A list of positions in the current company is then made available and the position to which the employee is being transferred can be selected. Use to search the list of available positions.
- Complete the remaining fields namely *Appointment Type*, *Appointment Dates* etc.
Click on **Transfer Employee** to transfer the employee upon which a second appointment history record will be created.
Note:
- All positions held by the employee are ended and the *TO* dates are filled in.
- The new active position is added.
## Transferring the Employee to another Position in another Company
The **Transfer Employee /Appoint in new Position** screen is divided into two sections to make provision for the two options mentioned previously.
- Tick the radio button indicating that the employee *will be transferred* to another schema/company.
- From the drop-down either select:
- One of the available companies to which the employee is to be transferred, or
- Select *I am not sure* to place the employee onto an appointment holding list for later appointment. with this option the following message is displayed: "Please note that the employee will be available to ALL Companies"
- Complete the remaining fields namely the *Employee’s Last Day of Service in the Current Company* and the date on which the *employee will be available in the new company*.
Click on **Transfer Employee** to transfer the employee upon which the following message will be displayed: "Please note that the employee will remain within Signify Software until selected/ appointed by the new Company. Also note: All roles (if any) will be removed from this employee once the employee is transferred to another site". On acknowledgment of the message, the following will be applied:
- The employee REMAINS in his current position.
- The employee is placed on a list of *employees to be appointed* which all companies in the database have access to. The applicable company can then pick the employee up and appoint him in the correct position and only then will the employee be moved out of his current position in the current company to his new position in the other company. Refer to the [Appoint Employee being Transferred](http://signify.screenstepslive.com/s/10619/m/75331/l/843270-appoint-employee-being-transferred) section to learn how to appoint a transferred employee.
- The following message is displayed on the main Appointment History screen until the employee is physically transferred to the new company.
- The transfer can still be cancelled at this stage by clicking the **Cancel Transfer** button.
## Moving an Employee with his Current Position to a new place in the Organisation Structure
This action cannot be executed on the Appointment History page but how to accomplish it is mentioned here since it is sometimes a requirement to, instead of transferring an employee:
- Move an entire position with its incumbent to a new node on the organisation.
- While moving the position and person not cause a transfer record to be inserted into the person’s appointment history.
The steps to accomplish this are the following:
Open the organisation structure and locate the node where the position(s) currently reside.
A list of all the positions that will be ended because of the employment termination are listed at the top of the screen.
Complete the required fields and click **Terminate Employee** to complete the transaction.
- Navigate to **System** **Administration | Modules | Manage Employees | Organisational Assignment | Appointment History**.
- Locate the appointment record that is to be terminated or ended.
- Select **Terminate Appointment** in the **Action** hyperlink in the employee’s appointment record as shown below.
- Navigate to **System** **Administration | Modules | Manage Employees | Organisational Assignment | Appointment History**.
- Locate the appointment record that is to be corrected.
- Select **Make Correction** in the **Action** hyperlink in the employee’s appointment record as shown below.
## Previous Employment
Under previous employment a history of all previous employers and jobs are kept. What might not be obvious is that a person could have worked as an employee for another contracting company but was physically working on the site of the current employer.
Navigate to **System** **Administration | Modules | Manage Employees | Organisational Assignment | Previous Employment** to get access to this functionality.
## Reporting Lines
The reporting lines section is an important part of many modules where workflows are expected to route requests for approvals and decisions to the correct people.
In this section a number of module-specific *next higher managers* can be set up for an employee. E.g. if an employee requests to attend a training course, his request will be forwarded to the person who has been set up as his Training Manager. If he wants to apply for leave, his application is forwarded to the person acting as his Leave Manager etc. In this way an employee could have one direct line manager but multiple people approving different aspects of his life at a company.
In most cases the same person (i.e. an employee’s direct line manager) would be responsible for all the reporting lines but special cases can be treated via this functionality as well. Reporting line headings are configurable to suit a company’s requirements.
Navigate to **System** **Administration | Modules | Manage Employees | Organisational Assignment | Reporting Lines** to manage an employee's reporting lines.
Note: The Line Manager, usually an employee's direct manager, is the only mandatory field in the reporting line structure.
Populate the reporting line fields by selecting the managers using the hand picker tool and click **Save Reporting Structure.**
Click **Refresh Reporting Structure** to ensure all reporting line values are updated and refreshed.
# Employee Development
In this section, the focus is on an employee’s development in terms of training, training records, performance management history, development plans and professional profile.
**Navigation from the Home Page:**
- System **Administration | Modules | Manage Employees** to open the Employee List screen.
- When the screen is opened, the page will be empty i.e. no employee records will be displayed.
- Click Search to display matching employee records.
- Click on the **Action | View/Edit** link OR click on the employee record to access the employee's record.
- Once a record is selected, find the **Employee Development** link on the left side menu bar as shown below.
## Career Conversation
The Career Conversation Module is a “lighter” version of Performance Management that focuses on a conversation between the employee and his manager. The employee’s role profile is discussed and the main focus is on the key performance areas, key performance indicators and competencies. These KPA’s, KPI’s and Competencies are marked as Start, Stop and Continue and all items selected with an output of Start and Stop will form part of the employee’s Action Plan.
Refer to the Career Conversation Training Manual for more information.
## Talent Assessment
The information on this screen is displayed as part of an employee’s Talent Management process. Both employee and manager can see the detail but only the employee would have access to any documentation uploaded here. The information contained here is of a personal and confidential nature. Only trained and accredited personnel may have access to it. Caution should be exercised in using the information. For further information on their Talent Assessment Information employees should contact a Psychologist/ Psychometrist in HR.
In order to better understand your workforce, to know where to focus your training initiatives or if the correct talent distribution of personnel is available for a particular project it is necessary to have some grasp of the talents and potential in your organisation. This section enables you to graphically plot an employee's talent rating using a talent matrix.
Refer to the Talent Management Training Manual for more information.
## Assessment List
Assessment List provides a list of Online Assessments attempted by the employee.
## Learner Detail
This page is configurable to suit a company’s purposes.
- Track the status of employees against a list of values:
- 9 Check boxes
- 8 Date boxes
- 4 Text boxes
- 2 Memo boxes
- The labels of these items can be changed using the data dictionary - per system, not per schema.
## Learner Records
Provides a view of employees training and qualification history.
- Capture training, unit standards, skills programmes, learnerships, qualifications on individual learner records.
- Allow for batch capturing of training records to multiple employees.
- Print Training and qualification records for individual employees.
- Search by Title/Provider within a person's learner record
- Option to see summary or full view or learner record
- Categories covered are: Training, Qualifications, Unit standards
Refer to the Learner Records section for more detail.
## Performance Management
**Performance Management (PM)** is the process that identifies, evaluates, develops and monitors employee performance in order to ensure that
- the company/department's mission and objectives are achieved;
- the company/department's values are practiced;
- the employees benefit by knowing what their expectations are and get recognition for their efforts;
- feedback on employee performance is provided, training and development approach is improved and career planning is furthered.
Refer to the Performance Management Training Manual for more information.
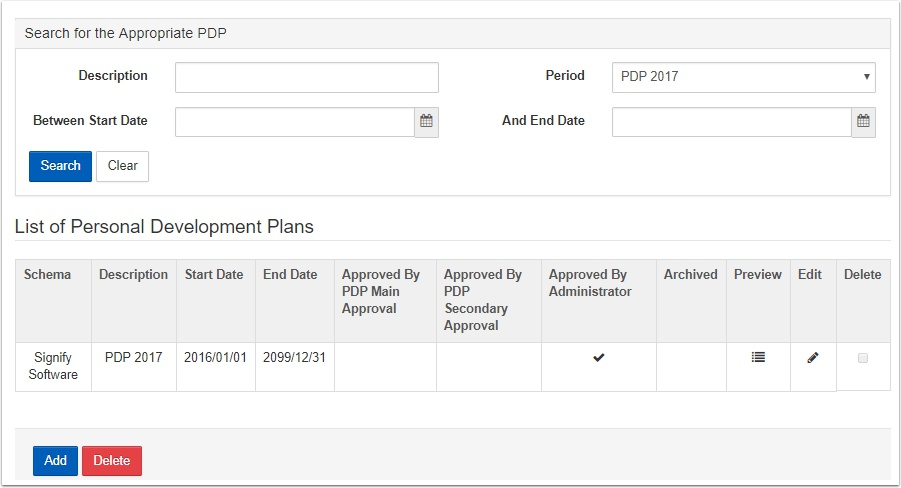
## PDP (Personal Development Plan)
Personal Development Planning is the process of creating an action plan based on goal-setting and planning for personal development within the context of a career, education or for self-improvement.
The PDP, also called an IDP (Individual Development Plan) or a PEP (Personal Enterprise Plan), usually includes a statement of one's aspirations, strengths or competencies, education and training, and stages or steps to indicate how the plan is to be realized. Personal development plans may also include a statement of one's career and lifestyle priorities, career positioning, analysis of opportunities and risks, and alternative plans.
Refer to the PDP Training Manual for more information.
[](https://signature.signifyhr.co.za/uploads/images/gallery/2021-03/Nb3Z7azOlp7A8fN9-image-1616858664157.png)
## Professional Membership
Provides an option to add professional associations for an employee using the following fields:
- Membership Type
- Institute
- Membership Number
- Registration Date
- Expiry Date
## Training Roles
Training roles are used as an indicator or definition of what training an employee is required to undergo regarding a specific subject matter area.
This implies that every training role can be linked to different training courses and an employee's progress on the required courses can then be monitored. This requires configuration from Signify.
## Strengths and Weaknesses
The purpose with this section is to allow drafting a list of the strengths and weaknesses an employee exhibits. How it is actually used is up to the client. The section consists of one page with two tabs on which the respective strengths and weaknesses can be recorded.
## Notes
The notes made here do not have dates or responsible people linked to them. They are only representative of the thoughts of an employee’s superiors regarding his personal development. The page can be used for capturing notes of any kind.
# Employee Relations
The Signify Software Employee Relations (ER) Module is designed to assist with the recording and storing of information that relates to inadequate performance and misconduct of employees whilst they are at work. It should be noted that this module should not be used as a guide regarding ER matters as the primary function is to record events and outcomes that have already happened.
This manual will guide system users and administrators through the different options and ways to record events related to employee performance. The system compartmentalises IR into 5 sections:
1. Disciplinary Standard
2. Disciplinary Advanced
3. Dispute
4. Grievance
5. The Disciplinary Detail Report
6. Master Data
**Navigation from the Home Page:**
- System **Administration | Modules | Manage Employees** to open the Employee List screen.
- When the screen is opened, the page will be empty i.e. no employee records will be displayed.
- Click Search to display matching employee records.
- Click on the **Action | View/Edit** link OR click on the employee record to access the employee's record.
- Once a record is selected, find the **Employee Relations** link on the left side menu bar as shown below.
Refer to the Employee Relations Training Manual for more information.
# Compliance
**Available in Enterprise Edition**
In this section the focus is on an employee’s compliance in the company.
**Navigation from the Home Page:**
- System **Administration | Modules | Manage Employees** to open the Employee List screen.
- When the screen is opened, the page will be empty i.e. no employee records will be displayed.
- Click Search to display matching employee records.
- Click on the **Action | View/Edit** link OR click on the employee record to access the employee's record.
- Once a record is selected, find the **Compliance** link on the left side menu bar as shown below.
## Occupational Health and Safety Representation
OHS - Occupation Health and Safety provides Information on the company's elected Occupational Health and safety personnel.
The available fields are:
- HAS Representative
- Currently active
- Type (Drop down list)
- Certificate Number
- Dates valid From (Calendar provided)
- Assigned To
- Fire Fighter
- Currently active
- Type (Drop down list)
- Certificate number
- Dates valid from (Calendar provided)
- Assigned to
- First Aider
- Currently active
- Type (Drop down list)
- Certificate Number
- Dates valid from (Calendar provided)
- Assigned to
- First Aider Level (Drop down list)
# Manage Learner Records
This section is quite comprehensive and forms an integral part of all *learning*-related modules in the Signify HR system. In short it boils down to a history of qualifications, courses or any other training an employee went through prior to or while in a company’s employment
It is important to note that this entire module is highly configurable. Almost all fields as well as whether they should be mandatory or not, can be set up according to a client’s specifications.
The following are sources for Learner records:
- Events that are attended by an employee.
- Learning pathways (in their totality)
- Individual steps on pathways
- Programmes (comprising a number of courses)
- Assessments
- Manual inputs by administrative personnel
- Manual inputs from the Employee Self Service portal
- Bar-coded imports
## How to access the Learner Records
Navigation from the Home page:
- ***System Administration | Modules | Manage Employees | Employee Development | Learner Records*** to open the Learner Record List screen.
The following functionality is available on the Learner Record List Screen:
- **Search**
Basic criteria fields are provided but they can be expanded to allow more options.
- **Summary View & Full View**
- Full View displays every learner record in its own row. (Showing multiple records should they have come from a skills programme)
- Summary View is used to group all learner records coming from a skills programme under the title of the skills programme. The option is there to expand the programme to reveal the individual learner records.
- **Batch Editor**
Specify criteria and then easily edit all matching records without having to re-search every time. Some of the functions are:
- Works across employee learning records e.g. see all employees who have done the same course.
- Edit all matching records by hand or specify a change once and apply it to all selected records.
- **Reset Employee Assessments**
If an employee completed an assessment for which a learner record had been submitted, this functionality enables the administrator to manually reset the number of tries used, allowing the employee another try at the assessment.
- **Synchronise learner records on ID number**
In older versions of the LMS system, different employees could have the same ID Number. The **Synchronise learner records on ID number** functionality was used to copy all the learner records to all employees with the same ID Number. Later versions of the LMS does not allow for duplicate ID Numbers, therefore this functionality is now redundant.
- **Import Learner Records**
This functionality can be used to upload a comma delimited CSV file and directly import the selected file to create learner records. The file format is fixed and should be the same as the configuration.
- **Reports**
Learner Record Reports showing completion dates, statuses, scores etc. These reports can be downloaded in PDF format.
- **Add**
Add a new learner record.
- **Delete**
Delete selected learner records.
## How to Log (Add) a Learner Record
When the **Add** button is clicked, on the Learner Records List screen, the Log Learner Record screen is opened and the first activity on this page is to determine the type of learner record that is to be added for an employee.
The system will display different fields depending on the type of learner record chosen.
The sections available on the Log Learner Record screen are:
- BASIC INFORMATION:
- Quality checked: At the top of the **Qualifications** learner record is a checkbox. In cases where learner records are automatically logged from other modules, quality checking is not required. But where records are manually submitted from e.g. the Employee Self Service portal it might be prudent to occasionally quality check and verify the submitted information.
- Only the Title, Start Date and End Date fields are mandatory when creating a new learner record.
- ASSESSMENT:
- A learner record can be assessed by an Assessor using this functionality. The following accompanying information is also captured: assessment date, score, number of attempts.
- MODERATION:
- Moderation results can be captured and stored by the moderator. The following accompanying information is also captured: moderation date, moderation outcome and comments
- COSTS:
- Multiple costs can be captured per learner record e.g. course cost, travel cost, accommodation cost, printing cost etc.
- DIFFICULTIES ANTICIPATED:
- A text field to indicate any difficulties anticipated.
- NOTES:
- A text field allowing for notes to be added to the learner record.
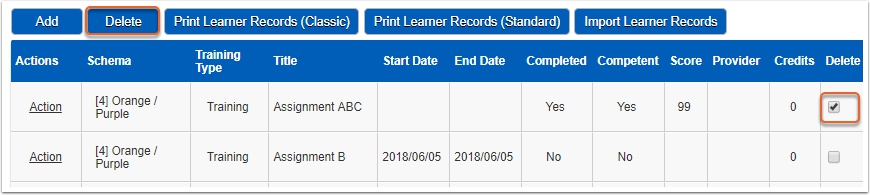
## How to Delete a Learner Record
Select the learner record(s) to be deleted and click on the **Delete** button.
[](https://signature.signifyhr.co.za/uploads/images/gallery/2021-03/jbpaY3uGaCfa6LAK-image-1616858765681.png)
Additional Actions on a Learner Record
In addition to the above mentioned functionality, the following actions are available with which to add additional information to an existing learner record.
Click on the **Action** link on the employee's learner record to show the dropdown item list.
- Supporting documentation can be uploaded on the learner record e.g. invoices, POE documents, assessment results, qualification certificate etc.
VIEW / EDIT ASSESSMENTS
- Multiple assessment results can be captured and stored by the assessor. The following accompanying information is also captured: assessment date, competent status, number of attempts and comments.
VIEW / EDIT MODERATIONS
- Multiple moderation results can be captured by Internal and External moderators. The following accompanying information is also captured: moderation date, moderation outcome and comments.
- The Internal moderator can send an email notification to the assessor containing the outcome of the moderation process.
- An External moderator can send an email notification to the External moderator containing the outcome of the moderation process.
COPY TO OTHER EMPLOYEES
Occasionally a couple of employees attend the same course or obtain the same qualification. It would be more efficient to provide the details once and duplicate it to multiple employees. This functionality enables such a quick duplication of records.
DOWNLOAD CERTIFICATE
A training intervention can be configured to allow the printing of certificates. A certificate can be downloaded and printed here.
EMPLOYEE FUNDING
This functionality is available on Qualification type learner records. The functionality manages scholarship information on the learner record. Details pertaining to a current or completed scholarship can be captured in these forms:
- Detail:
- Start and end dates; Mentor details; Status and Terms and Conditions.
- Periods:
- Periods of decreased, limited or no funding can be captured as well as whether such a period led to a scholarship re-application. Subjects passed or failed during a period can also be captured.
- Contributions:
- Any financial contribution to a scholarship from any source can be recorded.
- Expenses:
- A list of expenses incurred against the scholarship.
- Documents:
- Supporting documentation on a scholarship e.g. ID documents, invoices, report cards etc.
- Notes:
- Actions assigned to people; A due date can be added.
# Manage Subgroups
Subgroups are made up of employee records grouped or selected from the database because of some common characteristic e.g. the same department or job title etc.
Some of the advantages of making use of subgroups are:
- Employee records can be put into smaller groups for example only those within a specific company branch or level.
- Subgroups can be used for batch editing etc.
- A user’s access can be restricted to only the employees in a subgroup.
- A subgroup can be defined to include employees from across different departments and subsidiaries.
Standard subgroups that are used more frequently are created automatically by the system.
How to link subgroups to a user, will be discussed in the Manage Users section.
Administrators can create customised subgroups using the Subgroup Query Builder. It will be to your advantage if you have SQL knowledge when using this functionality.
## Working with Subgroups
Navigation from the Home page:
- ***System Administration | Subgroup*** to open the Subgroup List screen.
## Creating a New Subgroup
Click on **Create** to open the Query Builder screen.
Enter a description and category for the new subgroup on the screen below.
EXAMPLE OF A SUBGROUP CONDITION:
**Gender = 'Male' AND Age > '50'**
Creating a condition or criteria for a subgroup is a step-by-step process. As an example we will be building the condition shown above.
- In the **Available Fields** section, locate and click the *Gender* field
- From the **Operator** buttons choose the "="
- In the **VALUE** field, type in *MALE*
- From the **COMBINE** buttons click the **And** button
- In the **Available Fields** section, locate and click the *Age* field
- From the **Operator** buttons choose the ">"
- In the **VALUE** field, type in *50*
- Click on **Check Syntax** at the bottom of the page to validate your statement
- Click **Save**
Additional functionality available on the Query Builder screen are:
- **Undo**: Undo will undo your last step when building the condition.
- **Clear All**: Use to remove the entire condition.
- **Manual**: You get full control over the SQL portion of the condition as shown below. All other controls and buttons are removed, leaving only the available fields. A warning message alerts the user to the fact that only advanced users should attempt to manually edit a condition.
- Search for and locate the applicable subgroup you want to delete.
- Select the **Delete** check box.
- Select **Delete** to display the following confirmation message.
- Select **Yes** to confirm the delete action.
# Manage Users - How to Manage Users
This section assists the System Administrator in managing users in the Signify HR system. The following topics will be discussed:
1. Create, edit and remove a user account
2. Send Welcome Notification to New users
3. Define a User Account's Profile
4. Assign subgroup access
5. Grant reporting rights
6. Role Assignment
## How to Access Manage Users
To access the System Administration Users functionality navigation from the Home page:
- ***System Administration | System Administration | Users| Manage Users*** to open the List of Users screen.
## Add New User
There are two ways to create a user account:
1. The quickest way to create a user account is to make use of the link that becomes active when a new employee record is saved for the first time. This method was discussed in [Create a User Account for the Employee.](http://signify.screenstepslive.com/s/10619/m/75331/l/843269-create-a-user-account-for-the-employee)
2. Another way to create a user account for an employee is via the System Administration menu which will be discussed next.
Click on **Add New User** below, to open the **User Information** screen.
## Resetting a User's Password
The following steps are needed when a user requests the resetting of his user account password:
- Locate the **Reset User Password** section on the User Information screen.
- Three options are available and they include combinations of the following.
- Display the new password on screen e.g. if the administrator needs to send or even read the password to the user.
- Send the user a link which they have to:
- Click in order to reset the password themselves.
- Change the password when logging in the first time.
In all these cases, the user will be forced to change his/her password when logging into the system again.
## Opening a Locked User Account
The following steps are needed when a user requests the opening of his user account. A user account is normally locked if the password is incorrectly typed in three times.
Use the steps for resetting a user's password (discussed above) to unlock a locked user account.
## Removing a User Account
The predominant reasons for removing a user account are to either prevent the user from accessing the system or because the account is no longer being used.
Two methods are available for achieving this goal:
1. Disabling a User Account
2. Deleting a User Account
## How to Disable a User Account
Disabling a user account is a temporary way of rescinding system access to a user and one that should preferably be used instead of deleting the account.
- Open the List of Users screen and select the user to be disabled.
- On the **User Information** screen, tick the **Disable User** checkbox and click **Submit**.
- The account is now disabled and the user will no longer be able to login.
- The account can at any stage be enabled again by removing the tick.
## How to Delete a User Account
Deleting a user account is a permanent way of cancelling system access to a user. If the account was deleted in error, it will have to be recreated and all its authorisations manually re-entered. Rather disable the account as discussed in the previous section.
To delete a user account, follow these steps:
- Open the List of Users screen and select the user to be deleted.
- Select the delete check box and click **Delete** for the user account to be deleted.
- When you confirmed the delete action, the record will be permanently removed.
- The employee logging in with this account will no longer be able to login.
- **Note**: The employee record attached to the user account is NOT deleted only the system account by which the employee gains access to the system is removed.
## Defining a User Account's Profile
Besides the general information that makes up a user account, the following attributes can also be specified to even further define a user’s rights and access levels. For EVERY new user consider ALL the items below, even if they do not necessarily apply.
- Whether the user should be made a full system administrator or a schema administrator.
- To which subgroups the user should get access
- The level to which the user is to have access on a subgroup
- Which roles (e.g. leave administrator) the user is expected to play
- Which reports a user should have access to
- Which HR requests are to be routed to the user if applicable
- What the user’s default schema should be (if applicable)
## Giving a User Full System Administration Rights
Giving full system administration rights to a user should only be given under very controlled circumstances since sensitive information could become visible. Signing a confidentiality agreement is also advised. A System Administrator will be able to do the following:
- Create, edit and delete a user
- Grant subgroup access
- Grant reporting rights
- Grant roles (Role Assignment)
- Grant HR Process access
- Activate a subgroup
A user can be given System Administrator rights or Schema Administrator rights. The main difference between the two is that the Schema Administrator can only manage users on his own Schema.
- Open the applicable user’s account.
- On the *User Information* screen tick the *Administrator* checkbox.
- Click **Submit** to save the change.
**How do the welcome notifications work?**
By following the **three step workflow** below an email will be sent to users created or imported after the specified date. Users affected will be
- All users that have been imported and haven't received a welcome notification
- And users that were created manually and haven't received a welcome notification
You can untick the **Ignore users created / imported before this date** checkbox if you want to send welcome notifications to all users, regardless of when they were created on the system.
Choose one of the following three options:
1. Send the welcome message to all users
2. Select the welcome message only to users that I have selected
3. Send the welcome message to all users, but exclude users that I have selected
## Subgroup Access
In this section a user is given access to specific subgroups. By default a user has no access to all subgroups unless he is explicitly setup to have access to one or more. Refer to the [Subgroups](http://signify.screenstepslive.com/s/10619/m/75331/c/237838) section for more information on how to manage a subgroup.
- Open the List of Users screen and select the user to assign subgroup access for.
- Select **Subgroup Access** from the side menu bar to display the list of subgroups a user currently has access to.
- The **Subgroup List screen** allows for the following functionality when managing Subgroup Access:
- **Add Subgroup:** A new subgroup can be created
- **Refresh Subgroups:** All the applicable system tables for all the modules are refreshed.
- **Set Preferred Subgroup**: Use this setting to setup the default subgroup for a user.
- **Clear Preferred Subgroup:** Remove the preferred subgroup.
- **Delete:** Remove subgroup access.
**NOTE: The Refresh Subgroup action is very important after subgroups access were amended.**
## How to Define Permissions on a Subgroup
Click on the **View/Edit Permissions** link in the **Action** dropdown of the selected subgroup in the Subgroup List.
There are more than one area that specific permissions can be set up for. These are:
- Employee Records (includes the Manage Employees module)
- Query Builder
- Profiles (includes the Job profiler module)
- Switch to another user’s profile
## Setting up Permissions for Employee Records
To set up permissions for the employee records, tick the **Access to Employee Records** checkbox. This will open the following sections where detailed access can be specified per section. Go through the sections and indicate to which the user should have view and/or edit rights. Click **Save Subgroup Rights** to save the changes.
## Allow an Administrator user to Switch to Another User's Profile
- The system allows administrator users or users in suitably responsible positions to support other users by physically logging in as them. In this way the administrator user can see and do what the user is seeing and doing, thus giving practical and topical assistance.
- Be careful when assigning this right to any user since the administrator can see and do anything the user is able to see and do.
- All actions performed by the administrator are logged against the name of the administrator.
To allow full permission on *Switch to another user's Profile*, tick the appropriate check box as shown below.
## Switching to Another User's Profile
When an administrator user, who was given Switch User rights, logs into the system he will have access to the **Switch user** functionality from the system portal as shown below.
- Ensure that the appropriate subgroup is activated, search for the user to be supported and click to display all employees matching the search criteria.
- Locate the applicable user and click the "**Switch to ...**" button in the **Action** column.
- The session is changed to that of the selected user and from now on all actions are logged against the administrator not against the user.
- To return to the administrator’s own profile, click the **Switch user** functionality from the system portal.
- Acknowledge the switch back to your own profile.
# Manage Users - Subgroup Access
## Subgroup Access
In this section, a user is given access to specific subgroups. By default, a user has no access to all subgroups unless he is explicitly set up to have access to one or more. Refer to the [Subgroups](http://signify.screenstepslive.com/s/10619/m/75331/c/237838) section for more information on how to manage a subgroup.
- Open the List of Users screen and select the user to assign subgroup access for.
- Select **Subgroup Access** from the side menu bar to display the list of subgroups a user currently has access to.
- The **Subgroup List screen** allows for the following functionality when managing Subgroup Access:
- **Add Subgroup:** A new subgroup can be created
- **Refresh Subgroups:** All the applicable system tables for all the modules are refreshed.
- **Set Preferred Subgroup**: Use this setting to setup the default subgroup for a user.
- **Clear Preferred Subgroup:** Remove the preferred subgroup.
- **Delete:** Remove subgroup access.
**NOTE: The Refresh Subgroup action is very important after subgroups access were amended.**
## How to Define Permissions on a Subgroup
Click on the **View/Edit Permissions** link in the **Action** dropdown of the selected subgroup in the Subgroup List.
There are more than one area that specific permissions can be set up for. These are:
- Employee Records (includes the Manage Employees module)
- Query Builder
- (includes the Job profiler module)
- Switch to another user’s profile
## Setting up Permissions for Employee Records
To set up permissions for the employee records, tick the **Access to Employee Records** checkbox. This will open the following sections where detailed access can be specified per section. Go through the sections and indicate to which the user should have view and/or edit rights. Click **Save Subgroup Rights** to save the changes.
## Allow an Administrator user to Switch to Another User's Profile
- The system allows administrator users or users in suitably responsible positions to support other users by physically logging in as them. In this way the administrator user can see and do what the user is seeing and doing, thus giving practical and topical assistance.
- Be careful when assigning this right to any user since the administrator can see and do anything the user is able to see and do.
- All actions performed by the administrator are logged against the name of the administrator.
To allow full permission on *Switch to another user's Profile*, tick the appropriate check box as shown below.
## Switching to Another User's Profile
When an administrator user, who was given Switch User rights, logs into the system he will have access to the **Switch user** functionality from the system portal as shown below.
- Ensure that the appropriate subgroup is activated, search for the user to be supported and click to display all employees matching the search criteria.
- Locate the applicable user and click the "**Switch to ...**" button in the **Action** column.
- The session is changed to that of the selected user and from now on all actions are logged against the administrator not against the user.
- To return to the administrator’s own profile, click the **Switch user** functionality from the system portal.
- Acknowledge the switch back to your own profile.
# Manage Users - Copy User Rights
Properly defining a user’s subgroups, access rights, roles etc. is a time-consuming business. Fortunately, one user’s user profile can be copied across to other users.
Open the List of Users screen and select the user to assign subgroup access.
- Select **Copy User Rights** from the side menu bar to display the Copy User Rights screen.
- Select the user to receive the new set of access rights.
- Click **Copy User Rights** to copy all the rights from the current user to the selected user.
# Manage Users - Reporting Rights
When required, only certain reports can be made available to a user. In order to link the relevant reports to a user’s account, follow these steps:
- Open the List of Users screen and select the user to assign reporting access for.
- Select **Reporting Rights** from the side menu bar to display the list of reports a user can have access to.
# Manage Users - Role Assignment
A user can assume different roles other than just having employees report to him. E.g. in some cases, a user can be expected to approve training requests from employees not reporting to him. Or he can be expected to manage training events. In both these examples the user was assigned a specific role to execute the responsibilities and that is the objective of this section.
To assign a role to a user, follow these steps:
- Open the List of Users screen and select the user to assign reporting access.
- Select **Role Assignment** from the side menu bar to display the list of roles a user is currently linked to.
## Add a User Role
Click on Add to open the User Role Detail screen below.
To select a role, click the hand picker to open the **Available Role List** screen.
- Select the appropriate role and click **Select** to update the **User Role Detail** screen.
- If you are happy with this role, click **Save** to display the detail for the selected role.
- Use the screen below to more specifically stipulate what this role is allowed access to.
- From the complexity of this screen, it can be understood that between two users, linked to the same role, there can be a difference in access levels.
- When the **User Role Detail** page is saved, the user is returned to the updated **User Role List** screen.
- Continue in this fashion to assign more roles to a user.
## Delete a User Role
To delete a user role, follow these steps:
- Open the **User Role List** screen and select the role to be deleted.
- Select the delete check box and click **Delete** for the role to be deleted.
- When you confirmed the delete action, the record will be permanently removed.
# Manage Users - Schema Access
A Signify database can be shared among any number of companies in the same group. Each company will function as a separate entity but managers and administrators can switch between the companies (called schemas in the system) to access the employees from the respective companies.
Specific rights must be given to a user before he/she will be able to switch between the companies/schemas in the database. Assigning schema rights is done in the **Role Assignment** section discussed earlier.
- Open the **List of Users** screen and select the user to assign reporting access.
- Select **Schema Access** from the side menu bar to open the **User** **Schema Access** screen.
On the screen shown below the user’s default schema is set, meaning the schema that will be active when the employee logs in.
Select the default schema from the drop-down list and click **Save**.
# Manage Users - HR Processes Access
To assign user access to HR Process functionality, follow these steps:
- Open the List of Users screen and select the user to assign HR Processes to access.
- Select **HR Processes Access** from the side menu bar to display the list of reports a user can have access to.
You will now be able to assign user access to:
- Different request categories
- Request for Resignation
# Manage Users - IR and PDP Roles
In order to link the Industrial Relations and PDP user roles to a user’s account, follow these steps:
- Open the List of Users screen and select the user to assign reporting access for.
- Select IR and PDP Roles from the side menu bar to display the Role Assignment screen.
# Quick Reference Guides and Practical Exercises
A list of Quick reference Guides and Practical Exercises:
Click on the **Download** links to download the documents.
[](https://signature.signifyhr.co.za/uploads/images/gallery/2021-03/qzszvWWV43LpOnu3-Signify-Line-Image.jpg)
# Technical Manuals
List of Technical Manuals e.g. Employee Data Import Process.
# Technical Manual - Employee Data Import Process
## INTRODUCTION
The Signify System is not always the primary source of employee data and information needs to be imported from other sources. This document describes the employee data import process used by Signify Software to import and maintain employee information received from different sources using a number of import methods.
## IMPORT PROCESS METHODS
The employee data received from the client, will always be imported into a *staging table* first and then written into the Signify system. A number of stored procedures are executed once the information is in the staging table, to complete the import process.
All the import methods mentioned below, except the Excel Spreadsheet Template Import, can be scheduled to occur daily (even more than once a day), weekly or monthly as per the client’s requirements.
## 1. EXCEL SPREADSHEET TEMPLATE IMPORT
- A comma delimited CSV file that can be imported via the existing front-end import system functionality.
- This approach is used to:
- Receive employee data from a client in an Excel spreadsheet.
- Do tests and validations on the correctness of the employee data received.
- Do a once off import of employee data to confirm the data, fields etc.
- Schedule the automatic import.
- The client captures the information in the standard Signify Excel employee import template and sends the information to Signify.
- The import sheet layout has to be exactly the same as defined in the detail layout of the Excel template file described in the “Excel Import Template Layout” section.
## 2. SIGNIFY IS PROVIDED WITH A VIEW INTO THE CLIENT'S DATABASE
- Client’s IT to populate view or staging table on the client’s database.
- A scheduled automated job will import the data from the client’s database into the Signify staging table.
- The standard import process will be followed.
## 3. CLIENT PLACES DATA FILE ON A FTP SERVER
- Signify to provide layout format for import data file.
- Signify to create a secure location for FTP files.
- Client initiates a push action and creates a data file on the FTP Server.
- A scheduled automated job will import the data from the client’s FTP data file into the Signify staging table.
- The standard import process will be followed.
## 4. CLIENT PLACES DATA DIRECTLY INTO THE SIGNIFY DATABASE
- Signify to provide layout format for the Signify staging table.
- Signify to assign secure access to the Signify staging table.
- Client import data directly into the Signify staging table.
- A scheduled automated job will import the data from Signify staging table and the standard import process will be followed.
## 5. SIGNIFY READS DATA FROM THE CLIENT'S ACTIVE DIRECTORY
· Client to provide Signify with Active Directory login details.
· Signify to verify that they can connect to Active Directory.
· Client to specify what information should be sourced from Active Directory.
· A scheduled automated job will import the data from the client’s Active Directory into the Signify staging table.
· The standard import process will be followed.
## 6. CLIENT SENDS THE DATA TO THE SIGNIFY API
· Signify provides the client with the API URL and credentials.
· Client sends the data to the API endpoint which will populate the staging table.
· Client to specify what information should be sourced from Active Directory.
· A scheduled automated job will import the data from Signify staging table and the standard import process will be followed.
## TYPICAL IMPORT PROCESS DIAGRAM
The process below is a diagrammatical representation of typical processes which can be followed to import client data.
No spaces in front of the number.
This number will be used to create the employee’s username for logging into the system.
Number must be unique per employee.
Can be omitted if setting is active within Signify HR to automatically generate employee numbers.
Surname
Mandatory
Alphanumeric
500
FullName
Mandatory
Alphanumeric
500
MaidenName
Alphanumeric
500
KnownAs
= FullName
Alphanumeric
500
This field will be displayed on most reports and screens.
Initials
Alphanumeric
20
ID
Recommended
Alphanumeric
50
Populate with either a national ID number, an employee number or ensure a passport number is provided in the passport field
TelNoW
Alphanumeric (+## ## ### #### )
200
Numbers not in the specified format will be imported as a whole and not split into code etc.
(+27-12-345678 format only)
TelNoH
Alphanumeric (+## ## ### #### )
200
CellNo
Alphanumeric (+## ## ### #### )
200
Email
Recommended
Alphanumeric
200
EmpTitle
Alphanumeric
500
All values used here will be made part of the master data tables. Therefore ensure these values are correct if completed.
Location
Alphanumeric
500
OrgLevel1
Recommended
COM
Alphanumeric
100
This is the highest level in the company.
The Org Code must be unique across all org levels.
OrgLevel1\_Description
Mandatory
Company
Alphanumeric
500
This is the highest level in the company, usually the group/company's name.
OrgLevel1\_Region
Alphanumeric
4000
Values inserted in this field will also be populated in the Master Data for the Address Region.
OrgLevel1\_Province
Alphanumeric
500
Values inserted in this field will also be populated in the Master Data for the Business Address Province.
OrgLevel2
Alphanumeric
100
Only org level 1 is mandatory. Levels 2 to 9 are optional and are to be used only if needed.
For each level (1-9) in the organisation structure: An arbitrary (unique) code as well as name/description for the node of the position within which the employee is appointed.
If no code is provided, a code is automatically generated by the employee import process.
If the combination of levels do not comply to the organisation structure rules (e.g. Level 2 can exist within Level 1, Level 4 can exist within Level 3 or Level 2, etc), the record will be rejected.
The same Organisation Node Code cannot be used in multiple Organisation levels or locations - i.e. the organisation node code per node must be unique within the file
OrgLevel2\_Description
Alphanumeric
500
OrgLevel2\_Region
Alphanumeric
4000
OrgLevel2\_Province
Alphanumeric
500
OrgLevel3
Alphanumeric
100
OrgLevel3\_Description
Alphanumeric
500
OrgLevel3\_Region
Alphanumeric
4000
OrgLevel3\_Province
Alphanumeric
500
OrgLevel4
Alphanumeric
100
OrgLevel4\_Description
Alphanumeric
500
OrgLevel4\_Region
Alphanumeric
4000
OrgLevel4\_Province
Alphanumeric
500
OrgLevel5
Alphanumeric
100
OrgLevel5\_Description
Alphanumeric
500
OrgLevel5\_Region
Alphanumeric
4000
OrgLevel5\_Province
Alphanumeric
500
OrgLevel6
Alphanumeric
100
OrgLevel6\_Description
Alphanumeric
500
OrgLevel6\_Region
Alphanumeric
4000
OrgLevel6\_Province
Alphanumeric
500
OrgLevel7
Alphanumeric
100
OrgLevel7\_Description
Alphanumeric
500
OrgLevel7\_Region
Alphanumeric
4000
OrgLevel7\_Province
Alphanumeric
500
OrgLevel8
Alphanumeric
100
OrgLevel8\_Description
Alphanumeric
500
OrgLevel8\_Region
Alphanumeric
4000
OrgLevel8\_Province
Alphanumeric
500
OrgLevel9
Alphanumeric
100
OrgLevel9\_Description
Alphanumeric
500
OrgLevel9\_Region
Alphanumeric
4000
OrgLevel9\_Province
Alphanumeric
500
Birthday
Recommended
1900/01/01
YYYY/MM/DD
500
Race
Alphanumeric
500
EthnicGroup
Alphanumeric
500
Gender
Alphanumeric
500
JobCode
Recommended
= MAX(All numeric Job Codes) + 1
Alphanumeric
255
An arbitrary code used to uniquely identify a job e.g. ENG001.
If not provided in the file and a job exists in the system for the JobTitle, the existing JobCode will be used.
JobTitle
Mandatory
Learner
Alphanumeric
255
If the JobCode exists in the system and the current Title differs from the Title in the import, the Title in the system is updated to the value in the import.
PositionCode
Recommended
= JobCode + . + \[ MAX(All numeric Position Codes for JobCode) + 1 \]
Alphanumeric
255
An arbitrary code used to uniquely identify a position linked to a job e.g. ENG001.1.
If not provided in the file and and a position exists in the system for the PositionTitle, the existing PositionCode will be used.
PositionTitle
Recommended
Learner
Alphanumeric
255
If the PositionCode exists in the system and the current Title differs from the Title in the import, the Title in the system is updated to the value in the import.
OccupationalCategory\_ShortCode
Alphanumeric
10
OccupationalCategory\_Description
Alphanumeric
255
OccupationalLevel\_ShortCode
Alphanumeric
10
OccupationalLevel\_Description
Alphanumeric
255
Choose only from the following:
· Specialist or Middle manager;
· Technical worker or Junior management;
· Semi-skilled / discretionary decider;
· Unskilled / defined decider
InternalGrading
Alphanumeric
255
These values MUST be unique per Job.
OFOCode
Alphanumeric
50
MovementReason
Alphanumeric
100
EmploymentType\_Code
Recommended
Permanent
Alphanumeric
50
Double-check these values. Inconsistencies/differences between values which should be the same will cause them to be treated as separate values.
EmploymentType\_Description
Mandatory
Permanent
Alphanumeric
500
Double-check these values. Inconsistencies/differences between values which should be the same will cause them to be treated as separate values
LineManagerEmployeeNumber
Recommended
Alphanumeric
100
The employee number of the line manager to whom the employee reports. Mainly used for HR Event Management, not critical in LMS.
The line manager automatically acts in the place of all other managers unless the others are populated. Note that for every employee who is used as a line manager, there has to be a separate employee record in the import sheet or the line manager should already exist as an employee in the system.
LineManagerName
Recommended
Alphanumeric
500
PerformanceManagerEmployeeNumber
= LineManagerEmployeeNumber
Alphanumeric
100
The employee number of the manager to whom the employee reports for performance management purposes.
PerformanceManagerName
Alphanumeric
500
DepartmentManagerEmployeeNumber
Alphanumeric
100
DepartmentManagerName
Alphanumeric
500
TrainingManagerEmployeeNumber
= LineManagerEmployeeNumber
Alphanumeric
100
The employee number of the manager to whom the employee reports for training approval purposes.
TrainingManagerName
Alphanumeric
500
PDPFirstApproverEmployeeNumber
Alphanumeric
100
PDPFirstApproverName
Alphanumeric
500
PDPSecondApproverEmployeeNumber
Alphanumeric
100
PDPSecondApproverName
Alphanumeric
500
LeaveManagerEmployeeNumber
= LineManagerEmployeeNumber
Alphanumeric
100
The employee number of the manager to whom the employee reports for leave approval purposes.
LeaveManagerName
Alphanumeric
500
SalaryReviewManagerEmployeeNumber
= LineManagerEmployeeNumber
Alphanumeric
100
SalaryReviewManagerName
Alphanumeric
500
StartDateInCompany
Recommended
(1) Start Date In Group
(2) Start Date In Position
(3) Start Date In System
(4) GETDATE()
(see comments)
YYYY/MM/DD
10
The employee’s start date in his current company if the client has a multi-company system configuration.
If this date is not provided in the import and a position for this employee in the Job/Position and Schema exists in the system, the date from the existing position is used.
StartDateInGroup = StartDateInCompany = StartDateInPosition
StartDateInGroup
Recommended
(1) Start Date In Company
(2) Start Date In Position
(3) Start Date In System
(4) GETDATE()
(see comments)
YYYY/MM/DD
10
The employee’s initial start date in the group as a whole if the client has a multi-company system configuration.
If this date is not provided in the import and a position for this employee in the Job/Position and Schema exists in the system, the date from the existing position is used.
StartDateInGroup = StartDateInCompany = StartDateInPosition
StartDateInPosition
Recommended
(1) Start Date In Group
(2) Start Date In Company
(3) Start Date In System
(4) GETDATE()
(see comments)
YYYY/MM/DD
10
The position the employee currently holds.
If this date is not provided in the import and a position for this employee in the Job/Position and Schema exists in the system, the date from the existing position is used.
StartDateInCompany = StartDateInPosition = TerminationDate
TerminationDate
Recommended
9999/12/31
YYYY/MM/DD
10
If Signify is expected to import previous/terminated employees then this field should be provided
StartDateInPosition = TerminationDate
ReasonForTermination
Resignation (if TerminationDate != 9999/12/31)
Alphanumeric
500
Should only be provided if TerminationDate is present and not 9999/12/31
Nationality
Alphanumeric
500
HomeLanguage
Alphanumeric
500
Home\_Country
Alphanumeric
500
Home\_Region
Alphanumeric
500
Home\_CityTownVillage
Alphanumeric
500
Home\_PostalCode
Alphanumeric
10
Home\_UnitNumber
Alphanumeric
50
Home\_Complex
Alphanumeric
500
Home\_StreetNo
Alphanumeric
50
Home\_Street
Alphanumeric
500
Home\_Address1
Alphanumeric
500
Home\_Address2
Alphanumeric
500
Home\_Address3
Alphanumeric
500
HomePostal\_Address1
Alphanumeric
500
HomePostal\_Address2
Alphanumeric
500
HomePostal\_Address3
Alphanumeric
500
HomePostal\_Country
Alphanumeric
500
HomePostal\_Region
Alphanumeric
500
HomePostal\_CityTownVillage
Alphanumeric
500
HomePostal\_PostalCode
Alphanumeric
10
Business\_FloorNumber
Alphanumeric
50
Business\_Address1
Alphanumeric
500
Business\_Address2
Alphanumeric
500
Business\_Address3
Alphanumeric
500
Business\_Country
Alphanumeric
500
Business\_Region
Alphanumeric
500
Business\_CityTownVillage
Alphanumeric
500
Business\_PostalCode
Alphanumeric
10
PassportNumber
Alphanumeric
50
MaritalStatus
Alphanumeric
500
Citizenship
Alphanumeric
500
Disability
Alphanumeric
500
More than one disability can be added per employee. Use the semicolon to add more than one disability.
Customfield1
Alphanumeric
2000
Custom Fields are only imported if enabled per customer
Customfield2
Alphanumeric
2000
Customfield3
Alphanumeric
2000
Customfield4
Alphanumeric
2000
Customfield5
Alphanumeric
2000
Customfield6
Alphanumeric
2000
Customfield7
Alphanumeric
2000
Customfield8
Alphanumeric
2000
Customfield9
Alphanumeric
2000
Customfield10
Alphanumeric
2000
Customfield11
Alphanumeric
2000
Customfield12
Alphanumeric
2000
Customfield13
Alphanumeric
2000
Customfield14
Alphanumeric
2000
Customfield15
Alphanumeric
2000
Customfield16
Alphanumeric
2000
Customfield17
Alphanumeric
2000
Customfield18
Alphanumeric
2000
Customfield19
Alphanumeric
2000
Customfield20
Alphanumeric
2000
PasswordIfNewEmployee
Recommended
= Auto generated
Alphanumeric
75
System will never update password for existing employees.
System will only assign password for new employees.
System will force password change at first logon
SchemaID
Mandatory
1
Numeric
4
Only required if more than one schema exists
## IMPORT PROCESS STAGES
The import process kicks off by executing a validation process to determine if the information in the staging table is acceptable. If a specific record fails the validation process, this record will not be imported by the actual import. All the records that passed the validation will be imported.
The import process stages are as follows:
## 1. PRE-IMPORT
When the Excel Spreadsheet Template Import method is used, the import sheet layout has to be exactly the same as defined in the “Excel Import Template Layout” section. The entire import file can be rejected because:
- The number of columns are not correct.
- The column names are not correctly defined.
- The fields contain commas, carriage returns or other special characters.
Before any changes are made, the process makes a backup of the import process file content which will be processed.
The following data validations are done before a record is inserted or updated in the Signify System to ensure that data integrity is maintained:
- Date validations:
- All the dates are in the correct format (YYYY/MM/DD).
- Start date in company is after start date in group.
- Start Date in Position is after start date in group and after start date in company.
- Termination date is after Start Date in position.
- Termination date is after Start Date in company.
- Termination date is after Start Date in group.
- Employee Data:
- Employee’s employee number is populated.
- Employee’s first name is populated.
- Employee’s surname is populated.
- Employee number is not duplicated in the import.
- Job codes and positions:
- A job title is provided for each employee.
- Multiple employees are not appointed in the same position at the same time.
- The same job title does not exist for different job codes.
- Employment:
- All employees have an employment type description.
- All employees have at least one organisation level.
- Schema ID is populated for each employee.
## 2. ACTUAL IMPORT
The information is imported in the following order once the validation has been completed.
1. Master data:
1. Address related master data (e.g. Countries)
2. Employment Types
3. Titles
4. Ethnic Groups
5. Genders
6. Races
7. Marital Status
8. Nationality
9. Occupational Categories (OFO-related)
10. Occupational Levels (OFO-related)
11. OFO Codes
12. Languages
2. Org Structure Master Data (Codes & Names):
1. Validation performed:
2. Ensure that the Org Structure nodes for each record conform to all rules for the Org Structure as configured for the Schema (e.g. Level 3 node can be child of Level 1 or Level 2, Level 2 node can be child of Level 1, etc.)
3. Some clients prefer to manually maintain their organisation structures. In such a case Signify will only appoint employees in an org structure nodes that already exists.
3. Job Profiler Master Data:
1. Job Codes & Titles
2. Position Codes & Titles
3. Link Positions to the correct nodes in the Org Structure.
4. Import of Basic Employee Details per employee (New or update existing)
5. Import of Reporting Line Details per employee
6. Import of Appointment Related Data in the following order:
1. Terminations
- I.e. an employee’s current position is terminated
2. Transfers
- I.e. an employee transfer from one position to another is identified
3. Corrections
- I.e. the basic employee or appointment data must be corrected
4. New Appointments
- I.e. the employee and position is entirely new
7. Further actions performed after employee import process has been completed:
1. Create User Account if new employee and link to employee account (using an SP)
2. Disable user accounts for terminated employees
3. Update flat Org Structure for all Org Nodes (using an SP)
4. Subgroups are created for managers and org structure levels.
8. Further Customer Specific Actions:
1. Import of Custom Field Details per employee only if enabled per customer.
2. Create/update all Employee Subgroups as needed
3. Update Subsidiary Codes, etc.
Any records failing validation are excluded from the import and a validation log entry is created for these records to populate exception reports from the import process.
## Excel Spreadsheet Template Import method
## 1. PREPARING THE DATA
The following steps assume you have already populated and verified the data in the Signify Software *Employee Data Import* spreadsheet. For a full discussion on populating the spreadsheet, please see the addendum later in this document.
## 2. IMPORTING THE DATA
After you have successfully populated the Employee Data Import spreadsheet, you can start with the import by following these steps.
1\. Save the Excel spreadsheet as a **Comma Delimited (CSV)** file.
- Once you are satisfied with the results, click on Close.
## 4. HOW TO DOWNLOAD A SAMPLE FILE
- A sample file will provide the exact data sets required for the import process to go through smoothly.
- On the Home page select **System Administration**:
- At the top menu on the System Administration tab, select the **Import Data** from the drop-down list.
- Click on the link in the Action column and then select the **Download sample file** link.
- Once the file has finished download the file can be opened and saved.
**NOTE:** the downloaded file will always be in CSV format.
## 5. EXCEPTION MANAGEMENT
An audit trail is kept for all records imported, updated and rejected and is available via the Signify report module. The audit records are only available for a few months after the import and are then automatically deleted.
*The following are examples of exceptions messages that should be resolved before a record can be successfully imported and saved:*
- *Incorrect date format(s)*
- *StartDateInGroup ({0}) cannot be AFTER StartDateInCompany ({1})*
- *StartDateInCompany ({0}) cannot be AFTER StartDateInPosition ({1})*
- *StartDateInPosition ({0}) cannot be AFTER TerminationDate ({1})*
- *Employee number duplicates in the import file.*
- *There are different Job Titles using the same Job Code*
- *Position is not unique, another employee in the import has the same position code*
- *Appointment record overlaps another appointment record for employee OR another employee is appointed in the same position overlapping the time period specified. Start and End Date in a position is determined by Start Date In Position and Termination Date respectively.*
- *LineManagerEmployeeNumber - 4779 - does not exist in the system or in the import file*
- *PDPFirstApproverEmployeeNumber - 4779 - does not exist in the system or in the import file*
- *DepartmentManagerEmployeeNumber - CM01586 - does not exist in the system or in the import file*
- *PerformanceManagerEmployeeNumber - CM01586 - does not exist in the system or in the import file*
- *TrainingManagerEmployeeNumber - CM03397 - does not exist in the system or in the import file*
- *LeaveManagerEmployeeNumber - 9442 - does not exist in the system or in the import file*
- *Appointment overlaps existing appointment for employee*
- *Employee cannot be transferred to another schema with the same start date in position*
- *An unexpected scenario or anomaly has occurred. Please review the appointment information for further information*
Below find the exception reports available for the import process.
## 6. EMPLOYEE IMPORT SUMMARY AND DRILLDOWN REPORT
This is a drilldown report whereby the user can drill down on the number of ‘**Exceptions’** (rejections) and the total number of ‘**Records in Import’** per day.
## 7. EMPLOYEE IMPORT VALIDATION LOG E-MAIL
Currently the employee import process running at one of the Signify customers automatically sends an email to one of their employees containing the results of the import process, after the import process has completed. This enables them to respond to any errors in the import file to correct the information when imported again. See below an example of such import file.
## FREQUENTLY ASKED QUESTIONS
1\. When does the Signify process, which picks up data from the client’s staging table, run?
*The process can be scheduled according to the client’s needs and specifications e.g. every morning at 5:00 AM.*
2\. How is this process initiated, is it a batch process or manual run?
*A SQL job initiates the scheduled task.*
3\. What does the process do exactly e.g. populate tables, perform any data validations?
· *Clear the Signify import table.*
*· Copy all data from the client’s staging table to the Signify staging table.*
*· Data validations are done before a record is inserted or updated in the Signify System to ensure that data integrity is maintained.*
*· An audit trail is kept for all records imported, updated and rejected and is available via the Signify report module, since the amount of data generated, the audit is only available for a few months after the import date.*
4\. What if there is no data in the client’s staging table, does it notify anyone that the process was unsuccessful or is no action taken?
*Nobody will be notified that the client’s staging table contains no data. The SQL job will start as normal, but no data will result in no changes in the Signify system.*
5\. If there are no changes found when comparing to the existing data within Signify to the new imported client data, what action is taken?
*No update is done in the Signify system.*
6\. If there are updates for existing records, does it delete the old record and insert a new record, or merely update the existing record with the new values?
*Depending on the type of change, personnel information only updates the existing record, while a position change creates a new record.*
7\. For new data, is it as simple as inserting the new record/s?
*Yes, a new record is created for each new employee.*