User Manual
- Getting Started
- Preparing for Building an Organisation Structure
- Building your Organisaton Structure
- Impact of the Organisation Structure
- Organisation Structure Configuration
Getting Started
In this Section:
- Introduction to the Organisation structure Module
- Target Audience
- Prerequisites
- Other Considerations
Introduction to the Organisation Structure Module
The Organisation Structure module allows a user to define and build the hierarchical structure for a company. In addition to this a user can also continue and link individual employees or positions to nodes on the organisation structure.
How the different nodes on the organisation structure are called is fully customisable.
Target Audience
A company’s organisation structure serves as the starting point for many system transactions and reports. Utmost care must therefore be taken to ensure correctness. In light of this only system administrators will be granted access to the module.
Prerequisites
- Excellent organisation knowledge or an approved organisation structure
- Successful completion of the following Signify HR training modules
- Logging into the Signify HR system and basic navigation
- Appropriately configured master data for the Organisation Structure module. See SECTION 2
PREPARING FOR BUILDING AN ORGANISATION.
Other Considerations
Building even a medium sized company’s organisation structure one node at a time could be a daunting task. Therefore carefully consider the following pointers:
- Properly design the organisation structure and have it approved before attempting to build it into the system.Other modules in Signify HR rely heavily on this structure to order reports by, identify employees with etc. Make absolutely sure what is to be achieved with the structure before designing it. The modules most affected are:
- Other modules in Signify HR rely heavily on this structure to order reports by, identify employees with etc. Make absolutely sure what is to be achieved with the structure before designing it. The modules most affected are:
- Manage Employee
- Job Profiler
- Reports
- In order to ease the task of building and manipulating an organisation structure one node at a time, Signify Software has made a template available in which the organisation structure can be built and modified and then imported. Refer to the import templates for more information.
Preparing for Building an Organisation Structure
In this Section:
- Guidelines and Rules
- Design and Consider
- Configuration and Administration
Guidelines and Rules
The following guidelines and rules could help to ensure a more successful approach while designing the organisation structure.
- Start small and focus on a portion (e.g. one department or division) of the final structure.
- Don’t build too deep (i.e. too many child nodes) or too wide (i.e. too many sibling nodes) a structure initially. Build a few nodes and evaluate the outcome and practical implications.
- Remember that you can always deactivate (or store) one structure and build the following until you are satisfied with the result.
- As mentioned in section 1, remember that a template is available in which the organisation structure can be built and modified and then imported. However, this does not cancel out the importance of a correct design.
- Confirm what every node in your structure is called e.g. group, division, business unit, department, section etc. before you build the structure. The system allows you to configure the module with your own node descriptions making the structure development easier.
- Confirm the parent-child relationships between the different nodes e.g. Division and/or Group can fall under Company.
- Stipulate which child levels can be linked to which parent levels. In other words what the relationships between the levels are.
Role of Active and Valid in Determining the Applicable Structure or Node
- Every structure and every node is given three dates when it is created and activated. The dates are:
- Activated Date – The date on which a node/structure was made active. This simply means the node/structure COULD be the valid node/structure for today if we are also within the range of the valid from and valid to dates.
- Valid From – The date from which a node/structure COULD be the valid node/structure if the node/structure is also active.
- Valid To – The date until which a node/structure COULD be the valid node/structure if the node/structure is also active.
- More than one organisation structure can be active at the same time but only one company node/structure can be valid/active for any particular day.
- You could have more than one planning structure applicable at the same time.
- Which structure applies to any given day or time period is decided by two criteria and then also strictly in this order:
- The activation date (The active structure with the most recent activation date is considered first )
- The period for which it is valid. (Valid From – Valid To)
- The diagram below gives an example where the applicable structure had to be chosen from between 3 structures all activated on different dates and active for overlapping periods.
Which Structure Applies?
Always consider the following criteria and in this order when determining which organisation structure is valid for a particular day.
- The activation date (The active structure with the most recent activation date is considered first )
- The period for which it is valid. (Valid From – Valid To)

Design and Consider
In this section we will proceed with designing an organisation structure in Excel after which careful consideration will be given to its implications for other modules and reports.
Designing a Simple Organisation Structure
If we start with a very simple organisation structure like the one below, the following is evident.

- In this structure, Company, Division, BU, Department and Section all are examples of node descriptions and will be registered on the Unit Type screen.
- Company is the parent of Division which is the parent of BU which is the parent of Department which is the parent of Section. All these relationships will be registered in the Unit Relationships screen which would ensure that the correct nodes are linked to each other when building the structure.
The Implications of an Organisation Structure
Although what was done above seems simple enough, the implications are far reaching. Consider the following:
Employees will have to be linked to nodes on the organisation structure and most employees will be linked to the lower nodes.
- Positions will have to be linked to nodes. Again it is true that most positions are situated at the lower nodes.
- Job profiles will have to be written for every unique job on every node.
- Reports based on this organisation structure will follow this hierarchy. If your current hierarchical structure for reporting is not the same as what you built here, you are not going to get your reports out according to the desired structure.
- If you have people working only with the employees of a specific section or department, the system will allow you to configure the authorisations accordingly IF your structure makes provision for it. In other words is it possible to uniquely identify those employees by selecting a single department or section in its entirety?
Draft Your Own Organisation Structure
Use a spreadsheet and build a few nodes of your own organisation structure or use an approved structure if available.
- Do you have a clear and unique description for every node?
- Are the relationships between the nodes clear?
Building your Organisaton Structure
In this Section:
- Create an Organisation Structure
- Add Nodes to the Organisation Structure
- Edit Nodes
- Delete Nodes
- Copy Nodes
- View Chart
- Activate the Current Organisation Structure
From Paper to Structure
In this section we will start building an organisation structure into the Organisation Structure module.
The assumptions are that:
- You have an approved organisation structure.
- All required node/unit types for the plan have been loaded (See the Configuration and Administration section.
- The required unit type relationships have been defined.
In preparation for building the organisation structure let’s review the functionalities that will be addressed in this section.

|
|
||||||||||||||||||
Step 1 – Create an Organisation Structure
- From the portal page, click System Administration on the Administration Menu.
- Select Modules |Organisation Structure | Administration | Organisation Structures from the menu to open the screen below.
No organisation structures have been loaded yet and therefore the list of existing organisation structures is empty.
Click

to open a blank Plan Detail screen.
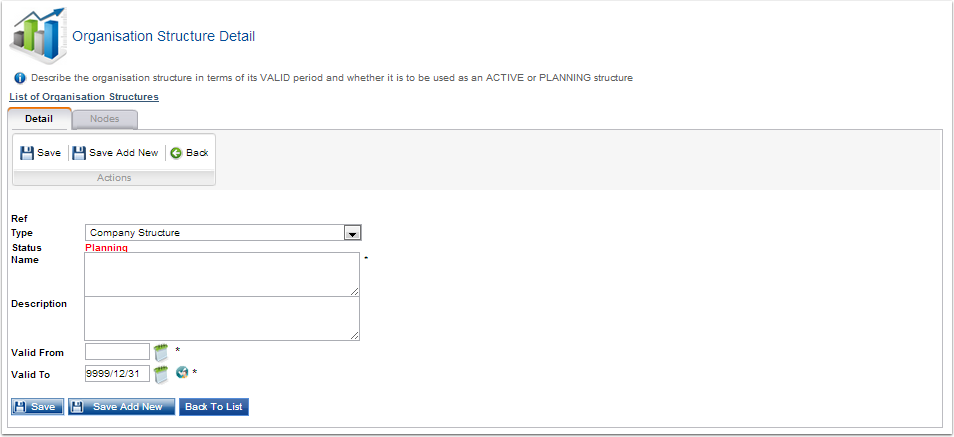
The first node on an organisation plan/structure automatically becomes the NAME of the plan.
- To create the first node on the blank screen above, in the Ref Type field select Company Structure and provide a descriptive name for you organisation structure.
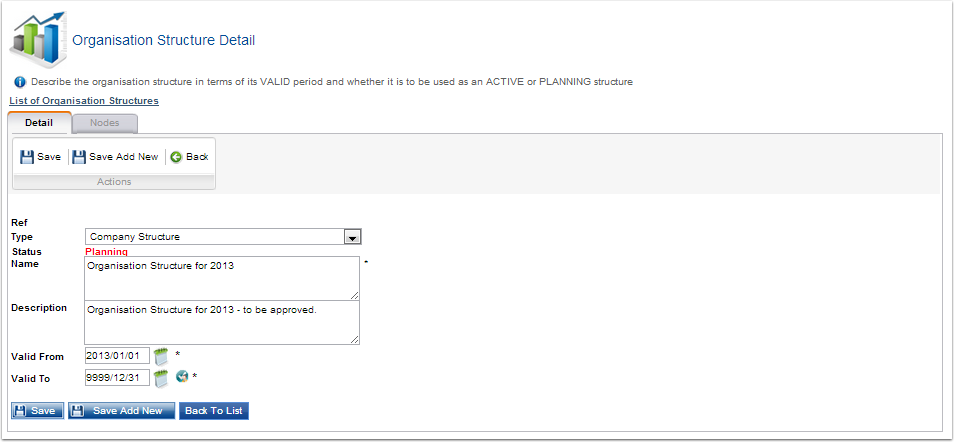
- Then proceed to complete the other fields.
|
Valid From and Valid To
For a discussion of the importance and application of the Valid From and Valid To dates, see Section 2.
|
Valid From and Valid To: For a discussion of the importance and application of the Valid From and Valid To dates, see Section 2.
Click

to submit the plan. The Plan Detail - Units screen will now change to reflect the added organisation structure.
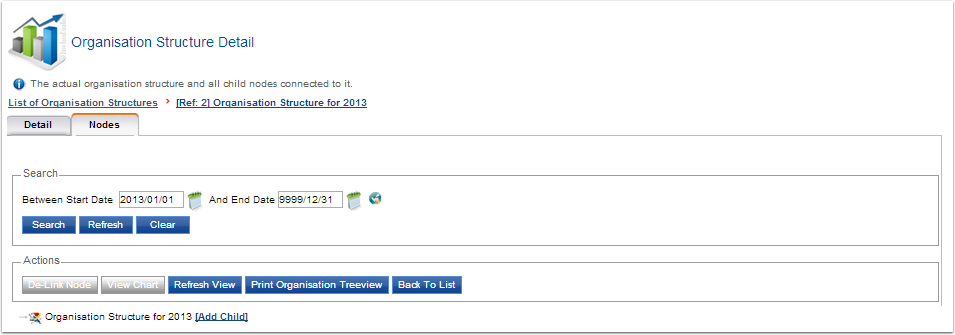
· To edit the structure’s name (or the first node), click the

tab.
Step 2 – Add Nodes to the Organisation Structure
Our next step is adding the top level of the organisation to the plan.
· Select the node for which you would like to add a new child node – in this case the structure’s name.

· Click

to display a blank Node Detail screen.

- Set the Valid From and Valid To date.
- Select the Type from the lookup (which is pulled in from the Node Type administration screen completed earlier.
- Enter the Name and the Description of the node.
Click

to add the node to the structure.
The organisation structure now changes to

Edit Node
This function allows a user to edit existing nodes. For this example we are going to change the details of a node.
- Select the node which you would like to edit.

Click

to open the Node Detail screen.

- Edit the required fields and, when done, click

to submit the changes.
In addition to viewing the node detail, note that for most nodes another three tabs could become available:

Additional Information
The

tab is used to record any additional information regarding the node that might be required. Information like company registration details, address details etc. All the information is optional so use it only when required.
One section that needs further discussion is the business address.
Business Address
When a business address is provided on an organisation structure level, the implication is that all employees in positions attached to this level should have the same business address. To accomplish this, a scheduled procedure is kicked off to update all employee business address details to the organisation structure level’s business address. A few rules, part of this procedure, are as follows:
- The employee’s business address can be found under Manage Employees | Employee Profile | Address
- An employee’s business address is ALWAYS synchronised to that of the organisation structure. In other words any changes specific to the employee’s business address will be overwritten by the organisation structure level’s business address.
- If the organisation structure level’s business address is not available, the next higher level is checked and its business address used if available. If that level’s address is not available the next higher level is checked etc.

Node Parents
Click

to view the parents to which this node is linked. Since this node was firstly linked to the Coal division and then also linked to the Heavy Minerals division two parent nodes are listed.

Node Children
Click

to view the child nodes linked to this node. Currently no children have been linked.

Refresh View
Maintaining an organisation structure on a web page is resource intensive and therefore the screen is not updated after every change. When you have made a change and would like to view the results on the organisation structure as well, click

to refresh the page and render all changes.
Refresh (Flatten) Organisation Structure
Building a hierarchical organisation structure has many advantages but sometimes there is a need to view the structure in a flat format e.g. for certain types of reports. To accomplish this, a flat structure is derived from the hierarchical structure during an offline process that runs every evening. This process has the following implications:
- Some reports will not immediately reflect a structure change. Changes will only be visible in a flat structure-type report on the day after the changes were made.
- Some functionalities, e.g. moving org structure levels, also rely on the flat structure and need an updated flat structure before it is attempted.
- In many cases a company’s subgroups are derived from the flat organisation structure files.
If a user cannot wait for the after-hours, automated flat structure update, an alternative is available.
- Open the Organisation Structure module from Modules | Organisation Structure.
- Locate the applicable organisation structure from the list of structures.
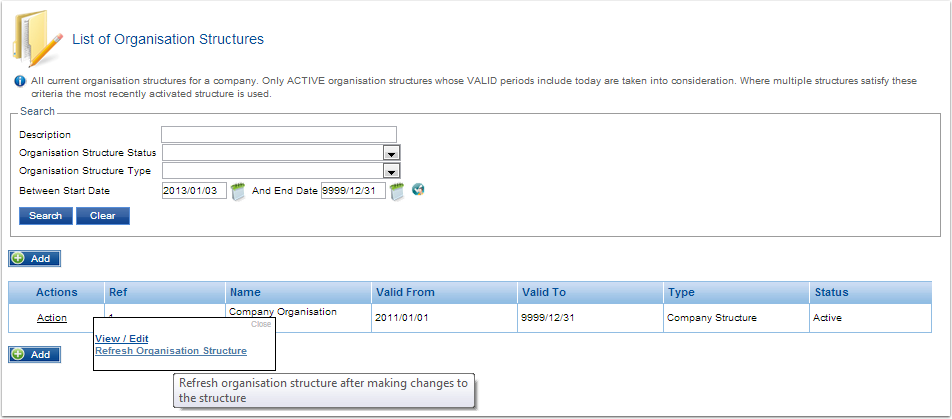
- Click the structure’s Action hyperlink to view a list of available actions.
Click

to manually rebuild/refresh the flat organisation structure.
Refresh Organisation Structure
Use the Refresh Organisation Structure action to quickly refresh the structure in cases where an updated flat organisation structure file is needed.
Link Positions
A very important step after creating and finalising an organisation structure is linking positions to the appropriate levels. In this section linking positions will be treated with all its prerequisites and implications.
Prerequisites to Linking Positions to An Organisation Structure
- In the Job Profiler module, ensure that a job profile exists.
- Part of building a job profile is creating positions. Ensure that appropriate positions have been created under the job profile.
Linking a Position to An Organisation Structure
If appropriate positions exist in the Job Profiler module we can proceed with linking them to our organisation structure.
- On the organisation structure, select the level or node to which the positions will be linked.
- Keep in mind that generally positions are linked to the LOWEST LEVELS of an organisation structure.

- On the selected node, click

to open the following screen.
There are two ways in which positions can be linked to the structure:
- Search for and add the positions one by one.
- From a list of positions, mark all the positions to be added and link them all at once.
Add One Position at a Time
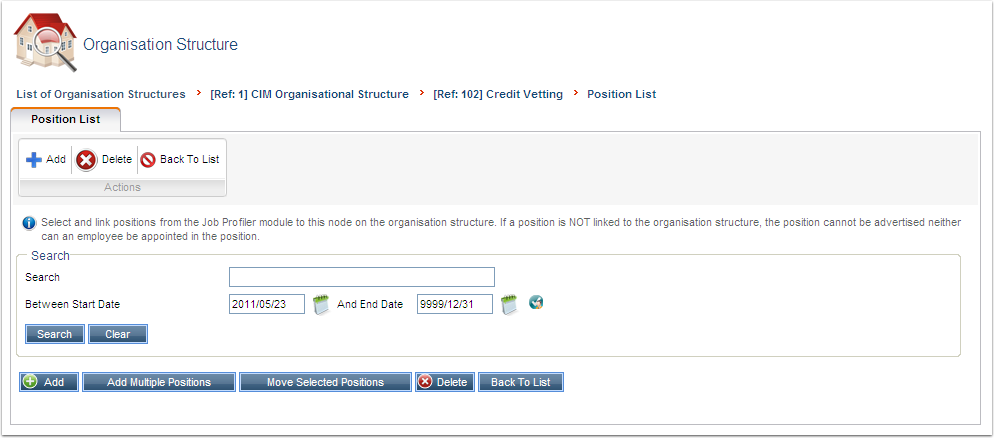
- On the Position List screen, click

to open the following screen.

Note the following on this screen:
When the screen opens, only positions NOT YET LINKED to the organisation structure are shown.
Click

to also display positions already linked to the structure. These are displayed as follows.

- Already linked positions cannot be selected.
- If a position happens to have an incumbent, the name and employee number of the person is shown as well.
- The search section makes provision for a user to search both for a position and for a position’s incumbent (because a position is more often than not identified by whom it is occupied.)
- Locate the position to be linked to the organisation and tick its radio button to select it.
- Click

to transfer the selected position to the detail page where the linking can be confirmed.
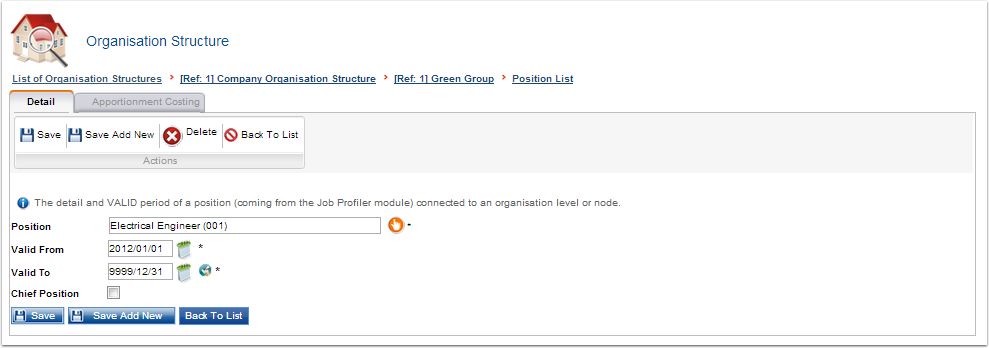
Note the meaning of the following fields:
- Valid From and Valid To – Specifies the period for which the position will be linked to the organisation. The Valid To date is usually set to 9999/12/31 to indicate that there is no end date.
- Chief Position – When a number of positions are linked to a node on the organisation structure, one of them is usually a manager’s positions. Use this field to indicate the chief’s position.
- Click

to confirm the position’s linking.
- Note that the

tab becomes available. This tab allows you to specify what percentage of the linked position’s expenses will be paid by whom.
Apportionment Costing (Optional)
- Click the

tab to open the following screen.
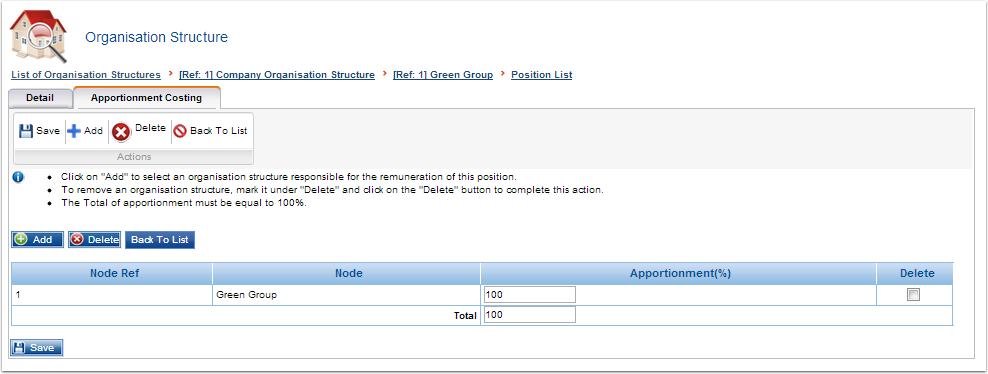
- Click

to select additional organisation structure levels.
- For each added level specify the percentage of the position’s remuneration the level will be responsible for.
- Ensure that the total apportionment for all levels equal 100%.
Linked Positions Shown on the Organisation Structure
After linking a position to the organisation structure, the structure is updated to display the number of positions linked to it on every level. The count can be seen on the screenshot below.

Add Multiple Positions
Aadd multiple positions all at once, follow these steps:
- On the Position List page, click

to open the screen below.

Tick the required positions and click

to transfer them back to the Positions List page.
- The Positions List page is updated with the new positions but the system does not stay on the Organisation Structure Detail page where the apportionment can be done.
- To reach the apportionment each position must be opened individually and their apportionment specified if required.

- Locate the desired position and click on the record to open the Organisation Structure Detail page and from there navigate to the apportionment tab.

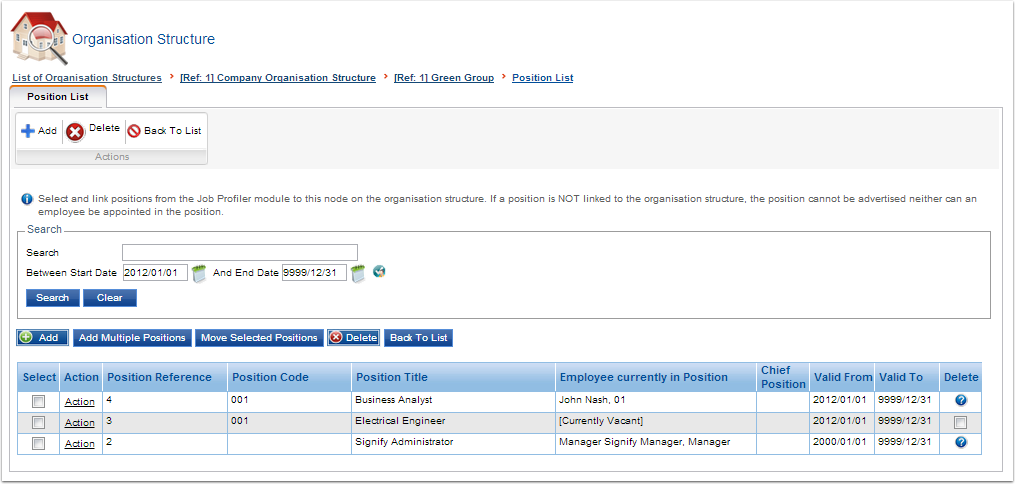
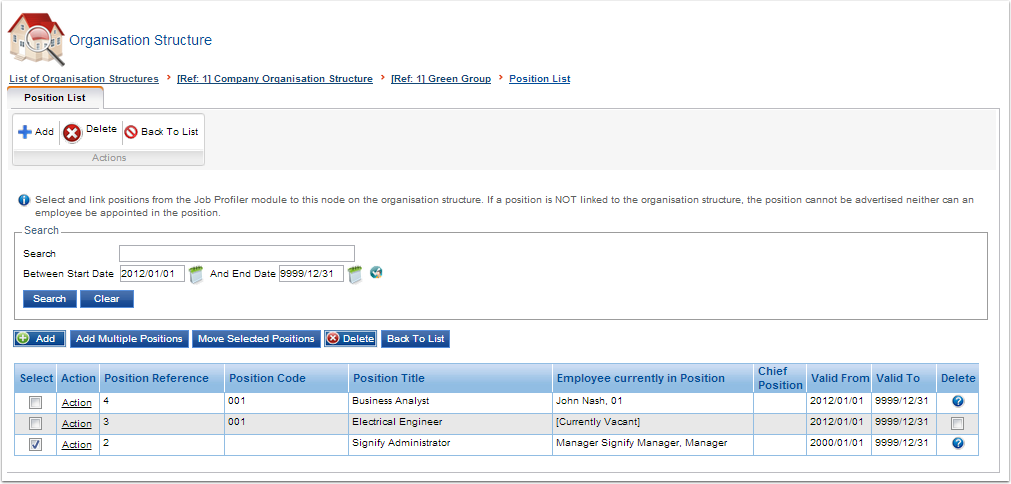
Once The Positions Have Been Linked And Employees Appointed
In the screen image below a number of positions were linked to an organisation structure node. The next logical step would be to appoint an employee into a position. This is done in the Manage Employees module and is discussed in the Manage Employees manuals.
After employees were appointed in the positions, the organisation structure’s Linked Positions screen will reflect the appointments.
If the records are investigated on this screen, the following are not always evident:
|
|
- Click

to display a history of people appointed to a position.

Moving an Employee With His Current Position To a New Location On the organisation Structure
This action’s purpose is to:
- Move an entire position with its incumbent to a new node on the organisation.
- While moving the position and person not cause a transfer record to be inserted into the person’s appointment history.
The steps to accomplish this are the following:
- Open the organisation structure and locate the node where the position(s) currently reside.

- Click

for the applicable node to open the following screen.
- Tick the positions to be moved and click

- Confirm the moving of the positions.

- On the following screen, confirm the details of the position to be moved.

- Click
to select the destination node for the position(s).

- Click

to accept the destination node.

If satisfied with your selection, click

Confirm the moving of the position

Linking Positions to An Organisation Structure Is a Prerequisite For…
- Employees can only be appointed in positions that exist and are linked to the organisation structure.
- Only positions linked to an organisation structure can be advertised.
De-Link Nodes
This functionality allows the user to delete a node if there are no child nodes or positions linked to the node.
- Select the node to be deleted as indicated below.

- On the Actions toolbar, click

- If the node has no child nodes or positions linked to it, the following message appears where you can click

if this is what you want to accomplish.

- If the node to be deleted has any child nodes linked to it, the following message is displayed, preventing the node from being deleted.

Remove all child nodes and then de-link the node from the structure.
- If the node to be deleted has any positions linked to it, the following message is displayed, preventing the node from being deleted.

- Remove all positions linked to the node and then de-link the node from the structure.
View Chart
This functionality allows the user to see a visual representation of the organisational structure.

- Select the applicable node and click

to generate the company structure.

Notes on using View Chart
- This functionality is still under development and the correctness and visual appeal can at the moment not be guaranteed.
- If it is useful but be aware that future changes are anticipated.
Move Node
Occasionally it becomes necessary to move an entire level with all its sublevels and positions to another parent level in the organisation structure. Before doing an example, note the following:
- A node/level can only be moved from one parent type to the SAME parent type. In other words if the type of the level to be moved is a company and its parent is a division, then it can only be moved to a parent on the destination structure that is also a division.
- A company’s subgroups are derived from its organisation structure. If an organisational level is moved, that level’s subgroup needs to be recreated. This is done during an automatic, offline process that runs every evening. See the box below for a manual process.
- Another implication of a level that was moved is that users who had access to the level via its accompanying subgroup will NO LONGER have access. They must explicitly be given access to the new level/subgroup. This is done via the normal user administration.
- Open the organisation structure containing the level or node to be moved.
- Note that in our example the level’s type is Department and its parent level’s type is Business Unit.

- Select the applicable node and click

to open the Node Detail screen shown below.

- Locate and click the

- The following screen opens, showing all potential parent nodes having the same type than the node’s current parent node.
- If the anticipated move is to a node that was just added to the structure, the node will probably not be part of the list since this list is dependent on the flattened organisation structure. See an earlier section for a manual procedure to flatten the organisation structure.

- Select the destination parent level and note that only destinations of the Business Unit type are shown.
- Click

to apply the move to the destination level.
- The entire level with all sub levels and positions was moved as shown below.

Implications of Moving an Organisation Structure Level
- The subgroup accompanying the moved organisation level becomes obsolete.
- Users who had access to the org level’s accompanying subgroup lose their access rights and these need to be reissued on the new subgroup once it is created for the moved level.
- Rebuilding the flat organisation structure is done after hours.
- Use the Refresh Organisation Structure action to quickly refresh the structure in cases where an updated flat organisation structure file is needed.
Activate the Current Organisation Structure
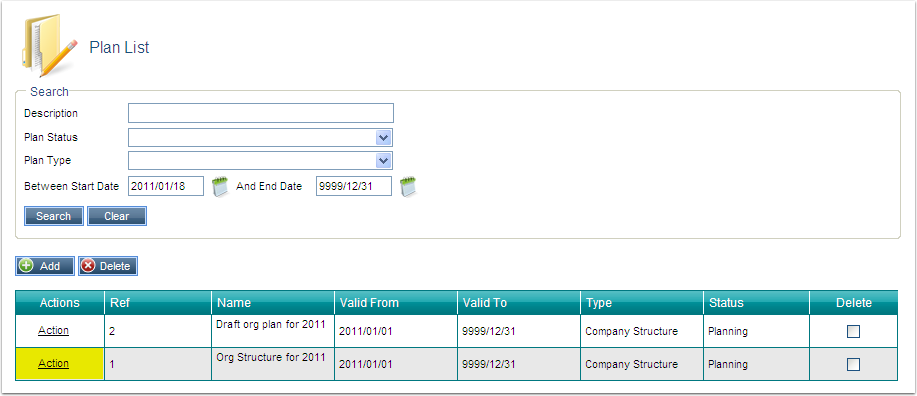
The Organisation Structure module caters for two types of organisation structures – In Planning and Active. A user can have any number of plans in the planning or active phase.
By default all new organisation structures are in the planning phase and you have to explicitly activate a plan to make it active. This section describes the steps to activate a plan.
- From the Plan List screen, select and open the plan to be activated.

- Select the Detail tab as indicated to open the plan’s Detail screen.
- Locate and click

to change the status of the plan to Active.
The Status of the plan will now be Active as indicated below:

Impact of the Organisation Structure
In this Section:
- In Job Profiler
- In Employee Self Service
Job Profiler
The following activities take place in the Job Profiler module:
- Creation of job profiles
- Creating positions that are linked to a particular profile
In the Organisation Structure module:
- Every position is linked to a level on the organisation structure.
This is then fed back to the Job Profiler module indicating exactly where on your organisation structure a position is located.


Employee Self Service
Every employee is appointed in a position and every position has to be linked to the organisation structure before an employee can be appointed in the position.
Once appointed an employee can check where in the organisation his position is located and he/she can also view the entire organisation structure.
- From the My Quick Start menu, select My Details.

- Your personal details are displayed including your position’s location in the organisation structure.
- From the screen above, click

to open a copy of the organisation structure.

Reports
A standard feature on almost all Signify reports is the ability to filter the report contents using the organisation structure. An example of this type of report criteria is shown below for a Leave module report.
- Using this parameter is optional.
- Selecting a level opens up and filters the next level and so on.

Subgroups are automatically created based on the organisation structure. These subgroups are used to filter information on reports as well as when working with employee-related information.

Organisation Structure Configuration
In this Section:
- Organisation Structure Configuration
Configuration and Administration
In this section you will be shown how to configure the Organisation Structure module before you start building a structure. This will be done in two main phases and the sample structure you developed above will be used:
- Provide a list of what your organisation structure nodes are called.
- Stipulate which child nodes can be linked to which parent nodes. In other words what the relationships between the nodes are.
Provide the Node Types

Step 1
- Click System Administration from the Administration Menu.
- Open the Organisation Structure module by selecting Modules | Organisation Structure | Administration | Organisation Structures.

Step 2

This will open the screen where the node descriptions are provided.

All the regular screen functionalities are available with which to Add, Edit or Delete records. An existing unit type is edited by clicking anywhere on the record or by clicking the View/Edit hyperlink.
Step 3
- Click Add to open a blank record as shown below.

- Provide a node’s Name and Description e.g. Company.
- Click Save or Save Add New to provide successive node descriptions. The order in which they are provided is of no importance here.
- Continue in this fashion until all your node descriptions have been entered.
Provide the Node Type Relationships

Step 4
Now it’s time to provide the relationships between the different nodes.
The screen below will open showing any existing relationships. This screen is interpreted as follows:
- The node in column Linked Node Type is linked to (or falls under) the node in the column Node Type.

Step 5
- Click Add to open a blank relationship screen as shown below.

- Select the parent node from the Node Type dropdown and then select its child node from the Linked Node Type dropdown.
- Click Save or Save Add New to add consecutive relationships.