Chapter 2: Using the product
- How to Make it a Success
- The Performance Management Dashboard - For employees
- The Performance Management Dashboard - Open an existing contract
- The Performance Management Dashboard - Create a new contract
- The Performance Management Dashboard - Functionalities and layout
- The Performance Management Dashboard - For Managers
- The Performance Agreement - Overview
- The Performance Agreement - Set Your Objectives PART 1
- The Performance Agreement - Set Your Objectives PART 2
- The Performance Agreement - Check-ins
How to Make it a Success
Process: Step 1

Lesson duration
About 5 minutes

What you will learn:
-
How and what to communicate to your employees and other stakeholders during the Performance Management process.

Communication and Change Management
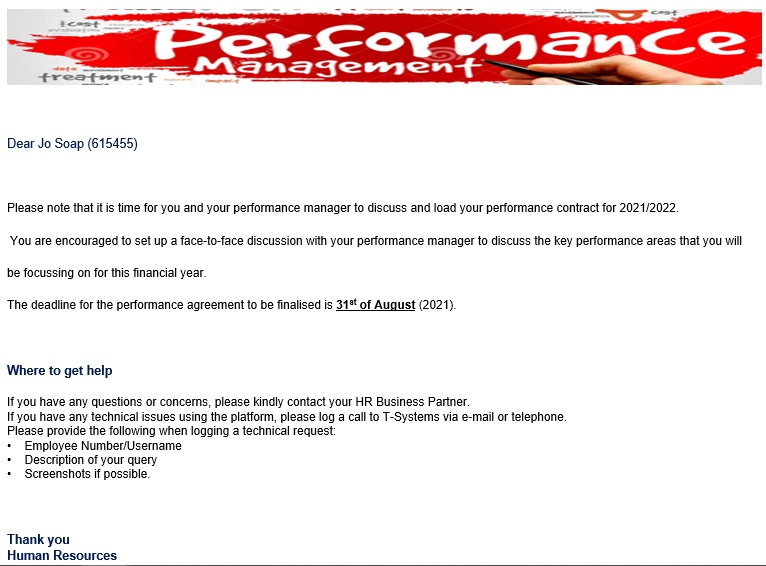
Managing expectations (and sometimes even fears) is crucial when embarking on a Performance Management process. More so if a new system is part of the package. Therefore, we recommend the following types of communication when you get to this point in the process. The system has a general email that can be configured and scheduled to go out to all involved in the performance management project. See below for a typical example.
Send System Notifications
Other useful information to communicate to users includes:
What do the deadlines mean e.g. "The Performance Contract must be loaded, submitted, and approved by the manager by 31st August"?
How many KPAs should there be on a typical Performance Contract?
Is there a guideline for how many KPIs there should be under a KPA?
Should the users make use of standard (e.g., industry-specific) KPAs and KPIs, or can they compose their own?
Will the company be populating the KPA and KPI libraries with examples?
Can the employees build their own contracts, and only afterwards discuss them with their managers? Or should there be a joint discussion before the contract is created?
Can the employee and manager make use of contract templates in the library? Are there any templates in the library?
Conduct Short Training Sessions
Sometimes users get stuck on some tiny detail which they are unsure off. Arrange online training sessions, which people can attend at will, and there deal with short, impactful topics which are relevant at this stage of the process. These topics are usually supplementary to the standard training material or emphasise their importance. Examples of training sessions are:
- Copying a user's contract to another user (for managers).
- Constructing a good KPA and KPI.
- Changing the section weight of an agreement.
- Attaching documents.
- Understanding my Performance Dashboard.
- Balancing the weights of perspectives, KPAs and KPIs.
- Submitting my objectives to my manager.
- Reopening my (previously submitted) contract (if I need to make changes).
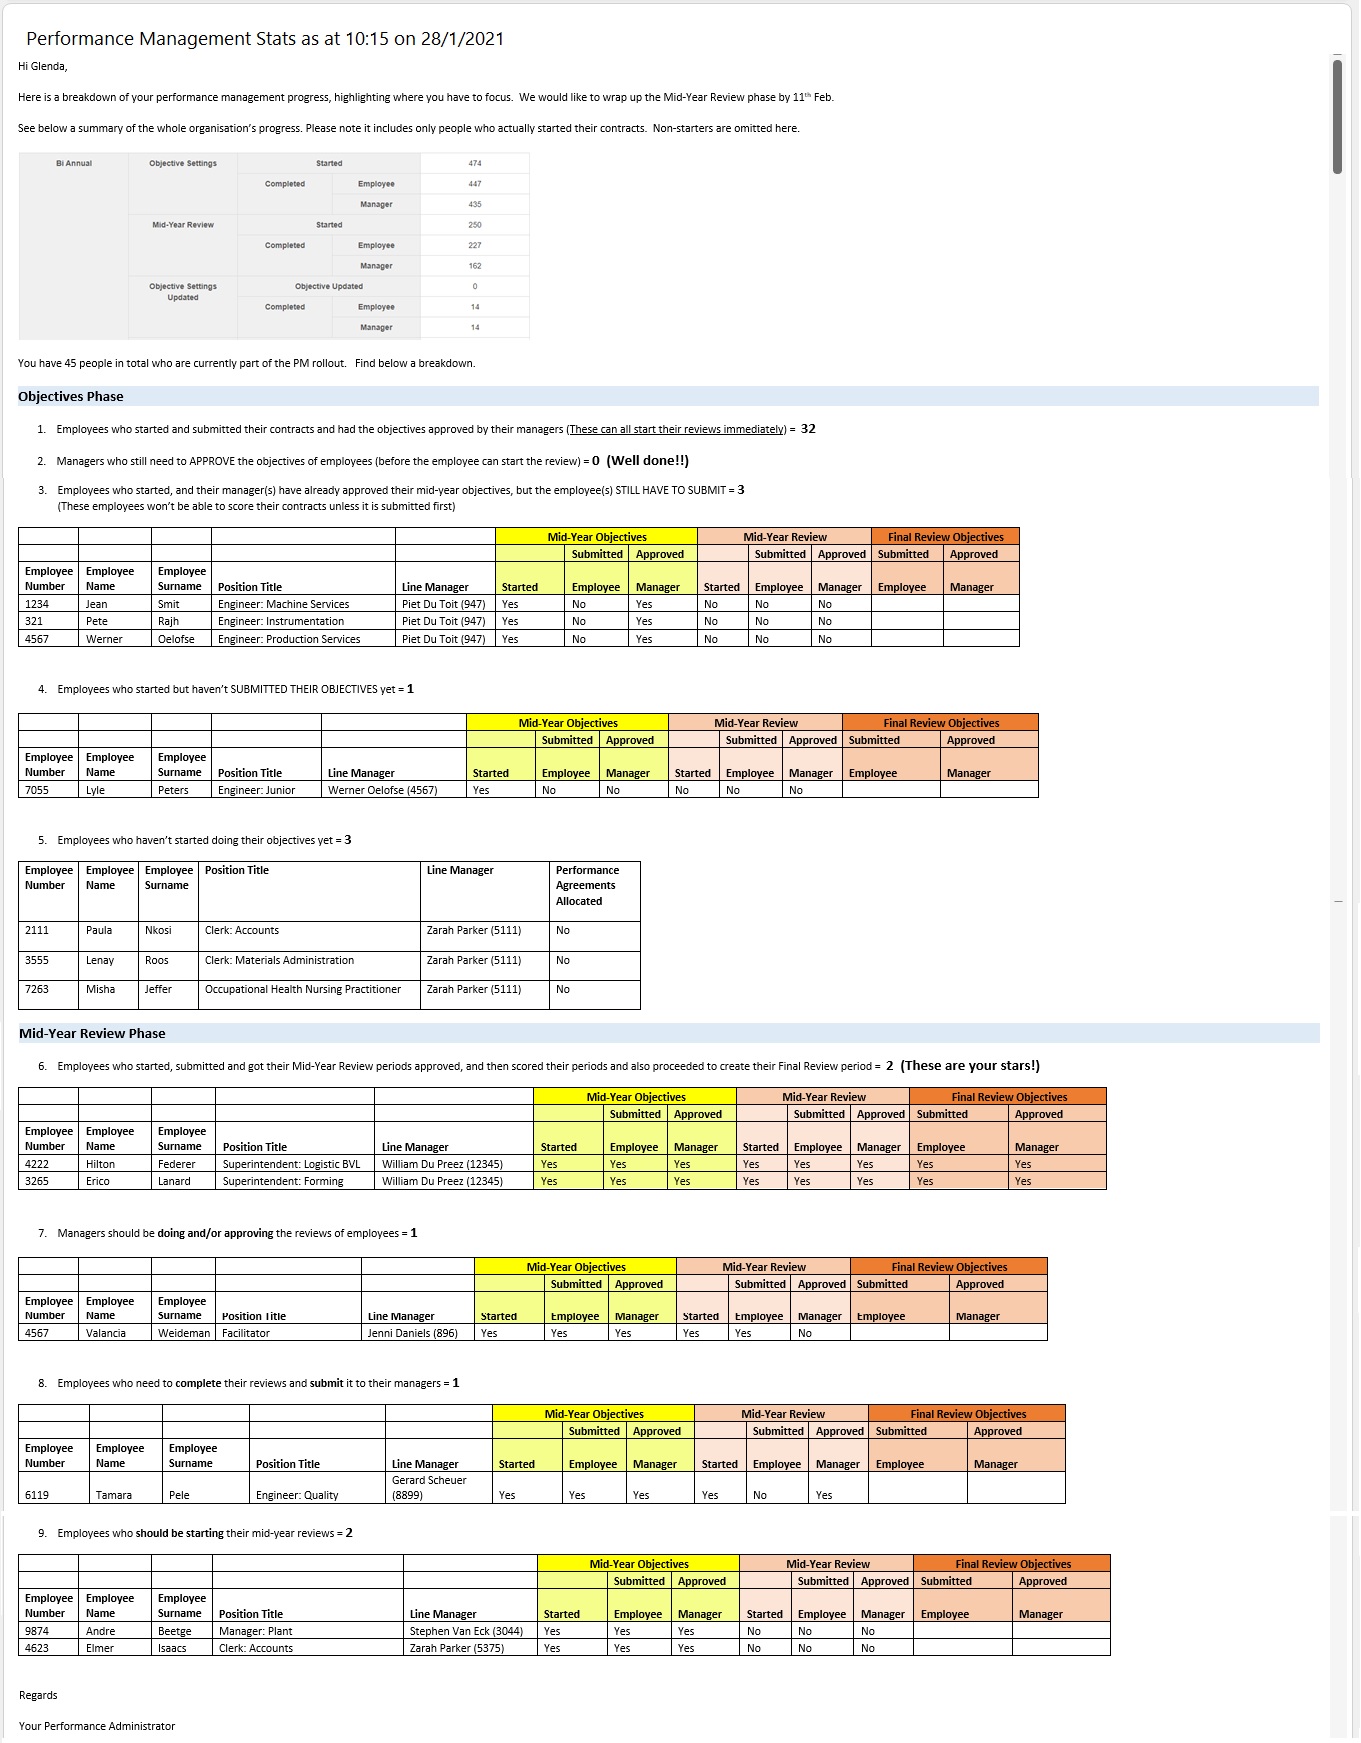
Share Process Statistics
Besides the relevant upfront communication and guidelines, once the process has started, be sure to keep the momentum by encouraging employees and managers with little bits of information, and more guidance as to what is expected from them.
Use the system reports to extract process statistics and use these to create momentum. See below for an example. This can be sent every week during the peak periods of the process - usually when approaching a deadline.
Remember, your users do not engage with the system daily and people forget a system after a month or two of inactivity. Use every opportunity to push training and guidelines and encouragement to them.
Recommended further reading
- Glossary of terminology and definitions
- How to Use Performance Management with Success
- The Employee's Performance Management Dashboard
- Open an Existing Contract
- Create a New Contract
- Functionalities and Layout of the Performance Management Dashboard
- The Manager's Performance Management Dashboard
- Overview of The Performance Agreement Screen
- Set your objectives - Part 1 (Working with KPAs and KPIs)
- Set your objectives - Part 2 (Working with the other sections)
- Perform a Check-in
- Rate your objectives

The Performance Management Dashboard - For employees
Process: Step 1
Lesson duration
About 5 minutes
What you will learn:
-
Summary of main process steps supported by the Performance Management Dashboard for Employees.
-
Other actions available on the Performance Management Dashboard for Employees.
The Performance Management Dashboard for Employees
Every employee, forming part of the Performance Management process, gets access to their own Performance Management Dashboard. This dashboard is a high-level summary of an employee's Performance Contracts. Normally, an employee can have one performance contract for any given performance cycle.
There are however differences between what an employee can do from his/her dashboard, and what managers can do from theirs. The manager's dashboard is discussed in the following pages.

Employee's Performance Management Dashboard Manager's Performance Management Dashboard
Employees can perform the following tasks from the Performance Management Dashboard:
- View and/or open existing and previous performance contracts.
- Create a new contract.
- Determine the progress and next step of a performance contract phase.
- Load objectives into a Performance Agreement.
- Submit the agreement objectives for approval to a performance manager.
- Consider check-in inputs from a performance manager.
- Rate an agreement's objectives.
On top of these primary functions, the dashboard also enables a user to do the following:
- View and download documents on a contract.
- Print a copy of a contract.
- Verify if a review period is included or excluded from the overall contract score calculation.
- Determine if a subsequent phase is open or still locked.
- Determine if a contract is locked for editing e.g., if a manager forgot to unlock it when exiting.
- View the relative percentage weights of contract components.
- View the manager's feedback given during a check-in and reply as needed.
These are discussed in more detail in the following pages.
Recommended further reading
- Glossary of terminology and definitions
- How to Use Performance Management with Success
- The Employee's Performance Management Dashboard
- Open an Existing Contract
- Create a New Contract
- Functionalities and Layout of the Performance Management Dashboard
- The Manager's Performance Management Dashboard
- Overview of The Performance Agreement Screen
- Set your objectives - Part 1 (Working with KPAs and KPIs)
- Set your objectives - Part 2 (Working with the other sections)
- Perform a Check-in
- Rate your objectives

The Performance Management Dashboard - Open an existing contract
Process: Step 1
Lesson duration
About 5 minutes
What you will learn:
-
What is on the employee's Performance Management Dashboard.
-
Open an existing Performance Contract.
Open an Existing Performance Contract
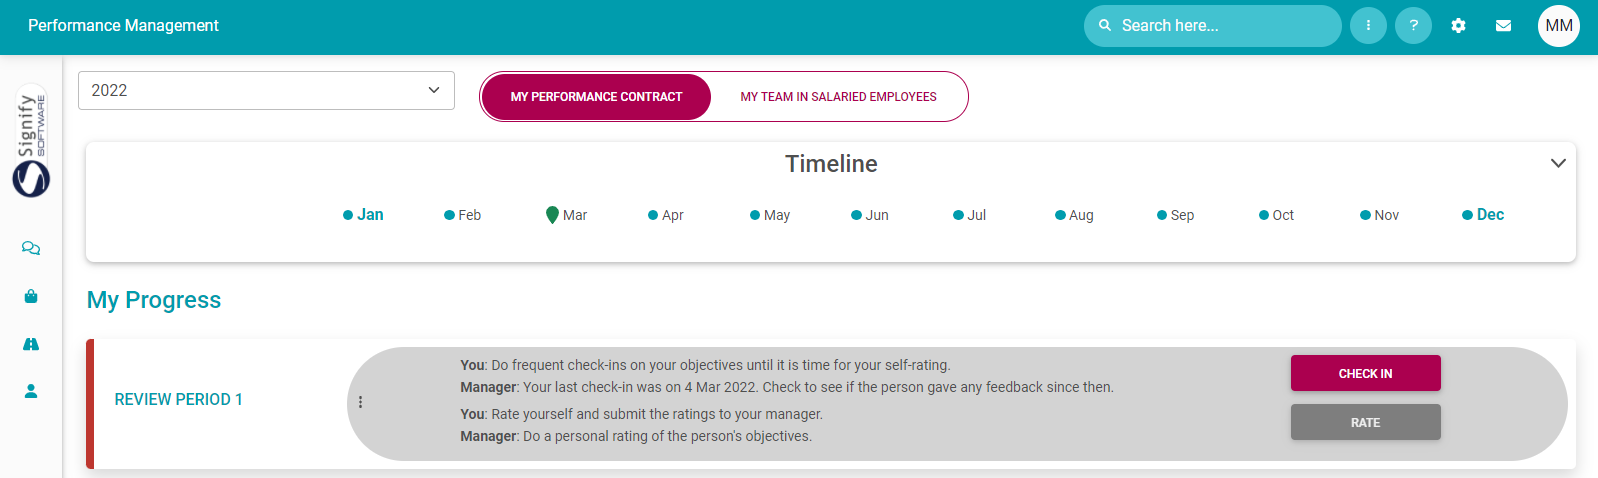
What the performance dashboard tells us...
- The performance cycle the employee is busy with e.g., 2022.
- The employee's Performance Contract is displayed. As an added option, the dashboard could indicate whether the employee is a manager, managing a team of people, each having their own contract.
- The general timelines for each period and phase of the performance year.
- Your progress in the performance process e.g., Review Period 1.
- The suggested next step for the user, e.g., 'Complete the objective setting'.
- The amount of time you have left to complete the current phase.
- Whether you still have to START the contracting process (meaning you don't have a contract at the moment), or can just CONTINUE its population (if you did manage to start the contracting), or have arrived at the CHECK-IN and RATE-ing phases already.
- The components (and their relative importance or weights) of the contract e.g., the Performance Agreement (90%) and a value survey (10%).
- The final overall score, including all review periods and additional components e.g., a Value Survey.

If an employee has an existing contract for the current performance cycle

the CONTINUE button if you want to open the agreement and continue setting your objectives. The screen opens in the first review period, and you are supposed to finish listing performance objectives before submitting the agreement.
the CHECK-IN button if your agreement was already submitted and approved and you would like to start checking in on your objectives. (See the following section for more information)
the RATE button if your agreement was already submitted and approved and you have moved into the rating phase of the review period. (See the following section for more information)
the VIEW button if your agreement was fully scored, submitted, and approved by your manager and is now only available for viewing.![]()
When you exit the assessment period (using the BACK TO DASHBOARD button), you will return to the Performance Dashboard.
Recommended further reading
- Glossary of terminology and definitions
- How to Use Performance Management with Success
- The Employee's Performance Management Dashboard
- Open an Existing Contract
- Create a New Contract
- Functionalities and Layout of the Performance Management Dashboard
- The Manager's Performance Management Dashboard
- Overview of The Performance Agreement Screen
- Set your objectives - Part 1 (Working with KPAs and KPIs)
- Set your objectives - Part 2 (Working with the other sections)
- Perform a Check-in
- Rate your objectives

The Performance Management Dashboard - Create a new contract
Process: Step 1
Lesson duration
About 20 minutes
What you will learn:
-
Creating a new performance contract by copying a previous contract.
-
Creating a new performance contract by using a contract template.
-
Creating a new Performance Contract by copying a contract from another employee. (Manager's function only).
-
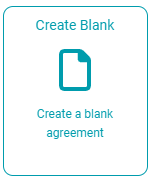
Creating a new performance contract by starting on a blank page.
Create a New Performance Contract
If an employee doesn't have an existing contract for the current performance cycle:

- Click the START button to initiate a wizard which will take you through the steps needed to create a Performance Contract.
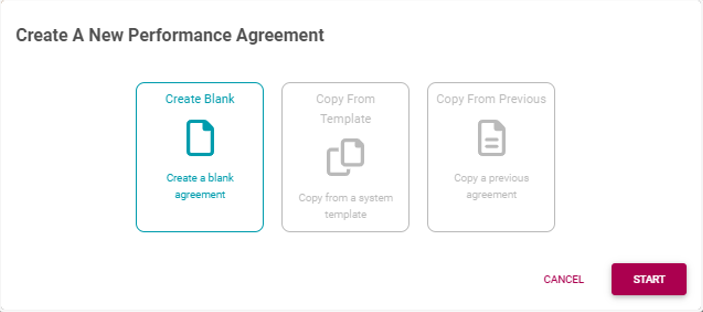
-
Create Blank - which means the user will have to type, or select every objective required.
-
Copy From Template - which means start your contract from a template example and then customise it as needed.
-
Copy From Previous - which means reusing, or starting with last year's performance contract.
-
Copy an agreement of one of my employees - only available to a manager, should he/she want to copy contracts between employees.
Decide which option suits you best and then follow the guidelines for each below. We discuss them in order of convenience.
Can I copy one of my historical contracts to start from?
If you have a previous contract which is still relevant, given your current role, choose the tile Copy From Previous, and then select the contract to copy from. All the agreement's contents will be copied to your new performance cycle's contract, except for the approval statuses, ratings, and comments. Then, continue editing and/or adding objectives as needed.
- Select the tile Copy From Previous.
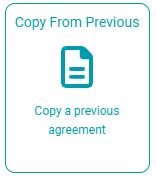
A list of all previous agreement review periods is presented. Note you can, for instance, select a Performance Agreement's first or second (or third or fourth - if applicable) review periods.
- Click the chosen review period and click CREATE to create your contract.
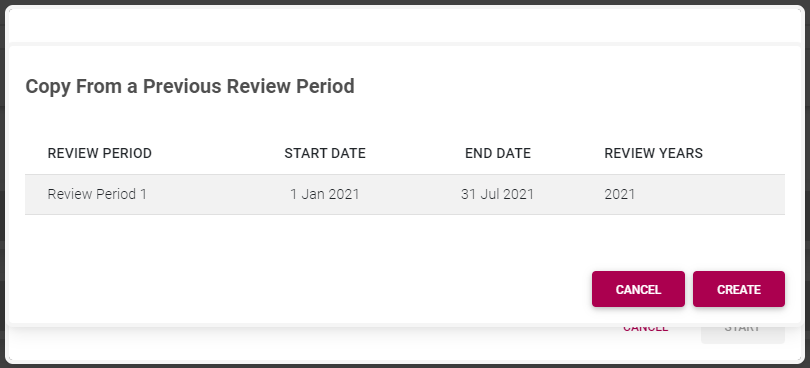
Notice that by copying from a previous period you have...
... created the contract
... created the agreement's review period(s)
... populated all the agreement sections with the same content as in the original agreement.
Adding and amending objectives is discussed in another section.
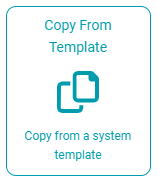
- Click the tile Copy From Template.
- Search for the required template from the library.
- Use the PREVIEW button if you are unsure about the contents of a template.
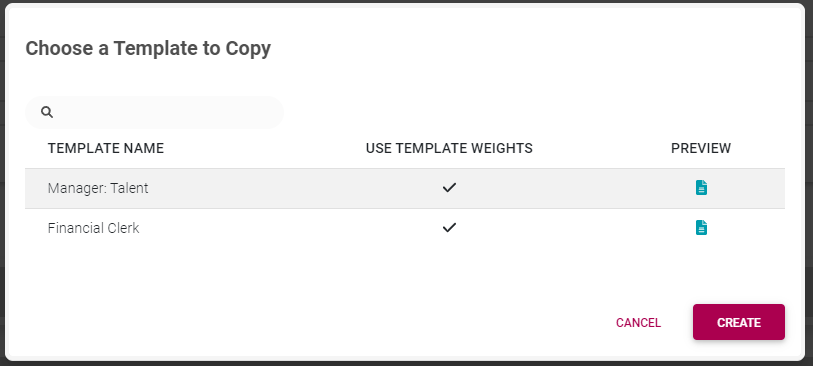
- Click on the chosen template name.
- Click CREATE to create the new agreement and to open it in the first review period.
TICK ON: You will start with the template's section weights when creating a new agreement.
TICK OFF: You will start with the default company performance management section weights when creating a new agreement, i.e., override the template section weights.
Notice that by copying from an agreement template you have...
... created the contract
... created the agreement's review period(s)
... populated all the agreement sections with the same content as in the template agreement.
Does another employee's agreement closely fit my current role?

- Click the tile Copy Another's.
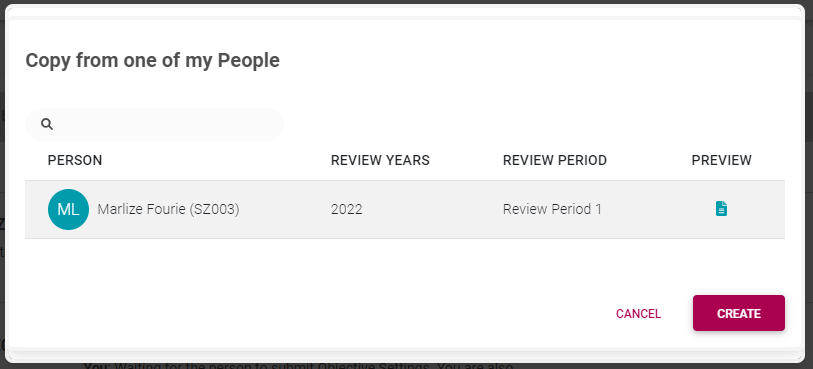
- Search for the applicable employee, and review period.
- Click the record's PREVIEW icon to make sure this is the correct agreement.
- Click on the chosen item and then click CREATE.
The new agreement is created and is opened in the first review period.
Notice that by copying from another employee's agreement, your manager has...
... created the contract
... created the agreement's review period(s)
... populated all the agreement sections with the same objectives as in the source agreement.
If you don't have any previous contracts, there are no matching templates in the library, and your work is unlike any of your colleagues', then choose this tile to create a blank agreement for you. You will have the opportunity to create a new Performance Agreement from scratch in cooperation with your manager.
To create a new blank agreement for the selected performance year:
- Choose the Create Blank tile,
- then click START to create your contract.
What can I expect to see once I have created a contract for a new performance cycle?
Whatever you choose from the above options, the system might ask a question or two to identify the most appropriate template or historical contract. But, once that has been settled, the contract is either copied or created and the following will happen.
The new contract is created (including its one, two, three or perhaps four assessment periods).
The screen opens in the first review period.
If a template or historical contract was selected as a source, its contents will reflect in the first assessment period.
When you exit the assessment period (using the BACK TO DASHBOARD button), you will return to the Performance Dashboard and see the contract stages and phases reflected there.
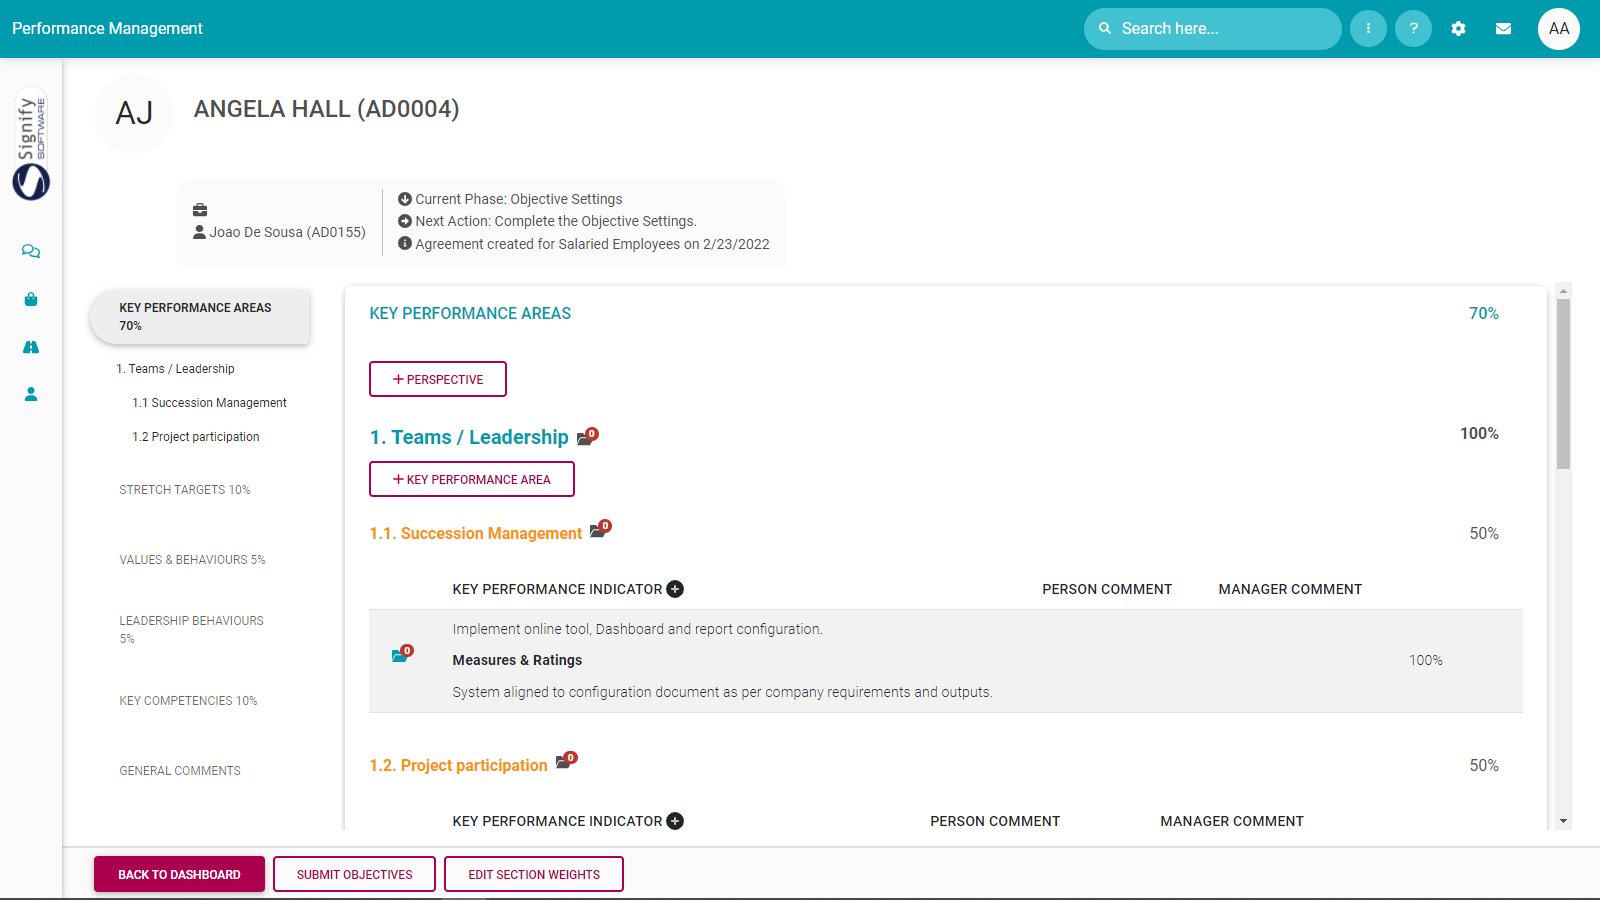
See below for a typical Performance Agreement. Depending on your choices above there may be some objectives loaded.
The details of the screen are discussed on another page.
Recommended further reading:
- Glossary of terminology and definitions
- How to Use Performance Management with Success
- The Employee's Performance Management Dashboard
- Open an Existing Contract
- Create a New Contract
- Functionalities and Layout of the Performance Management Dashboard
- The Manager's Performance Management Dashboard
- Overview of The Performance Agreement Screen
- Set your objectives - Part 1 (Working with KPAs and KPIs)
- Set your objectives - Part 2 (Working with the other sections)
- Perform a Check-in
- Rate your objectives

The Performance Management Dashboard - Functionalities and layout
Process: Step 1
Lesson duration
About 15 minutes
What you will learn:
-
How to switch between the employee's Performance Management Dashboard, and that of the manager.
-
Understand performance periods and phases.
-
How to read your contract's progress, and what your next step would be.
-
How to 'delete' a contract's review period.
-
How to print a contract.
-
Understand the locking of periods and phases.
Additional Functionalities on the Performance Management Dashboard
In previous pages, we discussed some of the functionalities available to employees and managers, but we focused specifically on creating a new Performance Contract.
On this page, we will highlight a few additional functionalities and the general layout of the dashboard screen. In our discussion, we will refer to the screen and pointers below.

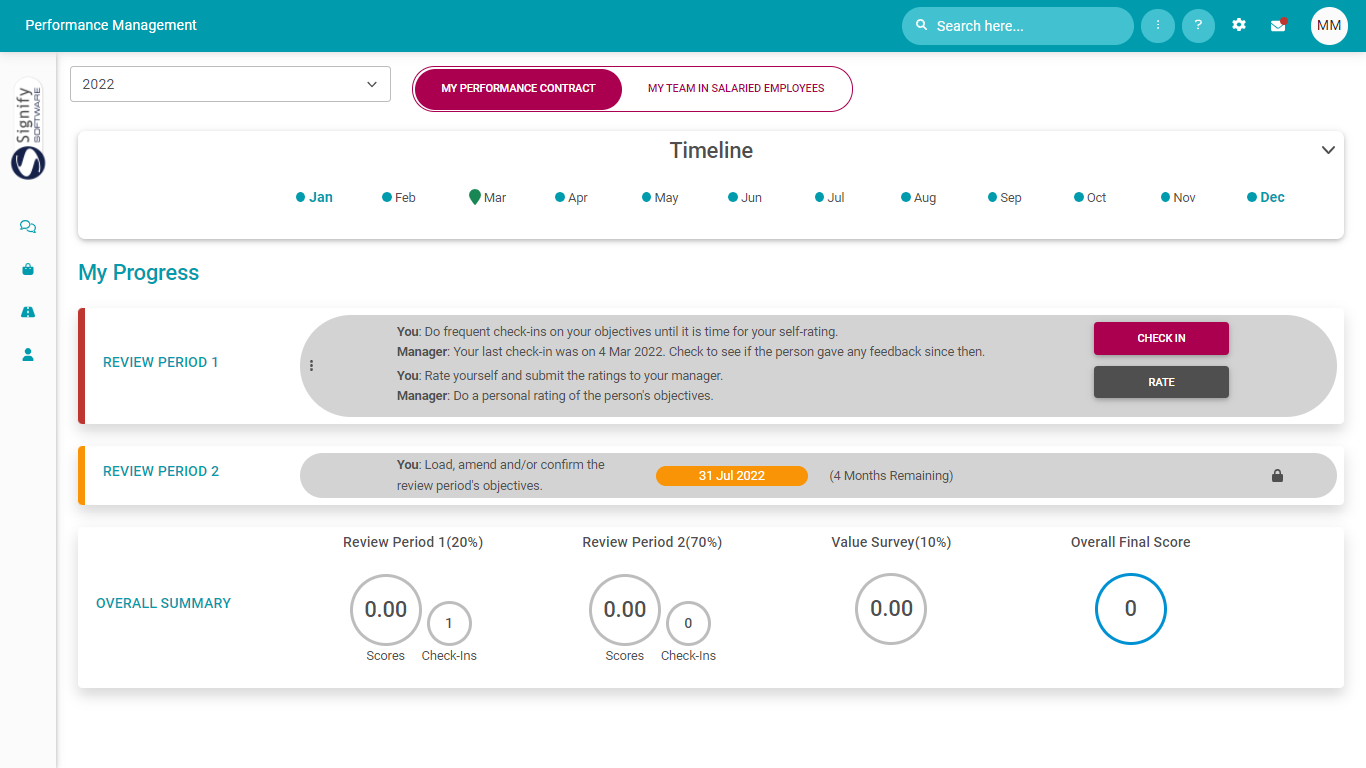
#1. Performance years
At the top of the Performance Management Dashboard you will find a dropdown with the existing and previous performance years. The default value is the current performance year. Page back to historical contracts by choosing the applicable performance year.

#2. My contract / My team's contracts
The toggle button is used to easily switch between your Performance Contract, and those of your team - should you be managing a group of people.

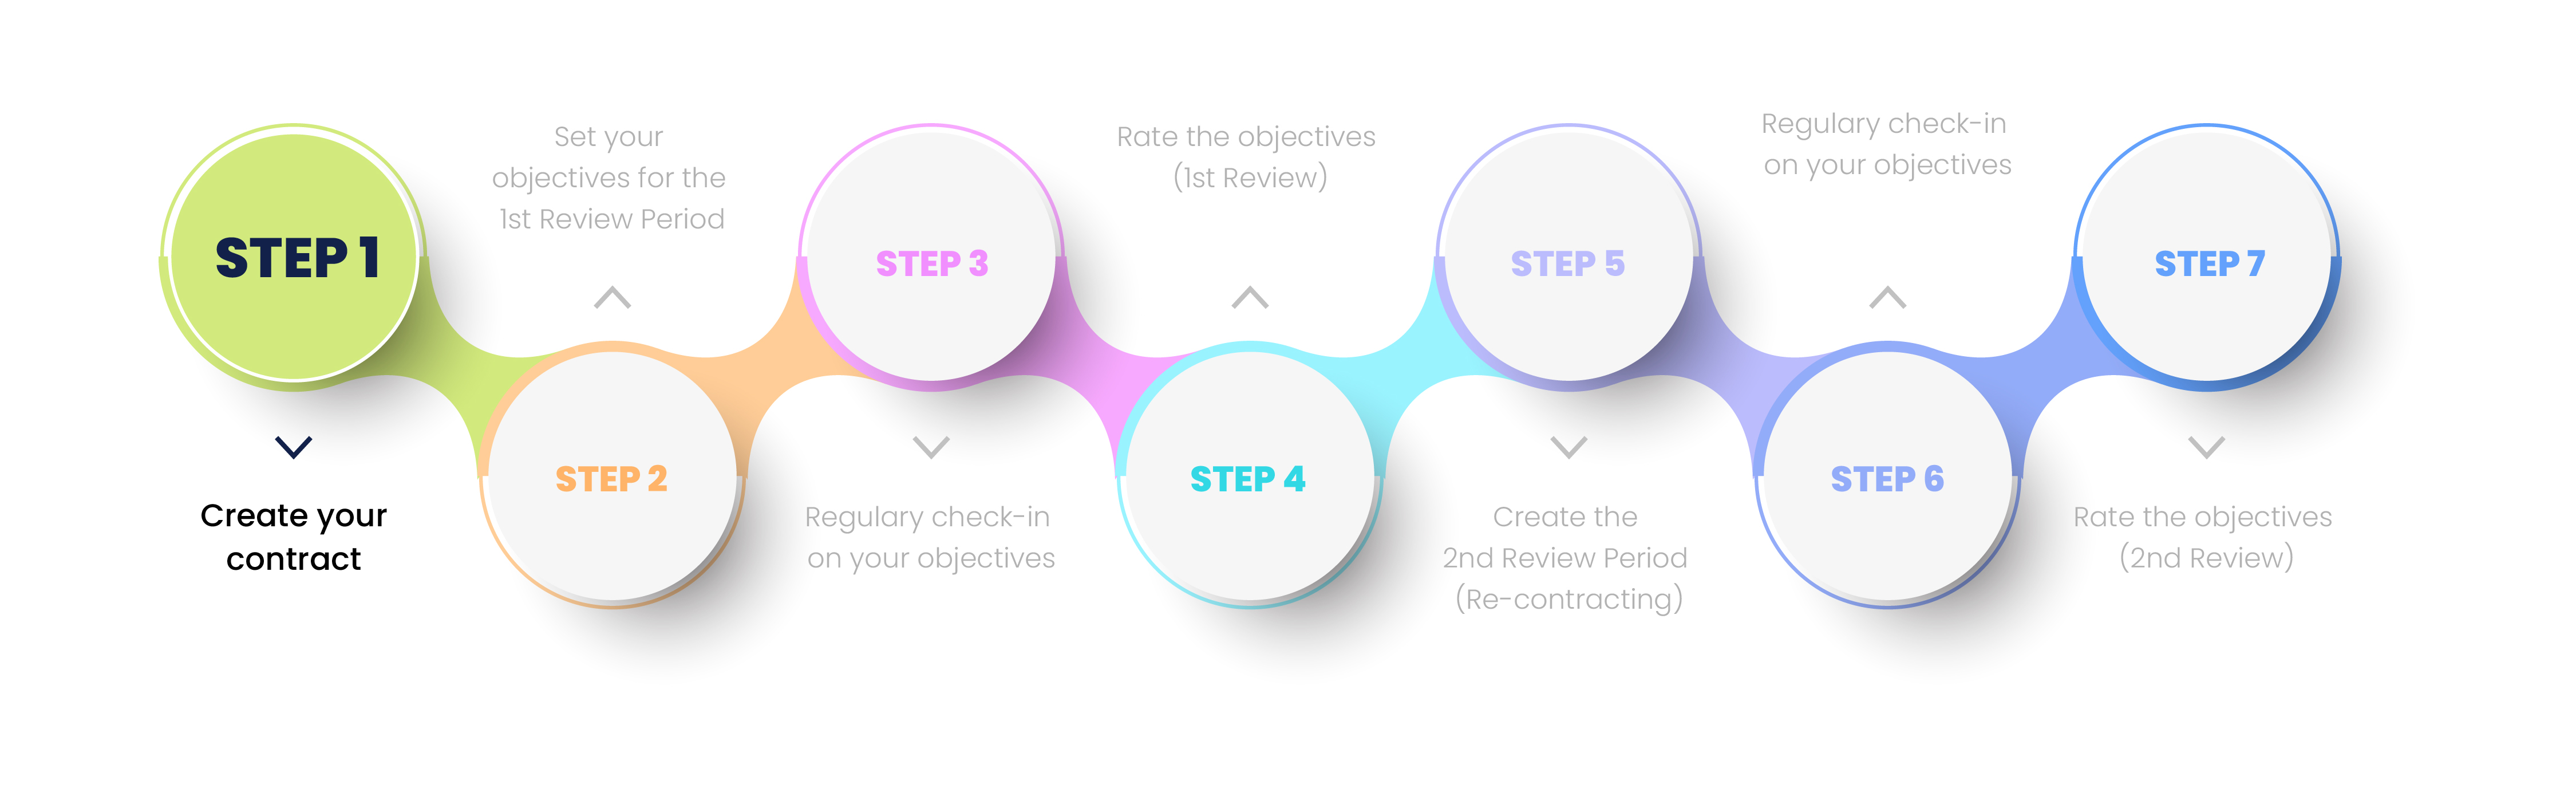
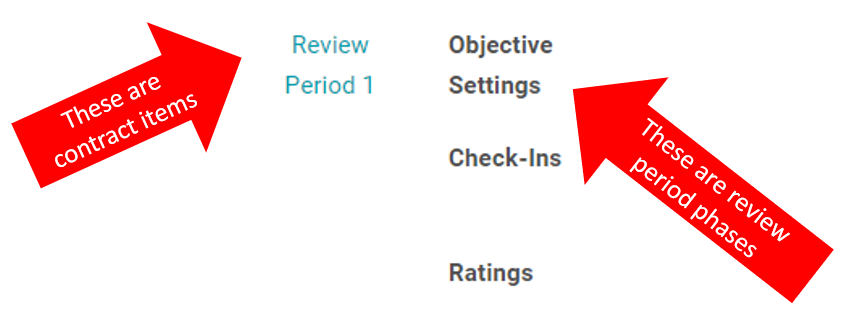
#3. The periods and phases in my contract
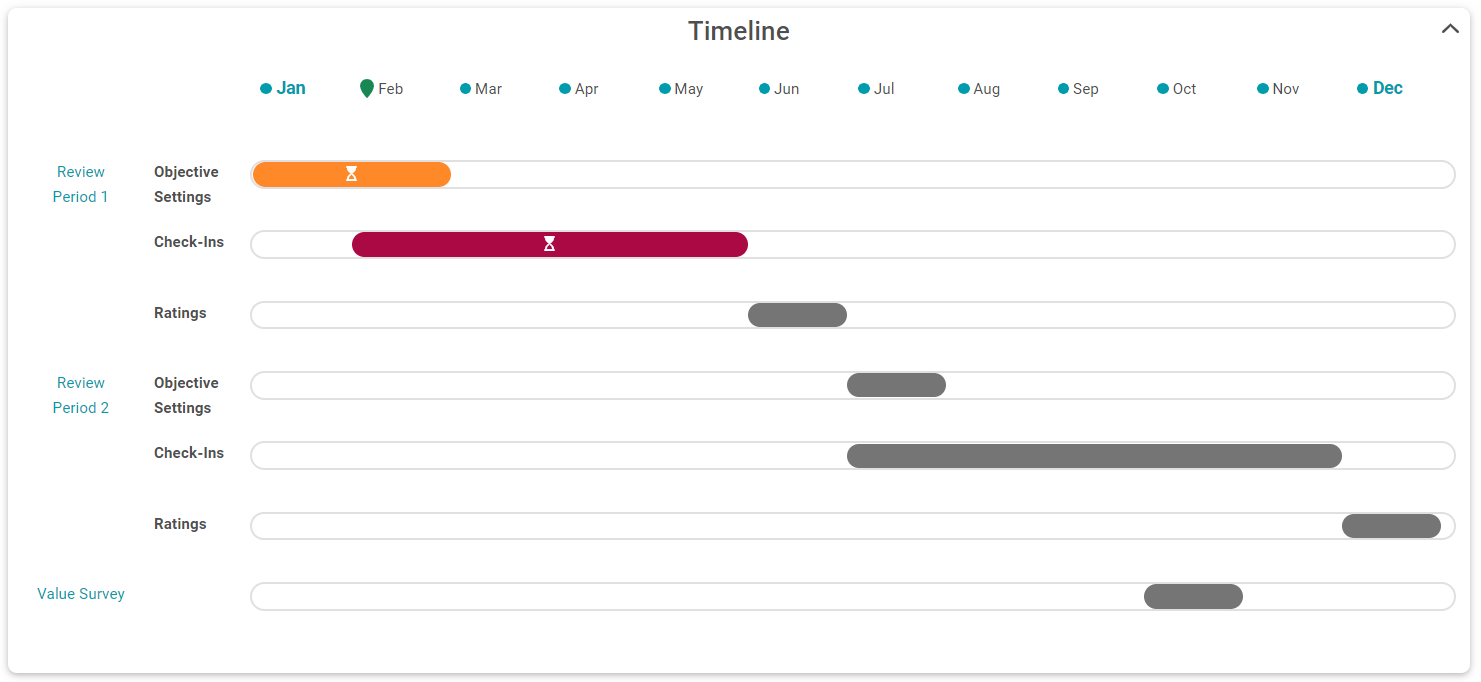
A contract is made up of contract items of which at least one is a review period (containing your performance objectives), and an optional component e.g., a Value Survey.
Each review period comprises two phases: during the Objective Setting phase your agreement objectives are determined, and during the Rating phase the objectives are evaluated and scored or rated.
Optionally you may have access to a Check-in phase which allows the employee and manager to do ad-hoc check-ins (informal evaluations) of the employee's progress in reaching the employee's objectives.
Furthermore, each review period and its phases are time-bound, as indicated by the timeline. Some may be available for access, some may still be locked, as indicated by their grey colour.
If an employee's contract contains more than one review period, the same phases will repeat for each review period.
The optional contract item, called Value Survey above, has only one phase.

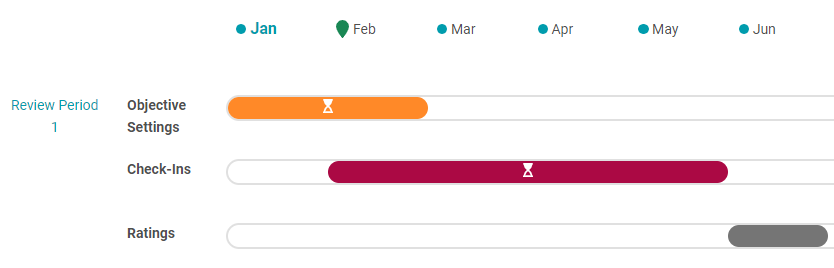
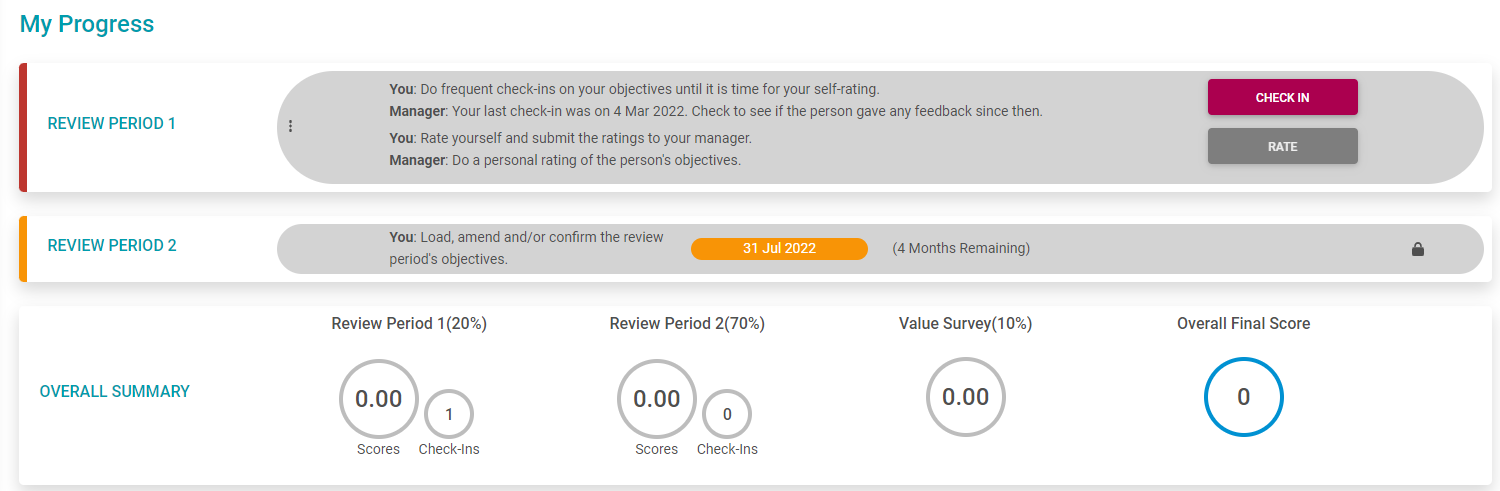
#4. My progress in the review periods
Together, the review periods in your performance contract form your Performance Agreement i.e., the agreement or consensus between you and your manager about your objectives for the year ahead.
Each review period goes through two formal stages (objective setting, and rating) with an optional check-in functionality or phase supporting them. A review period's status or progress must be read with the official timelines in mind. Hover on a review period's progress and date range bar to get the specific dates for a phase.

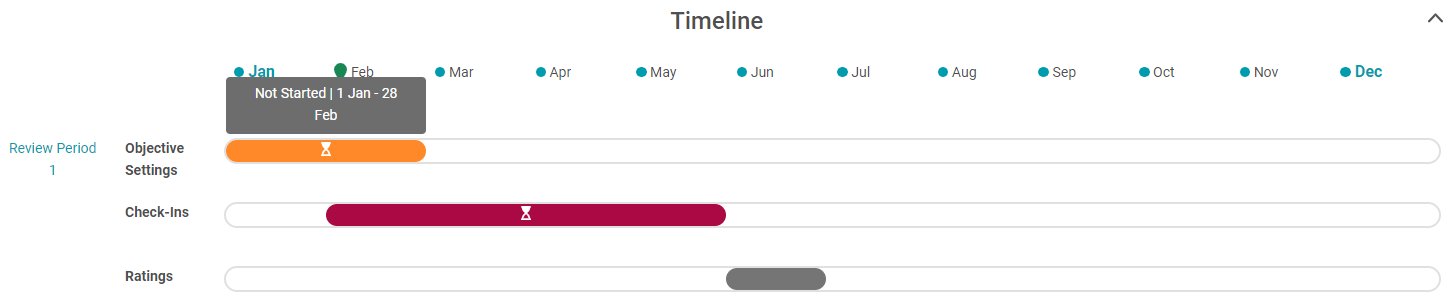
On the images above, note the following:
The instructions about your next step in a phase. Here are a few instructions from the perspective of an employee.
Load, amend and/or confirm the review period's objectives.
Finish setting your objectives and submit them to your manager.
Do frequent check-ins on your objectives until it is time for your self-rating.
Do your self-rating and submit it to your manager.
The countdown to a deadline. As you can see from the Timelines, each phase has a date range. Usually, a review period's phase is only open for changes while you are within the phase date range. Before and after the date range, a phase might be locked.

The action(s) that corresponds with the suggested next step. Here are some of the action buttons you can expect to see.
| BUTTON | YOUR ACTION |
 |
Click to create your Performance Contract. |
| Click to open your agreement's review period and then either add or amend your objectives and/or submit the objectives to your manager. | |
|
|
Click to open the Check-in functionality where you and your manager can evaluate your progress against your set objectives. A check-in is a more informal evaluation of objectives to give guidance before the formal review is done. |
|
|
Click to open your review period and do a self-rating of your performance against each objective. Your self-ratings will become visible to your manager only once you submit the agreement. |
|
|
The review period was finalised and closed out. Click to view your manager's personal ratings as well as the final agreement ratings. |


#5. Further actions available during a review period
Besides the usual activities during a review period, you also have access to all documents uploaded against KPIs and other objectives in the review period, and to print a copy of your review period.
- Hover over or click the More icon (also called Action Plan) to reveal any further options you may have.
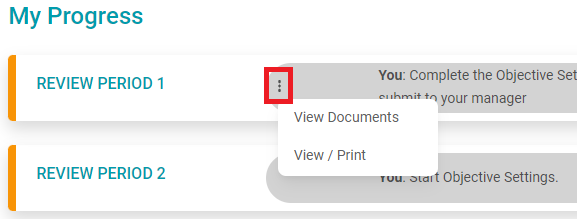
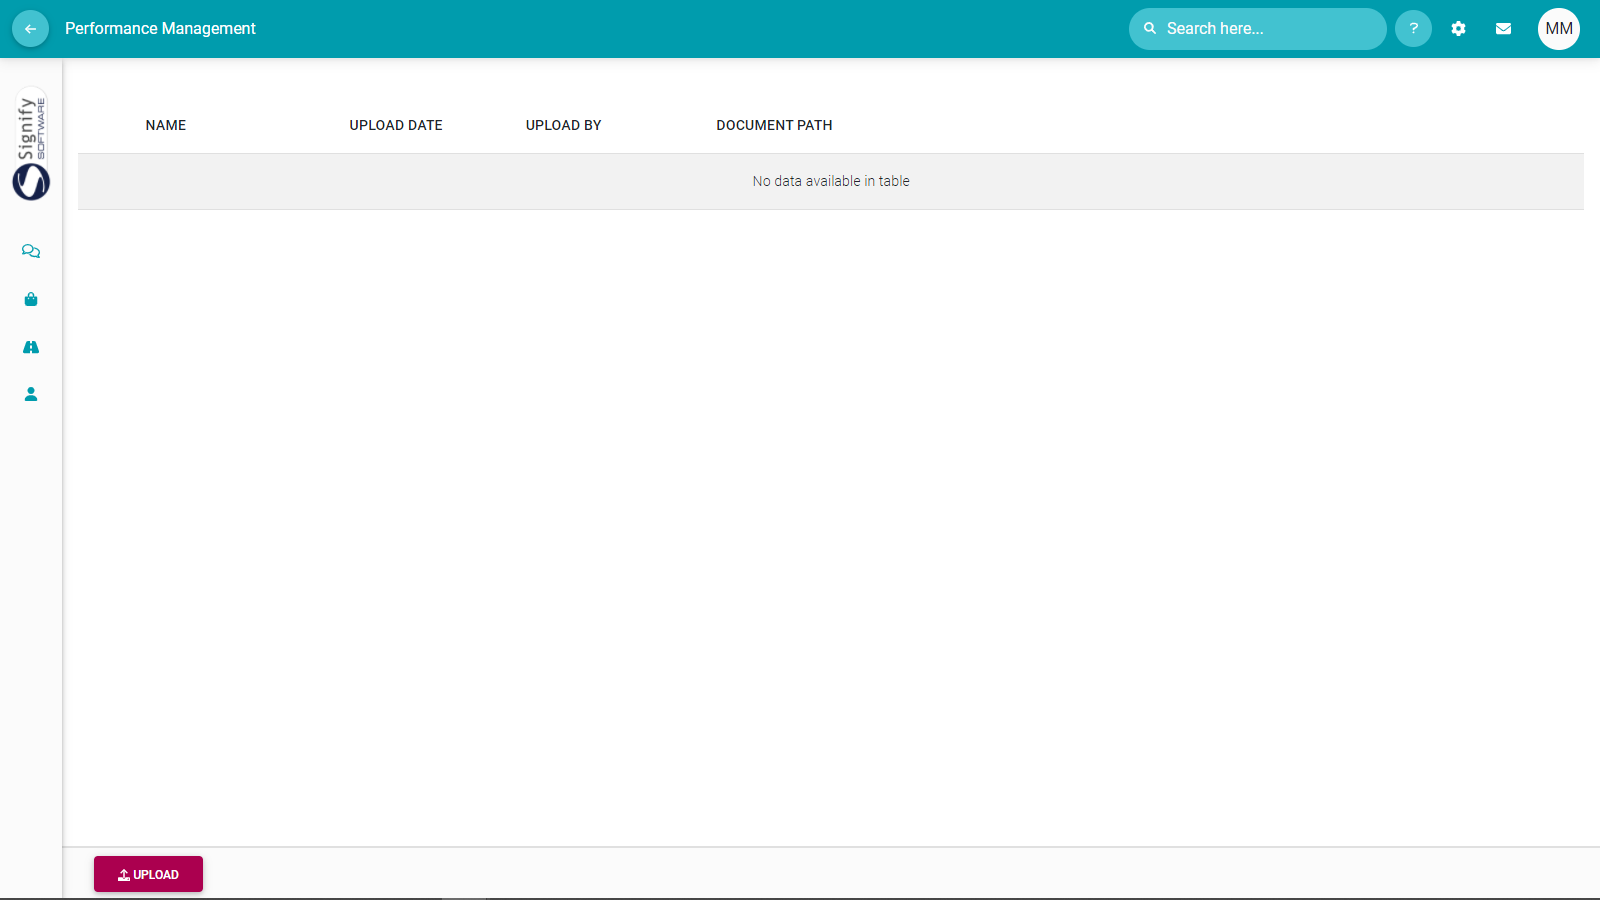
View Documents:
All documents uploaded during the contracting period can be found here. They are available for viewing or downloading.
- Click View Documents from the review period's More (Action Plan) icon options.

View / Print:
Printing a document is standard functionality. Due to the potential size of a Performance Agreement, note the following trick to contain the size of what is going to be printed.
- Click View / Print from the review period's More icon options.
- While in print preview mode, locate and click the collapse icon to the far right of the section(s) whose content you'd like to hide when printing. For effect, we have collapsed all sections' content, retaining only the section title, percentage weight and scores - if any, and the General Comments section. See the example below.

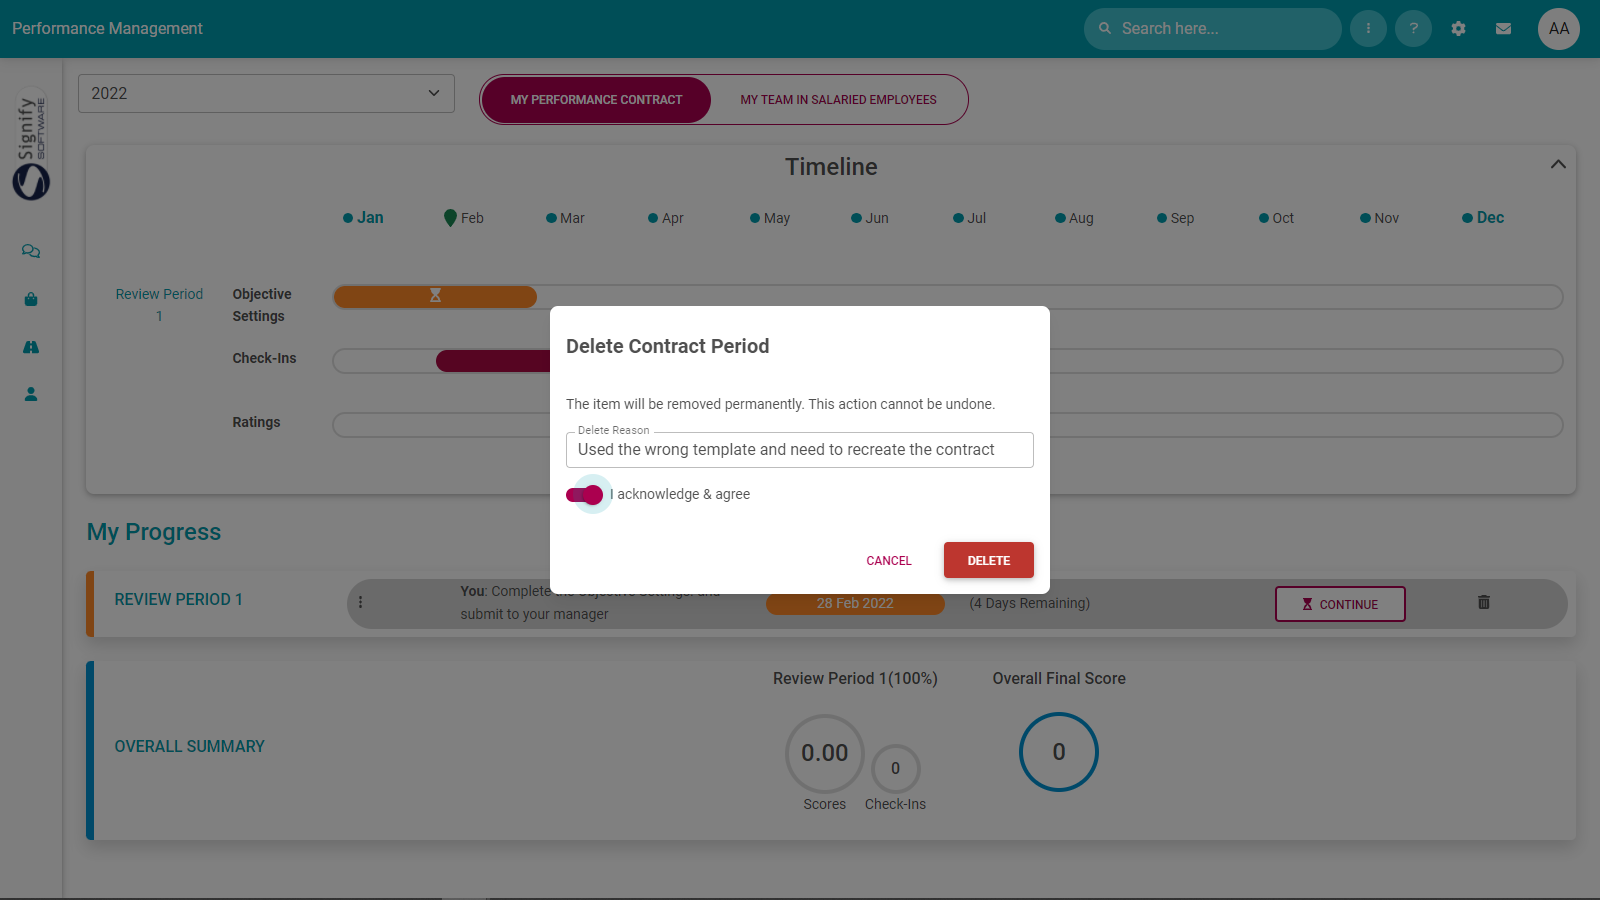
Delete Objectives:
Your Performance Contract's number of review periods is fixed. Therefore, clicking the DELETE button below does not delete the review period; it clears out all objectives you may have loaded into any section of your agreement.

- Once clicked, follow the on-screen instructions to delete the objectives.
- Note that a review period can only be deleted if it has not yet been approved.
#6. If something seems locked

If you find a lock symbol or icon in a review period, it means your manager or employee is busy working on the review period, either loading objectives or scoring the objectives. Only one person is allowed to work in a review period at any given moment.
#7. In summary
When a contract has been finalised, it implies the following has been done. This is shown in the Overall Summary part of the performance dashboard.
- All the review periods have been populated with objectives - and approved by the manager.
- All the review periods have been rated - and approved by the manager. (There is a score for each period)
- If applicable, the scores from any additional components (e.g., a Value Survey) have been entered into the system and incorporated into the employee's contract.
- A final overall score was calculated and is available.

Recommended further reading
- Glossary of terminology and definitions
- How to Use Performance Management with Success
- The Employee's Performance Management Dashboard
- Open an Existing Contract
- Create a New Contract
- Functionalities and Layout of the Performance Management Dashboard
- The Manager's Performance Management Dashboard
- Overview of The Performance Agreement Screen
- Set your objectives - Part 1 (Working with KPAs and KPIs)
- Set your objectives - Part 2 (Working with the other sections)
- Perform a Check-in
- Rate your objectives

The Performance Management Dashboard - For Managers
Process: Step 1
Lesson duration
About 15 minutes
What you will learn:
-
What managers can do on their dashboards.
-
How to switch between groups of people.
-
How to know what to do when managing contracts.
-
How to access employee contracts.
The Performance Management Dashboard for Managers
Every user forming part of the Performance Management process gets access to their own Performance Management Dashboard. If a person manages other users or employees, the person fulfils the role of performance manager and gets access to a Performance Management Dashboard for Managers.
The activities described below are from the viewpoint of a performance manager, assisting their employees during the performance management process. Except for the submission of objectives (done by an employee themselves) and the submission of self-rated objectives (also done by an employee), a performance manager has control over all aspects of an employee's Performance Contract. If you are a performance manager, we recommend also viewing The Performance Management Dashboard for Employees section. On this page, we will focus on additional functionalities only.

What can a manager do on the Performance Management Dashboard for Managers?
Manage their own Performance Contract (in their capacity as a regular user).
Manage the performance contracts of the manager's own, direct reporting lines.
Manage the performance contracts of ad-hoc groups of people - if assigned to this manager.
Create a new performance contract for their employees.
View existing and previous Performance Contracts of employees.
Determine the progress of a Performance Contract phase of an employee and determine the next step.
Get overall progress stats for his/her department.
Print employee contracts.
Perform Check-ins on employee performance agreement objectives. And view the reply from the employee.
#1 Switch between groups of people

- At the top of the dashboard page, select the applicable performance year, then click the toggle button to switch to the contracts of that team.

Your own Performance Contract
Employees reporting to you as their direct line or performance manager.
Employees in other groups (e.g. Senior Management). These do not necessarily report to you, but you might be responsible for their Performance Management.
#2 Where should you focus?
Managing several employees with contracts in various stages and phases of the Performance Management cycle can be daunting.
We took the guessing out of the management by grouping the employees according to the following phases. Just note the phases will repeat for each review period in the Performance Contract.
As a manager, you can assist with every step, but in the tables below, we assume the employee will perform their tasks to the fullest.
This employee is in the Objective Setting phase.

And this is what is supposed to happen.
| EMPLOYEE'S ACTIONS | THE MANAGER'S ACTIONS |
|
|
This employee is in the Rating and Check-in phase.

And this is what is supposed to happen.
| EMPLOYEE'S ACTIONS | THE MANAGER'S ACTIONS |
|
|
#3 Access the agreements of employees
If employees have been linked to a manager, the manager can perform all actions on the employee Performance Contracts, except submitting the objectives and ratings.

The following actions are at the manager's fingertips.
![]()
Click START, CONTINUE, RATE, and/or VIEW - or whatever the phase requires.

Click DELETE to clean out all the review period's objectives and start over.

Click the More or Action Plan icon to print the contract, and to see all uploaded documents.
Recommended further reading
- Glossary of terminology and definitions
- How to Use Performance Management with Success
- The Employee's Performance Management Dashboard
- Open an Existing Contract
- Create a New Contract
- Functionalities and Layout of the Performance Management Dashboard
- The Manager's Performance Management Dashboard
- Overview of The Performance Agreement Screen
- Set your objectives - Part 1 (Working with KPAs and KPIs)
- Set your objectives - Part 2 (Working with the other sections)
- Perform a Check-in
- Rate your objectives

The Performance Agreement - Overview
Process: Step 2

Lesson duration
About 10 minutes
What you will learn:
-
Agreement navigation.
-
What goes into each of the agreement sections.
The Index of Sections
Previously, we created a Performance Contract and are almost ready to start populating the agreement's first review period with performance objectives for the year.
Before we start, let's briefly check the layout of the screen and the functionalities available.
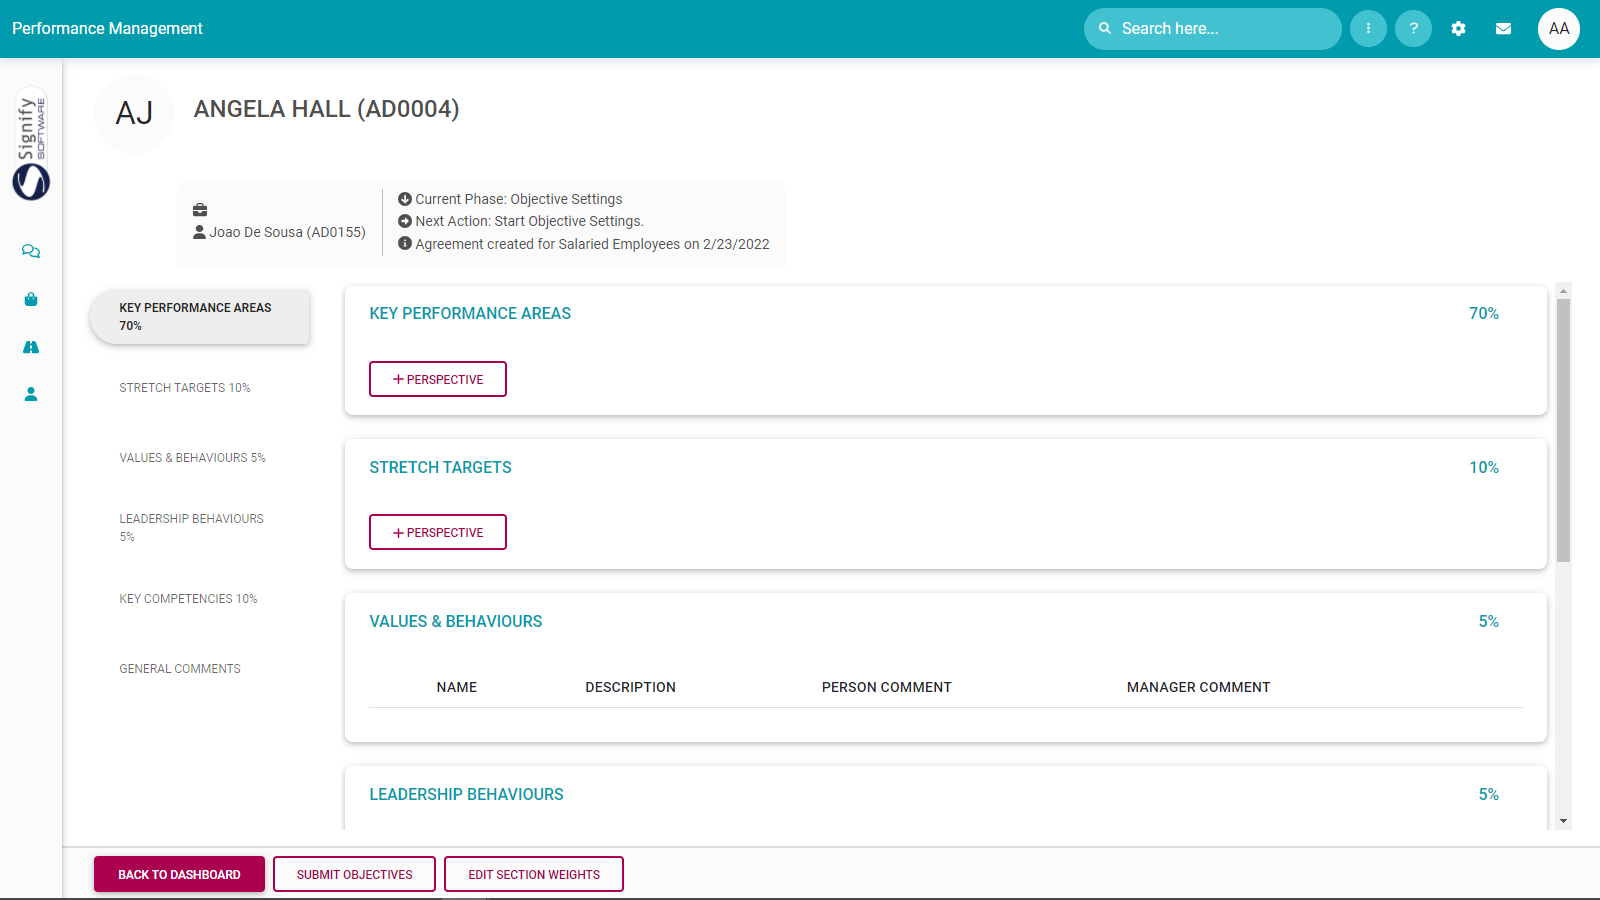
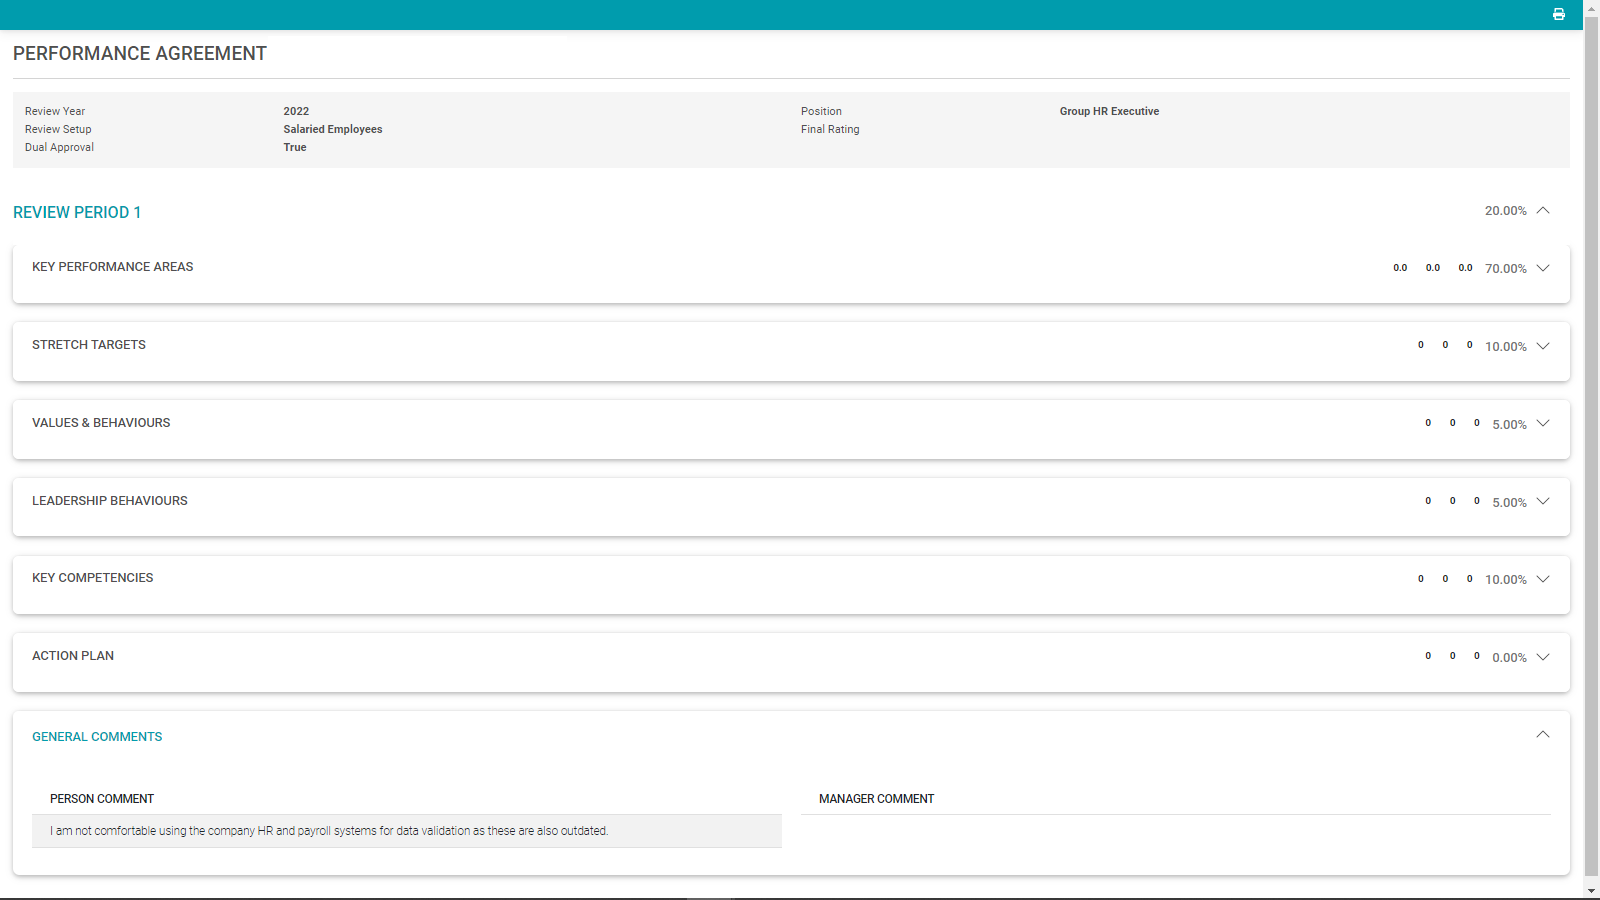
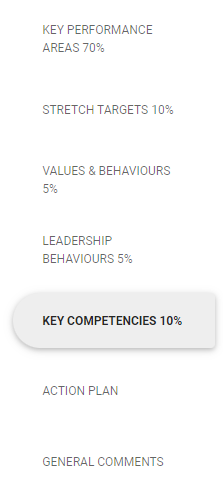
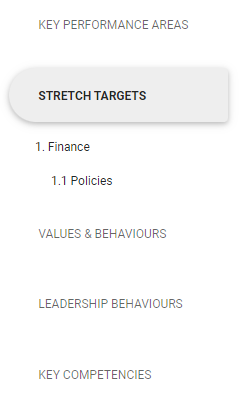
The index of sections indicate the sections of the agreement apply to you and their relative importance as a percentage. The Key Performance Areas section is always a part of an agreement, but Stretch Targets, Values & Behaviours, Leadership Behaviours, and Key Competencies might not be. These sections depend on various settings and whether you are a manager.
- Click on a section to navigate to it.
What goes into each section?
We will briefly tour each section to understand its native/original intention but note that you can rename any section to fit your purpose. The renaming of a section might completely change its purpose.
Key Performance Areas
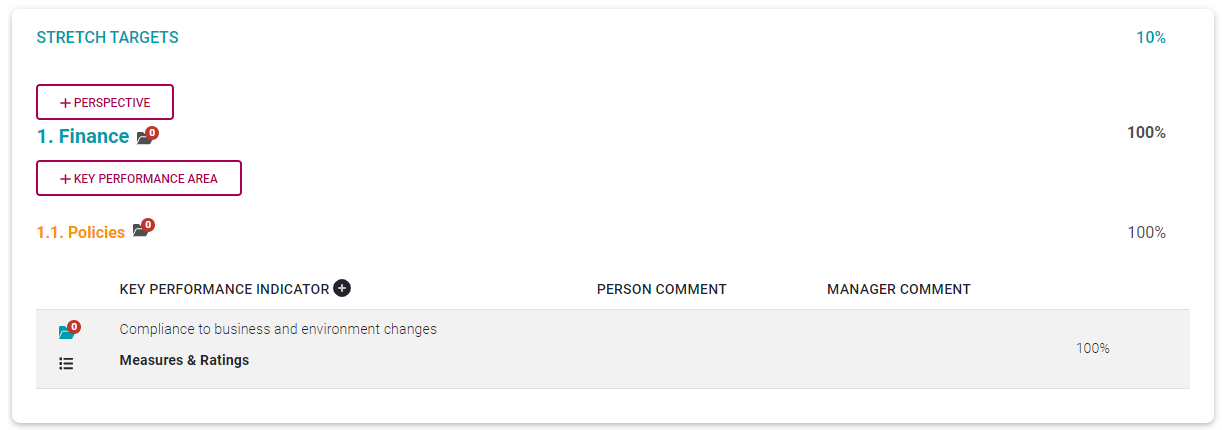
The KPA section is used to identify the areas within the business that a person is responsible, e.g., Process Improvement, Safety and Health, Security, etc., and how they relate to company strategies or focus areas - called perspectives or pillars.
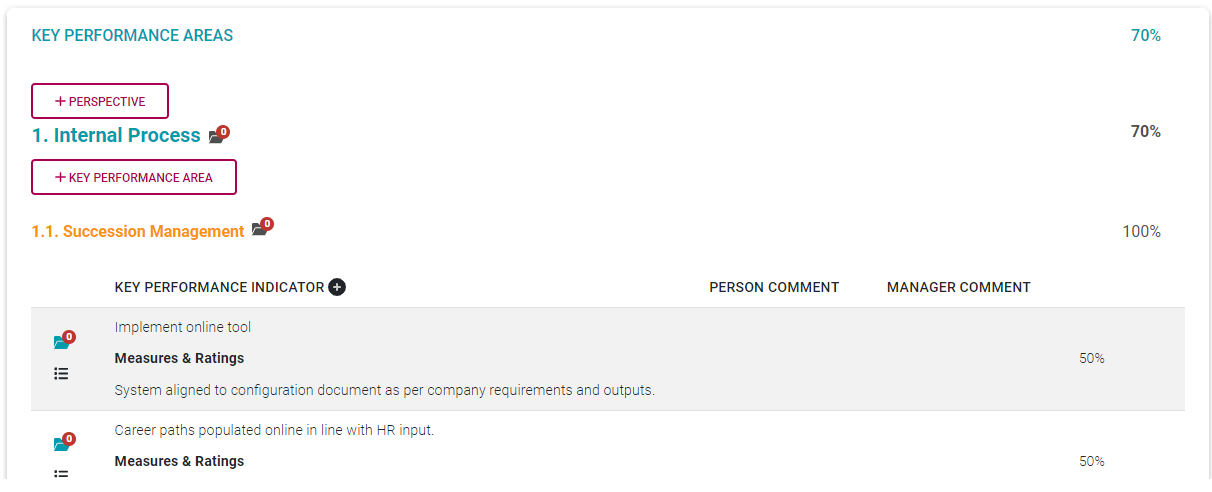
This section contains up to three levels of information. The Perspectives level is sometimes omitted and is dependent on client configuration.
Perspectives
Key Performance Areas
Key Performance Indicators
Note the action buttons:
| BUTTON / ICON | USE |
|
|
Opens a list of values. Sometimes choosing from the library is compulsory; sometimes you are allowed to use the library or create your own values. |
 |
Allows library and own values. |
 |
Views uploaded documents, and upload new documents. |
 |
Open a text box for your comments. |
|
|
Delete an item. |
|
Invisible buttons |
In many cases, headings become active after you have added them - allowing their editing and sometimes additional fields.
Click on them to see what lies beneath. |


The other sections have a layout similar to, or simpler than the Key Performance Areas shown below. Some unfamiliar terminology might be used in these sections. Refer to the Glossary for a brief explanation of each.
Stretch Targets
The Stretch Targets section works the same as the Key Performance Areas section, but the fact that it is a separate section implies a separate overall purpose.
It is usually reserved for senior management where 'stretch' targets are present on Performance Contracts. Alternatively, you can change the section's name if you would like to use this section for a completely different purpose.
Values & Behaviours
Sometimes called Company Values, this section has a dedicated library for its items and is usually used to measure general company values. This section normally applies to all employees' part of the performance process.
Typical Company Values are:
Continuous Improvement
Integrity
Trust
Fun
Leadership Behaviours
This section is activated only for people who are managers of other people. If it does not apply to an employee, its section weight is distributed pro-rata among the other sections.

Typical Leadership Behaviours are:
Compassionate Leadership
Alignment
Awareness
Confidence
Key Competencies
This section lists the skills/competencies an employee should possess in order to do their job. And allows the employee to be measured against them.

Typical Key Competencies are:
Communication
Decision Making
Problem Solving
Teamwork
Action Plan
Employees and managers can use the Action Plan section to register any action supporting the employee's Performance Contract overall, or even an action specific to a KPI, Company Value, Leadership Behaviour, or Key Competency.
Training requirements or needs are special types of actions that can also be logged in this section.
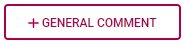
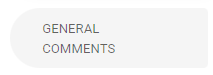
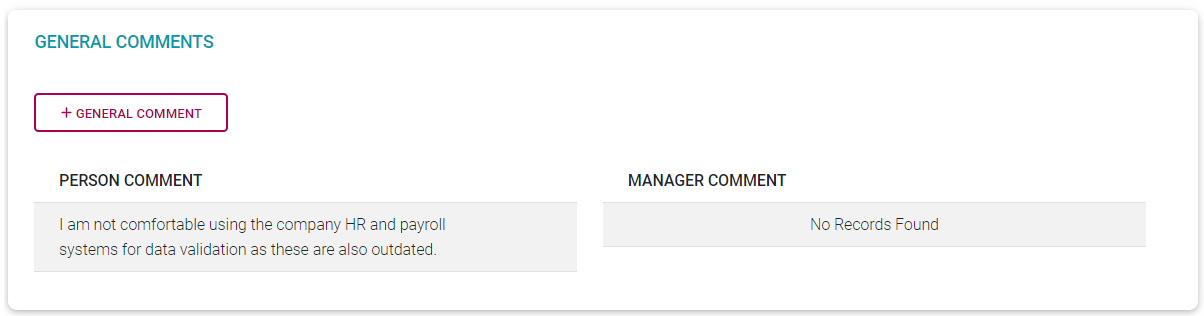
General Comments
The General Comments section can be used by an employee or manager to note something, provide motivation for including or excluding an objective, and to explain the reason for giving a higher-than-expected or lower-than-expected rating.

Wrapping it up
At the bottom of the screen are three buttons.

While in the objective setting phase, all information added to the page is saved automatically, unless there is an explicit SAVE button, as on the popups.
When you are done, click BACK TO DASHBOARD to release and close the screen and to return to the employee dashboard.
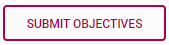
When your objectives have been listed, explained, and fleshed out and you are ready to request approval from your manager, click SUBMIT OBJECTIVES. Your manager will be notified.
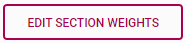
Each section comes with a predefined section weight. Click EDIT SECTION WEIGHTS to amend the suggested section weights to better reflect the intention of your job.
Recommended further reading:
- Glossary of terminology and definitions
- How to Use Performance Management with Success
- The Employee's Performance Management Dashboard
- Open an Existing Contract
- Create a New Contract
- Functionalities and Layout of the Performance Management Dashboard
- The Manager's Performance Management Dashboard
- Overview of The Performance Agreement Screen
- Set your objectives - Part 1 (Working with KPAs and KPIs)
- Set your objectives - Part 2 (Working with the other sections)
- Perform a Check-in
- Rate your objectives

The Performance Agreement - Set Your Objectives PART 1
Process: Step 2
Lesson duration
About 20 minutes
What you will learn:
-
How to work with the Key Performance Areas section in a Performance Agreement.
-
How to add perspectives to the Key Performance section.
-
How to add key performance areas to the Key Performance section.
-
How to add key performance indicators to the Key Performance section.
-
How to upload supporting documents to objectives.
-
How to link actions to KPIs, and/or to the agreement in general.
-
Good suggestions when working with objectives.
Setting your Objectives
What is your goal?
Take a minute to read through the following pointers before you start your agreement. Understanding the purpose of a Performance Agreement will impact on how you approach it, and what you get from it.
In creating your Performance Agreement, you will take the following steps:
- Identify what you have to achieve and want to achieve in your job in the year ahead.
- Make sure your manager agrees with your goals, and how you are going to work towards achieving them.
- Make sure the way you formulate your goals (via its defining measures and targets) causes them to be tangible, easily measurable, trackable, etc.
- Determine the relative importance of each goal. Work objectives are not all equal in importance.
- Send everything to your manager for approval.
All of this may take up to 2 months to finalise unless you can start from a previous, and well-structured agreement.
An example
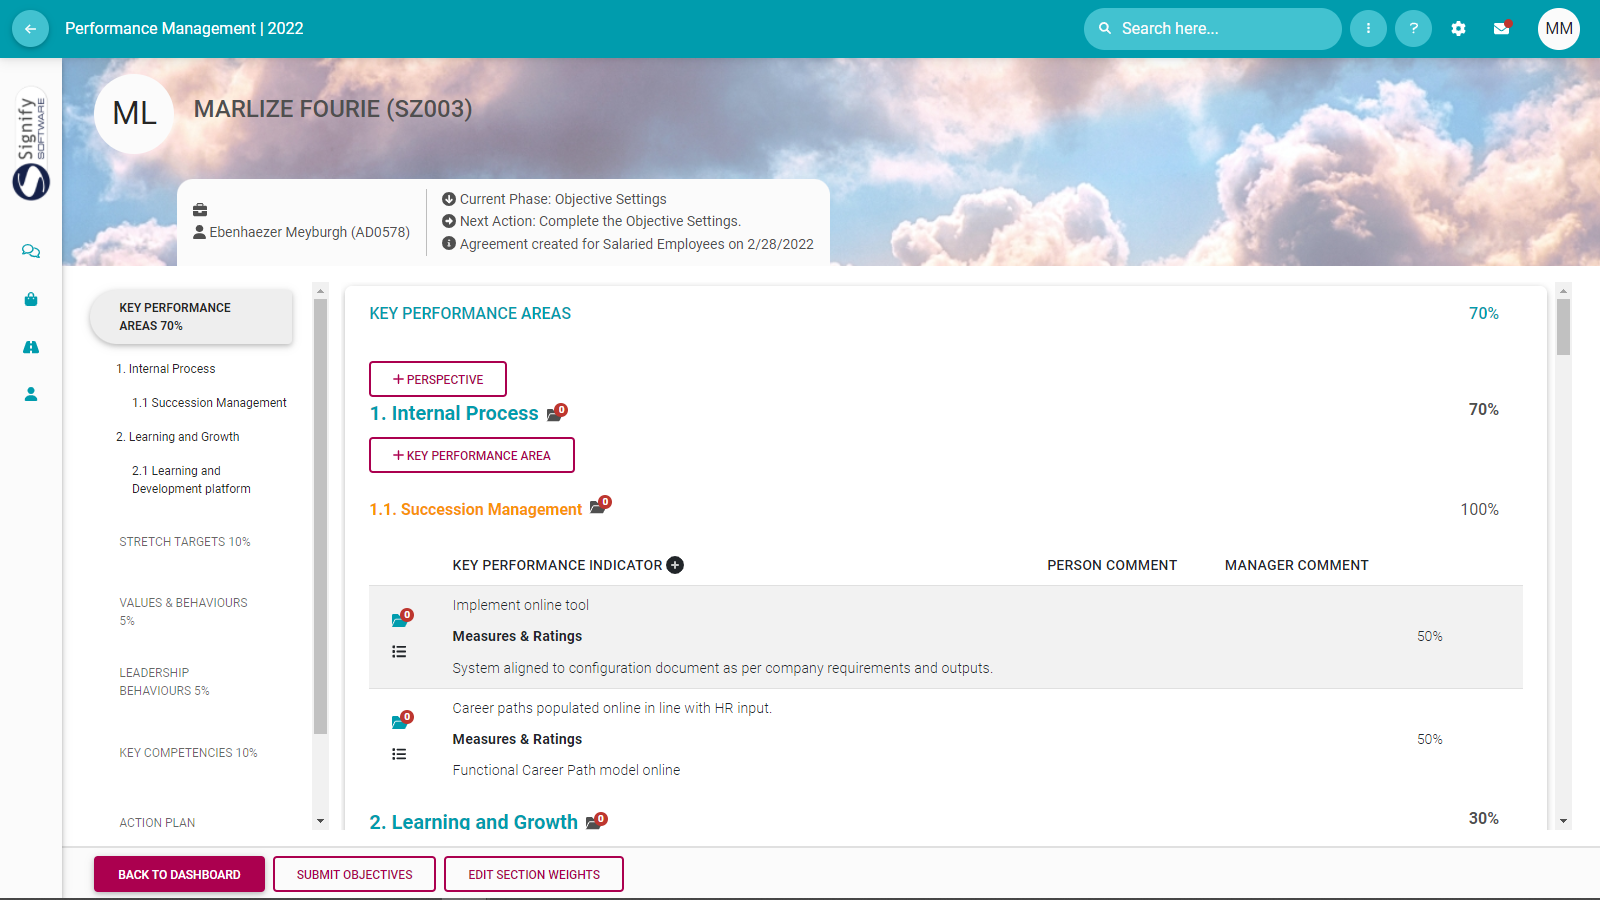
See below a fully populated KPA section. Your Stretch Targets will have a similar layout; the other sections will be simpler.
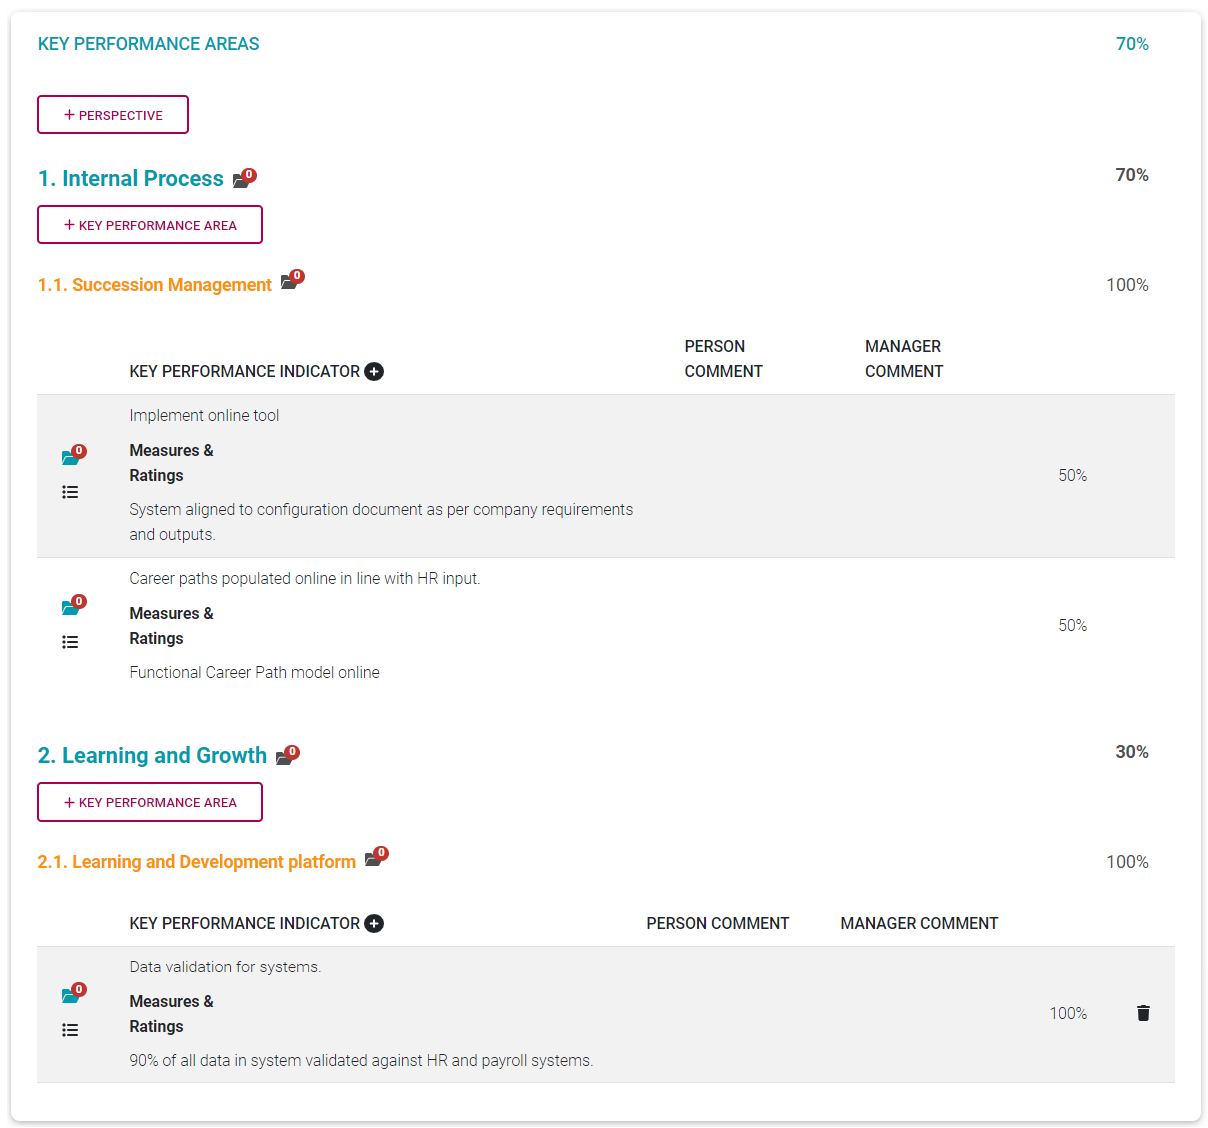
The Key Performance Areas Section
We are going to plan your agreement using the above example as a roadmap.
Perspectives Level
(Optional, depending on company settings)
Refer to the section The Performance Agreement - Overview for background on the use of perspectives.
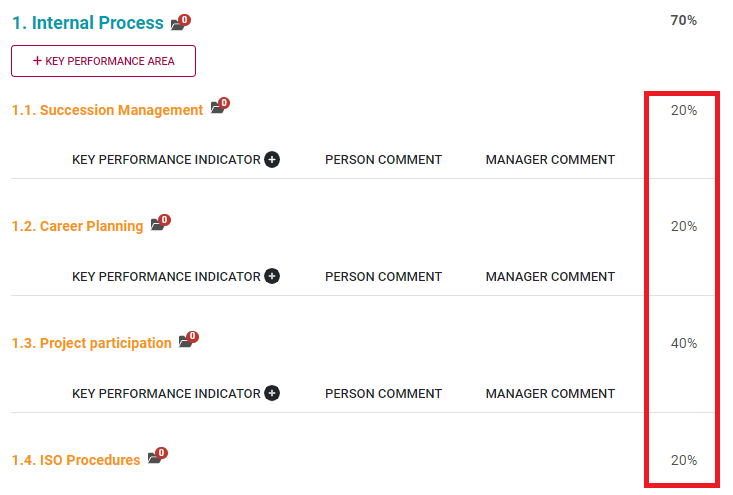
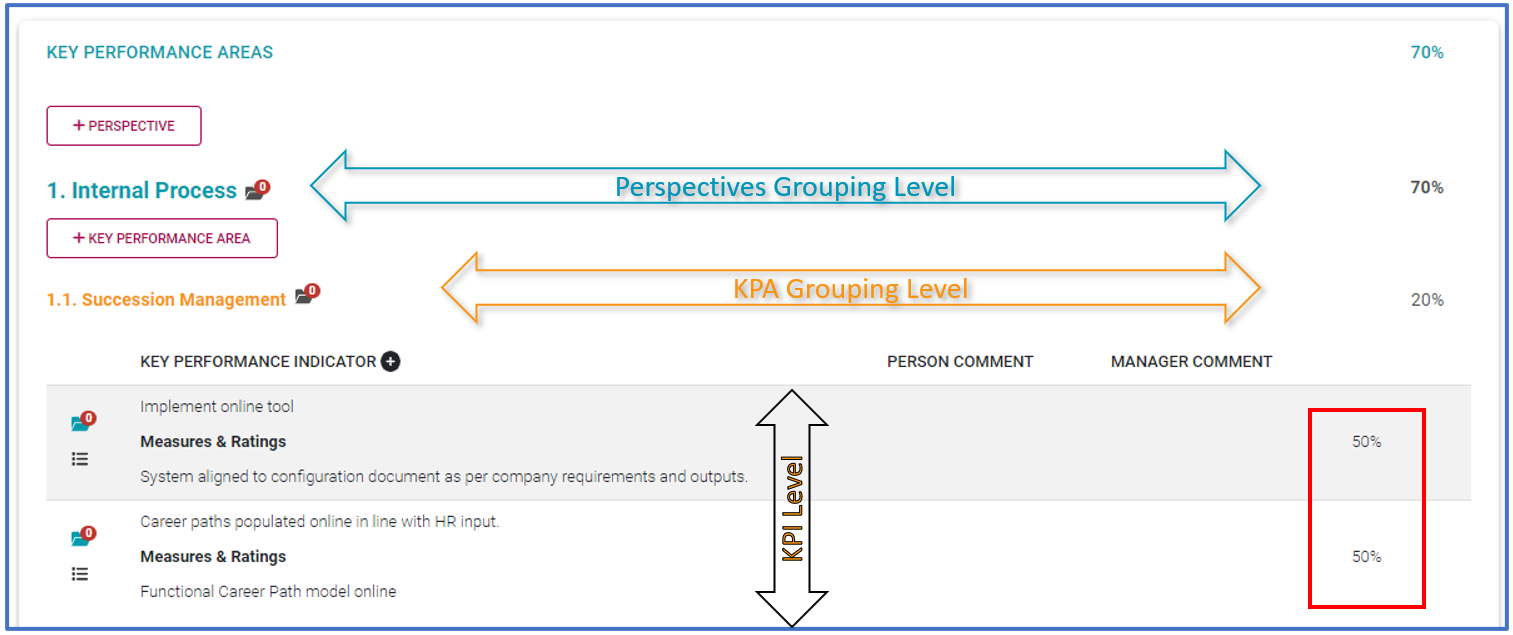
Notice that the relative importance of the Key Performance Areas section is 70% - in our example.
We are going to focus on the perspectives level first. Perspectives are used to group key performance areas, and key performance areas are in turn used to group key performance indicators.
Let's remove all the KPAs and KPIs from our example and see the perspectives in isolation. In the example, there are two perspectives: Internal Process (worth 70%) and Learning and Growth (worth 30%). All our KPAs will be loaded under one of these two perspectives.
Notice how the total of their relative weights adds up to 100%.
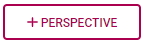
- Click +Perspective to open the list of available perspectives. It is a fixed list, and no custom values are permitted.
- Choose the appropriate perspective and provide a suitable weight. Click SAVE.
If you are working on a new, blank agreement, we suggest loading all your perspectives together and assigning their weights. This way it is easier to get an overview of them before adding KPAs and KPIs, and visually easier to get their weights to total 100%.
- To delete a perspective, hover over the perspective, then locate and click its Delete icon.
- To edit a perspective and its weight, click on the perspective.
- When finished loading all the perspectives, ensure their total weight equals 100%.
Key Performance Areas Level
Refer to the section The Performance Agreement - Overview for background on Key Performance Areas.
Now we are going to focus on the KPA level. Key Performance areas (KPAs) are used to group Key Performance Indicators.
Let's remove all the KPIs from our example and look at a KPA in isolation, under its parent perspective called Internal Process.
Notice how the total of all the KPA weights (under one parent perspective) adds up to 100%.
- Click +Key Performance Area to open an input screen on which two options are available.
- LIBRARY: If you want to choose a suitable KPA from the library, click LIBRARY. Then choose the pointing finger icon to search the list of available key performance areas.

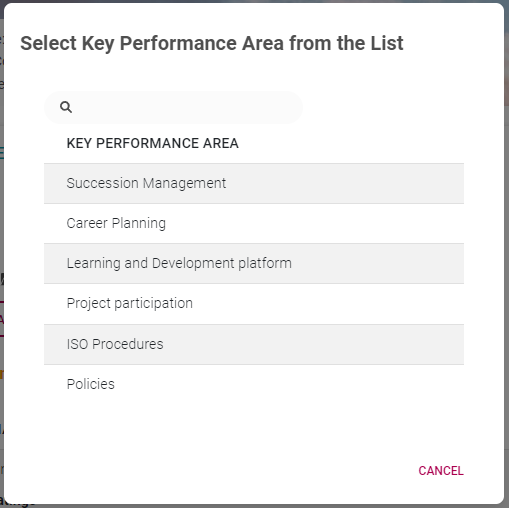
-
- TYPE OWN: Or click Type Own to provide your own custom KPA.
- Choose or type the appropriate key performance area and provide a suitable weight. Click SAVE.

If you are working on a new, blank agreement, we suggest - for a specific perspective - loading all its key performance areas and their weights at once. This way it is easier to get an overview of all the KPAs under a perspective before adding KPIs, and it's easier to get their weights to total 100%.
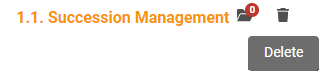
- To delete a KPA, hover over the KPA, then locate and click its Delete icon.
Make sure you load each KPA under its correct parent perspective – you cannot move them later; you will have to delete the KPA record and recreate it if needed.
- To edit a key performance area and its weight, click on the Key Performance Area.
- When finished loading all the key performance areas under a perspective, ensure their total weight equals 100%.
Key Performance Indicator Level
Refer to the section The Performance Agreement - Overview for background on Key Performance Indicators.
Now we are going to focus on the KPI level. There can be more than one KPI under a parent key performance area (KPA), as in the example below.
Notice how the total of all the KPI weights (under one parent KPA) adds up to 100%.
Make sure you load each KPI under its correct parent KPA (and perspective) – you cannot move them later, you will have to delete the KPI record and recreate it if needed.

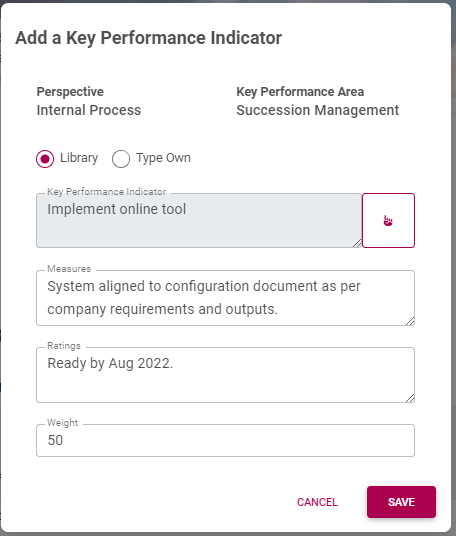
- Look for the little + sign next to the KEY PERFORMANCE INDICATOR heading. Click it to open the KPI input screen below, on which two options are available.
- LIBRARY: If you want to choose a suitable KPI from the library, click LIBRARY. Then choose the pointing finger icon to search the list of available key performance indicators.
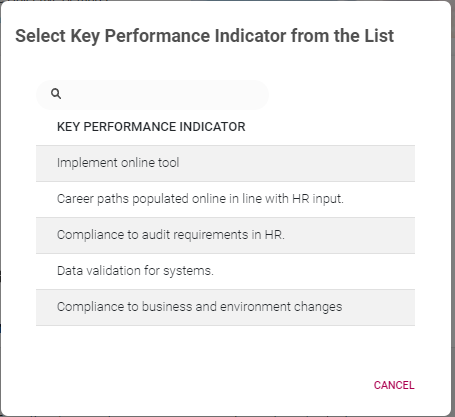
-
- TYPE OWN: Or click Type Own to provide your own custom KPI.
- Choose or type the appropriate key performance indicator, along with appropriate Measures and Ratings. Remember to provide a suitable weight. Click SAVE.
If you are working on a new, blank agreement, we suggest - for a specific KPA - loading all its Key Performance Indicators and their weights at once. This way it is easier to get an overview of all the KPIs under a KPA.
- To edit a key performance indicator and its fields, click on the Key Performance Indicator record.
- To delete a KPI, hover over the KPI record, then locate and click its Delete icon.

Now do it!
Before we move on to the other sections, practice the steps above.
- Add your perspectives one after the other.
- Balance their %
- For each perspective, add applicable KPAs.
- Balance their %
- For each KPA, add applicable KPIs
- Balance their %
What else is there?
We only discussed adding the primary levels to the KPA section of the Performance Agreement. But there are a few additional functionalities to consider.
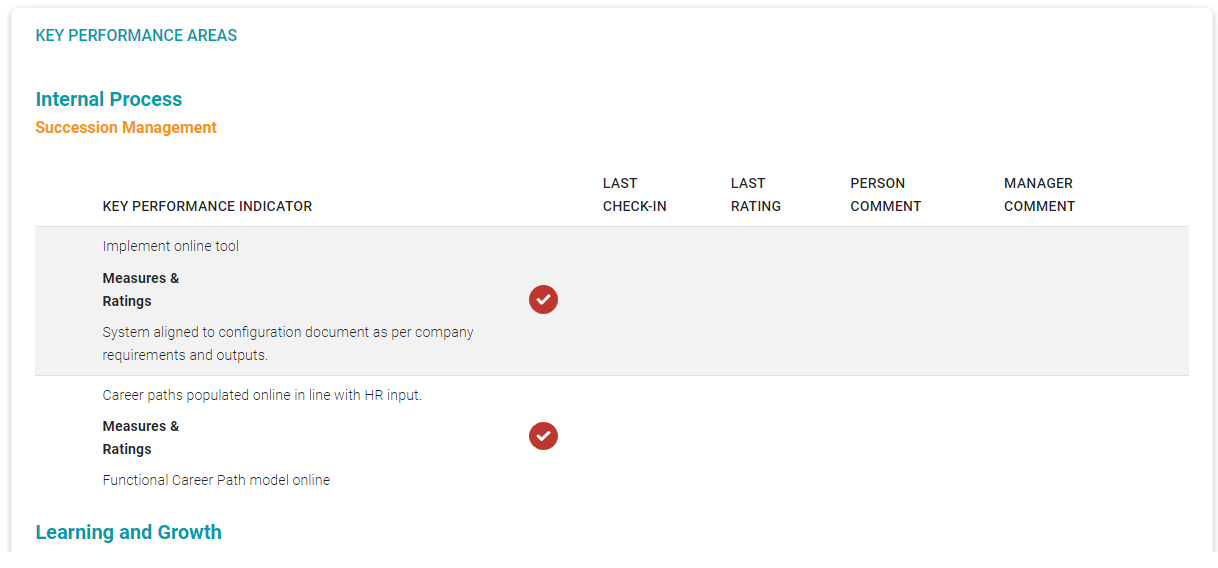
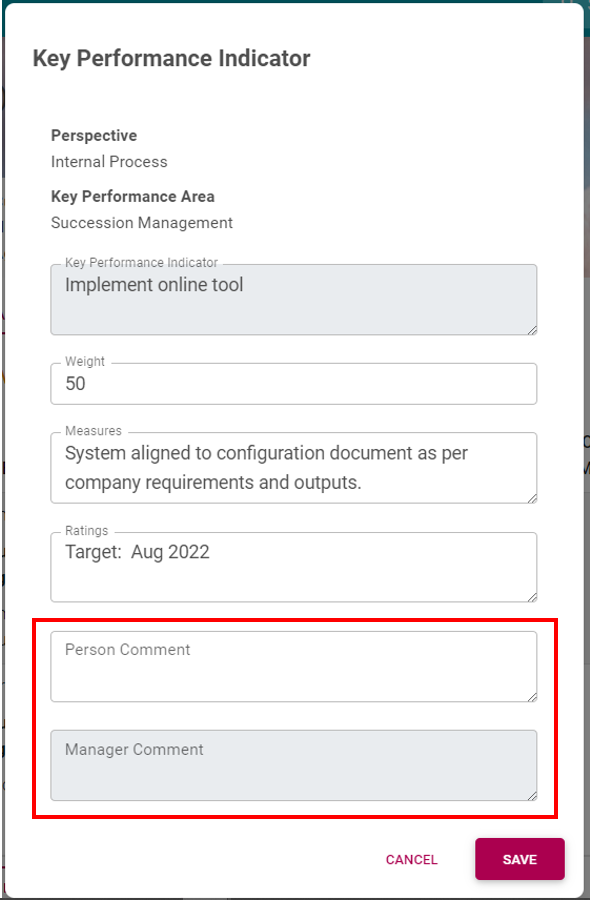
Person and manager comments on a KPI
After adding a KPI the record is displayed on the screen.

- But, click the record to reveal not only the information entered previously but also fields where the employee and/or their manager can provide clarifying comments. Measuring a KPI is not always straightforward - use these fields to shed light on the intention and purpose of a KPI.
General Comments
Enter any notes, remarks, concerns, and other clarifying comments on the content contained in a Performance Agreement.
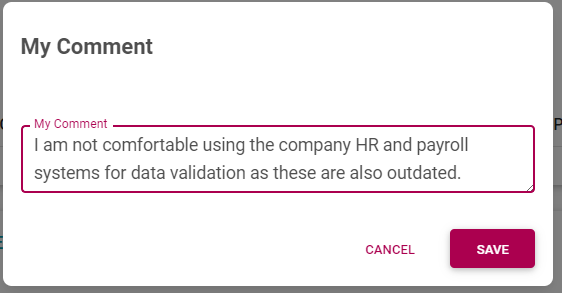
- Click SAVE.
Documents
Documents in support of your chosen objectives, or for omitting objectives, can be loaded on Perspective, KPA, and KPI levels. See below for the location of the Documents icons at each level.
- Click the Documents icon to open the Document View and Upload screen.
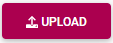
- Click the UPLOAD button to open a document upload screen.
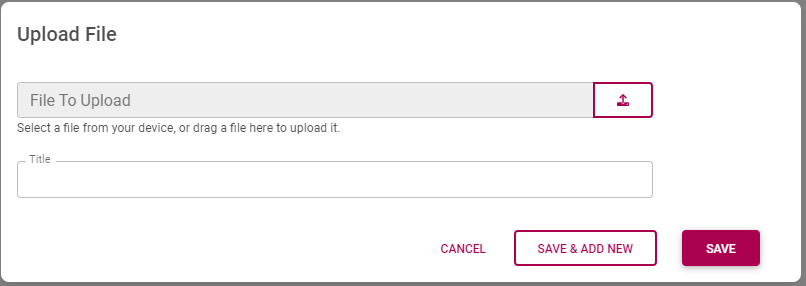

- Click the Upload icon or drag and drop a file directly onto the Upload File screen.

- Click SAVE.
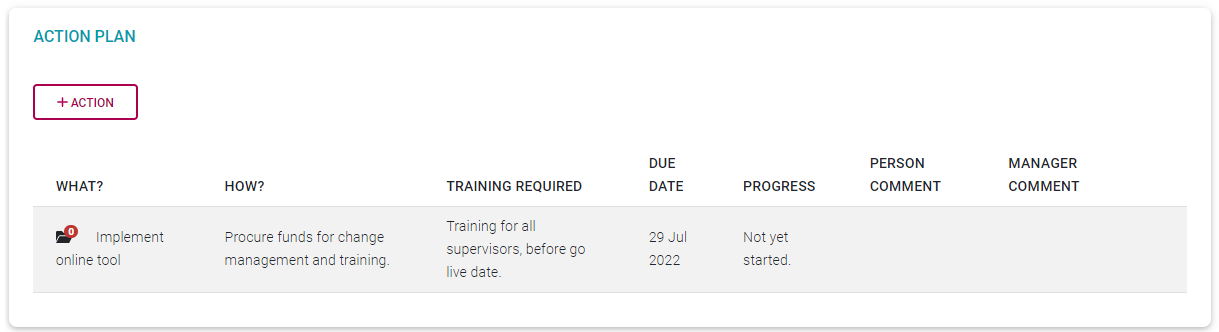
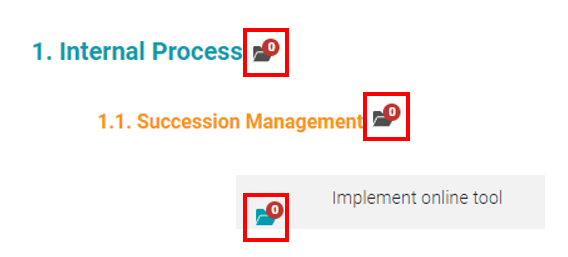
Actions on a Key Performance Indicator
Listing a KPI under a KPA usually implies some form of action e.g., "Implement the online tool by...".
To support achieving a KPI, additional activities might be needed e.g., "Procure funds".
These actions can be loaded and linked directly to a KPI record.


- Locate and click the More (Action Plan) menu in a KPI's record to open an action plan screen for the KPI.
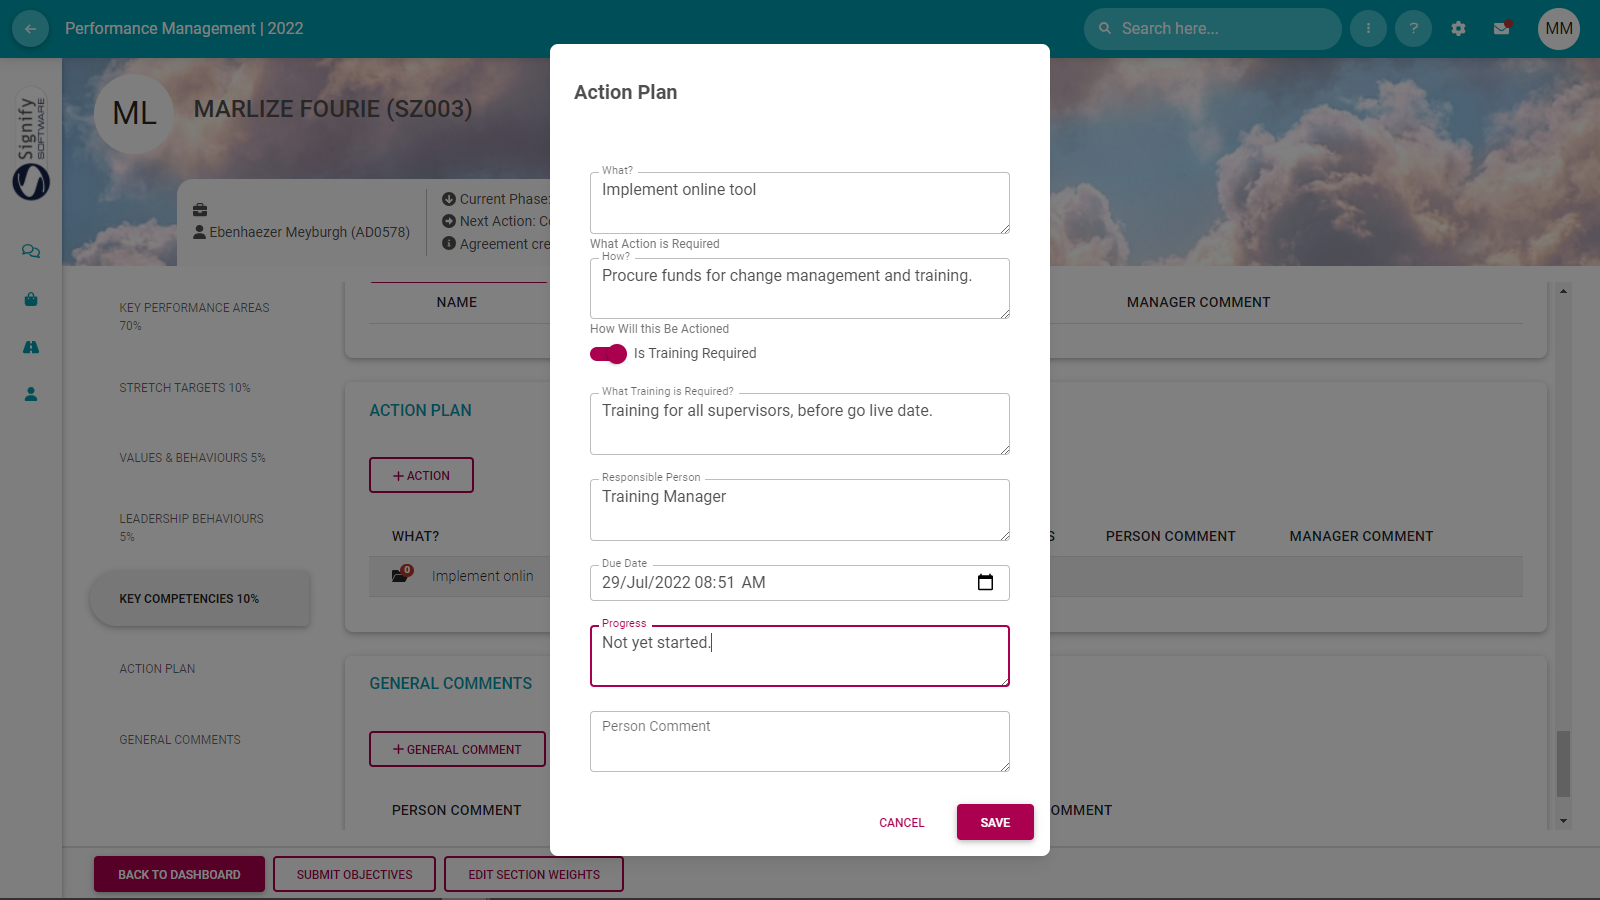
Note the following about the Action Plan:
The action plan can be created in support of a specific KPI.
In addition, an action plan can be an ad hoc activity in support of or flowing from the Employee's Performance agreement.
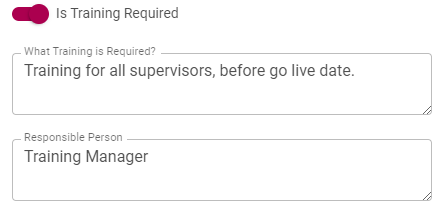
The screen contains optional training-related fields if the action plan is training focused.
- Click SAVE when finished with the action plan.
- On the menu to the left of the screen, click Action Plan to see where the action is listed.
An employee and/or manager can at any time click the action plan and provide comments and a progress update. Use the fields Progress and Person Comment (or Manager Comment).
Suggestions for building a robust Performance Agreement
- Have an up-front discussion with your manager to talk about your goals, how to measure them etc.
- Focus only on the key areas of your job, don't try to cover everything. Five to eight key areas should suffice for most jobs.
- Have relevant documentation at hand e.g., reports to referring to, portfolios of evidence as needed, etc.
- Assume everything you list in your agreement will have to be measured in some way. Make it as practical as possible.
- Use the Comments section to explain your motivations for choosing or omitting certain objectives. In a month or two you may have forgotten what your reasoning was.
- If an objective is only going to become relevant in the next review period (e.g., after 6 months), list it now and get it on your agreement. You can always exclude it when doing the ratings during the review.
- When building a Performance Agreement, also consider the bigger picture of an agreement that could very well be applicable for a number of years to come.
- When doing the KPA and Stretch Target sections, plan your Perspective-KPA-KPIs before loading them into the system. It's easier to move things around in Excel or Word.
- Don’t be in a hurry to submit your contract for approval. Sleep on your objectives and review them a couple of times before submitting them.
Recommended further reading:
- Glossary of terminology and definitions
- How to Use Performance Management with Success
- The Employee's Performance Management Dashboard
- Open an Existing Contract
- Create a New Contract
- Functionalities and Layout of the Performance Management Dashboard
- The Manager's Performance Management Dashboard
- Overview of The Performance Agreement Screen
- Set your objectives - Part 1 (Working with KPAs and KPIs)
- Set your objectives - Part 2 (Working with the other sections)
- Perform a Check-in on your Objectives
- Rate your objectives

The Performance Agreement - Set Your Objectives PART 2
Process: Step 2

Lesson duration
About 15 minutes
What you will learn:
-
How to add objectives to the Stretch Targets section.
-
How to add objectives to the Company Values section.
-
How to add objectives to the Leadership Behaviours section.
-
How to add objectives to the Key Competency section.
-
How to submit the Performance Agreement to a manager for consideration and approval.
-
How to reopen a submitted Performance Agreement for changes.
Setting Your Objectives
In the section Performance Agreement - Setting Your Objectives PART 1, we looked at the Key Performance Areas section in depth - loading perspectives, key performance areas, and key performance indicators.
We have also seen how to upload documents, link actions, and load user comments.
On this page, we will go through the Stretch Targets, Company Values, Leadership Behaviours, and Key Competency sections.
Although the standard name for the second section of a Performance Agreement is Stretch Targets, note that the name can be changed to reflect company requirements.
The Stretch Targets Section
(Optional, dependent on company settings)
The working of this section is a carbon copy of the Key Performance Areas section and won't be discussed in depth, but you are welcome to refer to the section The Performance Agreement - Overview for background on its use.
There are, however, two differences to consider:
The section has a different importance attached to it, as can be seen from its percentage weight allocation.
Although potentially present on all employee contracts, it does not necessarily apply to all employees. It usually applies to more senior levels of management - but this decision depends on company requirements.

The layout and functioning of the Stretch Targets section are the same as that of the Key Performance section. Therefore, the suggested approach is:
- Load all the required perspectives and balance their percentage weights to total 100%.
- For each perspective, load its applicable KPAs and balance their percentage weights to total 100% (per perspective).
- For each KPA, load its applicable KPIs and balance their percentage weights to total 100% (per KPA).
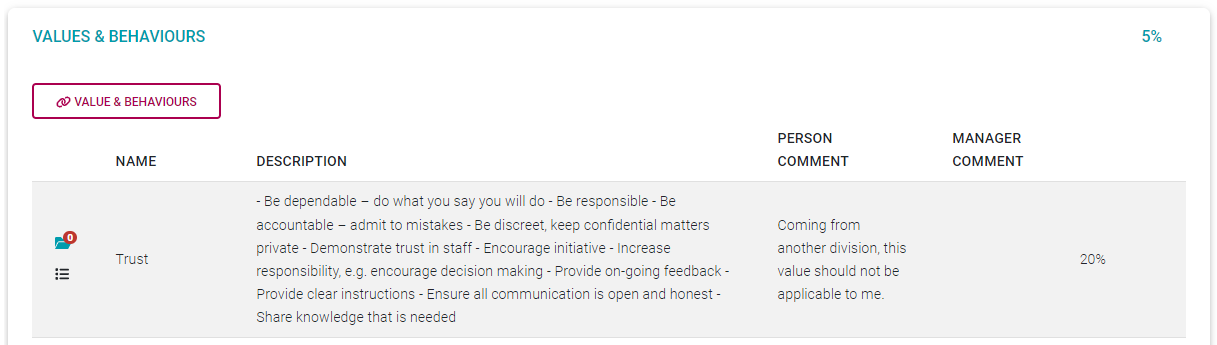
The Values & Behaviours Section
(Optional, dependent on company settings)
The objectives in this section are automatically loaded when a new Performance Contract is created. See below for an example of a populated Values & behaviours section.
Please refer to the section The Performance Agreement - Overview for some background on its use.
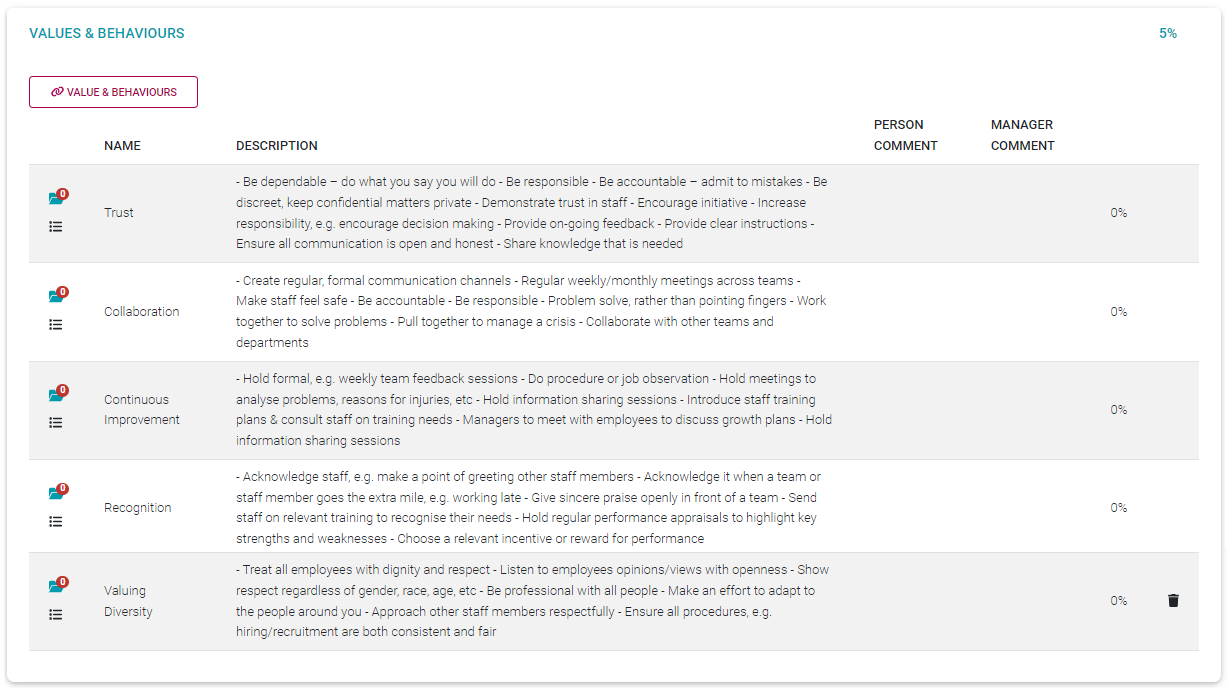
Note the following about the section.
All items are pre-loaded but can be deleted as necessary, and in collaboration with your manager. Use the Delete icon to delete records.

Items not automatically loaded (e.g., because they were not part of the underlying template agreement), can be viewed and even added, by clicking the (Link) Values & Behaviours button in the section.

Use the MORE (ACTION PLAN) icon to load an action specific to a Value. See Performance Agreement - Setting Your Objectives PART 1 for more details.

Use the Documents icon to view and/or load documents in support of a Value.

Click on a Value & Behaviour record to edit its weight and add relevant comments.
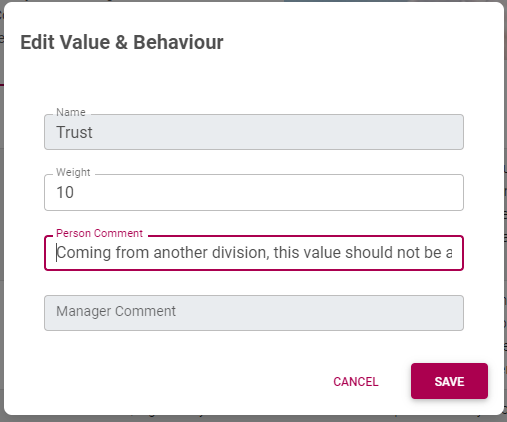
Once saved, the employee and manager comments display on the screen.

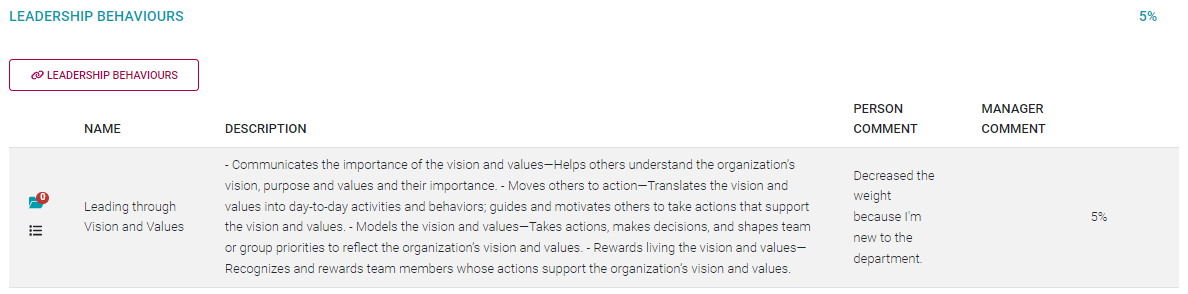
The Leadership Behaviours Section
(Optional, dependent on company settings)
The objectives in this section are automatically loaded when a new Performance Contract is created, and if you manage people i.e. You have employees reporting to you. See below for an example of a populated Leadership Behaviours section.
Please refer to the section The Performance Agreement - Overview for some background on its use.
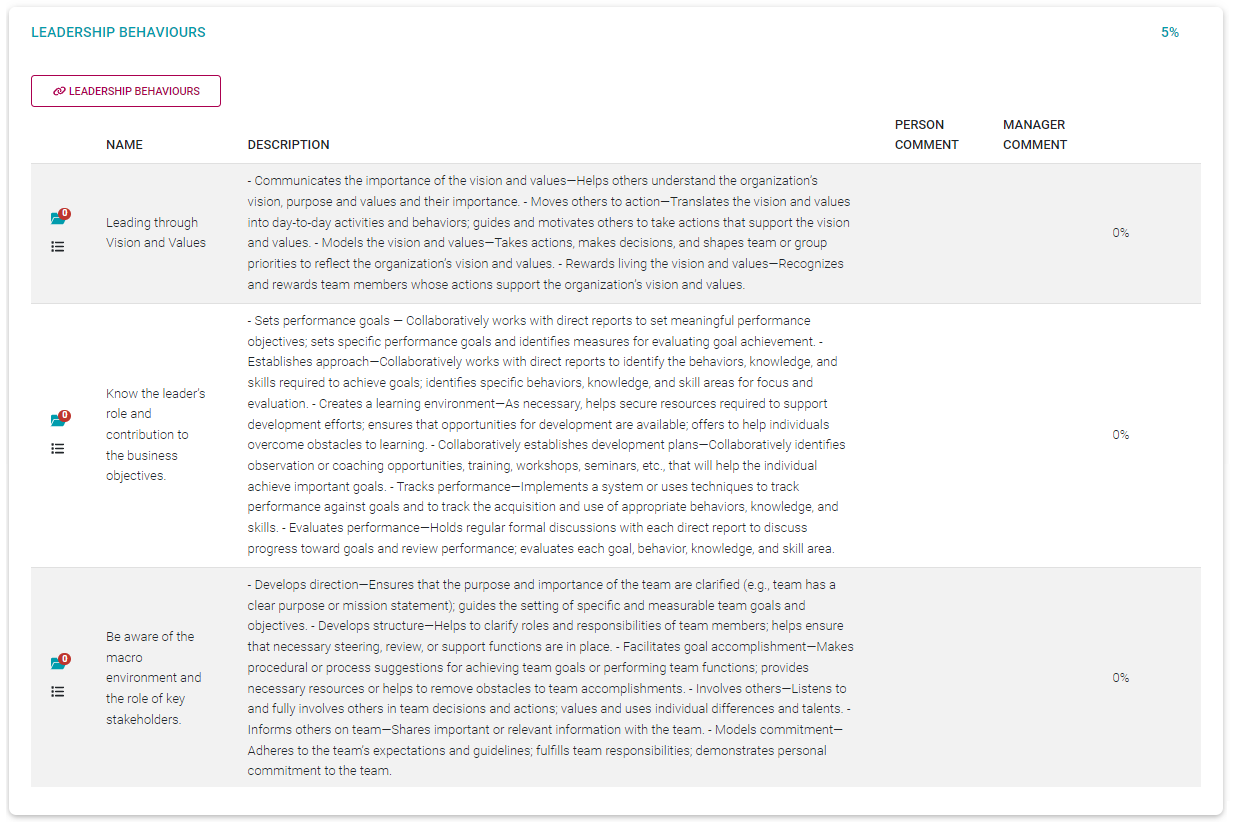
Note the following about the section.
All items are pre-loaded but can be deleted as necessary, and in collaboration with your manager. Use the Delete icon to delete records.
Items not automatically loaded (e.g., because they were not part of the underlying template agreement), can be viewed and even added, by clicking the (Link) Leadership Behaviours button in the section.

Use the More (also called Action Plan) icon to load an action specific to a Value. See Performance Agreement - Setting Your Objectives PART 1 for more details on loading actions.
Use the Documents icon to view and/or load documents in support of a Value.
Click on a Leadership Behaviour record to edit its weight and add relevant comments.

Once saved, the employee and manager comments display on the screen.
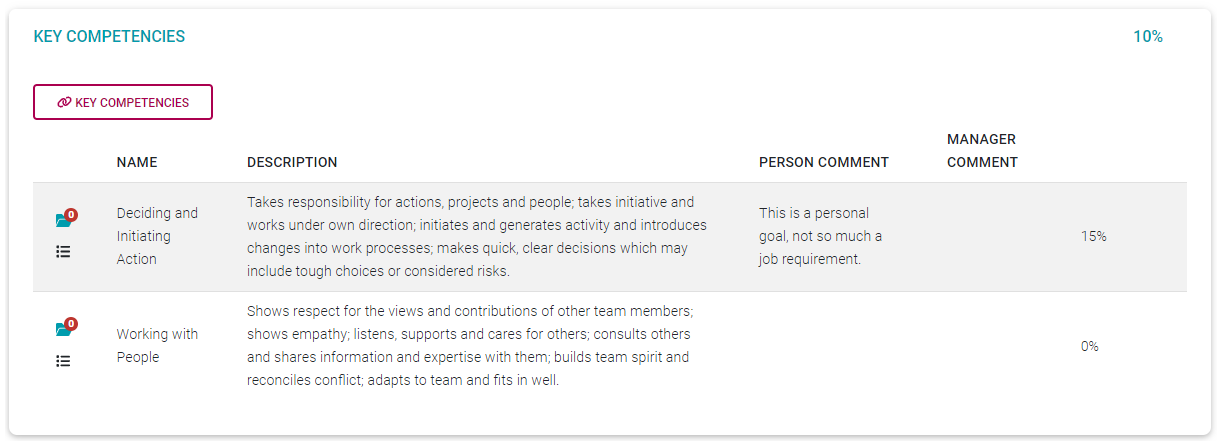
The Key Competencies Section
(Optional, dependent on company settings)
The objectives in this section are sometimes sourced (from the employee's job profile) and automatically loaded when a new Performance Contract is created but this depends on company preferences. We are going to populate this section as if no records were pre-loaded. See below for an example of a populated Key Competencies section.
Please refer to the section The Performance Agreement - Overview for some background on its use.


- Click (Link) Key Competencies to open a library screen with available key competencies to choose from.
- Scroll through the list or use the Search facility at the top of the page.
- Tick the check boxes of the chosen competencies and click LINK at the bottom of the screen.

The selected key competencies are transferred to the agreement's Key Competencies section.

- Each competency is assigned a 0% weight when initially selected.
Note the following about the section's records.
Use the Delete icon to delete records.
Use the More (Action Plan) icon to load an action specific to a Key Competency. See Performance Agreement - Setting Your Objectives PART 1 for more details on loading actions.
Use the Documents icon to view and/or load documents in support of a Key Competency.
Click on a Key Competency record to edit its weight and add relevant comments.
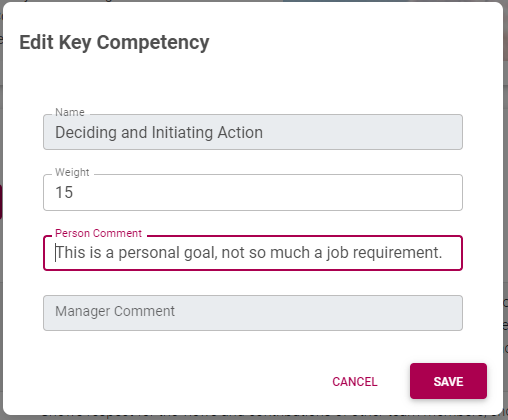
Once saved, the employee and manager comments display on the screen, and the weight is changed.
Submitting Your Objectives
In Parts 1 and 2 of setting your objectives, we learned how to work with each agreement section, loading objectives, and balancing weight allocations. In this section, we will learn how to finalise the sections and their objectives, and then how to submit the agreement to a manager for approval.
We will approach the finalisation process via a checklist of typical questions to ask yourself.
I have populated all sections (applicable to me) with suitable objectives.
Each objective has a weight assigned.
The sum total of all my section weights = 100%

At the bottom of the page, click EDIT SECTION WEIGHTS for a summary.
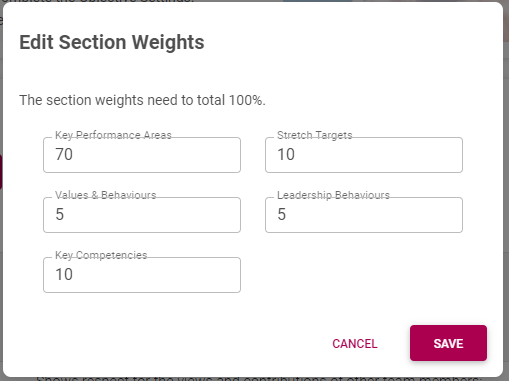
Section by section, the sum total of all section weights = 100%. In the Key Performance Areas and Stretch Targets sections:
- The weights of all KPIs under a parent KPA add up to 100%.
- The weights of all KPAs under a parent perspective add up to 100%.
- The weights of all perspectives add up to 100%.
I have uploaded appropriate documentation in support of my objectives - where needed.
Where applicable, appropriate comments have been added to objectives.
Where applicable, objective-specific actions were registered, due dates and responsible people assigned and progress updated.
Where applicable, general actions were registered, due dates and responsible people assigned, and progress updated.
General comments were loaded as needed.
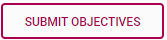
- If you are comfortable that the above was addressed, click SUBMIT OBJECTIVES.
- Click the acknowledgement.
- Click SUBMIT.
Typical Submission Messages
Besides the checklist given above, the most important agreement element checked and validated by the system, is the item weights which must total 100%. With this we mean:
The sum total of all section weights = 100%
Section by section, the sum total of all item weights = 100%.
In the Key Performance Areas and Stretch Targets sections:
- The weights of all KPIs under a parent KPA add up to 100%.
- The weights of all KPAs under a parent perspective add up to 100%.
- The weights of all perspectives add up to 100%.
If any of these fails validation, expect a message like the one below. Then, check the totals of all the sections, change as needed, and submit again.

Beyond the Submission
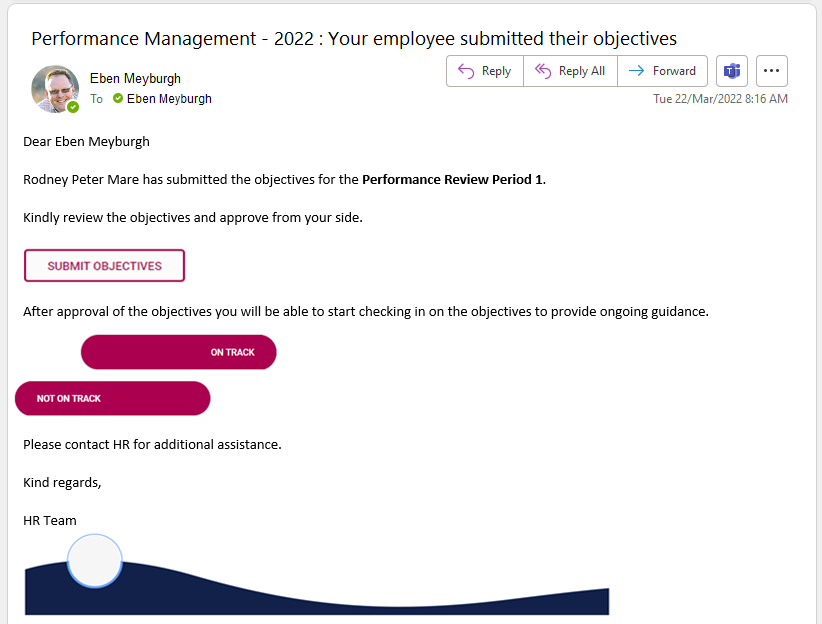
Submitting a performance contract to a manager kicks off a series of activities, inside the system and outside. See below for a summary of them.
Email to the performance manager
The following email (example only) will be sent to a manager when an employee has submitted his/her performance contract.
Email to the employee
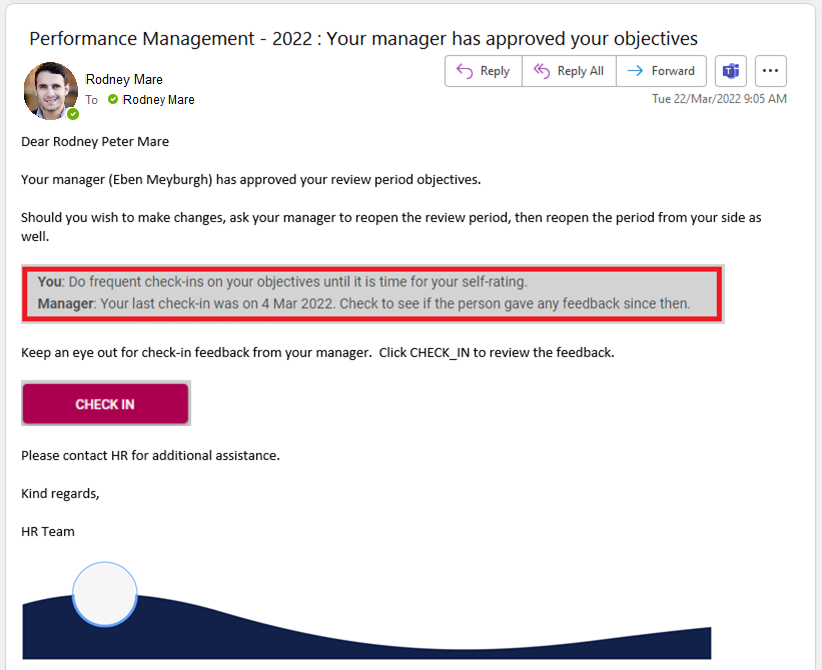
Upon approval of the employee's contract by the manager, the employee in his/her turn will receive the following notification (example only).
Contract status update
Each contract has a progress status as it continues on its way to approval, review, finalisation, etc. After submitting the agreement content, the contract status on the employee's side changes as follows.
What will happen next?
Expect the following to happen once you have submitted your Performance Contract.
Your performance manager might call you for a meeting to discuss your objectives, their weights, how to measure them, and what their review might entail.
Your performance manager will approve your objectives and you will receive an email stating the fact.
Your Performance Agreement will allow Check-ins on your objectives. For more information, see Doing Check-ins on your Objectives. Regularly sit down with your manager and do a Check-in on your objectives.
When the time arrives, the review of your objectives will be enabled and become available.
Reopening a submitted contract
Suppose you would like to make changes to your objectives after you have submitted the contract, and even after your manager has approved the objectives as well. See below for the steps to follow in each of these cases.
You have submitted the contract, but the manager hasn't approved it yet
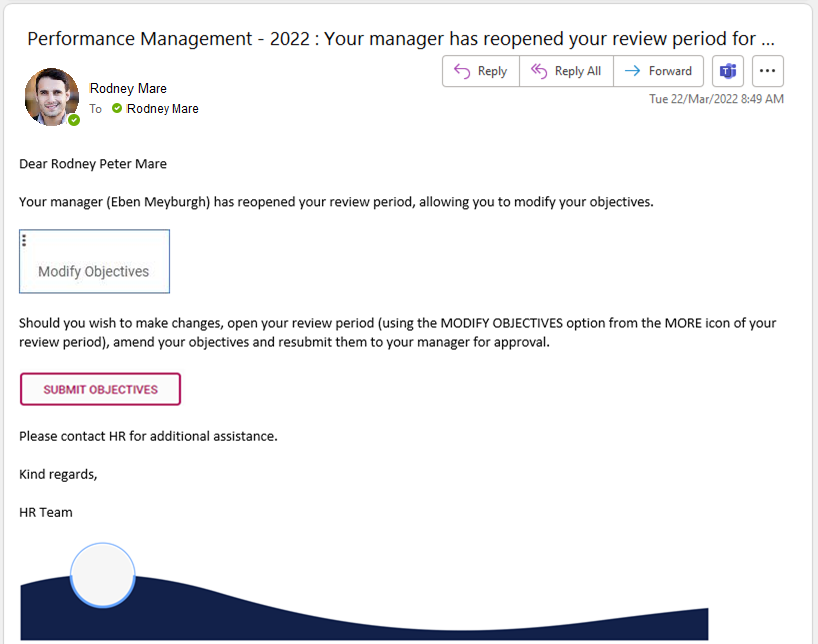
In this case, you can reopen the contract from your Performance Dashboard with one click.

- Locate and click the More icon to open its items.

- Click MODIFY OBJECTIVES.
- And wait for the confirmation message.

The agreement is now open again as shown by the progress.

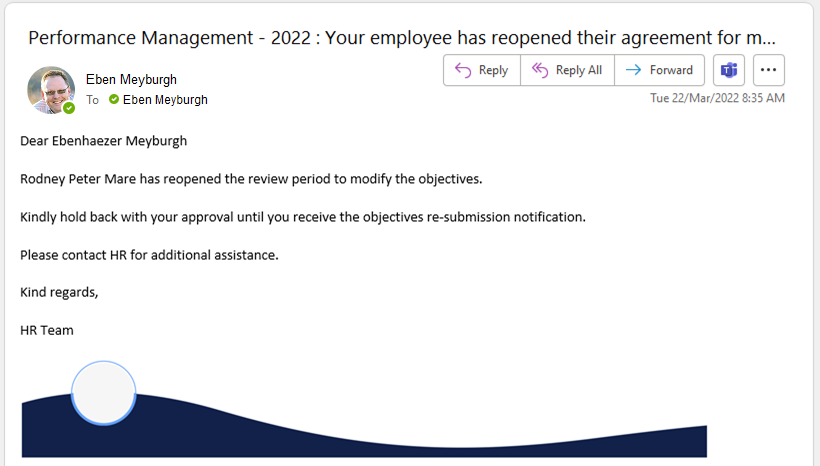
Since the approval of your objectives triggered a notification to your manager, the reopening of your agreement will again trigger a notification. See an example below.
You have submitted the contract, and the manager has approved it
If your contract has been submitted (by you) and approved (by your manager), then two steps are needed.
- Ask your manager to open his/her Performance Dashboard and click MODIFY OBJECTIVES on your contract - thus cancelling the manager's approval.

You can expect a notification confirming the agreement's reopening, similar to the one below.
- On your Performance Dashboard, go to the period to be opened, and click MODIFY OBJECTIVES - thus cancelling your submission and opening the agreement.
Recall that your manager will be notified of the agreement's reopening via a notification, like the one shown earlier.
Changing a submitted/approved contract
Initially, the employee and manager can work on the employee's objectives while the review period is still in the objective setting phase. At some stage, the employee or manager may submit or approve the objectives from their side...while the other is still making changes. If any changes are made on a submitted or approved review period, the submission/approval is automatically cancelled, and the parties will receive a notification to this effect. This is done to protect employees and managers from thinking a review period is done, while changes are still being made.
If the employee's submission has been cancelled by the system, the employee can expect this notification. (Example only)

If the manager's approval has been cancelled by the system, the manager can expect this notification. (Example only)

Recommended further reading:
- Glossary of terminology and definitions
- How to Use Performance Management with Success
- The Employee's Performance Management Dashboard
- Open an Existing Contract
- Create a New Contract
- Functionalities and Layout of the Performance Management Dashboard
- The Manager's Performance Management Dashboard
- Overview of The Performance Agreement Screen
- Set your objectives - Part 1 (Working with KPAs and KPIs)
- Set your objectives - Part 2 (Working with the other sections)
- Perform a Check-in on your Objectives
- Rate your objectives

The Performance Agreement - Check-ins
Process: Step 3

Lesson duration
About 6 minutes
What you will learn:
-
When the Check-in functionality becomes active
-
Using the Check-in stats
-
How a manager would do a check-in on an objective, and provide feedback
-
How the employee can reply to a checked-in objective's feedback
Doing a Check-in on Objectives
After submitting their performance objectives, employees will work on achieving them for three to five months before doing the review with their managers.
During this period, using the Check-in functionality provides a simple but effective way of keeping the objectives in focus, getting guidance and direction from a manager, and ensuring there are no surprises during the actual review.
Just note, a manager does not have to check-in on all objectives every time a Check-in is done. Select a few - if guidance is needed - and give feedback only on those objectives. During the next Check-in, focus on another set of objectives.
Remember, a Check-in is not a replacement for a face-to-face discussion with your employee/manager, it is done in addition to regular discussions.
A Check-in can be done as many times during your performance cycle as is needed.
Activating the Check-in functionality
Using the Check-in functionality is optional and depends on a company's configuration.
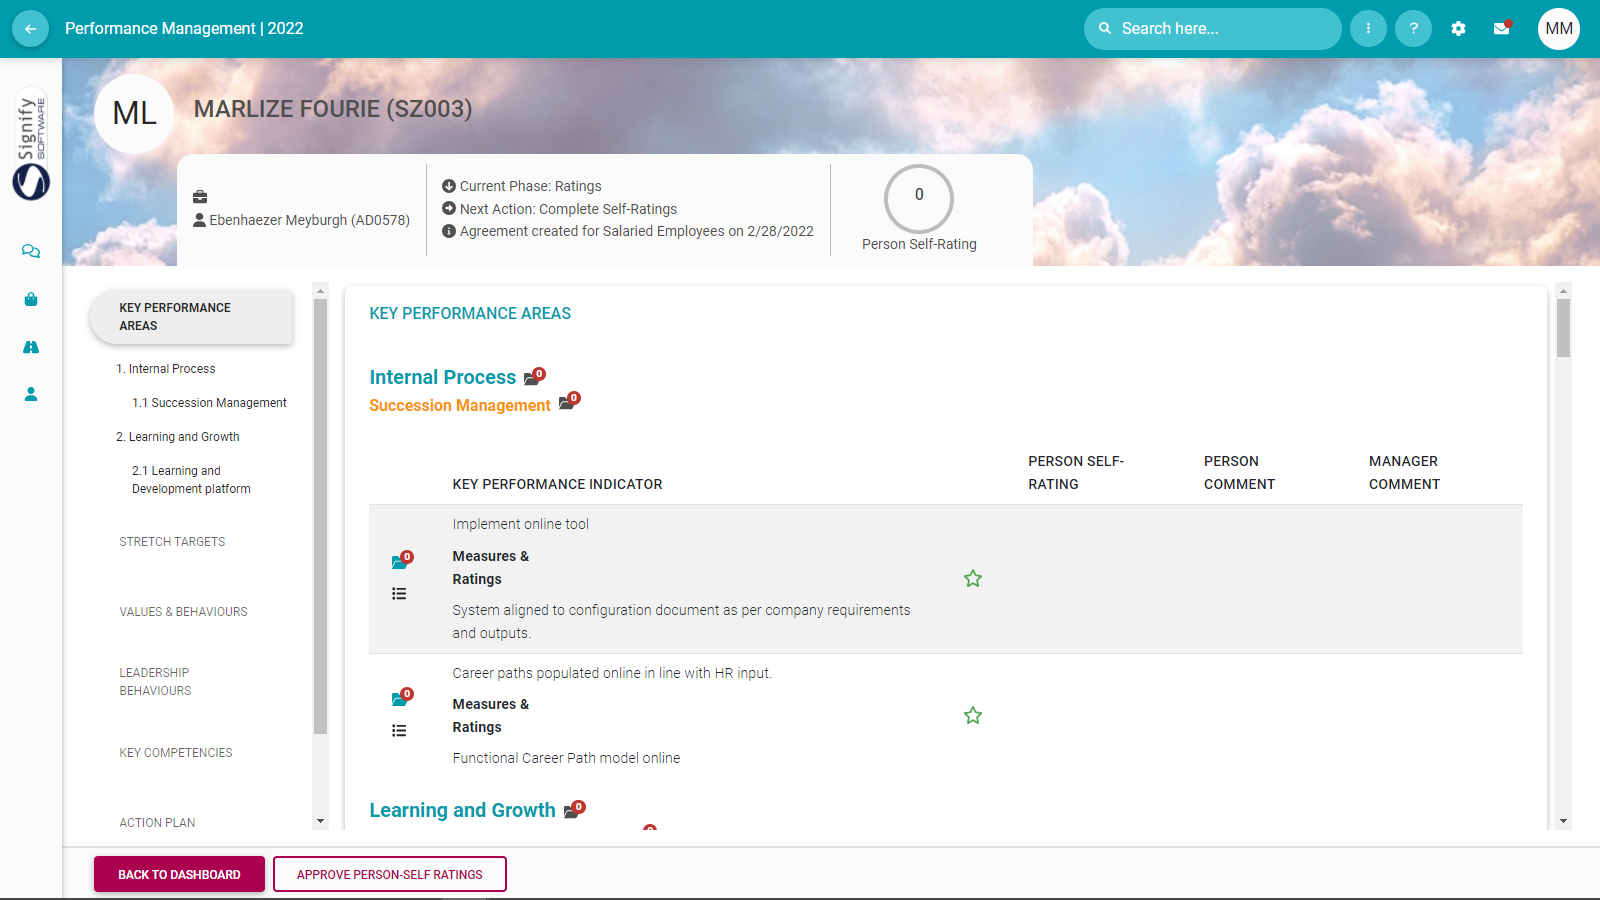
If Check-ins are enabled in the system, the CHECK-IN button will become active when an employee's objectives have been submitted and approved - that is when the contracting phase has concluded. See the screenshot below.
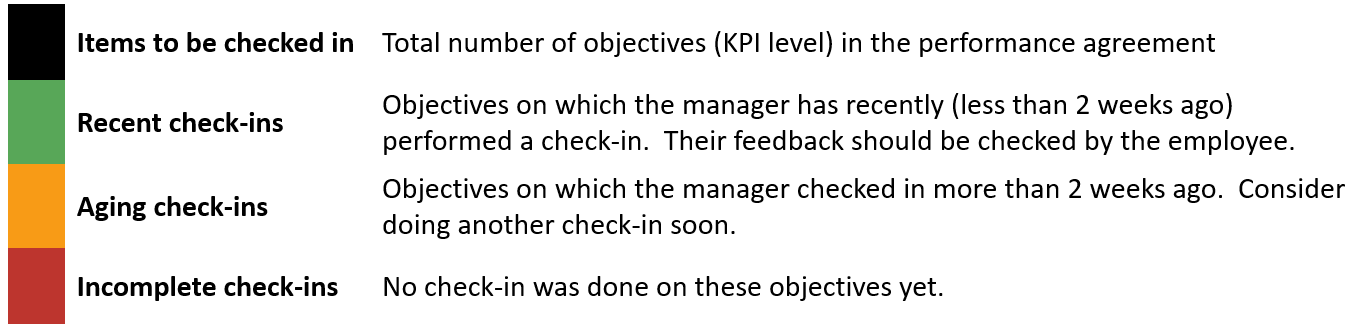
Check-in statistics
When the employee or manager opens the employee's check-in screen, find a summary of Check-in statistics at the top of the screen. It serves to give some indication of where to focus, and this is helpful when there are lots of objectives on a performance agreement.

See below for the interpretation of the numbers.
Do a Check-in (as manager)
Since the bulk of the activity on the check-in screen is from the manager's side, the following screenshots are from the manager's perspective.
- From the Manager's Performance Management Dashboard, locate the applicable person's contract, and click its CHECK-IN button.

- The Check-in screen opens, revealing:
The Check-in stats at the top.

The standard section menu is on the left side of the screen.
The objectives are grouped per section in the middle of the screen.
- Locate the objective due for a Check-in, and click on its record ...

- ...to open the check-in feedback screen.


- Provide feedback as needed.
The feedback in the My Comments field is made available to your employee; feedback typed as Private Comments is not.
- Use the Rating toggle button to indicate current progress sentiment.
Evaluating an item is not done in terms of the regular 1 to 5 (e.g.) rating scale but in the format of an On Track, or Not on Track indication.


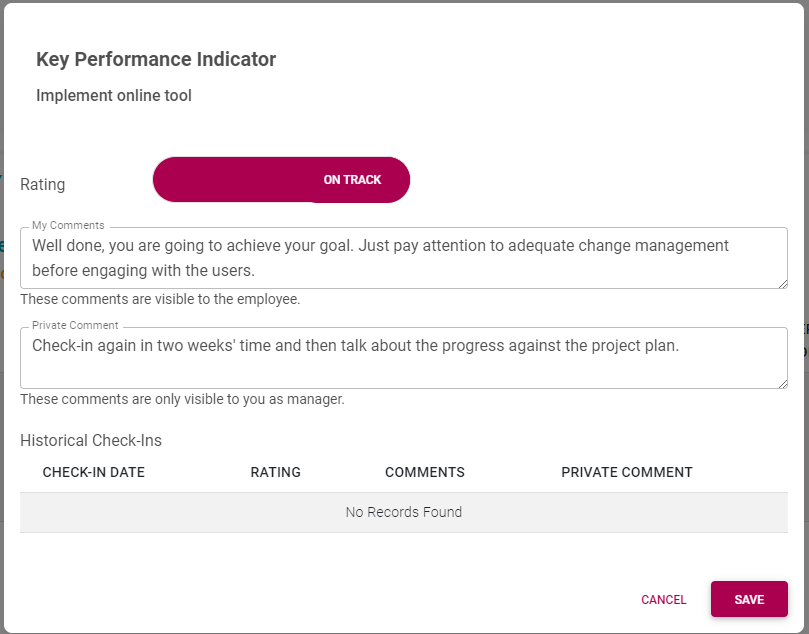
- Click SAVE when done.
After saving the feedback, notice how the feedback is added to the history of the objective's check-ins.
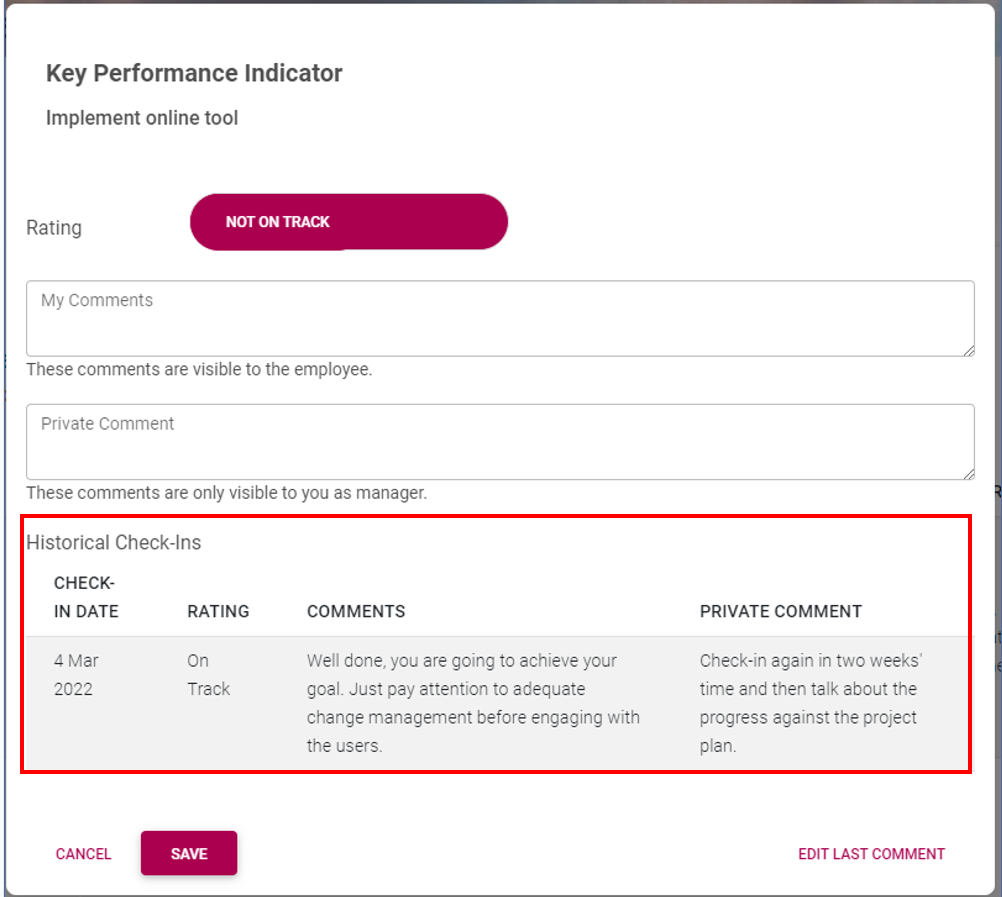
- In the lower, right corner, click EDIT LAST COMMENT to edit the last feedback. The agreement screen is updated with objectives having had check-ins done on them.
Reply on Check-in feedback (as employee)
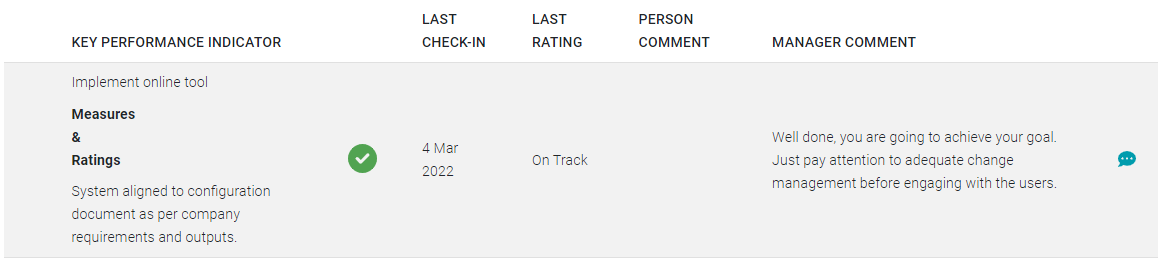
When an employee views a review period on their performance management dashboard, the presence of check-in feedback is displayed as a status message.


- Click CHECK-IN to open the check-in screen.
The screen statistics are updated to reflect new entries.

The checked-in objectives are highlighted, and feedback is visible.

- Click on an objective's record if the employee would like to reply to the manager's feedback.
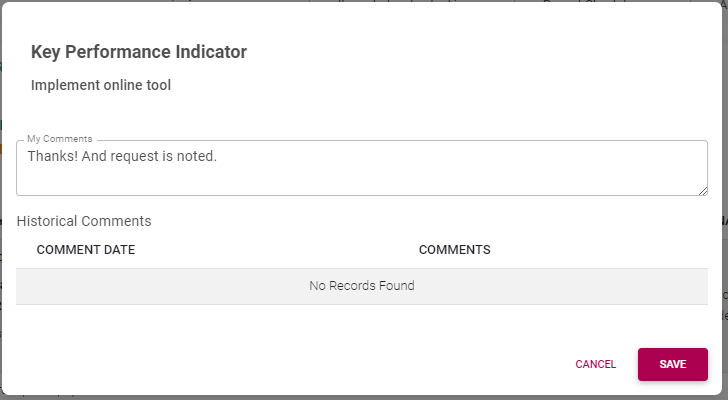
Feedback history is updated if comments are saved. Use the EDIT LAST COMMENT link in the lower right corner if you'd like to edit the comment.
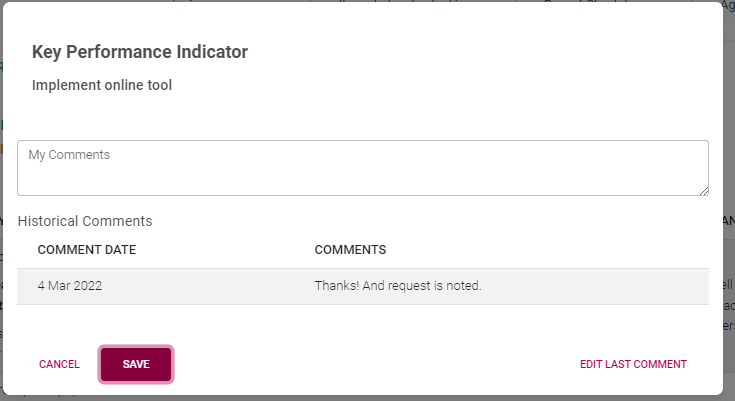
The Check-in screen is updated with the employee's reply.

- Click BACK TO DASHBOARD to exit the check-in screen.
Recommended further reading:
- Glossary of terminology and definitions
- How to Use Performance Management with Success
- The Employee's Performance Management Dashboard
- Open an Existing Contract
- Create a New Contract
- Functionalities and Layout of the Performance Management Dashboard
- The Manager's Performance Management Dashboard
- Overview of The Performance Agreement Screen
- Set your objectives - Part 1 (Working with KPAs and KPIs)
- Set your objectives - Part 2 (Working with the other sections)
- Perform a Check-in on your Objectives
- Rate your objectives
