Signature
- Signature Overview
- Organising Content
- Searching Content
- Default Page Editor
- Reusing Page Content
- Creating Video Tutorials
- How to guides
Signature Overview
The building blocks of Signature is based on the idea of a Library. Just like any library there exist shelves with books, each book can contain chapters and pages. You start off by creating the shelve that is the highest level of categorisation in Signature. Once you have created or identified the appropriate shelve you can start creating your book. A book which acts as the next level of categorisation. Ideally you'd have separate books for separate topics.
Within a book you can directly create pages or you can first create chapters. Chapters provide an additional level of page grouping to keep pages organised but are optional. All the information you write is held within pages. Although books and chapters do not hold information they can be given a short description to assist with searching and visibility.
Bookshelves can contain multiple books and a single book could be placed on multiple Bookshelves.
Default Colour Coding
Bookshelves, books, chapters and pages have set colour coding in Signature to ensure they are easily identifiable. The below examples show the default colour scheme.

Library Building Blocks
| Building Block | Explanation |
| Shelve | The highest level of categorisation and can store multiple books |
| Book | A categorisation of content per topic |
| Chapter | A grouping of information with sub topic and trend |
| Page | The lowest level of content grouping and can exist in a chapter or directly in a book |
| Draft Pages | A page yet to be finally saved and is continuously save as a draft whilst editing of the page |
Organising Content
Within Signature there are two options for moving content around; Either you can move pages and chapters individually or you can sort entire books.
Note that to move content you will need to have ‘edit’ permission for both the content being moved and the parent it’s being moved into.
Categorisations and Types
Main Shelves
Developer Portal: A shelve where all the books of a more technical nature will be stored. This information will be shared internally as well as with external development teams.
Modules/Products: A shelve to store all books for each of the modules in our integrated solution. Manuals, Business Rules, FAQ and the likes will go here.
Signify: A shelve where all the company related books will be stored. Books answering the questions who we are, how our products work and upcoming events will be included here.
Module Shelve Books:
Technical Guide: A guide with a focus on the technical aspects of the module. A module can have multiple technical guides for each sub module or group of functionality.
Technical Guide: A guide with a focus on the use of the module from the front end. A module can have multiple user guides for each sub module or group of functionality.
Moving Single Books & Chapters
Books and chapters can be moved directly to a new chapter or book. To move a chapter or page in this way go to a page or chapter and select ‘Move’ in the overflow menu, found on the right-hand side of the top toolbar:
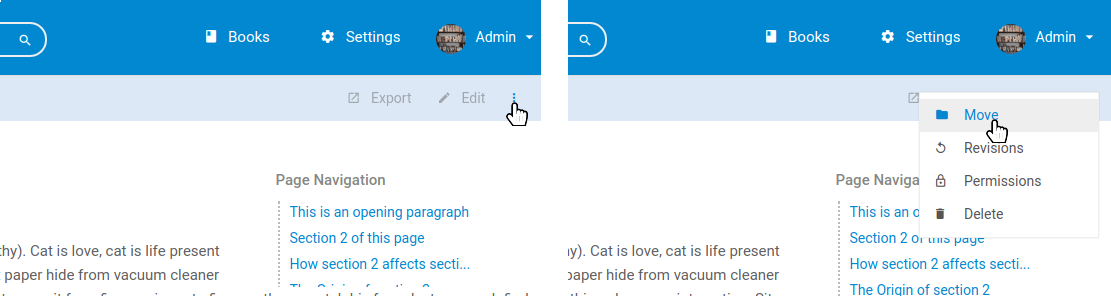
Clicking the ‘Move’ action will take you to a screen where you can select a new location for your chapter or page. Here you can search for a particular book or chapter using the search bar at the top of the selection screen. Once you select a new parent for your chapter or page press ‘Move Page’ or ‘Move Chapter’ and your chapter or page will be moved to the new chapter or book. If you move a chapter all child pages will remain in that chapter and any related activity will now show up under the new parent book.
Sorting Books
The ‘Book Sort’ interface allows you to move multiple pages and chapters with ease in a simple drag and drop interface. To sort a book simply go to the book and select ‘Sort’ in the overflow menu (3 vertical dots found next to the edit button) at the top right of the page and you will be directed to the sort view:
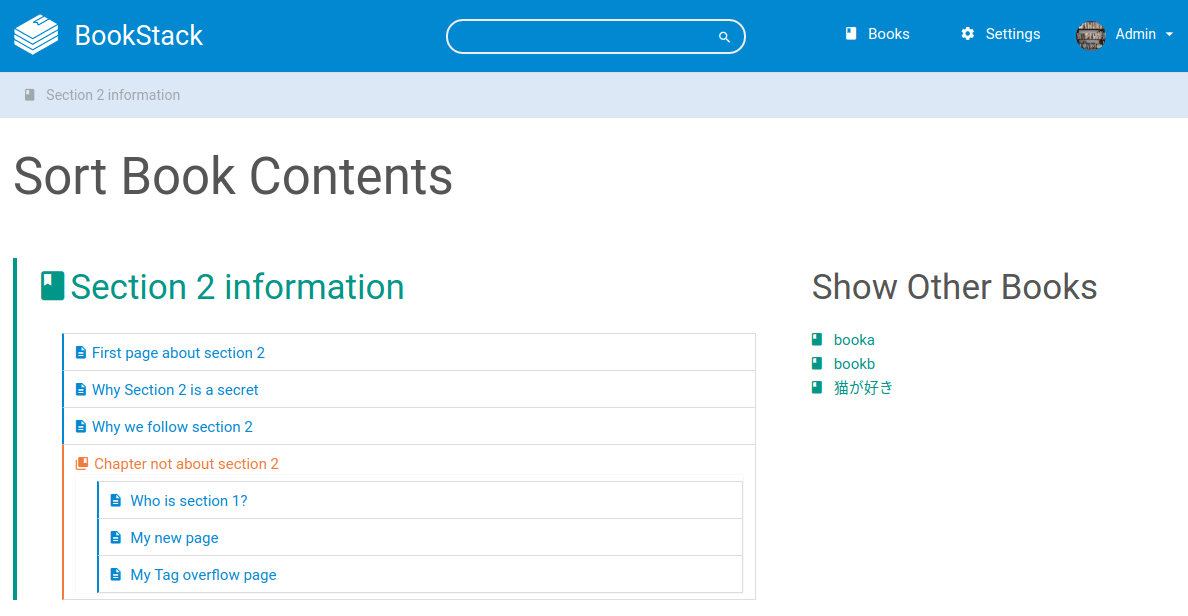
Initially, just the book you came from will show on the left. You can add extra books into the sort interface by selecting them on the right. Here you can simply drag and drop chapters and pages around and also between different books. Once you have organised your content press ‘Save’ and all included books will be re-organised.
Searching Content
The ability to search your documentation is vital to day-to-day use. There are a few locations within Signature where you can search for your content. Below is a list of search functions within Signature:
- Header Search Bar - The search bar/link in the header of every page allows you to search from anywhere. This search is a global search which will look across all books, chapters and pages in your system. After performing a search in this box you’ll be led to a search page that includes options and features that can help you build a more advanced search.
- Book/Chapter Search Bar - When viewing a book or chapter a search bar can be found in the top of the left sidebar. These searches will look across all child items.
- Move & Link Selection - When choosing to move a page/chapter or when selecting a page/chapter/book to link to within the editor the most popular items are shown but you also have the ability to search.
Advanced Search Syntax
All of the above search locations within BookStack share the ability to use advanced search syntax. An easy way to see this syntax in action is to use the global search in BookStack then play with the search filters which will update the search term with the below syntax. Below are details of the different types of syntax that can be used:
| Search Type | Syntax | Examples | Description |
|---|---|---|---|
| Normal Searches | <term_a> <term_b> | london meeting | Normal word searches across the name and description or body of your content. When mulitple terms are searched only one term has to match your content but content containing both terms will be higher in the results. |
| Exact Searches | "<term>" | "london meeting" | Exact matches will require that the whole string within quotes exists in your content in exactly the same format. Use this if you're looking for an exact phrase containing or if you need to search for a term with spaces in. |
| Tag Searches | [<name>] [<operator><value>] [<name><operator><value>] |
[location] [=london] [location=london] [attendees>5] |
Tag searches allow you to find pages which have specific tags applied. You can search by tag name, by tag value or by both name and value. When searching by tag value an operator must be used to define the match type. You can use =, !=, <, >,<=, >= or like as operators. When using the like operator you can use % symbols to represent wildcards in your search. |
| Filter Searches | {<filter_name>} {<filter_name>:<filter_value>} |
See below | Filters perform additional advanced functionality to make your searches even more powerfull. Some filters take values but some don't need to. See below for a full list of filters available. |
Available Filters
Filters are set advanced search features that can be used in your search term. The below table shows all the filters available in BookStack and how they can be used.
| Syntax | Examples | Description |
|---|---|---|
| Date Filters | ||
| {updated_after:<date>} | {updated_after:2016-12-30} | Adds the condition that the content must have been last updated after the given date. The date should be in the format YYYY-MM-DD |
| {updated_before:<date>} | {updated_before:2016-12-30} | Adds the condition that the content must have been last updated before the given date. The date should be in the format YYYY-MM-DD |
| {created_after:<date>} | {created_after:2016-12-30} | Adds the condition that the content must have been created after the given date. The date should be in the format YYYY-MM-DD |
| {created_before:<date>} | {created_before:2016-12-30} | Adds the condition that the content must have been created before the given date. The date should be in the format YYYY-MM-DD |
| User Filters | ||
| {updated_by:<user_id|me>} | {updated_by:10} {updated_by:me} |
Adds the condition that the content must have been last updated by the user of the given numeric ID. If 'me' is used in place of a numeric ID then it will find content that was last updated by the current logged-in user. |
| {created_by:<user_id|me>} | {created_by:10} {created_by:me} |
Adds the condition that the content must have been created by the user of the given numeric ID. If 'me' is used in place of a numeric ID then it will find content that was created by the current logged-in user. |
| Content Filters | ||
| {in_name:<search>} | {in_name:London Meetings} {in_name:Meetings} |
Will require the content to have the given <search> term in the name rather than the name or content body. |
| {in_body:<search>} | {in_body:London Meetings} {in_body:Meetings} |
Will require the content to have the given <search> term in the body rather than both the name or content body. |
| Option Filters | ||
| {is_restricted} | {is_restricted} | Will require the content to have content-level permissions active. Does not return items with only inherited asset permissions. |
| {viewed_by_me} | {viewed_by_me} | Will require the content to have been viewed by the current user at least once. |
| {not_viewed_by_me} | {not_viewed_by_me} | Will not return any content that has been viewed by the current user. |
| {type:<content_types>} | {type:page|chapter|book} {type:page|chapter} {type:book} |
Restricts the types of content that will be in the search results. Use of this will depend on the type of search. For example, in a chapter search only pages are shown so this has no effect. |
Search Examples
Below are some examples of using the above syntax and filters with descriptions:
"my cat" {viewed_by_me} {updated_after:2017-01-24}"my cat"- Search for content containing the exact phrase ‘my cat’{viewed_by_me}- that has been viewed by me{updated_after:2017-01-24}- and was last updated after the 24th of Jan 2017.
-
textbook discussion [meeting] {type:page} {created_by:me}textbook discussion- Search content for the wordstextbookordiscussion[meeting]- only show content that has ameetingtag applied{type:page}- only show pages, hide chapters and books{created_by:me}- that was created by me.
-
{type:book|chapter} {created_by:me} {created_after:2016-08-12} {created_before:2017-02-18}{type:book|chapter}- Search all books and chapters{created_by:me}- that were created by me{created_after:2016-08-12}- after the 12th of Aug 2016{created_before:2017-02-18}- but before the 18th of Feb 2017
Default Page Editor
The default editor in Signature is a ‘What You See Is What You Get’ (WYSIWYG) editor. The usage of this editor is similar to typical word-processing applications such as Word or Google Docs.
Editor Shortcuts
The following shortcuts are available in the WYSIWYG Editor:
| Shortcut (Windows & Linux/Mac) | Description |
|---|---|
Ctrl+S / Cmd+S |
Save Draft |
Ctrl+Enter / Cmd+Enter |
Save Page & Continue |
Ctrl+B / Cmd+B |
Bold |
Ctrl+I / Cmd+I |
Italic |
Ctrl+U / Cmd+U |
Underline |
Ctrl+1 / Cmd+1Ctrl+2 / Cmd+2Ctrl+3 / Cmd+3Ctrl+4 / Cmd+4 |
Header Large Header Medium Header Small Header Tiny |
Ctrl+5 / Cmd+5Ctrl+D / Cmd+D |
Normal Paragraph |
Ctrl+6 / Cmd+6Ctrl+Q / Cmd+Q |
Blockquote |
Ctrl+7 / Cmd+7Ctrl+E / Cmd+E |
Code Block |
Ctrl+8 / Cmd+8Ctrl+Shift+E / Cmd+Shift+E |
Inline Code |
Ctrl+9 / Cmd+9 |
Callout (Keep pressing to toggle through styles) |
Reusing Page Content
Within Signature you may find that you want to include the same block of content in multiple places. You could copy and paste that content into multiple pages but then, if that content needs to be changed, you’d have to update it multiple times across different pages. Introduced in BookStack v0.14 is the ability to include other pages and to also include single blocks of content from other pages.
Note that the included behaviour is non-recursive so including will only work to a single level. This ensures performance and prevents users from breaking pages by creating include loops.
Include Tags
To include the content of a page within another you can use the following syntax:
{{@page_id}} or {{@page_id#content_id}}
Here are some examples of this in use:
- Includes all the content from the page with an id of ‘5’.- Includes the content within the element of idbkmrk-copyright-yearin the page with an id of ‘10’.
You simply enter that in the page editor and then, when the page is viewed, the content will be dynamically be fetched. This means you can update the referenced content and it will show the same changes on any page the content is included within.
Easily Grabbing the Syntax
Finding the id of a page can be difficult so a quick and easy way to find include tags is built into Signature. View a page with some content you want to re-use. Use your mouse to select some content and you will see a popup appear. By default this contains a direct link to that content. If you click the link icon on the left it will switch to show you the include tag for that content. Simply copy that and place it in another page. Remove the # and content id to include the whole content of the page instead of just a single block.

Creating Video Tutorials
A video is worth a thousand words or maybe a few more. At Signify we create short tutorial videos to impart knowledge regarding general questions and the functionality of our system and tools. The following list will serve as a guide on how to create videos
- Time Limit: Video nuggets must be shorter than 10 min and to the point
- Naming Convention: {Description regarding Topic}_{Version of System}
- Language: English
- Recording Tool: Loom, ShareX, Apowersoft
- Any video recorder is allowed, as long as it does not leave a watermark in the background of the video after recording
- Theme: Record videos with neutral Signify theme and Signify logo. Do not record video on client’s system.
- Data: Use proper real-life data in your videos. Avoid using “test” data (e.g. random names like “Frankie's first pathway test”
Where to upload your videos?
Signify has a YouTube channel for the purpose of storing your hard work in creating them. While uploading select the correct playlist, there is a playlist per module . All videos either fall under one of the following categories:
Technical: Videos of a more technical nature or that is not for public distributions. Videos of these type are unlisted and placed in unlisted playlist
User: Videos focusing on the user functionality and made for public distribution.
When uploading the video add a short description of the content matter and where applicable add the link to the relevant Signature page.
The YouTube channel Signify Software: Modules can be accessed through the image below. The Signify.Modules account can be used to access it.

How to guides
Short guides on how to create content on Signature
How to create a new book
When to add a book?
You can think of a book as a topic you can speak on for days on end without stopping. In other words, there really is a lot to say!
Smaller or shorter snippets of information belong in either a chapter or a page.
Steps
- Sign into Signature
- Select the shelve you want to add the book to

- Click on 'New Book'

- Specify a proper name and description for your book (Pro-tip: A proper choice here will go far in others finding your book when they need it)
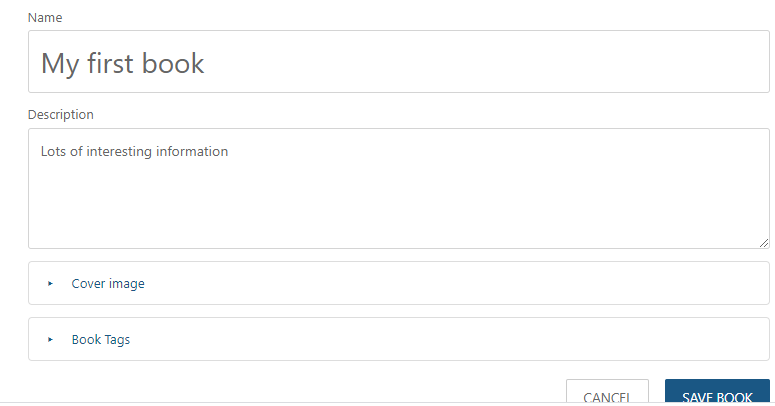
- Add a Cover image to help users identify your chapter visually over time
- Book Tags can be added to improve searching