VACANCY TRACKER & RECRUITEMENT
The Recruitment & Selection Module manages advertisements for positions up to the point where an employee can be appointed to a position. These advertisements can be placed for both internal and external candidates.
- User Manual - RECRUITEMENT
- Configuration
- Module Administration
- Positions on Job Profiler
- Advertised Positions
- Create and Edit an Advertisement
- View Advertisements and Apply for a position
- Review Advertisements
- Manage Applications on an Advertisement
- Categorise an Application
- Manually Add an Application
- Filter Applications
- Send Letters to Applicants
- Appoint an Applicant
- Reports available in the module
- User Manual - VACANCY TRACKER
- Quick Reference Guides and Practical Exercises
User Manual - RECRUITEMENT
Configuration
Recruitment: Introduction to the Recruitment & Selection Module
The Recruitment & Selection Module manages advertisements for positions up to the point where an employee can be appointed to a position. These advertisements can be placed for both internal and external candidates.
Recruitment: Module Configuration
Configuring the Recruitment & Selection module is fairly basic.
- Click System Administration on the Administration Menu.
- Click System Administration | Tools | Configuration

Recruitment: Configuration Sections
On the left hand menu: Click Framework | Human Resources | Recruitment to open the Configuration Module Setting Detail page

Recruitment: Configuration Module Setting Detail
- Settings can be modified by the administrator
- An audit trail is created for changes made in this section
- When done, click Update Settings to submit the changes
- In many instances settings are cached by your browser. To ensure that the settings are effective immediately click the Clear Application Cache button
- Click on the Home button on the left hand side to exit the Configurations page

Selected Setting Description
Recruitment - Notify manager of application
- If selected the manager will receive a notification if one of his direct employees reporting to him apply for an advertised position.
Recruitment - Show rating sections on application
- If ticked will, for each application, display sections (e.g. qualifications required) in which to indicate if the application makes the requirements in that section.
Recruitment - Thank you message when submitting an application
- A courtesy message displayed to employees after submitting their applications.
Recruitment - Show only advertisements for positions reporting directly to a chief position
- Once a chief position has been defined, everyone in that organisational node reports to that person
Recruitment - The maximum allowed uploadable size of an external applicant's CV document. This value is measured in BYTES.
- The size stipulated here will determine the size of the CV document the applicant can upload
- The page example above has a default size that allows for a 5 megabytes (5242880 bytes) CV document to be uploaded.
Recruitment - The number of hours / days the email link will be active for applicants that apply for an advertised position on the External Recruitment Portal(The value specified must be in seconds)
- The signify system sends a link to an external applicant when they apply for a specific position. This link determines the number of hours/days the link should be active before it expires
Recruitment - The number of hours / days the email link will be active for recruitment agents that apply for an advertised position on the External Recruitment Portal(The value specified must be in seconds)
- The signify system sends a link to an external agent when they apply for a specific position. This link determines the number of hours/days the link should be active before it expires
Recruitment - The URL of the system that acts as the external module of the entire recruitment module
- This URL is where the external recruitment system is accessed
Recruitment - The absolute URL of the system that acts as the index page of the ERM
- This is the absolute URL where the index page of the External Recruitment Module is accessed
Recruitment - Show link on advertised positions to allow chief position to see positions advertised in their org unit
- This setting allows the chief position to see other positions that are advertised within the organisational unit
Recruitment - Declaration when recruitment application is submitted (No acceptance required if no declaration)
- A declaration message when the application is submitted. If there is no declaration then acceptance is not required
Module Active
- Determines if the Recruitment & Selection module is active in the Signify HR system
Module Administration
Administration of this module consists of populating the page look ups and filtration criteria as well as the letter templates.
Master Data
From the Home page:
- Click System Administration on the Administration Menu.
Please note: If you do not see this option it means you do not have system administration rights.
- Click Modules | Recruitment | Master Data to display the list of master data items
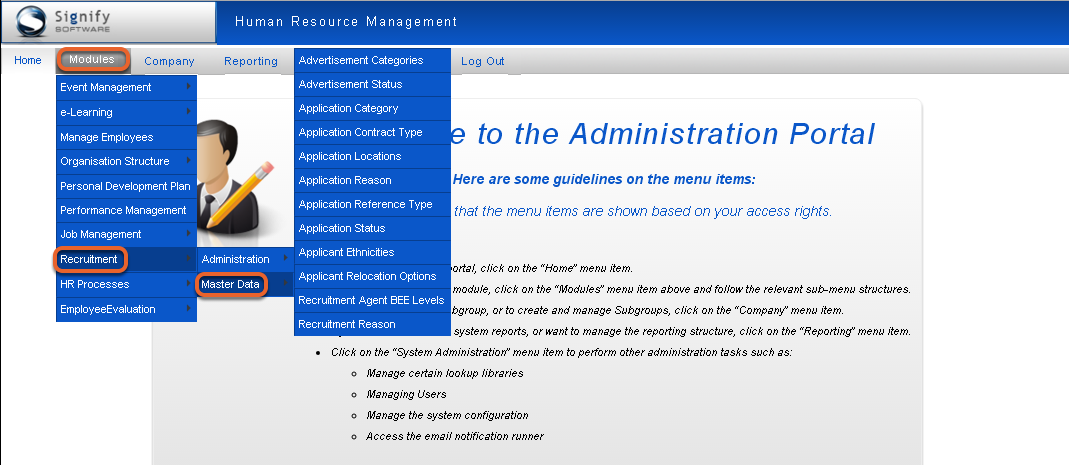
Master Data Descriptions
Advertisement Related Master Data:
- Advertisement Categories
- Categories can be defined according to preference. Generally categories defined as departments
- Advertisement Status
- Values used to indicate the different statuses of an application. Examples are: Not Submitted, Invited, Appointed, Cancelled etc. These fields can be edited, but no new fields can be added.
- Recruitment Reason
- The reason why a position is being advertised. Examples are: New Position, Previous Incumbent Resigned, and Restructuring
- Application Category
- Values used to indicate the different categories applications could be in. Examples are: Group A, Group B. Professional, Manager, Technical, etc.
- These fields can be viewed, edited, added and deleted
- Application Contract Type
- A new recruitment contract type can be created here. This information will be displayed
- Application Locations
- A new location for positions can be created here. This information will be displayed
- Application Reason
- Values used to indicate the different reasons people can put forward why they are applying for a position. Examples are: Promotion, Change of Environment, Job Exposure etc.
- Application Reference Type
- Values used to indicate the different types of references (or relationships) that can potentially be used in support of an application. Examples are: Former Colleague, Current Manager, Friend etc.
- Application Status
- Values used to indicate the different statuses of an application. Examples are: Not Submitted, Invited, Appointed, Cancelled etc. These fields can be edited, but no new fields can be added.
- Applicant Ethnicities
- Applicant ethnicities can be created here. This information will be displayed
- Applicant Relocation Options
- Applicant relocation options can be created here. This information will be displayed
Recruitment Agent Related Master Data:
- Recruitment Agent BEE Status
- Recruitment Agent BEE Levels can be created and edited here
Configure Letter Templates
- Click System Administration on the Administration Menu.
- Click Modules | Recruitment | Administration | Configure Letter Types
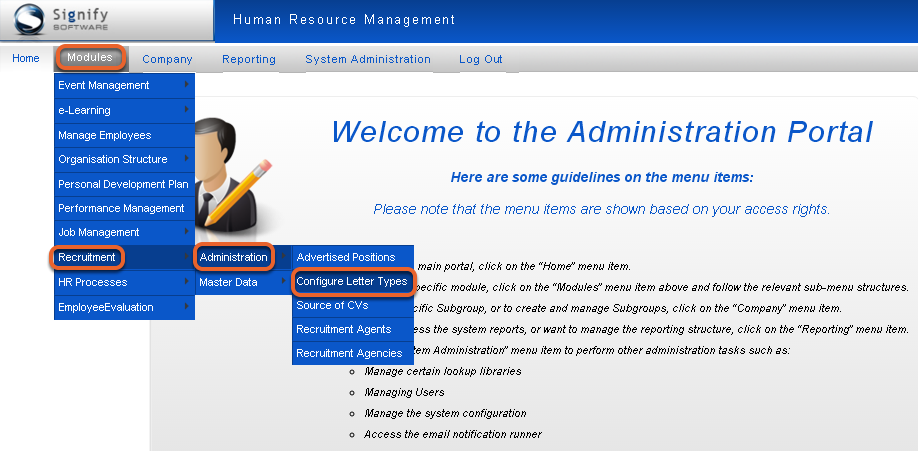
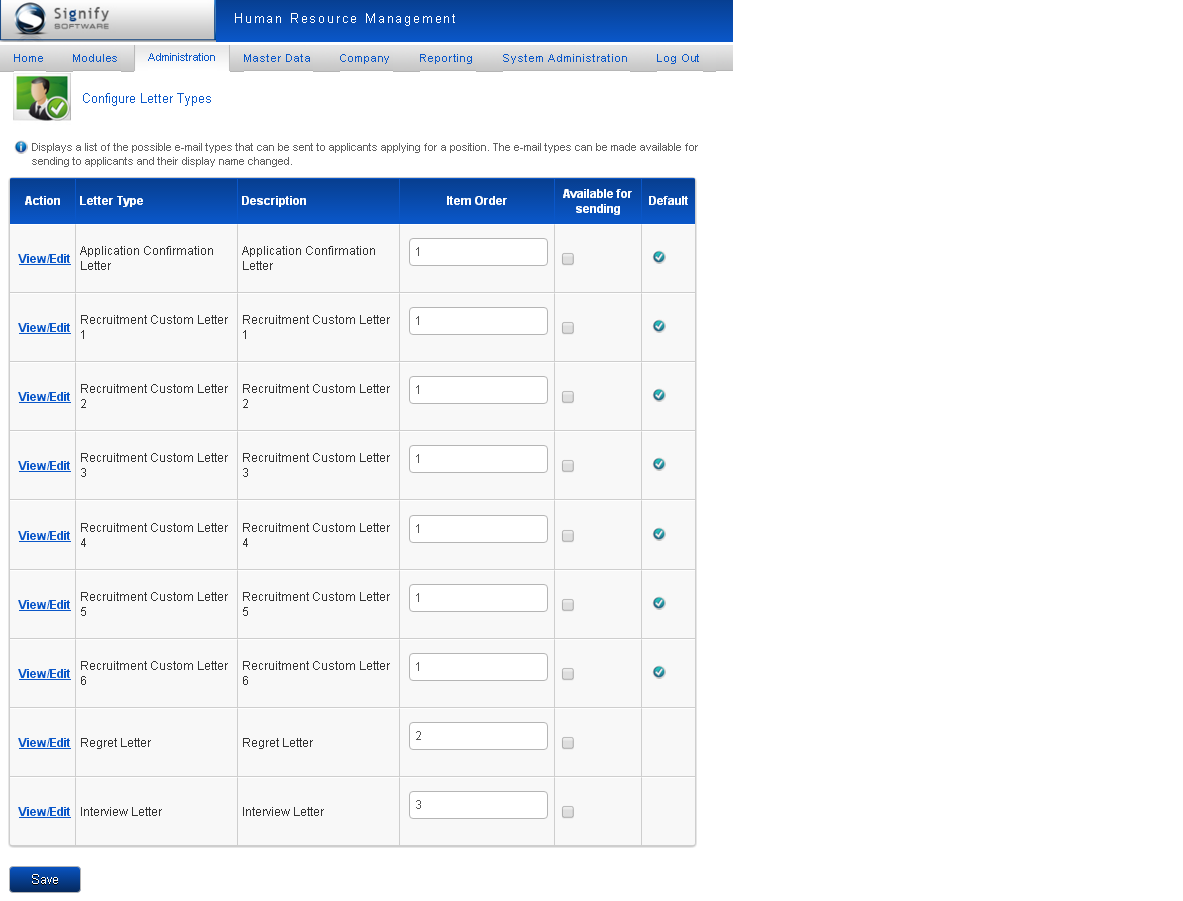
List of Letters
- The following page is displayed:
The list of letters is loaded by Signify Software and additional templates can only be added by Signify.
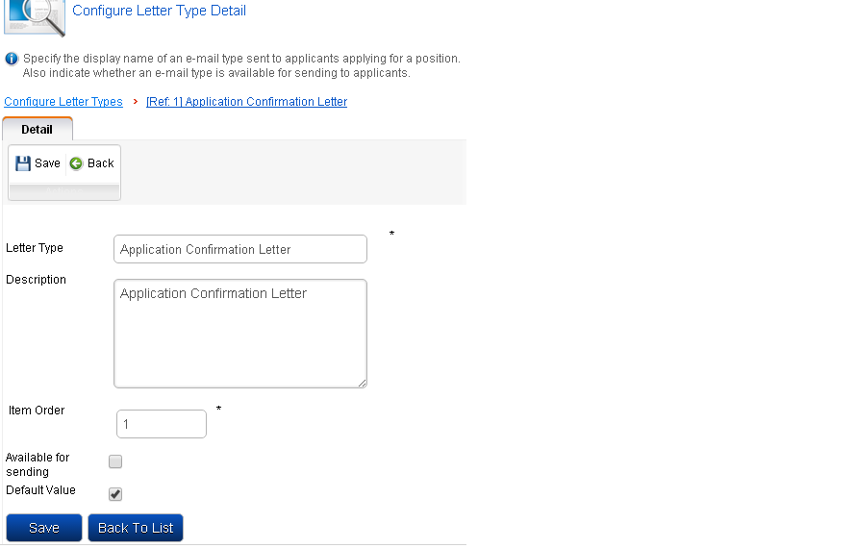
Configure Letter Type Detail
Letters can be edited. To edit a letter:
- Click on the view/edit hyperlink in the Action column next to the relevant letter you would like to edit.
- The following page will be displayed

Edit Letters
- Change the letter type and or description if applicable
- Specify the order e.g. if 1, then this will be the first option to display in the letter dropdown in the Applications Received Page .
- Tick if the letter must be available for sending if ticked then it will display in the dropdown option of letters that can be sent to the candidates located in the Applications Received page.
- Recruitment | Administration | Advertised Positions |Click Here to… View/Edit Applications
- Tick if this letter should be the default letter type to be selected in the letter dropdown.
- Click Save to save the modifications made
- An example of the dropdown option on the Applications Received Page:

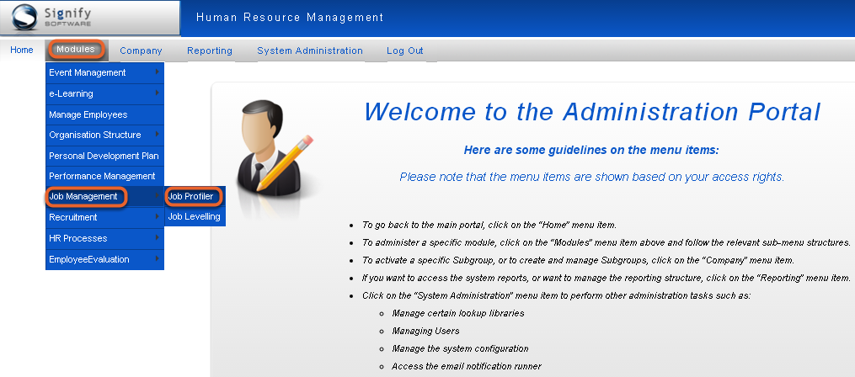
Positions on Job Profiler
In order to advertise a position, that position must exist in the Job Profiler module.
Verify the position's details
As mentioned, the first step before building a position’s advertisement is to verify the position’s details in the Job Profiler module.
Check the job's profile
Open the Job Profiler module from the main menu.
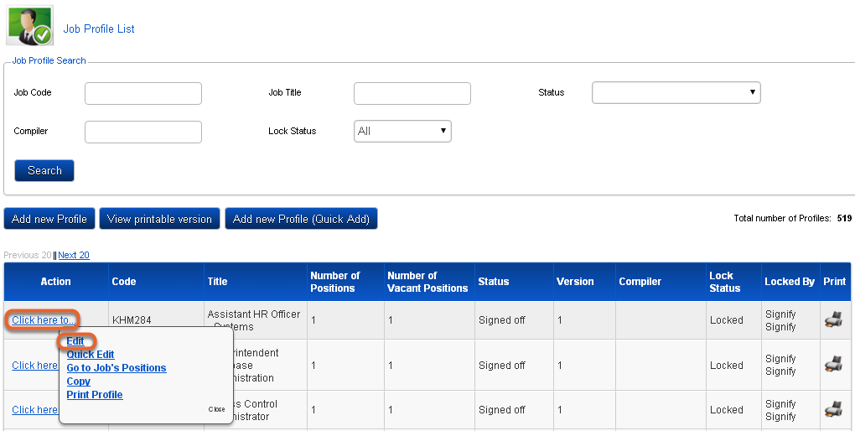
Locate the applicable Job Profile
- Locate the applicable job profile by searching for it on the list of job profiles.
- When found, in the Action field, click Click here to… and select Edit from the available options.
Confirm where the position is located on the Organisation Structure

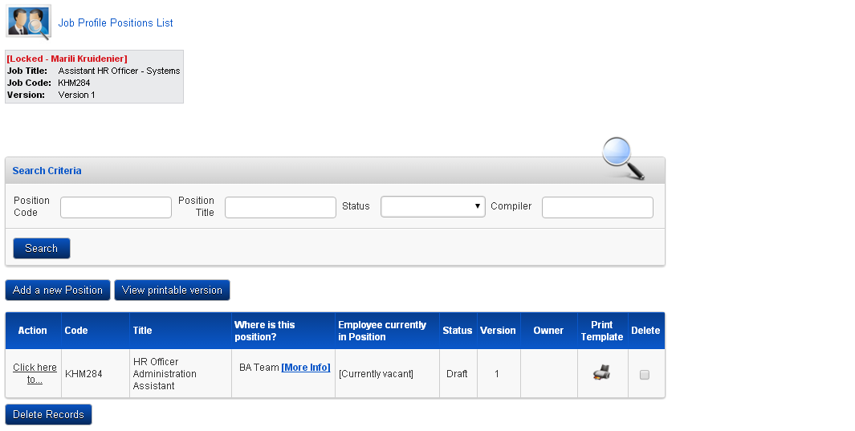
Job Profile positions list
On the list of positions in this profile, every position is qualified with the following information:
- Where on the organisation structure the position is located.
- A hyperlink “Link position to Org” will be displayed next to positions that have not yet been linked to the Org.
- Who the current incumbent is or it will display if the position is vacant.
- To view the location of the position, click "More Info" and a portion of the Org Structure will be displayed.
Advertised Positions
The process of creating a position’s advertisement will be explained
The Advertised Positions page
- Click System Administration on the Administration Menu.
- From the Home page select Modules | Recruitment | Administration | Advertised Positions

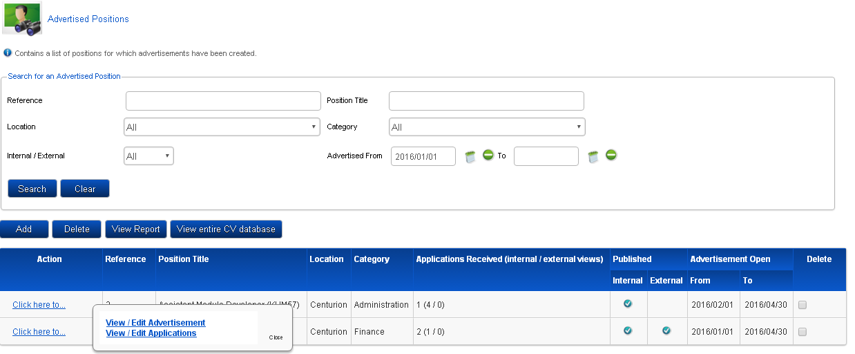
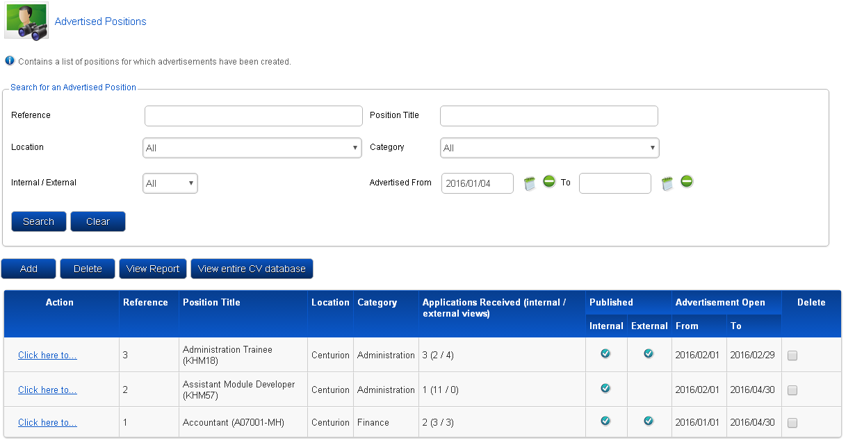
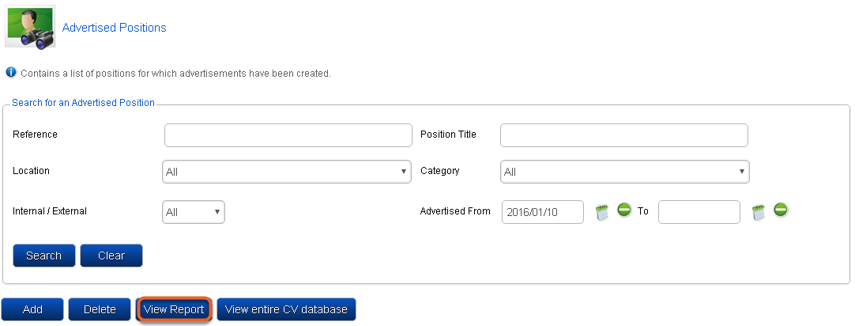
Advertised position landing page
- The Advertised Positions page that will be displayed is seen below:
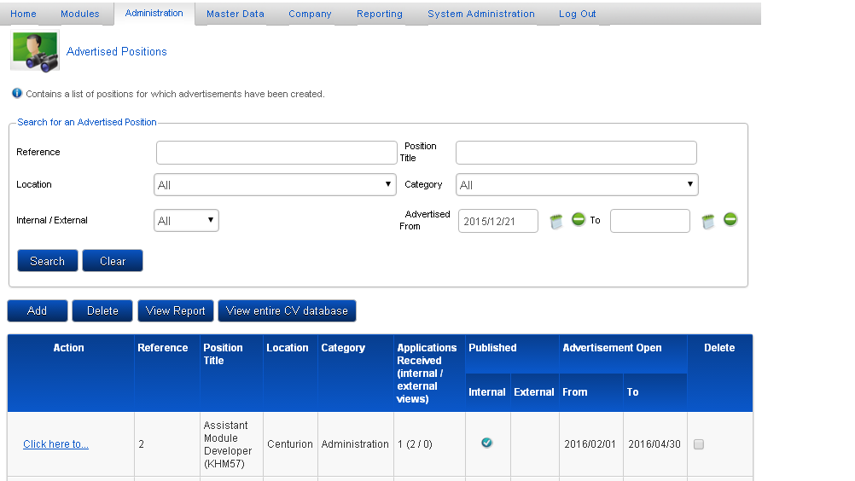
This page summarises the Recruitment & Selection module’s status in the following ways:
Actions that can be performed on this page:
- Search for a specific advertised position(s).
- An advertised position can be added by clicking the Add button.
- An advertised position can be deleted by ticking the delete checkbox and clicking the Delete button.
- View Report will display the list of advertised positions and this information can then be exported to Excel.
- View entire CV Database will give you an overview of all CV’s received from all internal and or external candidates.
Table contents:
- Action: In the action column you can click on the respective advertised positions Click here to… hyperlink and select to either view/edit the advertisement or to view/edit applications.
- Reference: The reference number in the second column is system generated and is the unique number assigned to each advertisement.
- Position Title: Position title is the description as specific when the job profile is created.
- Location: This is where the position will be filled.
- Category: This is in which department this positions falls under.
- Applications received: It shows how many applications have been received per advertisement and also shows how many internal and external views the position received.
- Published (Internal / External): This will be an indication if the advertised position is for internal and or external candidates.
- Advertisement Open From/To: This is the date that the position will be open for applications to be submitted.
- Delete: The advertised position will be deleted when the delete checkbox has been ticked and the delete button in selected.
Additional information you need know about this page:
- By default only advertisements that have been advertised from a month ago onwards are shown. To see older advertisements adjust the Advertised From date accordingly.
- In the search box the advertised from date defaults to the current date. If a position is created and it does not appear in the table, change the Advertised From date to include the period that the position was advertised from.
Create and Edit an Advertisement
Create an advertisement for a position
Follow these steps to create a new advertisement for a position:
- On the Advertised Positions page click the Add button to open the page where the details of the advertisement can be captured.
- All fields marked with a * are compulsory and must be completed else you will not be able to save the information.
- The following page is displayed:
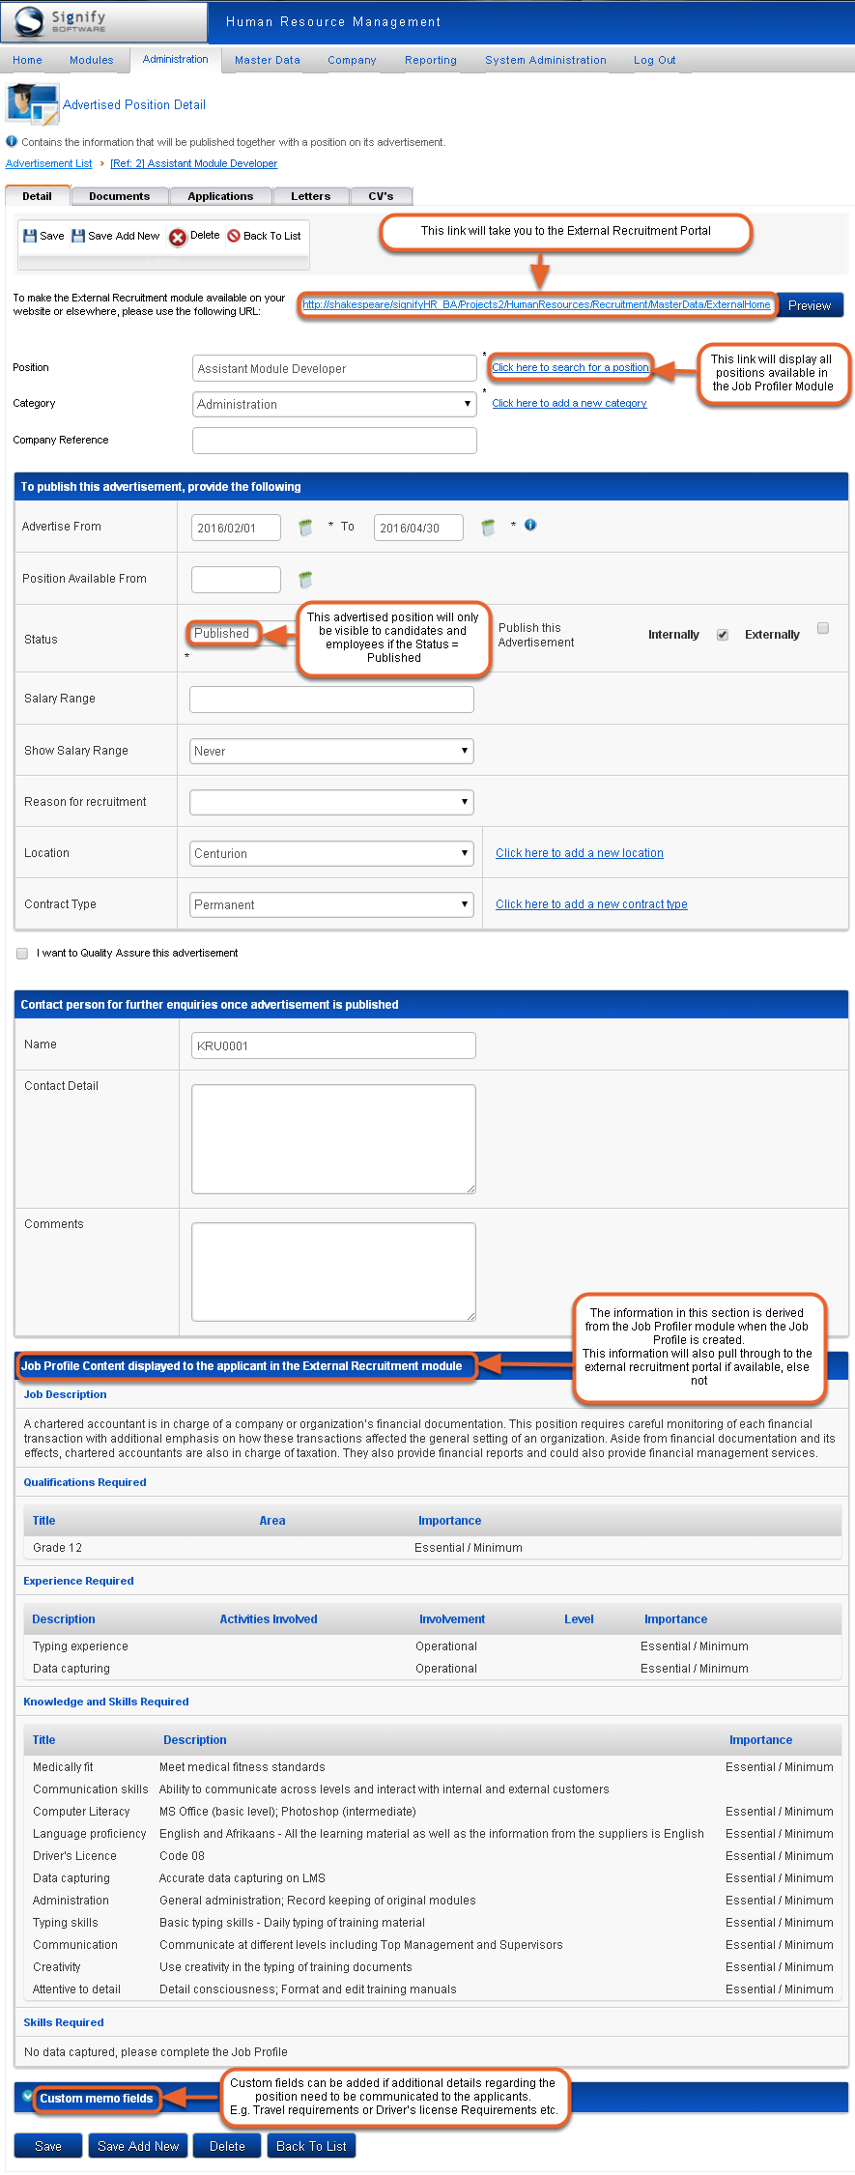
Save the advertisement
- When all required details have been entered, click the Save button to submit the advertisement.
- When the page is closed, the completed advertisement is visible on the Advertised Positions list page as per the example below

Edit an advertisement
Once an advertisement has been saved it is shown in the Advertised Position list page. The following actions are available once you have located the desired position:
- View/Edit Advertisement takes you back to the Advertised Position Detail page discussed in the previous section.
- View/Edit Applications opens a list of applications submitted against the advertisement.
Detail Tab
- To update the advertisement select the View/Edit Advertisement option.
- Update the information where required and click Save.
Apart from the advertisement details already specified, the following tabs are also made active when an advertisement is saved the first time.
- Documents
- Applications
- Letters
- CV’s

Documents Tab
- Click the Documents tab to open the Documents page
- This page contains documents that are uploaded against the position’s job profile in the Job Profiler module.
- These documents can be downloaded here or in the Job Profiler module but no documents can be added directly to the advertisement itself.

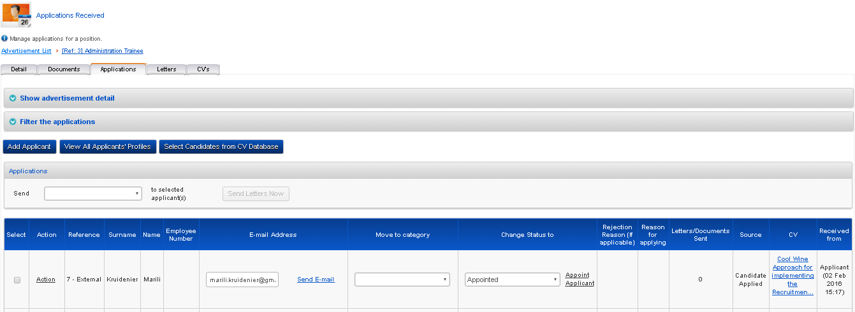
Applications Tab
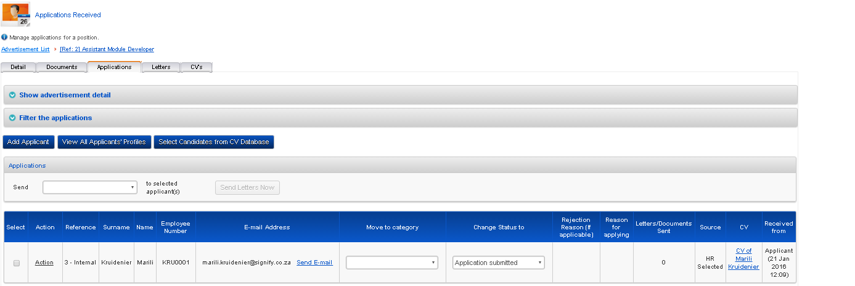
- Click the Applications tab to display the Applications Received page.
- Information displayed here is applicable to the individuals that manage the applications received and appointments/rejections.
The detail of the applications will be discussed in detail further on in the document.
Letters Tab
- Click the Letters tab to open the Recruitment Letters page.
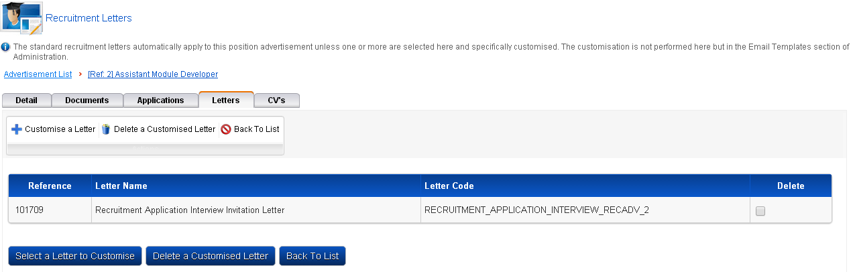
Customise a letter type
- The Recruitment module is installed with a number of standard letters similar to the page example above.
- Sometimes there may be a need to use branded or custom developed letters instead of the standard ones. To customise a letter type:
- Select the Administration option in the top menu bar.
- Select the Configure Letter Types option.

Configure Letter Types
- A list of available letters will be displayed, in the Configure Letter Types page as seen below.
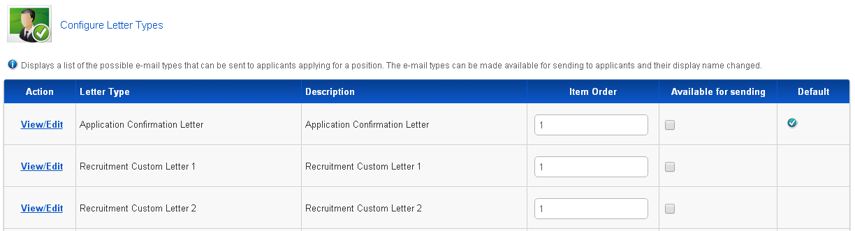
Configure Letter Type Detail
- Select the View/Edit hyperlink next to the applicable letter type to be modified.
- The letter details will be displayed as it is shown in the Configure Letter Type Detail page below.
- Modify the relevant fields and click Save.
CV's Tab
- Click the CV’s tab to open the following page.
- This page contains ad hoc CV’s that are uploaded against the position by the manager or administrator of the advertisement.

View Advertisements and Apply for a position
In this section viewing available job advertisements and applying for them are described.
There are two ways in which an individual can apply for a position
- Internally on the Signify System
- Externally via the External Recruitment Portal
View the List of Published Advertisements (Internal Applicant)
- On the Signify System locate and select the Advertised Positions option on the My Quick Start menu.
- If the Advertised Positions option is not immediately visible, select Show more options from the My Quick Start menu.
- If Advertised Positions is not available at all, contact your systems administrator

List of positions
- The list of positions currently open for applications will be displayed in the Advertised Positions window similar to the example below:

Action Button
- The status column will display the status of the application as well as the reference number of the application.
- Once the Action button has been selected, the following options are displayed:
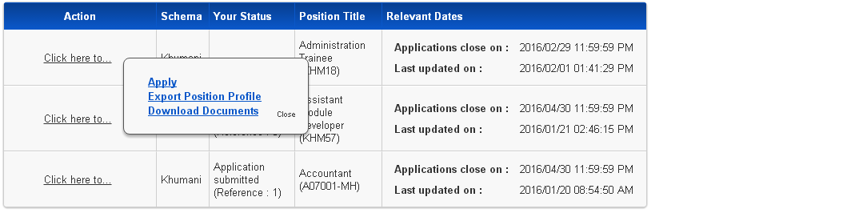
Apply
- Selecting Apply will open the Apply for a Position page, as shown below:
- Complete the form according to the specified position, indicating the reason for application and including additional comments as required/preferred

View Job Profile
- Selecting View Job Profile will open the Export Position Profile page as shown below:

Download Documents
- Selecting Documents will open the Documents page that will display documentation relating to the position that the applicant is applying for.
- In order to download the file, select the icon from the Download File column.

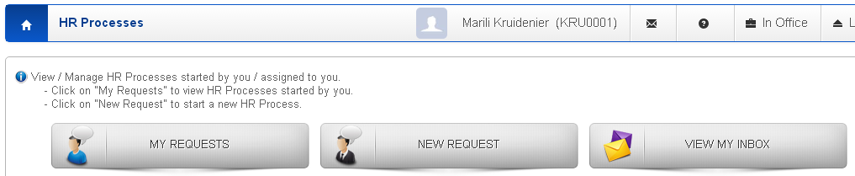
View a list of Positions that you have applied for
As an internal applicant, view the status of your application from the HR Processes menu located in the My Quick Start menu
Three options are made available in the HR Processes view:
- My Requests
- New Requests
- View My Inbox
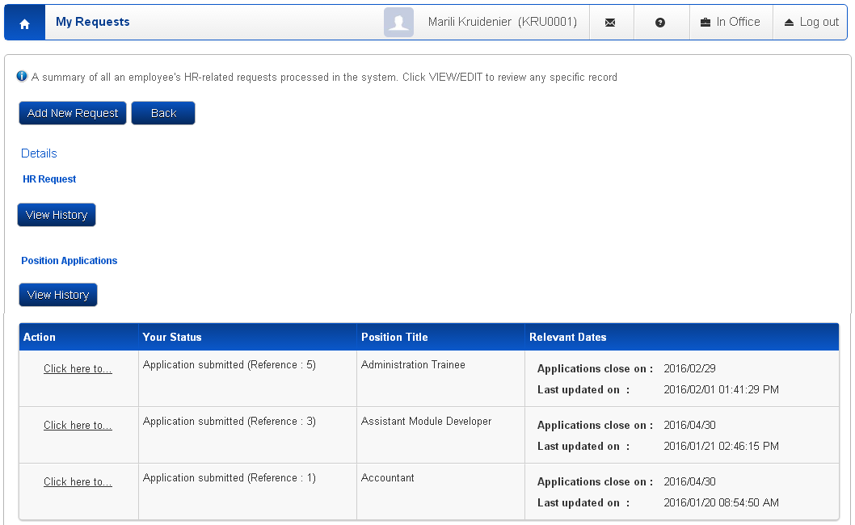
My Requests
On this page a user can view positions that they have applied for as well as the status of their applications.
New Request
- When selecting the New Request button, either from the HR Processes page or on the My Requests page the following page will open:
- Under the Employment group, a user can view vacancies that have been published.
- Once View Vacancies is selected the Advertised Positions page will appear.
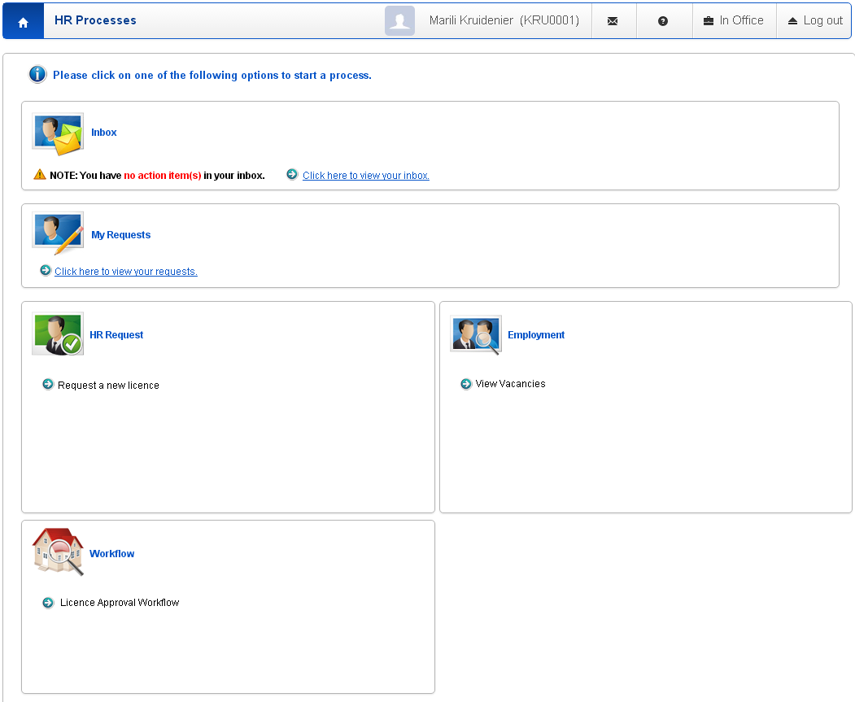
View my Inbox
- When selecting the View My Inbox button the following page will apprear:
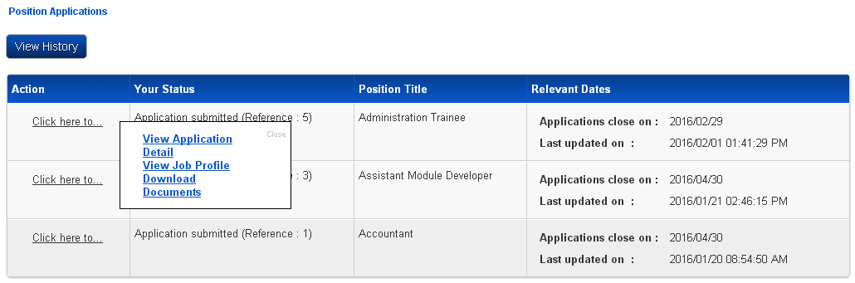
Review Advertisements
Review a Position’s Advertisement and/or Your Application
When considering a position’s advertisement, the following scenarios are possible (depending on the status of your application).
From the My Quick Start Menu, select HR Processes | My Requests | Position Applications.
In the Action column, select Click here to… in order to gain access to the following options.
- View Application Detail Submit/view an application for the advertised position.
- View Job Profile Opens a page summarising the entire job profile for the job/position, the Position Profile can also be exported from this page.
- Download Documents Opens a list of all documents pertaining to the job/position and enables the viewer to download them.
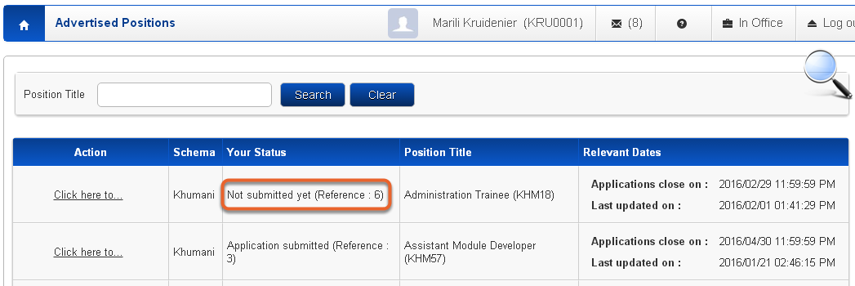
You Have Already Applied but Haven’t Submitted the Application Yet
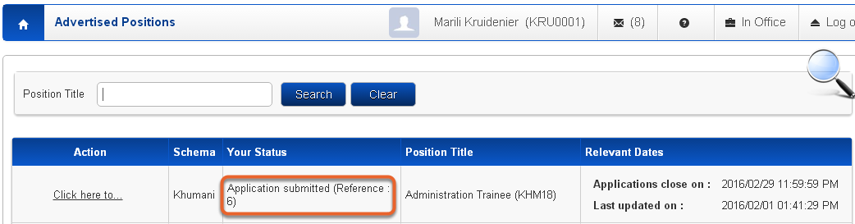
When the list of advertisements is opened, your status on each is visible in the Your Status column as shown in the example below.
In this example you have reviewed the advertisement and have done some work on it but haven’t clicked the final "Submit Application" yet.
Complete the Application
- From the advertisement’s Action column, click View Application Detail to view your application.
- Complete any outstanding details and…
- …if you want to submit the application, scroll down to the bottom of the Apply for Position page and click "Submit Application".
- If you would like to cancel your application, scroll down to the bottom of the Apply for Position page and click "Cancel Application" to have it removed from the process.

You Have Already Applied and Submitted the Application
When the list of advertisements is opened, your status on each is visible in the Your Status column as shown in the example below.
In this example you have completed and submitted the application.
- From the advertisement’s Action column, click View Application Detail to view your application.
- You won’t be able to change anything on the application but by clicking "Cancel Application" you can cancel your application and have it removed from the process.
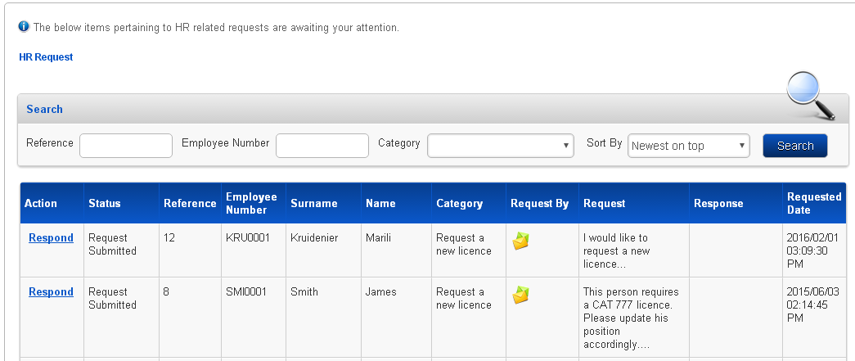
Manage Applications on an Advertisement
In this section viewing applications made against a job advertisement is discussed as well as entering applications on behalf of employees.
Check the Number of Applications Received
- From the Home page click System Administration on the Administration Menu.
- From the main menu, click Modules | Recruitment| Administration | Advertised Positions to open the following page.
Applications submitted
- Because applications were submitted against different advertisements, the number of applications can be seen in the Applications Submitted column.
- In order to open the list of applications, in the Action column, click Click here to… to open the list of actions available on an advertisement.
- Click View/Edit Applications to open the Applications Received page.

Actions on Applications Page
The following actions are available on this page and some of these will be discussed in the following sections:
- Open a specific application
- Categorise an application (including changing its status)
- Filter the applications
- Add an application on behalf of an employee
- Send appropriate letters to applicants (e.g. letters of regret etc.)
- Appoint an applicant
The information visible on the page is:
- Applicant details and email address (if provided)
- Applicant appointment date (if applicable)
- Number of letters sent to an applicant
- Applicant CV or other documentation uploaded
Categorise an Application
While still in an application, it is possible to adjust the application’s category and status. These are used for the following purpose:
Application Category: This field is typically used to place the application into a group of categories with a view on reconsidering it in future. Examples are Professional, Technical etc.
Application Status: Before submission, all applications start out as Not Submitted Yet until they are submitted upon which their status turns to Application Submitted. The other statuses can be used arbitrarily.
There are two ways to classify an application.
On the Application Itself
- On the Application Received page, click on Action and then View/Edit Application

Add Application page
- Locate the Classify the Application section and set the application’s category and status as required

From the Applications Received Page
- Return to the Applications Received page and locate the specific application.
- In the application record, find the two fields Move to Category and Change Status To and adjust as required.
Manually Add an Application
Job applications are ideally submitted by interested employees themselves but, for those situations where HR wants to register an application, the following functionality is available.
Add Application
- On the Applications Received page, locate and click the button Add Applicant.
- A blank Add Application page is opened where the details of the application can be provided.
- The only difference between this application and the direct, employee-submitted application is indicating the source or type of the application.

For an Internal Applicant
If the application is submitted for an internal applicant an employee in other words the employee must be selected from the personnel database.
- In the Applicant Details section, select the Internal radio button.

Search for an Employee
- Next to the Employee field, click on the orange hand to open the Employee Search.
- Locate and select the applicable employee and click Select.
- Complete the rest of the page according to the preceding sections.

For an External Applicant
If the application is submitted for an external applicant not an employee the system requires the details of the applicant.
- In the Applicant Details section, select the External radio button.
- Complete the required details. Note the mandatory fields indicated with an *.
- Complete the rest of the page according to the preceding sections.

Filter Applications
The goal of application filtering is to sift the applications based on their statuses, categories or even how the applicants are rated against a position’s job profile. These ratings could be the applicant’s original personal rating or the rating as adjusted by HR.
Filter the applications
- Click System Administration on the Administration Menu.
- Open the Application Received page from the main menu by navigating Modules | Recruitment | Specific Advertisement | Edit/View Applications.
- Locate and click the Filter the Applications as shown below.
- The Filter Applications section opens revealing the first phase of search and filter criteria for the selected advertisement.
- Any number of criteria can be provided and wildcards can be used.
- Click Search to apply the filter criteria on the applications.

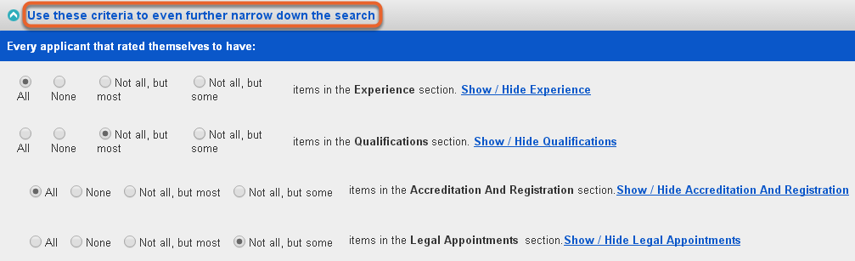
Use these criteria to even further narrow down the search
- The second phase of search and filter criteria is opened by locating and clicking Use these criteria to even further narrow down the search to open filter criteria based on job profiler sections.
- These criteria refer to the Job Profiler sections against which an applicant is expected to have rated himself in terms of the job’s essential requirements.
- This is shown in the example below.
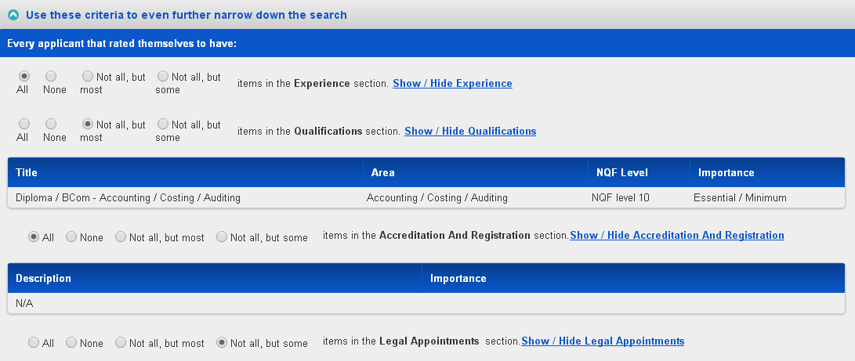
An example:
- Let’s revisit the Qualifications section on an application.
- From the lookup in each Job Profiler section, an applicant gets the opportunity of rating himself.
- An example of this section is shown below.

The following is possible in this filtering section:
- Click a rating’s radio button to include it in the filter.
- Click Show / Hide... next to a section to display the requirements from the Job Profiler module.
- If a random selection of criteria is applied, the filter looks as follows.
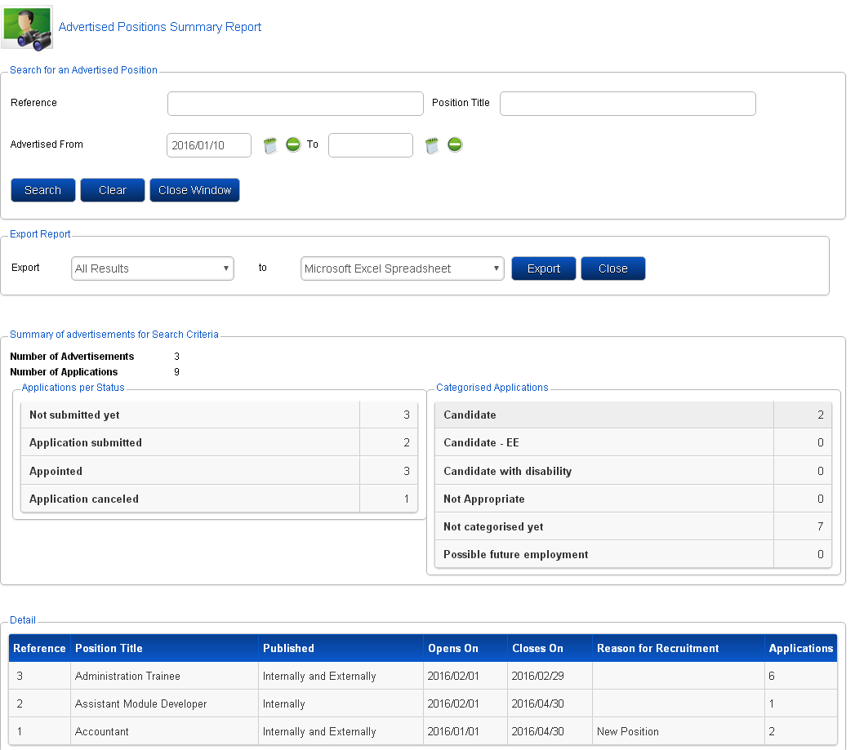
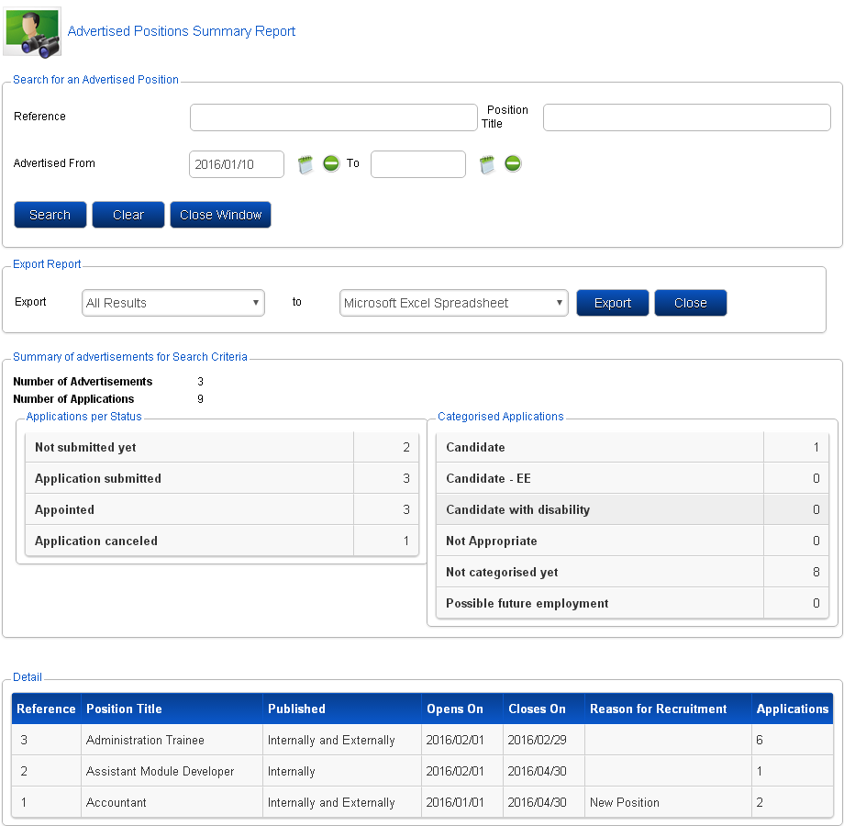
Applications Summary Report
The following report gives a summary of all current advertisements together with the number of applications submitted against them.
- Click System Administration on the Administration Menu.
- From the main menu, navigate to the Advertised Positions page (Modules | Recruitment| Administration| Advertised Positions) and select View Report.
Advertised Positions Summary Report
Send Letters to Applicants
In order to enable basic communication between HR and the applicants, a couple of standard letter templates are available for sending electronically to applicants. Some are:
- Application Confirmation Letter
- Letter of Regret
- Interview Letter
Sending letters
- Click System Administration on the Administration Menu.
- From the landing page and for a specific advertisement, navigate to Modules | Recruitment | Administration | Advertised Positions |View/Edit Applications to get to the Applications Received page.
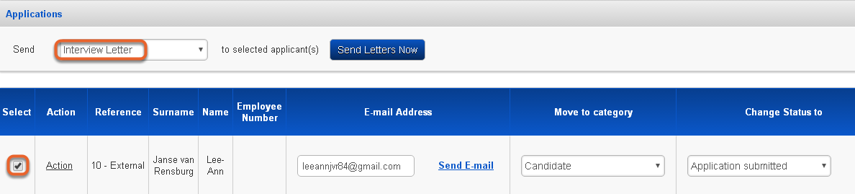
- Select the applicant(s) to whom a particular letter is to be sent by ticking the Select checkbox for their records.
- Locate the following area in the Applications section and select the appropriate letter from the lookup.
- The selected applicant with the appropriate letter is now indicated as shown below.
Send the Letter Directly
- To send the selected letter to the selected applicants, click Send Letters Now .

Preview and Change the Letter Before Sending It
Occasionally it may be necessary to edit a letter before sending it out. This is accomplished in the following manner.
- After selecting the applicant who should receive the letter, instead of clicking Send Letters Now, click Action for the first applicant to open the available options.

Letter preview/change
- From the list select Preview / Change selected Letter before sending to open the following page.
- Update or change the letter as required and click Send Now to send the email.

Keeping Record of Letters Sent
A record is kept of every letter sent from the Recruitment & Selection module. These records can be accessed as follows.
- Every letter that is sent from the module is sent via the Signify Software Email Runner component.
- The email runner sometimes takes a couple of minutes to send a letter out. Once done it will update the applicant’s record.
- In the Letters Sent field a count is kept of letters sent.
- To view the letters that have been sent to an applicant, in the Letters Sent field, click VIEW to display the detail.
- On this page, if you need to see the full email that was sent out, click View Email to display the page.
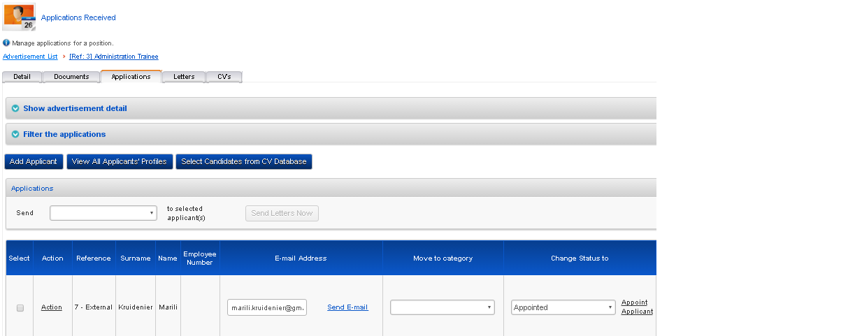
Appoint an Applicant
When a suitable candidate for a position has been identified, take the following steps to appoint the new employee. Since the applicant to be appointed can be either an internal (employee) or external person, both these scenarios have to be discussed.
Appointing an External Applicant
- Change the candidate’s Status to APPOINTED as shown below.
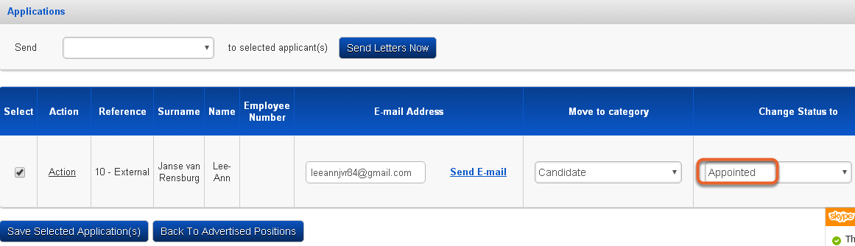
Submit new status
- Click Save Selected Application(s) to submit the applicant’s new status.
- The Status field now changes to include an Appoint Applicant hyperlink as shown below.
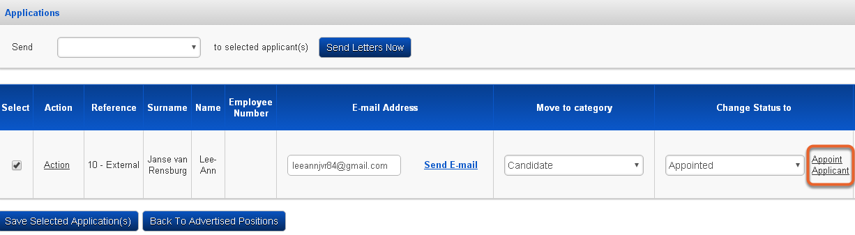
Appoint Applicant
- Click Appoint Applicant to open the following page.
- This page is the same as the regular Appoint Employee page except for the position and employee details that are already filled in.
- Complete the page according to the guidelines given in the Manage Employees Administrator Training Manual.

Appointed Applicant
- Click Appoint Employee and return to Recruitment to submit the appointment.
- If the candidate was successfully appointed, the application is changed to reflect the appointment date.

Appointing an Internal Applicant
Current employees can have different positions that they are active in and as such the system cannot summarily end all active positions in order to do a transfer to the new position.
It is recommended that appointing internal employees in a position be done according to the process described in the Manage Employees - Administrator Training Manual.
Reports available in the module
The following reports can be found inside the Recruitment & Selection module.
Where the report can be found:
- Manage Employees | Recruitment | Administration | Advertised Positions
- Manage Employees | Recruitment | Administration | Advertised Positions | View/Edit Applications | View All Applicant’s Profiles
Report’s Name:
- Advertised Positions Summary report
- Applicant’s Profiles
Advertised Positions Summary
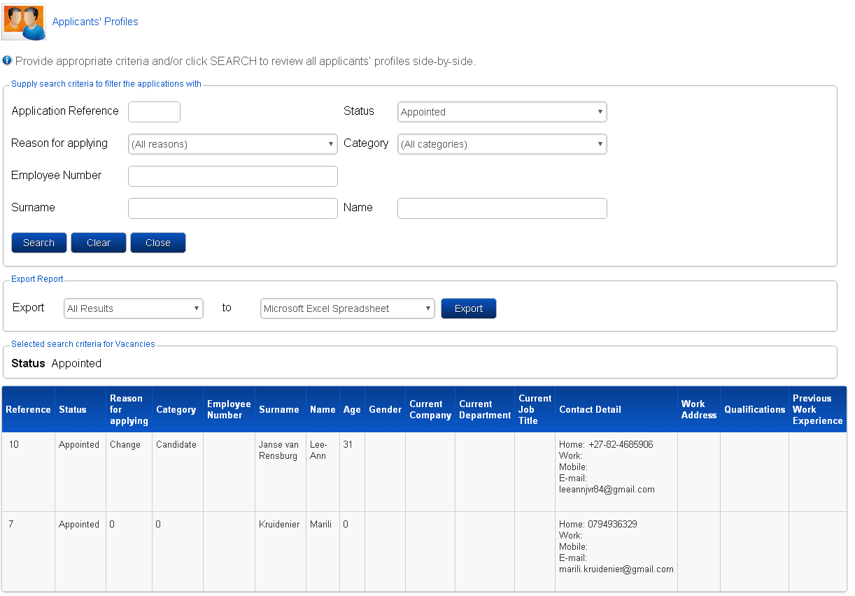
Applicant’s Profiles
User Manual - VACANCY TRACKER
Requisition Process
The following process explains how the Originator (Line Manager) submits a requisition form for an existing job title as well as all the approval levels that this requisition undergoes.
2.1.1 Step 1: Originator creates the requisition form
- The Line Manager are informed of a position that will become vacant. The first step is to complete the requisition form and send it for approval.
- Under the Portal Menu Items, the line manager will navigate to the Recruitment Requisition.
- From here all requisitions that the Line Manager has submitted are displayed under the "My Requisitions" tab.
- Any requisitions that need approval, are displayed under the "Awaiting your Approval" tab.
- All requisitions that have been completed are displayed under the "Historic Requisitions" tab.
- The Line Manager creates the requisition form by selecting the "Create Vacancy" button.
- There will be an option for creating a requisition form for an existing job title or new job title.

2.1.1.1 Sections on the Requisition Form
- The requisition form opens and needs to be completed. All mandatory fields are indicated with an asterisk (*).
- The following section describes the sections found on the requisition form.
2.1.1.2 Previous Incumbent Section
- When a previous incumbent is selected, the Incumbent's last day field is pre-populated by using information from the system:
- Incumbent’s last day the system calculates the last day by taking the current date and the notice period from Manage Employees to set a last date. This date can be changed.

2.1.1.3 Position Information Section
- When a previous incumbent is selected, the following field is pre-populated with information from the system:
- Job Title of the previous incumbent that is selected;
- Job Grade of the previous incumbent that is selected;
- Business Unit of the previous incumbent that is selected.

- The following fields are mandatory and needs to be completed:
- Appointment Type this is master data from Manage Employees.
- Cost Centre.
- Reason for vacancy this is master data from the Recruitment Module.
- Province this is related to the operating country’s provinces.
- HR Practitioner this is the BUHRM that will be responsible for this vacancy. This BUHRM will receive the notifications in case of escalations and will have the ability to approve, decline or put a vacancy request on hold on behalf of the approvers.
- Work Schedule this is master data from the Leave Module.
- Commencement date the day on which this vacancy request must be filled if possible.

2.1.1.4 Remuneration and Benefit Section
- The positions’ remuneration and benefit details are captured.

2.1.1.5 Budget available for External Sourcing
- The external budget is used to indicate whether advertisements can be placed through sources such as Pnet.

2.1.1.6 Submit for Review
- After completing the above sections, the form can be saved for submission at a later stage or it can be submitted for review.

- Upon Save or Submit, the request will be available under the My Requisitions tab until is submitted or approved. The requisition will remain visible on this tab until it is approved/declined, then it will become visible on the Historic Requisitions tab

2.1.1.7 Email Notifications
- An email is sent to the Originator and to the level 1 approver Line Manager.


2.1.2 Step 2: Line Manager +1 Approval
- The line manager +1 receives the email informing him that a requisition is awaiting his approval.
- The line manager +1 logs into the system and navigates to Recruitment Requisition found under the My Quick Start Menu Items.
- On the Awaiting Your Approval tab, the manager navigates to the Actions button and selects Review.

- The requisition details will be displayed. On the left side of the screen, Requisition Details of who the originator was and the date the request was submitted will be shown. The levels of approval can also be seen. The requisition can be Approve, Declines or put On Hold.

An email notification is sent to the originator informing him of the LM+1 decision and the assigned Business Unit HR Manager.


The requisition now goes to the Recruitment Phase
Quick Reference Guides and Practical Exercises
COMING SOON....