Clicker Assessments
Clicker Assessments
Document Purpose
Aim
The aim of this document is to provide a high-level overview of the Signify Clickers Sub-Module.
Clickers are used by learning administrators for the real-time assessment of groups of learners who do not necessarily have access to computers or the literacy to answer online assessments. It simplifies the assessment and allows each individual to provide his/her own unique answer.
Clickers
Introduction
The Signify system has been enhanced to integrate with the ‘ResponseCard RF LCD’ clickers from Participate Technologies. The functionality allows learners to complete assessments in groups, without having direct access to a computer.

A facilitator will assign clickers to learners and each learner will be able to answer questions read to them by the facilitator. The computer then stores the last input on each question from the learner’s clicker. After completion of the assessment a learner record is created for each learner and the assessment is marked.
The following will be discussed:
Process Flow

The following sections will discuss the setup of clickers, creating a clicker assessment, the administration of a clicker assessment, the learner’s perspective and learner records
Setup of Clickers
Two processes have to run simultaneously on a computer for the clickers to work.
The first is the Clicker module from the Signify LMS, the second is the Clickers Zip File. The zip file can be obtained from Signify. Once the file has been received, ensure that it is not in Zip format and that it is saved on your computer where it can easily be accessed.
If the folder was saved as a Zip file, unzip the folder by clicking on the right button of the mouse whilst the cursor rests on the folder. This will load all the file options.
Click on “Extract All” to move the files from the Zip folder to a different file. Use the default location or alternatively specify a new location by clicking on the “Browse” button.

Configure Clicker Relay
The Clicker Relay allows the LMS to connect to the Clickers. It is similar to a language translator and it will translate the input from the clickers to responses on the LMS System. Two processes need to be configured beforehand and run simultaneously for the clicker assessments to work.
First Configuration Process
In the Signify LMS System, go to the Learning Configuration Module Settings Detail page.
System Administration | Tools | Configuration | Framework | Human Resources | Learning.

Scroll down to the “Learning - The URL of the Clicker Server Relay component.” There should be a value in the text box provided. This is called the “URL of the Clicker Server Relay Component.” This component should be pre-configured, however, the URL (e.g.: ws://127.0.0.1:8081/) should be noted for the next step. If the text field is not configured, please contact Signify Support for assistance.

The second step in this process is to activate the module.
System Administration | Tools | Configuration | Framework | Portal Web Part Administration

Scroll to “Clicker Assessments” and ensure that both the “Visible” and “Enabled” tick boxes are selected.
Second Configuration Process
Locate the unzipped Clickers folder and open it. There should be a list of different file folders, XML documents, CONFIG files and different Manifest files.
*Please note that if any of these files are amended incorrectly, the clickers functionality is unlikely to work.
To enable the clickers, find the below 2 files:
- “SignifyHRClickerServerConsole.exe.config”
- “SignifyHRClickerServerConsole.vshost.exe.config”
The files can be found here: SignifyHR.Clickers.ConsoleApplication | bin | Debug.


These files will be configured using Notepad. To edit these files right click on the file and select "Open with" then select the Notepad program.

Once the file has been opened in Notepad, find “<add key="WebSocketServerPortNumber" value="8080"/>” and change the numeric value (e.g. “8080”) to the URL numeric value described in the 1st Configuration Process. Therefore, if the value from the 1st configuration process is to be taken the new value would be “<add key="WebSocketServerPortNumber" value="8081"/>”.
- Click on “File”, then on “Save”
- After the change has been saved, click on “File” then on “Exit”.
This process must be completed for both files.

Complete this process with both of the files:
- “SignifyHRClickerServerConsole.exe.config”
- “SignifyHRClickerServerConsole.vshost.exe.config”
Hardware Configuration and Check

After the configuration folders have been saved, insert the “Turning Technologies” dongle into any of the computer’s USB sockets.
Thereafter go back to the Clickers folder (SignifyHR.Clickers.ConsoleApplication | bin | Debug) and run the file named “SignifyHRClickerServerConsole.exe” as administrator.
To run the program as administrator right click in the file and select "Run as administrator".

This opens the console window and lists the processes. Each process should have “Done!” listed next to it.
- Connecting to hardware...
- Validating the hardware license...
- Initialising receiver...
- Initialising polling session...
- Initialising Web Socket Server...
The last line should read “Listening for web socket connection…” To test that the dongle can receive signals from the Response Card, click on any number of any of the response cards. A message in green will display: “*** Web Socket: Message failed to send, no connection active:”. This message indicates that the Response Card input was received by the computer.

If any of the actions have failed kindly contact Signify support to start the troubleshooting process. support@signify.co.za
Create a Clicker Assessment
To create a clicker assessment, please refer to the Assessment Builder Manual. Note the points below.
- When creating the assessment, the Assessment Type in the Assessment Detail window must be Clicker Assessment
- Only Single select questions must be used.
- The assessment questions can be exported by clicking on the “Export to Excel” button. The exported file can be printed for the facilitator to keep a copy.
Assigning Facilitators
The default configuration of the Signify system has a target audience set on the Clicker Assessment menu item. This is set so that only users with the role Assessment Facilitator will be able to access the Clicker Assessments.
To assign the role the the user navigate to:
System Administration | Users | Manage Users.

Search for the user you would like to grand the Assessment Facilitator role to. Then select the user or Click on Action | View/Edit. Select Role assignment on the left hand side menu then click on "Add Multiple Roles".


The facilitator might have to log out and back into the system for the changes to take effect.
Facilitate a Clicker Assessment Session
After the configuration has been completed and a Clicker Assessment has been created, the Assessment will be made available in the Clicker Assessment list.
Follow the path below to access the Clicker assessments.
Home | Clicker Assessments

Remember that the Console has to run at the same time as the Signify LMS system in order for the clickers to work. If the Console is closed at any time, the clickers will cease to work.
Once the above path is followed, the Learning page will load with all of the available assessments.
- The search function can be used to find a specific assessment.
- Click in the Text box and type the assessment name or part thereof to search for a specific assessment.
- Click on the "Search" button to search for the assessment.

A specific assessment can also be found by scrolling through the available assessments.
Clicking on “Start” will load the selected Clicker assessment.

If the Participate Technologies Dongle is disconnected, or the “SignifyHRClickerServerConsole.exe” is not open/configured, the screen will flash between “Connecting” and “Disconnected”. If the Console is open and the Dongle inserted, click “Retry”.


Once the clickers are linked to the LMS system, the “Clicker Receiver Details” page will load. The status will change to “Polling”.
Together with the receiver details, the Response Card Assign window will load. This window is only activated once any of the Response Card’s buttons are pressed.
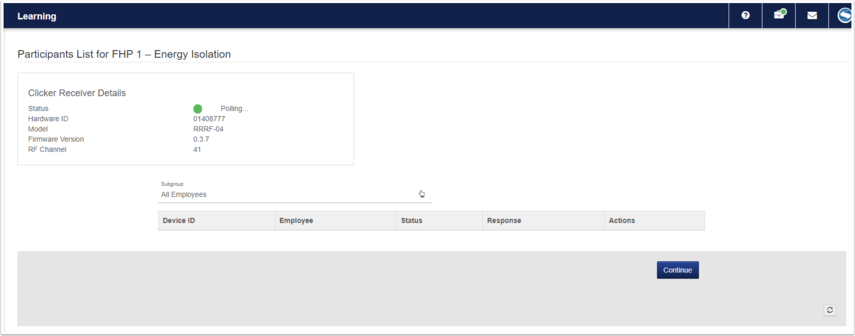

The facilitator will be able to select a preferred subgroup of users that they would like to assign to clickers. To do this select the hand icon and search for the subgroup you would like to select from.

Only users in the selected subgroup will be available for selection when assigning a clicker to them
- Device ID: The device’s unique identification will be loaded automatically when the response card is registered on the LMS. Each device’s unique number can be verified by looking at the back of the card.
- Employee: Type the employee's name, or Surname, or learner number in the text box to find them on the system. To view the first 30 users in the selected subgroup insert a space in the employee field.
- Refer to the Manage Employees Manual to add learners
- Status: When the response card is activated on the system for the first time, the status will automatically be “unassigned”. As soon as a learner is linked to a response card, the status will change to “enabled”.
- Response: The specific response used by the learner will be noted in this column.
- Assign: Once a clicker has been linked to a learner, click on “Assign” to link the specific response card to a learner.
- Cancel: Click on “Cancel” to remove the activation option for the response cards.
- Action Disable: A card can be disable by clicking on “Actions” and then on “Disable. This will disable the learner’s clicker without removing the clicker from the learners’ name. The status of the clicker will change from “enabled” to “disabled”.
- When a card has been disabled, it can be assigned to another learner by clicking on any of the response Card’s buttons. This will load a new clicker receiver details row. The same process as above can be followed when assigning the clicker to another learner.
- Action Enable: If a card has been disabled, and not re-assigned, it can be re-enabled by clicking on “Actions” and then on “Enable”. This will re-enable the learner’s clicker.
- Action Re-Assign: To reassign a new clicker to a learner, the current clicker has to be “Disabled” first. Once a clicker has been disabled, click on “Actions” and then on “re-assign”. Then click on any of the buttons of the new clicker, to assign the new clicker to the learner. After the Clicker has been linked, click on “Enable”, to provide the learner usage of the clicker.
- Continue: After all the clickers has been assigned, they will be listed in the Clicker Receiver Details Window. Click on “Continue” . This will load the Clicker Assessment.

The Clicker Assessment Window comprises of 2 separate sections on the same window.
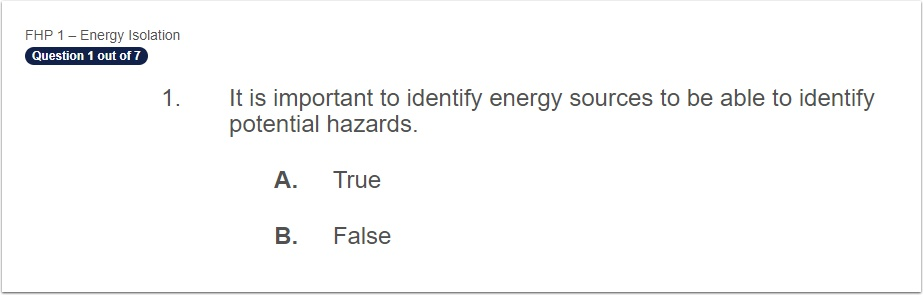
The first section is the question section, the second is the “Clicker Receiver Details” section. The questions for the clicker assessment are compiled in the assessment builder. They will appear in the window for all of the learners to see.
The Clicker Receiver Details window will have all the assessment details as well as other functions for the Assessor to use. The below information will automatically appear. It is used primarily to provide information about the assessment.
- Font Size
- Status
- Hardware ID
- Model
- Firmware Version
- RF Channel
- Session ID
- Session Start Time
- Facilitator.
Font Size: This allows the facilitator to change question and answer size on the screen.
Responses: The number of individuals who have responded will be listed. A “number” out of “total” value is provided. This allows the facilitator to gauge how many responses are still required for a 100% response ratio.
Click on the colored icons next to each section to expand the section. The window will expand with each individuals’ details and their progress. The Response per question section will provide the facilitator with information regarding the overall progress per question.

- Status: The status will show each learner’s clicker states i.e. Enabled or Disabled. When an individual’s clicker is disabled, the responses number will adjust automatically and the number of inactive learners will be indicated at the top.
- Employee: Each learner with their Employee Number will be listed next to their status.
- Device: Each device ID will be provided next to the corresponding learner.
- Responses: There are two responses recorded.
- Responses in Green indicate the number of valid (Both correct and incorrect) responses provided
- Responses in Orange indicate the number of invalid responses.
- Cross/Tick: A cross indicates that the specific learner has not yet responded, a tick indicates that a valid response was provided.

Questions: The LMS also provides a full overview of all the questions. Click on the down arrow to view the overall progress.

- Question: The question number is provided in this Column. Click on the question number to navigate to the question.
- Attempted: Green indicates that a question has been opened, red specifies that a question has not been seen by the learners.
- Answered: Green will indicate that all of the enabled learners have provided valid answers. Red labels show that there are responses owing.
- Last answer valid: green indicates that the final answer provided by all of the learners were valid, red indicates that a valid answer was provided, but then changed to an invalid answer.
Click “Edit Participants List” to navigate back to the Clicker Receiver Details page.
- All precious responses will be recorded; however, the current questions’ responses will not be recorded.
- Learners can be disabled prevented from continuing at any point.
- Learners can be enabled at any point
- Clickers can be re-assigned to learners at any point
- New learners can be added at any point.
To move to the next question, click on the “right arrow” , and similarly, click on the “left arrow” to navigate to the previous question. When clicking on any of the arrows, the LMS will show a popup screen requiring the facilitator to confirm that he/she want to move the next/previous page.
- Click on “Yes” to continue to the next question
- Click on “No” to return to current question.
Note the below when completing assessments:
- Assessments can be completed with disabled learners
- When moving to the previous question, the current question’s responses will not be recorded. The responses from the previous question will load with the question.

If one or more candidate’s selection is still outstanding, the system will display a different message and list each learner who have not yet provided a response.
- Click on “Yes” to continue to the next question
- Click on “No” to return to current question.

Once all the questions have been completed, a “Finish” button will display instead of “right arrow” button. Click on the “Finish ” button to load the “End Assessment” notification screen.
- Click on “Yes” to finish the assessment.
- Click on “No” to return to the assessment.

Regardless of whether a question is marked as mandatory or not in the Assessment Builder, the LMS will prevent the administrators from completing the assessment if all the questions have not been completed by all the learners. If there are outstanding responses, a message will display and inform the administrator that not all questions have been answered by the enabled participants. Click on “Ok” to return to the question list and use the Questions List to find the missing responses.

After all questions have been completed and the “Finish” button has been pressed, the “Assessment Complete” screen will load.
Click on “Results” button to view each learner’s results. The results screen will open up.
- Employee Details: Click on employee details to sort the list according to the learner’s names and surnames
- Score: Click on “Score” to sort the list from highest to lowest, or from lowest to highest.
- Passed: Click on “Passed” to list the learners who have passed first, then according to their names and surnames.
The assessment will be completed and learner records will be available for all the participants.

Learner's Perspective
The Clicker Assessment module does not require learners to access the system. Their interaction is limited to the Turning Technologies clickers and the questions that are presented on a projector. It was developed for ease of use and is ideally suited to situations where learners only have basic or lower computer literacy levels. It can also be used with learners who have profiles, but do not have access to the system.
Learner Records
Learner Records are created for each learner after they have completed the clicker assessment. These can be accessed form the Learner Records Menu (for a full discussion of learner records, please review the Manage Employees Manual).
Learner Records can be accessed from the Employee Development section on the right-hand side of the LMS window.
Manage Employees | Find Employee | View/Edit | Employee Development | Learner Records
Click on “Print Learner Record (Classic)” or “Print Learner Record (Standard)” to load the print learner record screen.
If “Print Learner Record (Classic)” a popup screen will open with all of the individual’s learner records. Click on “Print” to expert the learner records to PDF. The available folder will be available in the Downloads folder on the computer from where the records were generated.
Click on “Close” to close the window and return to the learner records.
If Print Learner Record (Standard)” is clicked on, a popup screen will open with all of the individual’s learner records. Click on “Print” to export the learner records to PDF. The available folder can be found in the Downloads folder on the computer from where the records were generated. The window can be closed by clicking on the “Close Window” button in the top right-hand corner.