Performance Management Implementation Guide

Activate the Performance Management module
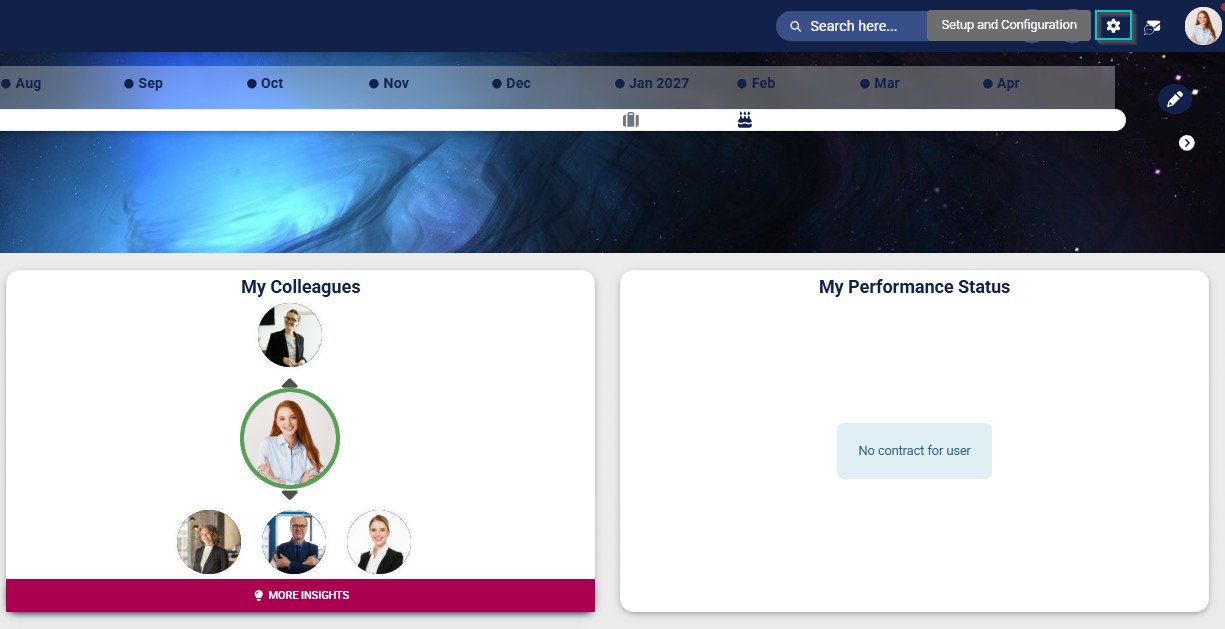
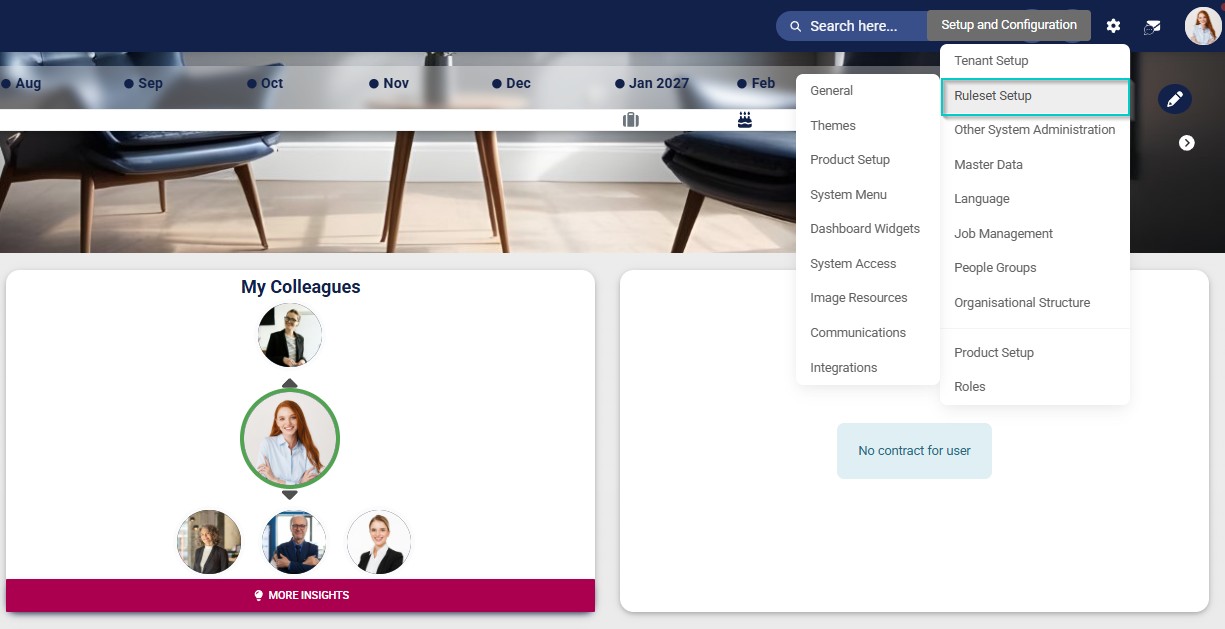
- Click the gear icon to access the Setup and Configuration menu.
- Click Ruleset Setup.
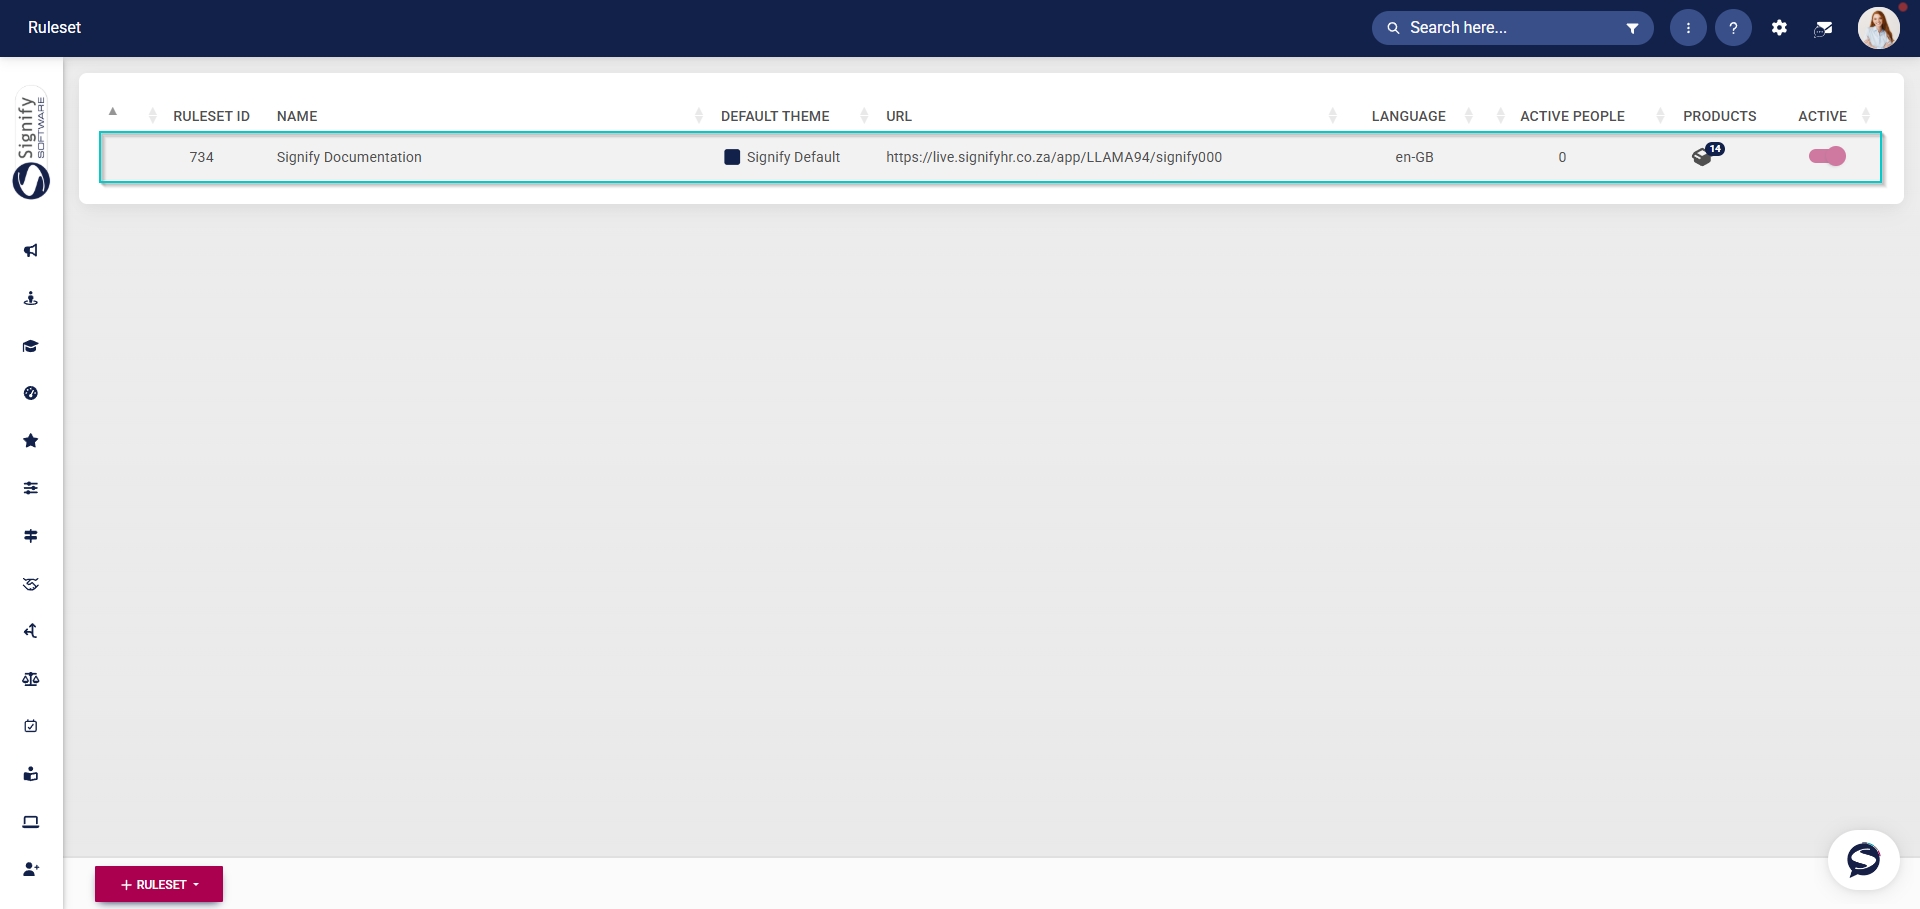
- Select the ruleset you would like to update.
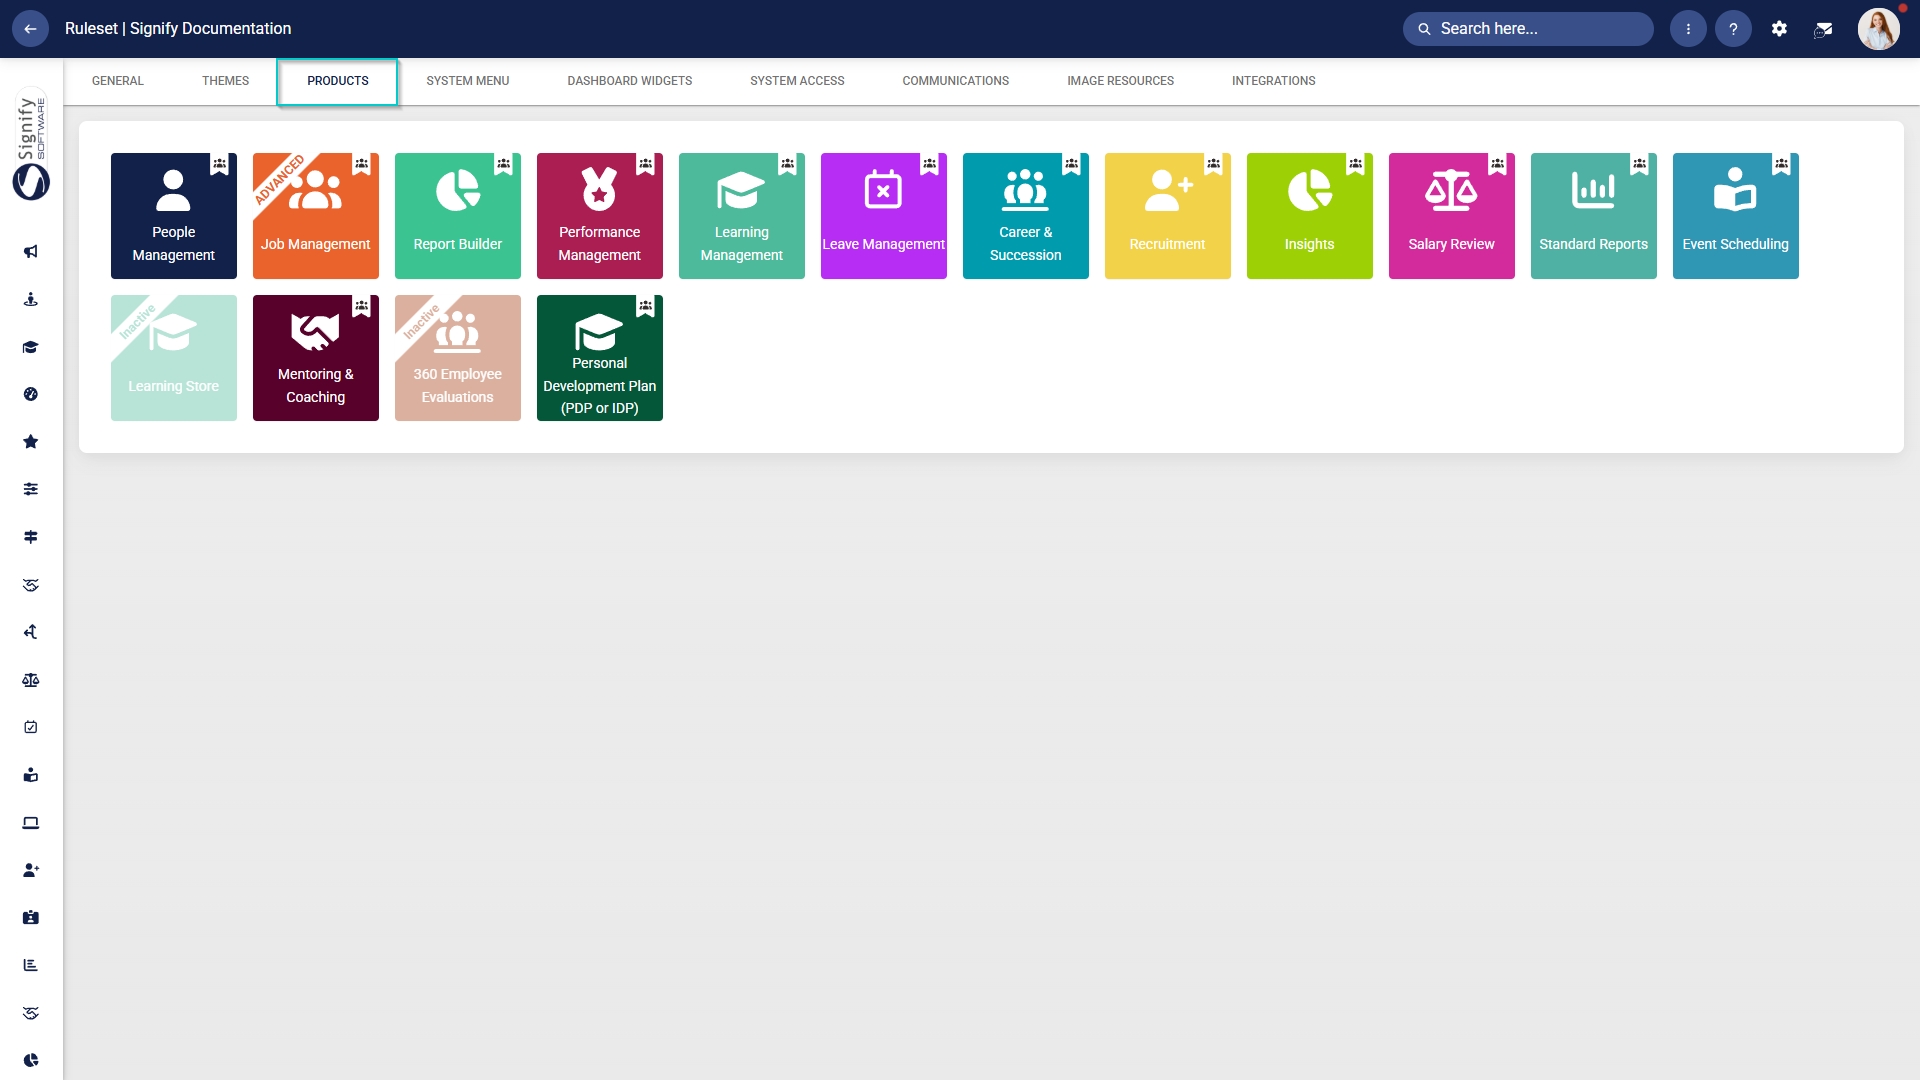
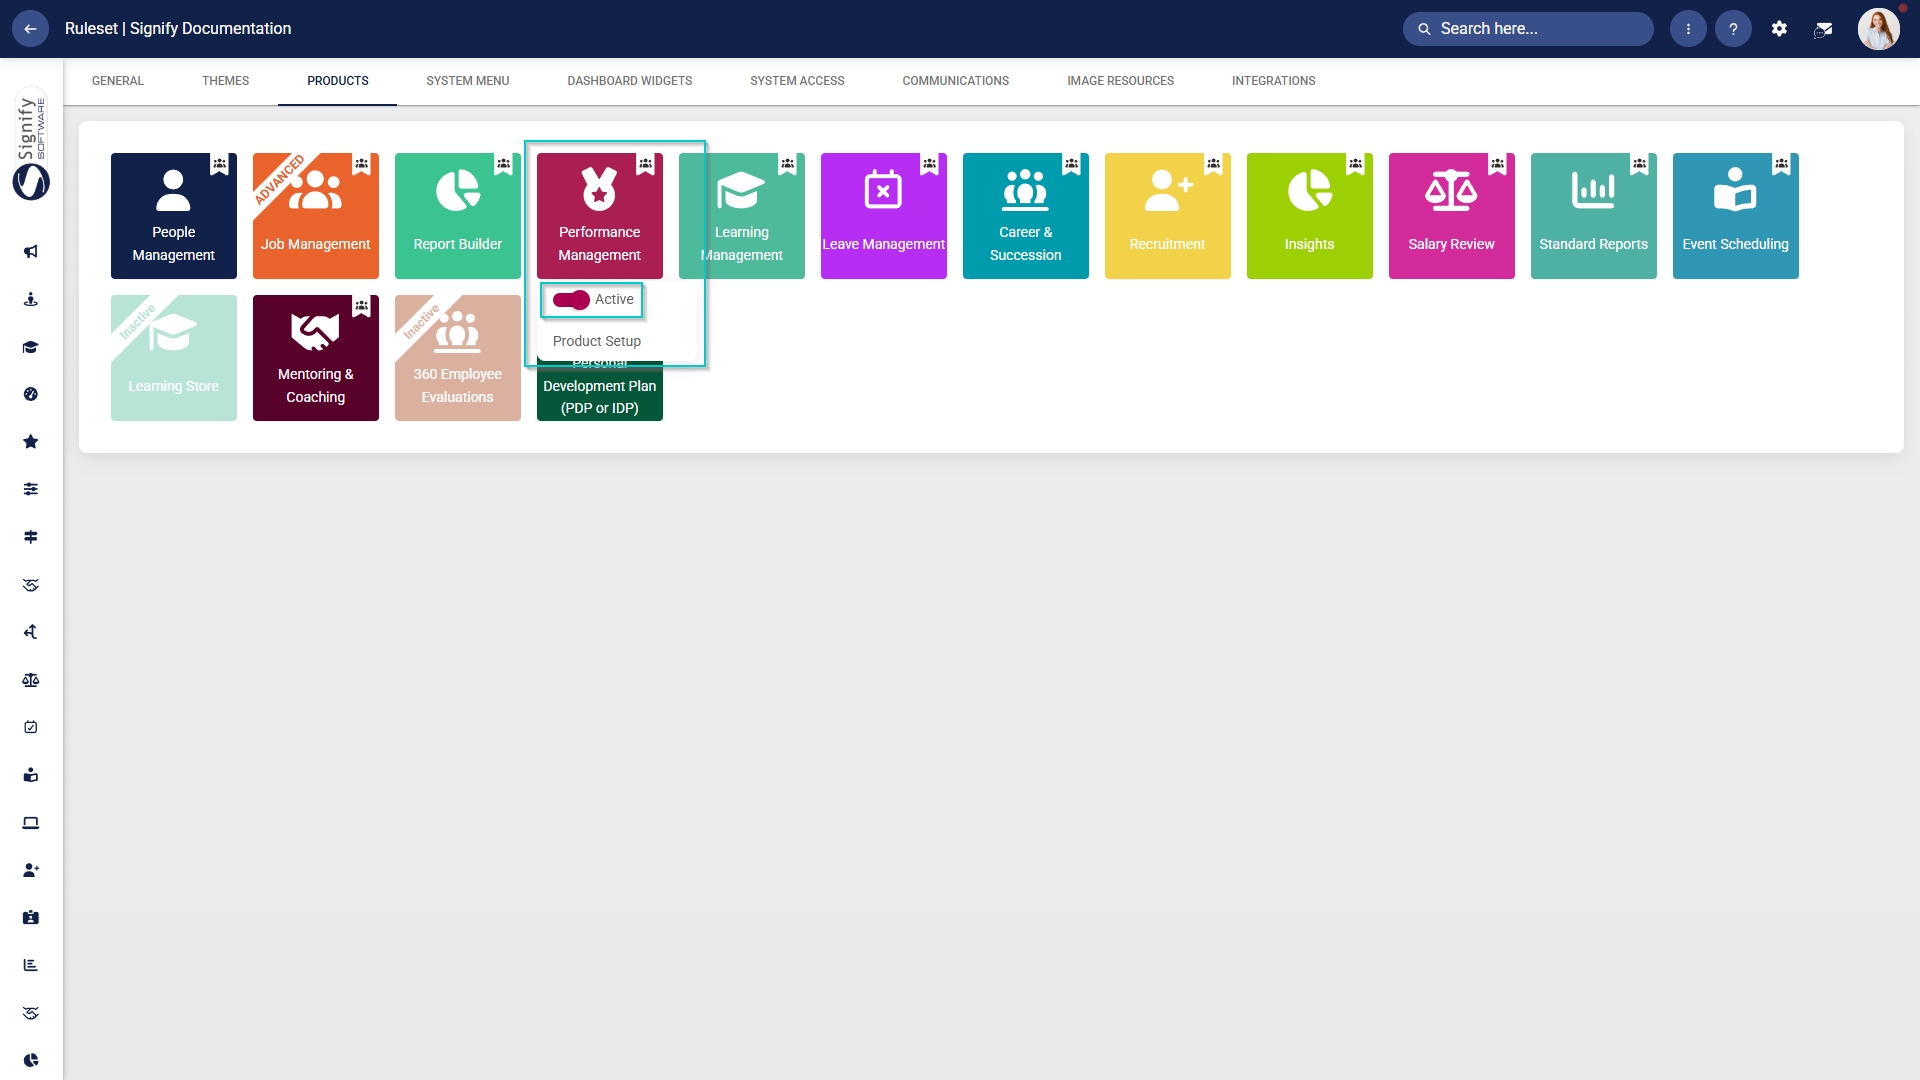
- Click on the Performance Management product card, then click the toggle button to set the product’s status to Active.
Add Performance Management to the system menu
- Click the gear icon to access the Setup and Configuration menu.
- Click Ruleset Setup.
- Select the ruleset you would like to update.
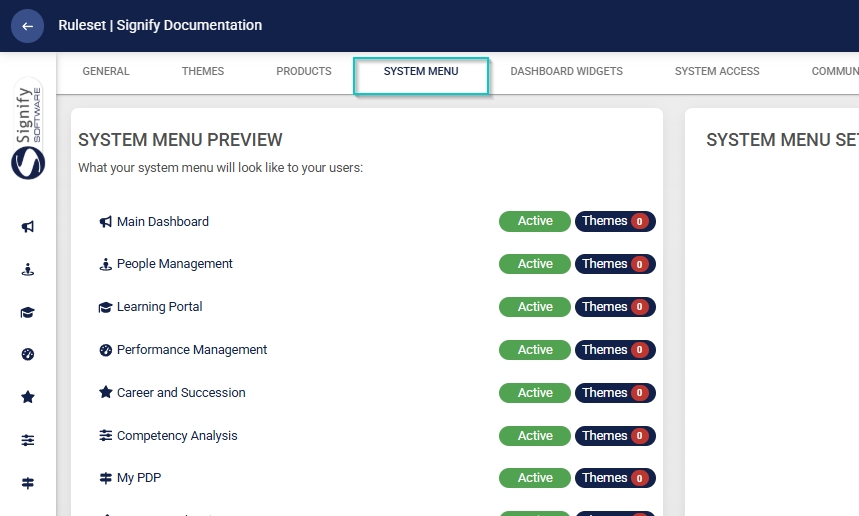
- Click the Performance Management menu item in the system menu preview.
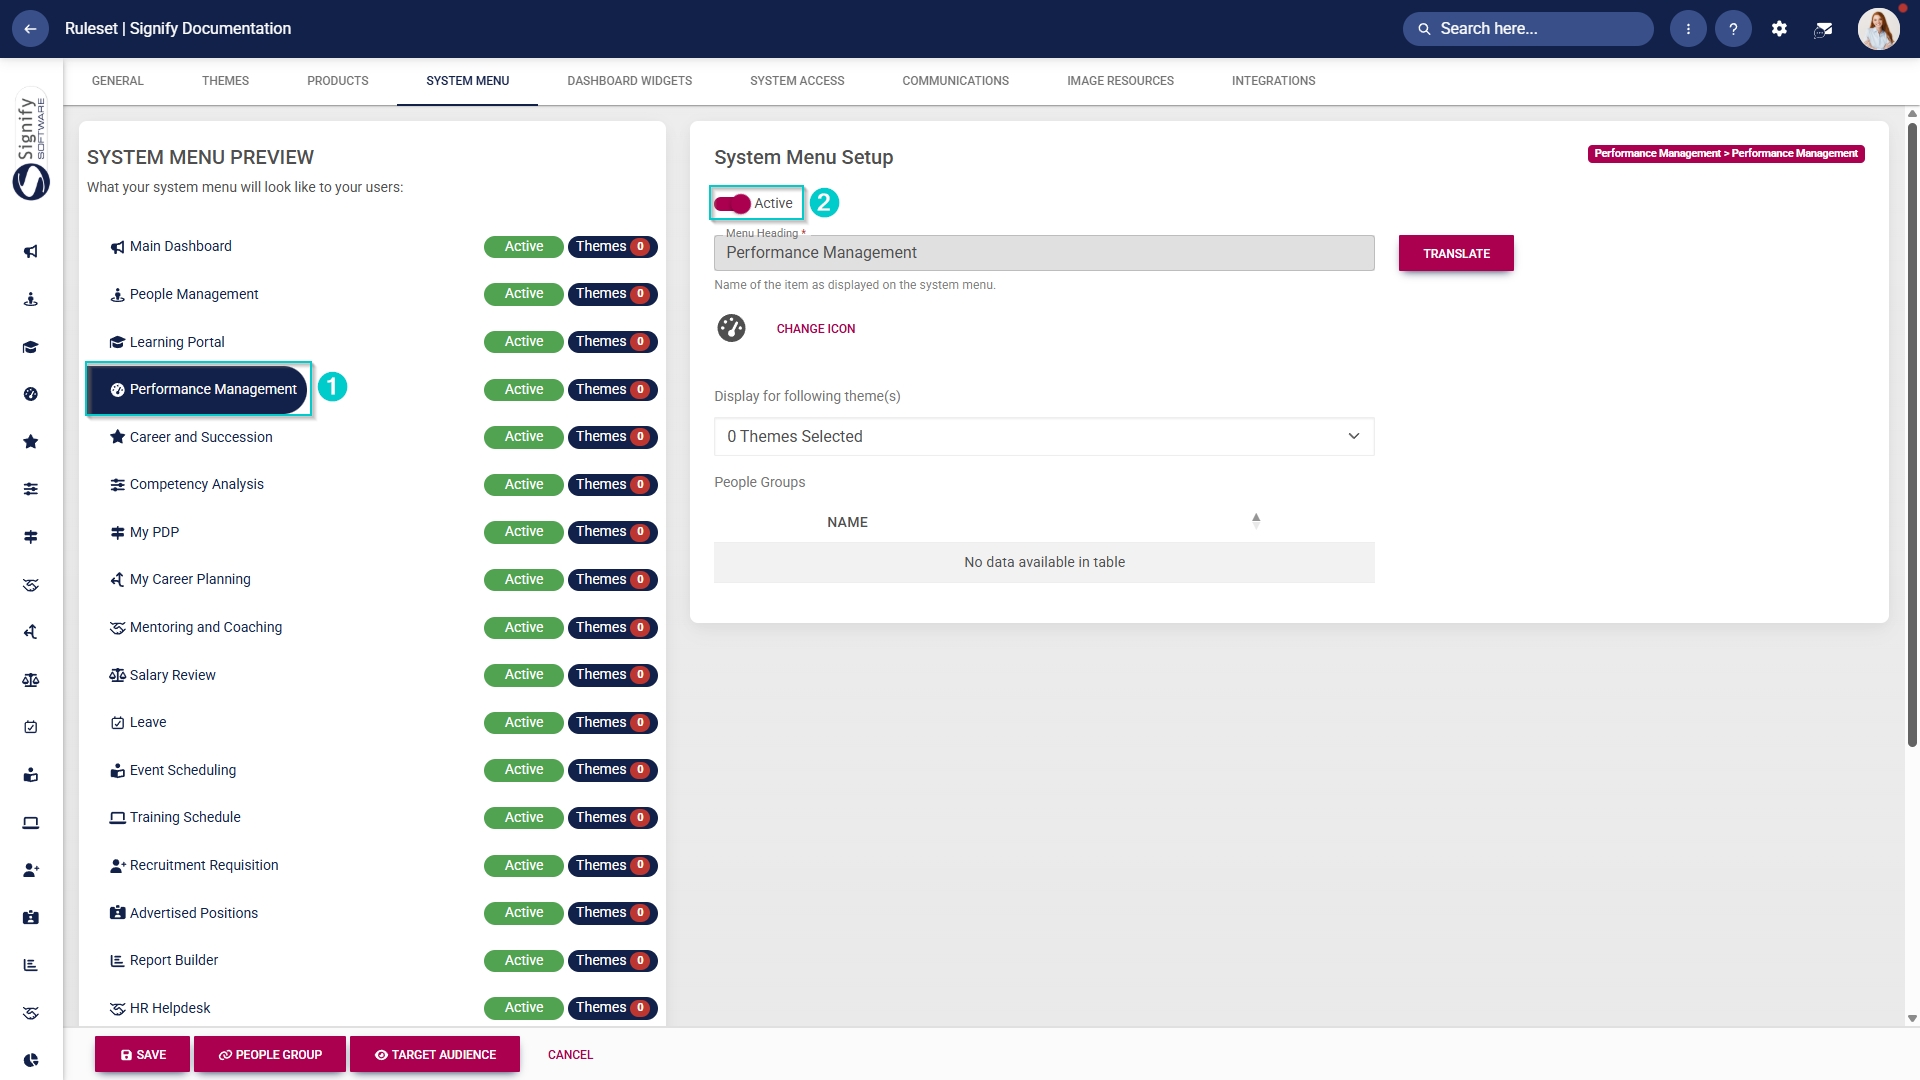
- Click the toggle button to set the system menu item’s status to Active.
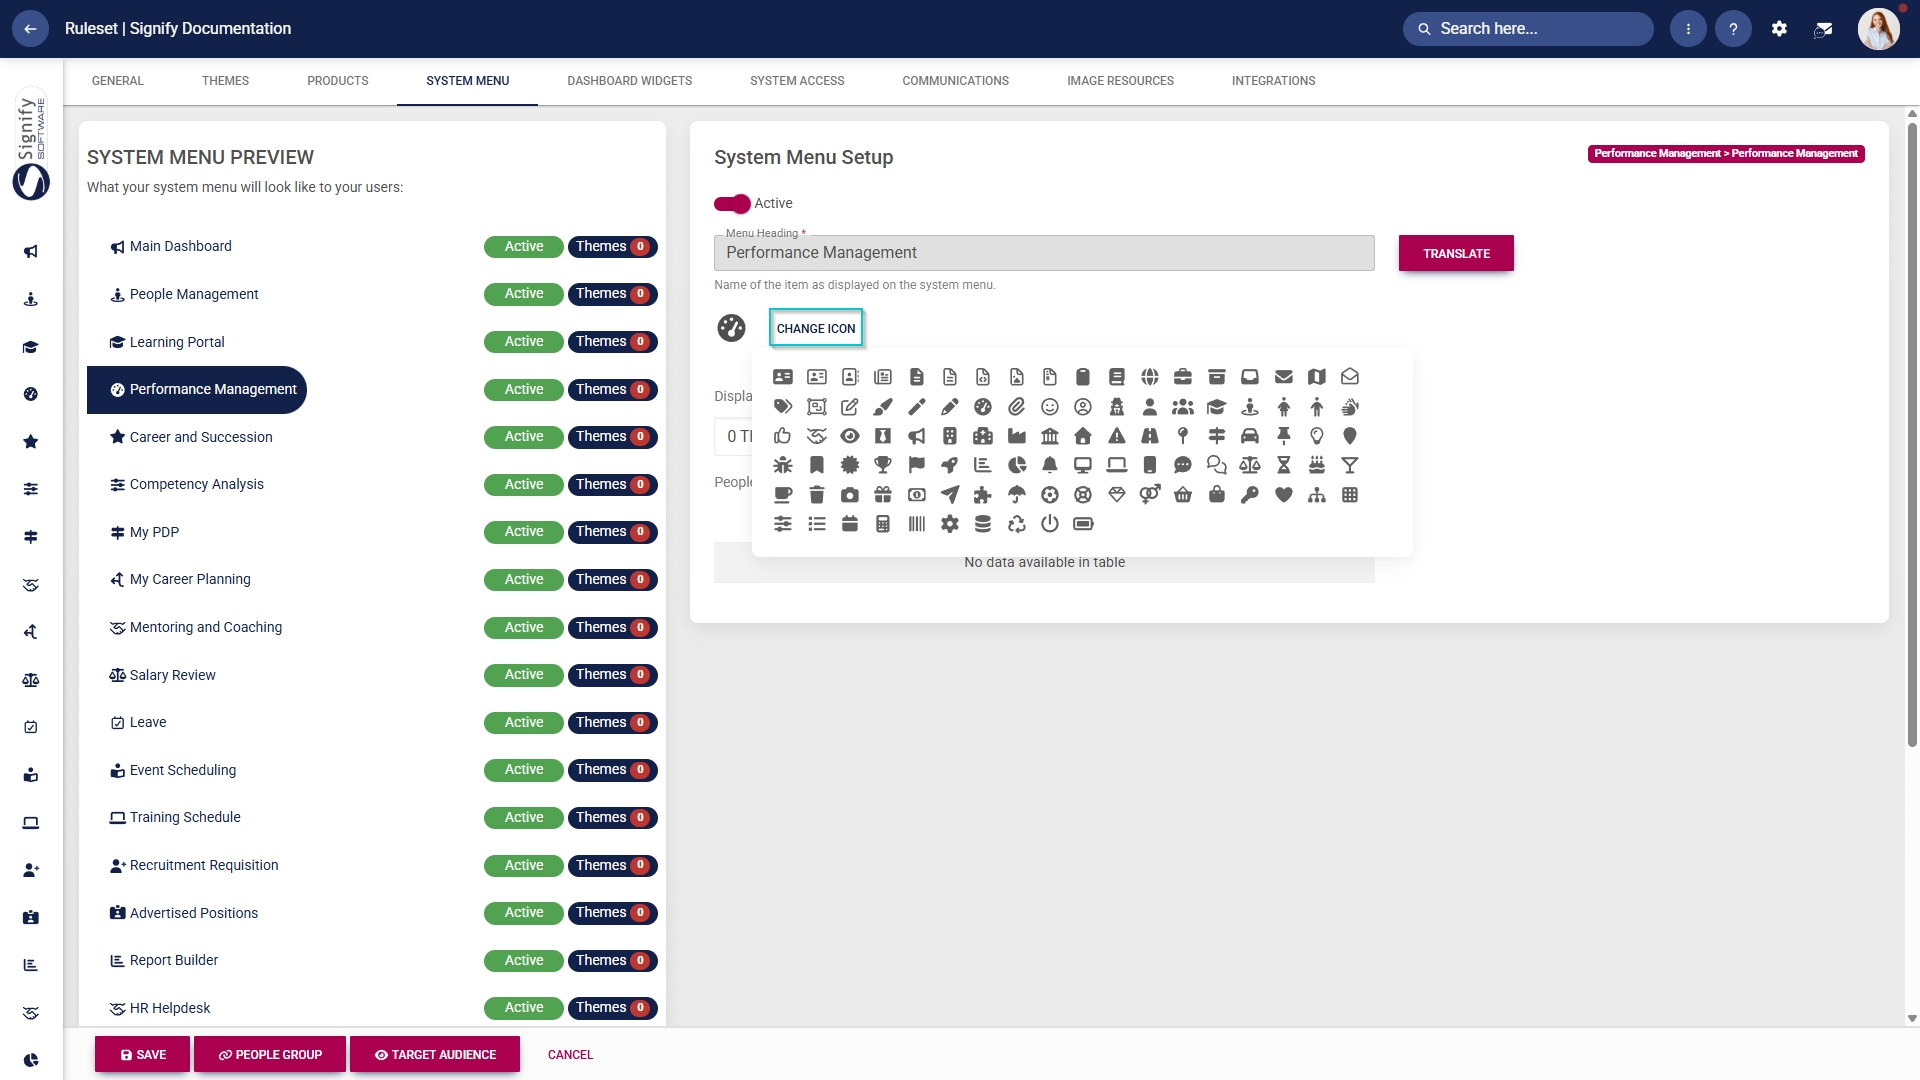
- You can select an icon for the Performance Management module by clicking CHANGE ICON.
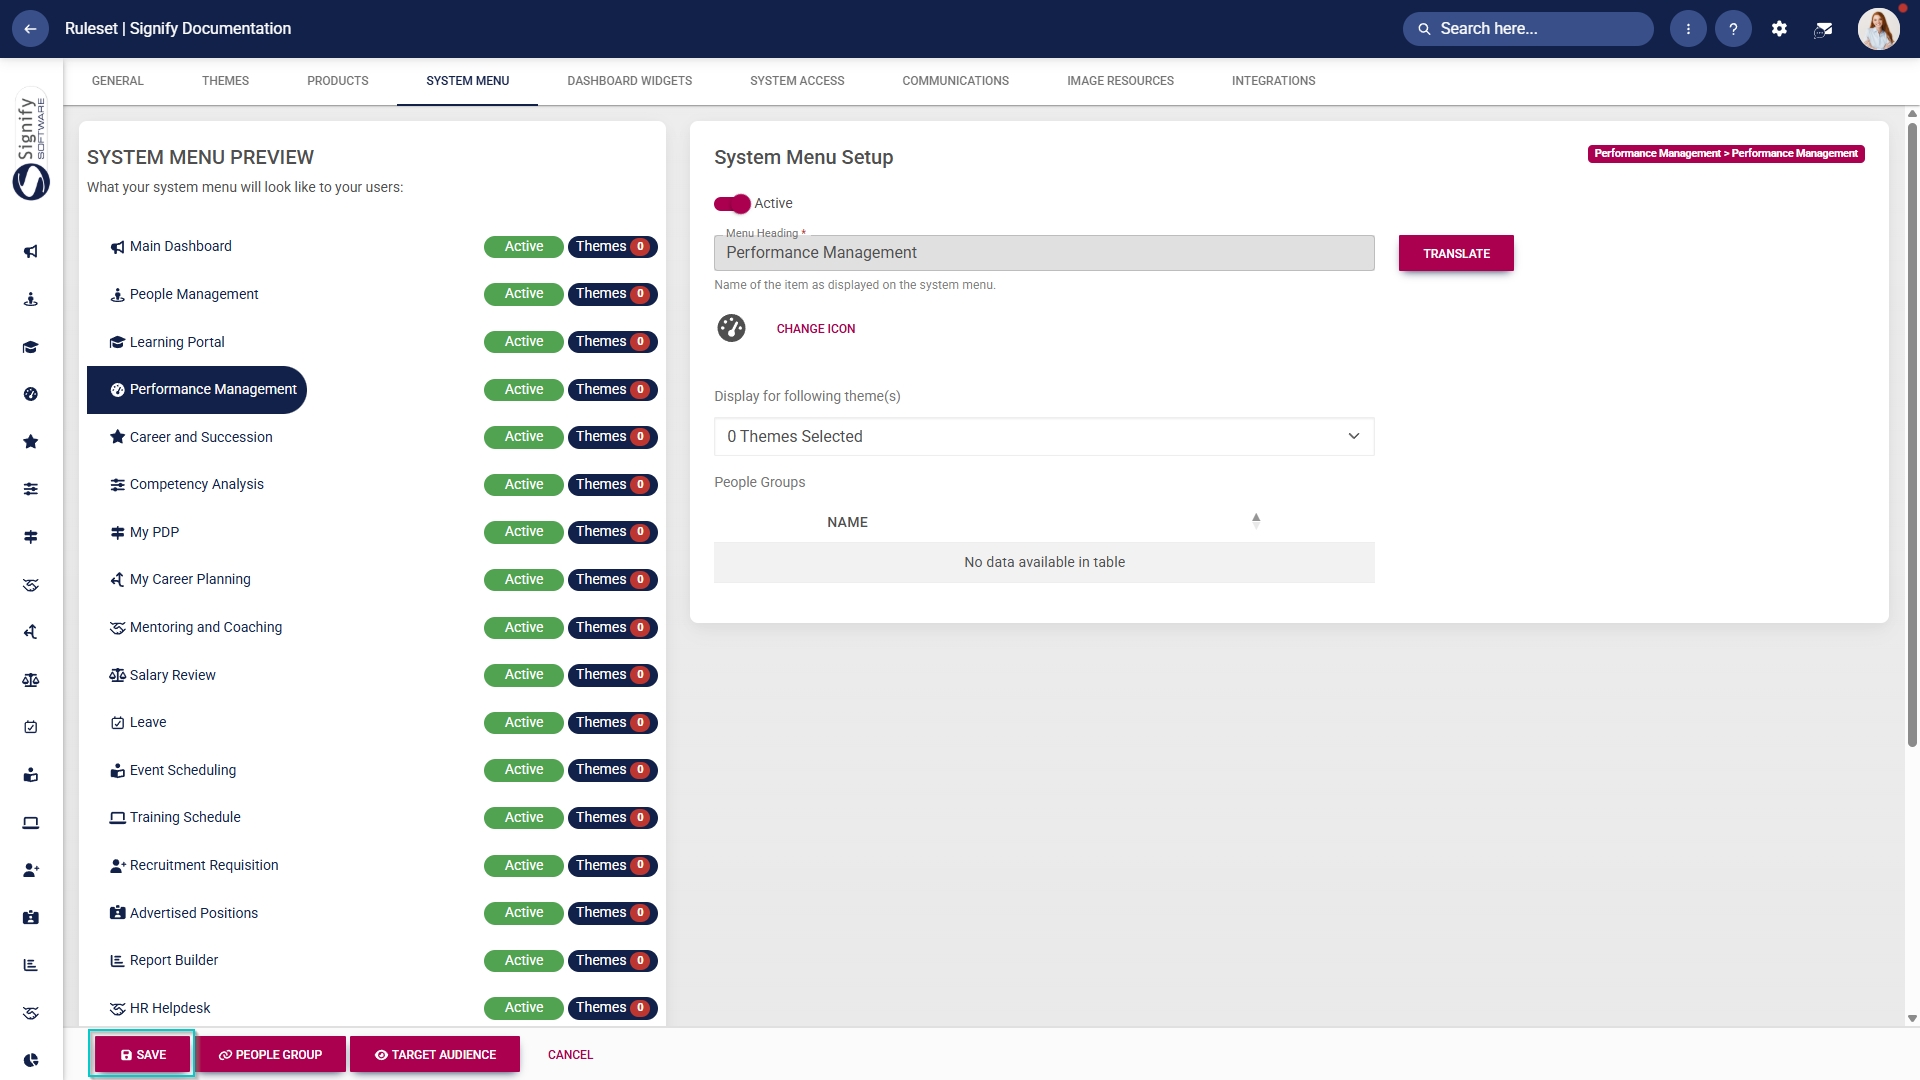
- Click SAVE to continue or CANCEL to discard your changes.
Update the Master Data Library
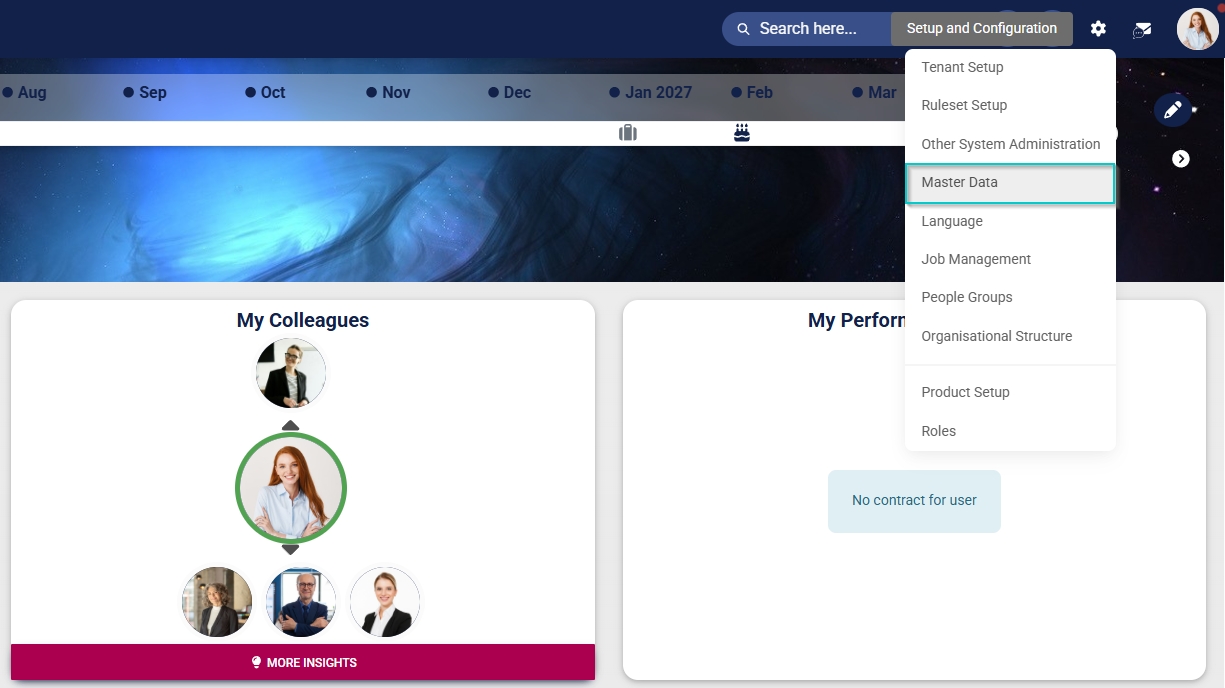
- Click the gear icon to access the Setup and Configuration menu.
- Click Master Data.
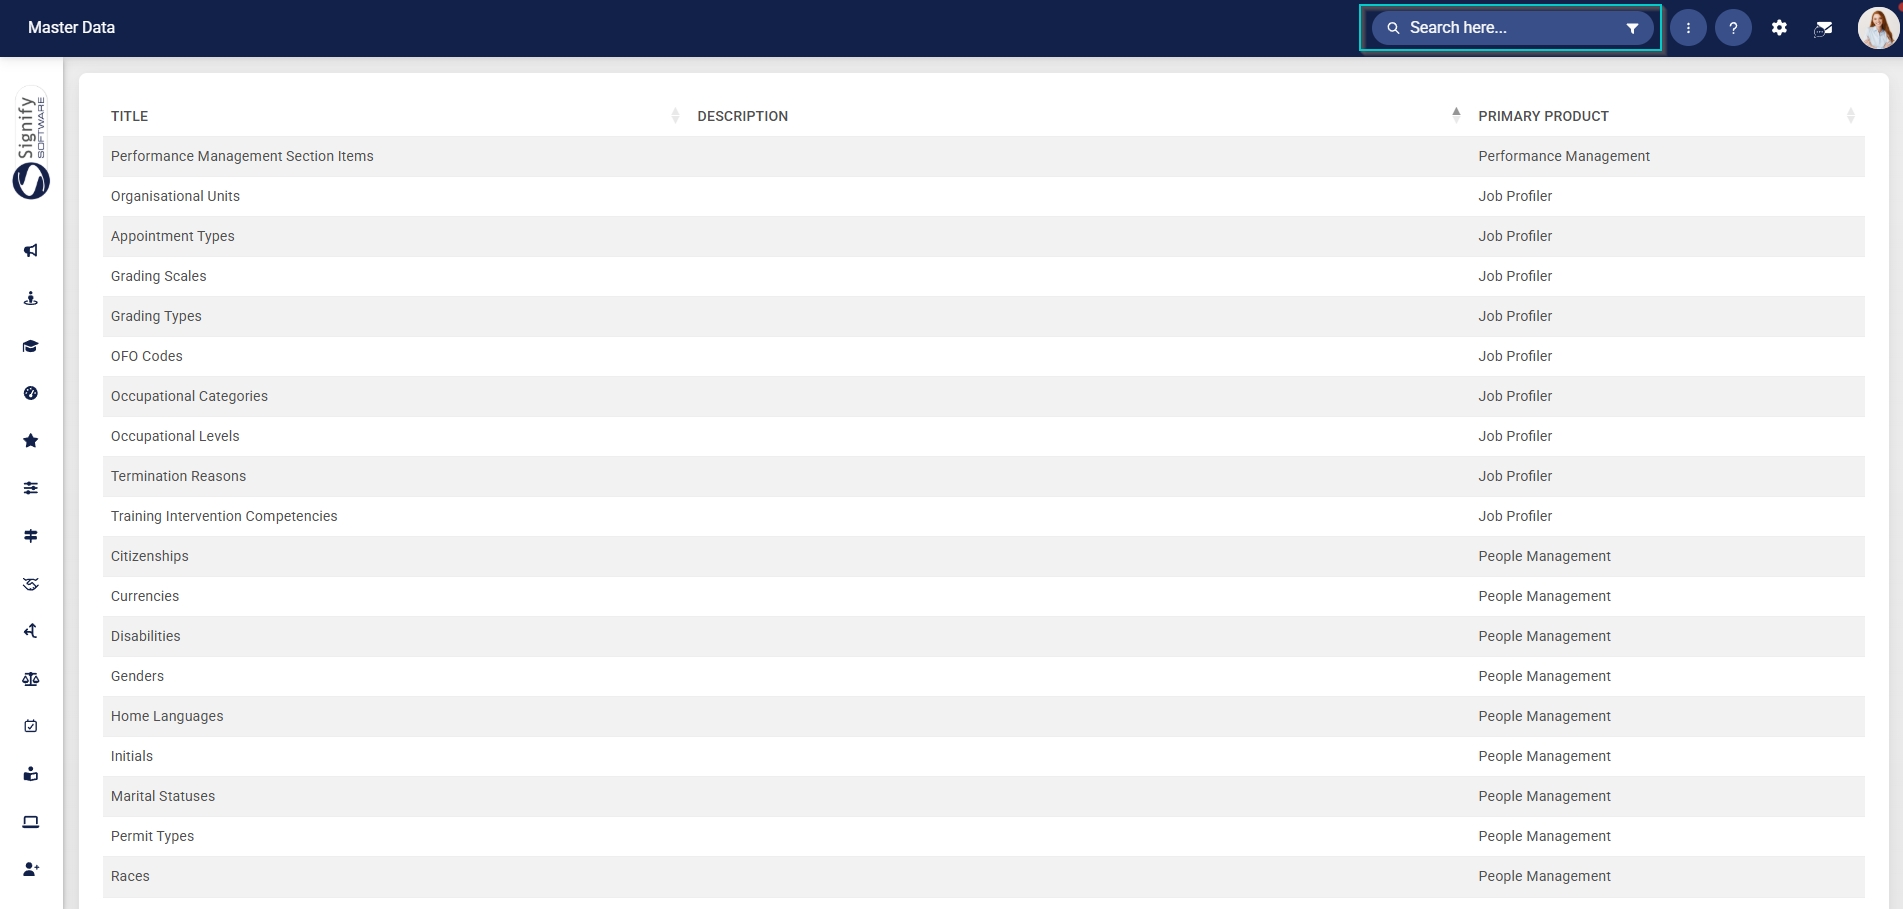
- The Master Data Library lists the categories for which administrators can create master data. Use the search bar at the top of the screen to filter the search results by Performance Management.
Configure Performance Management section items
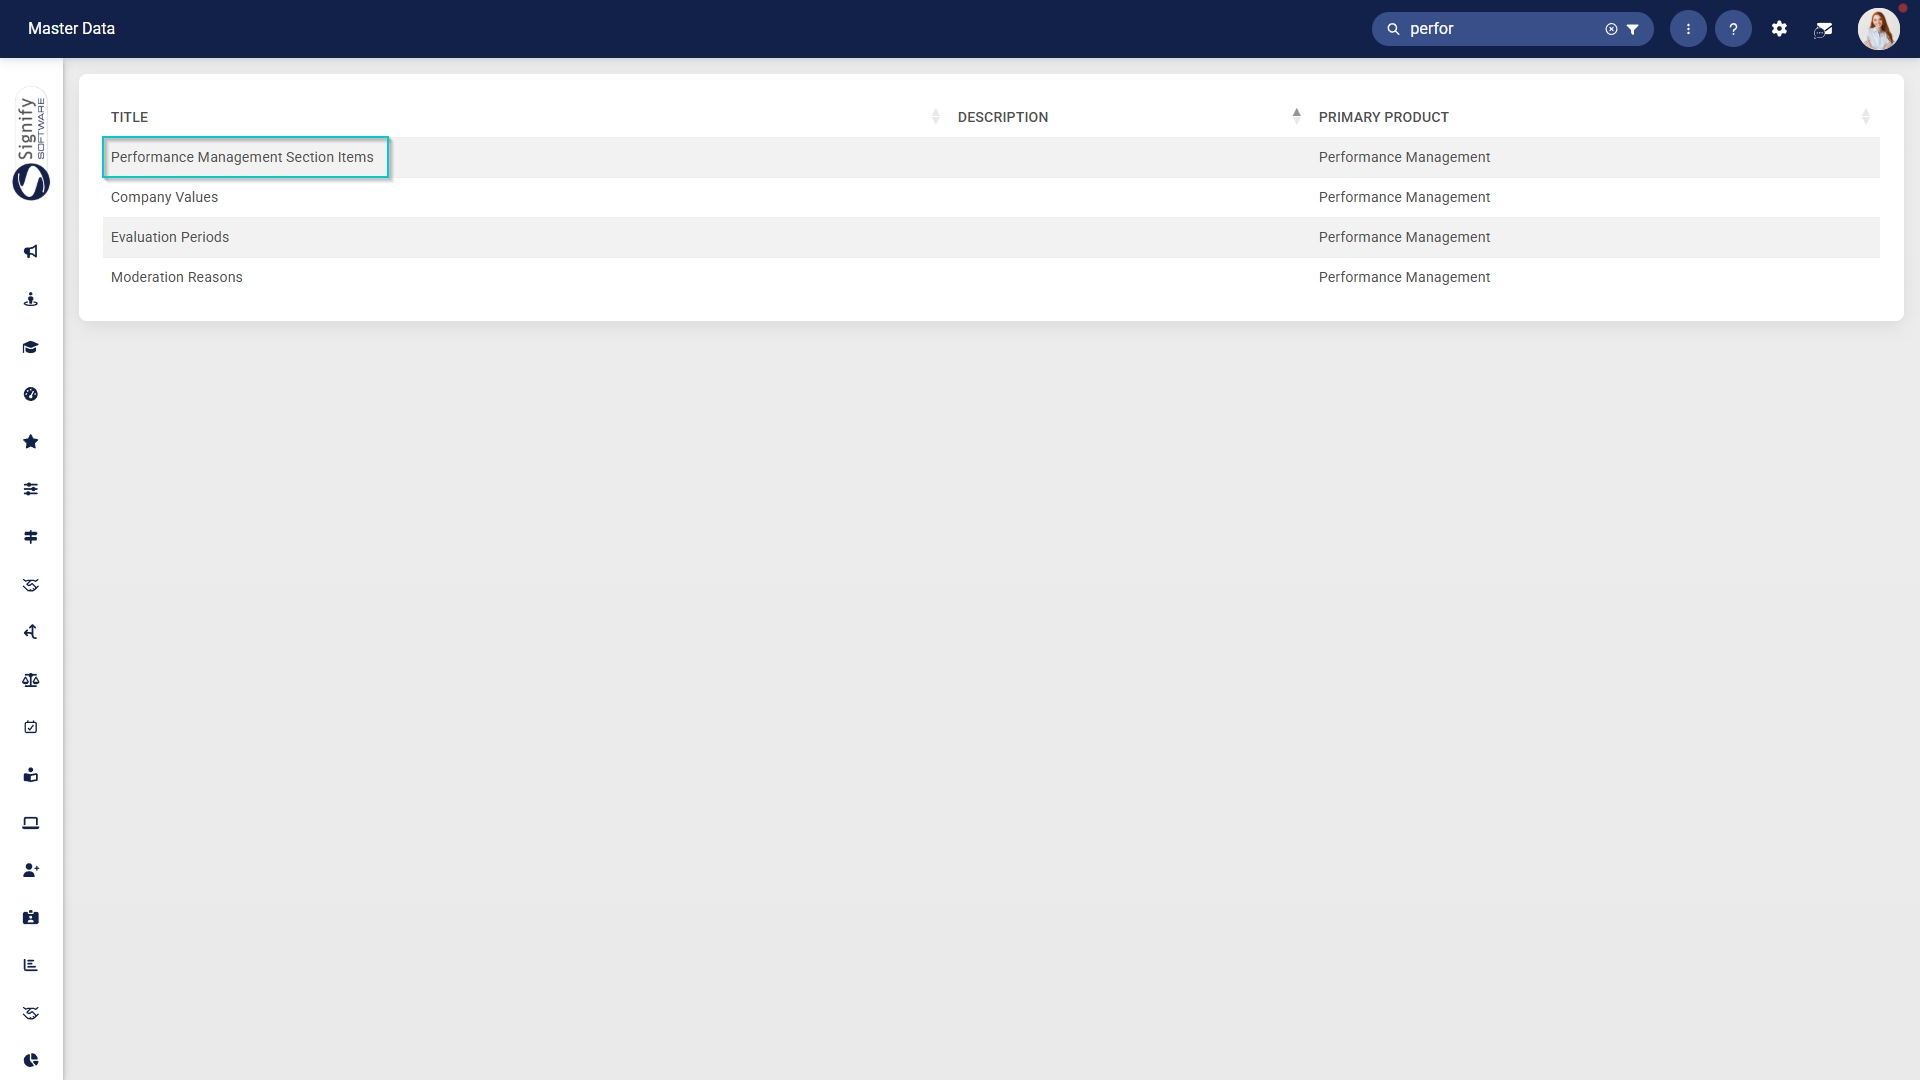
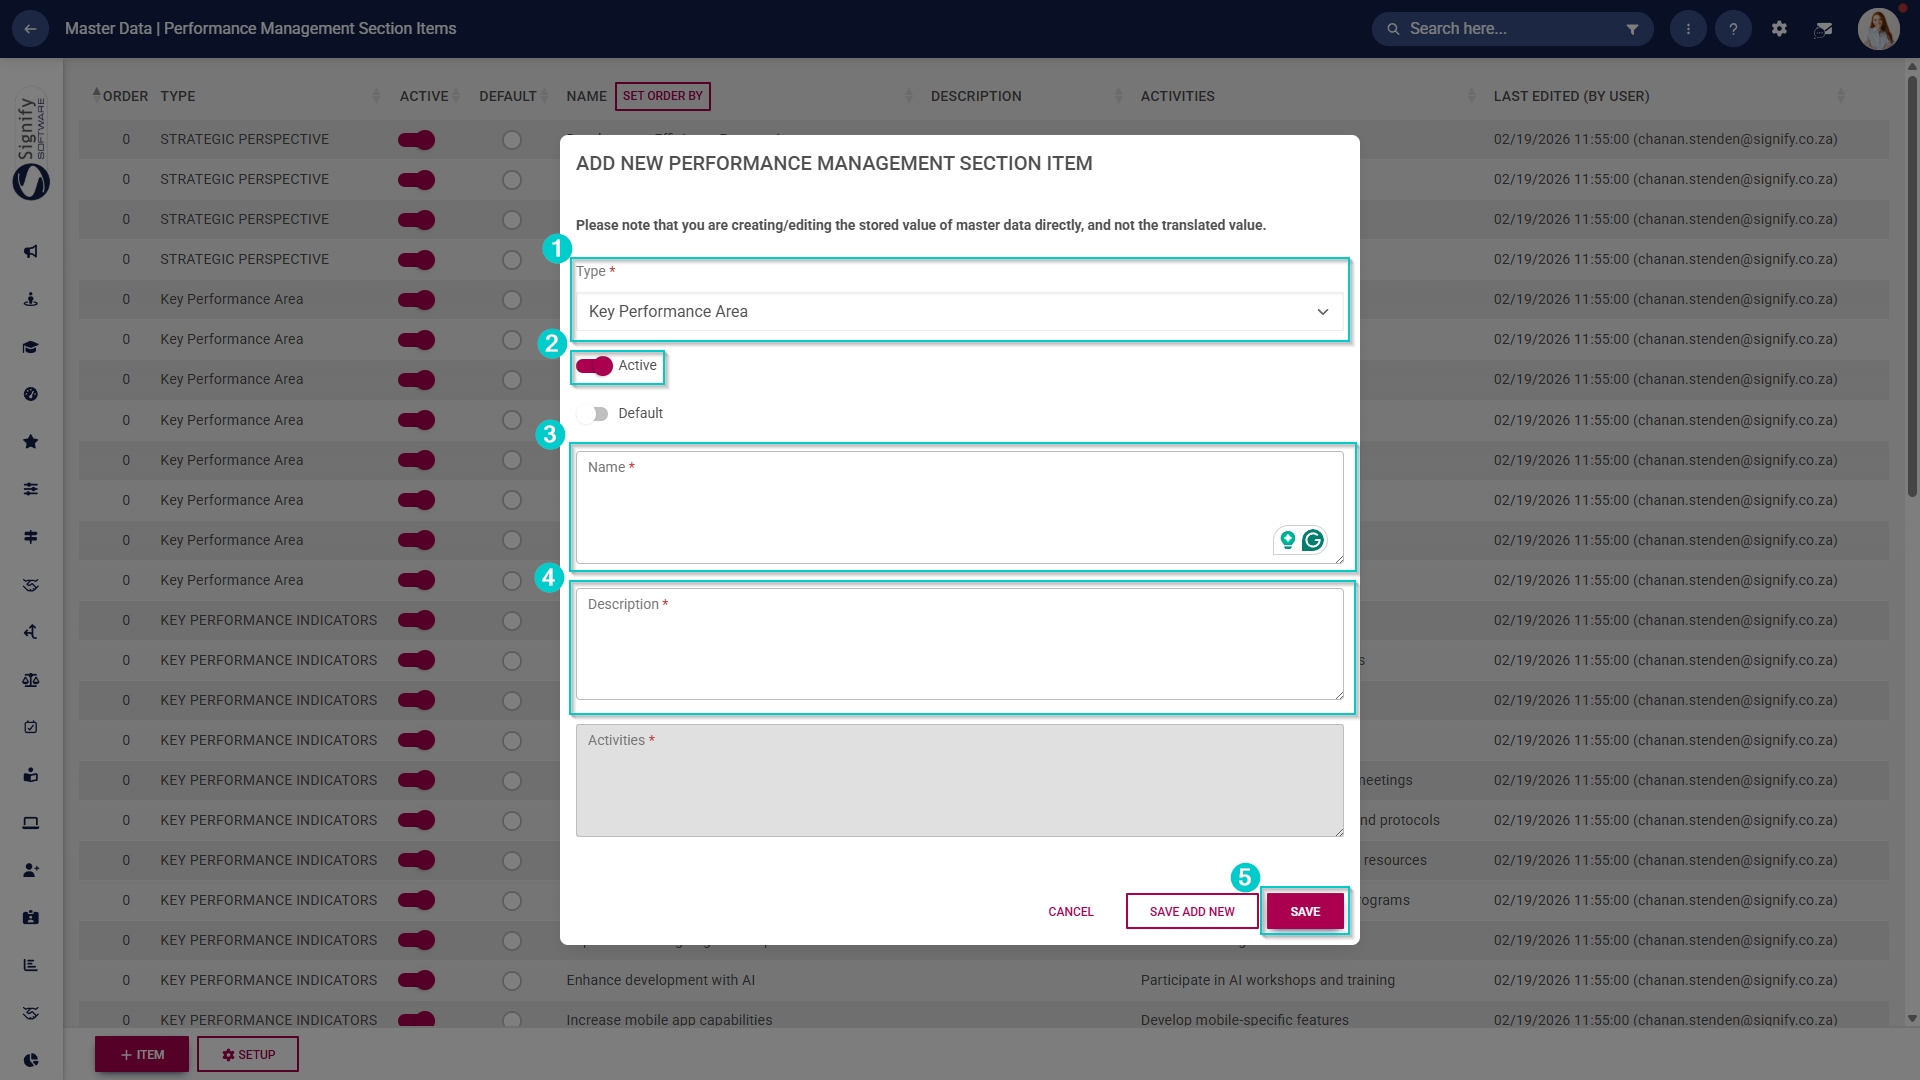
- Click on the Performance Management Section Items category to continue.
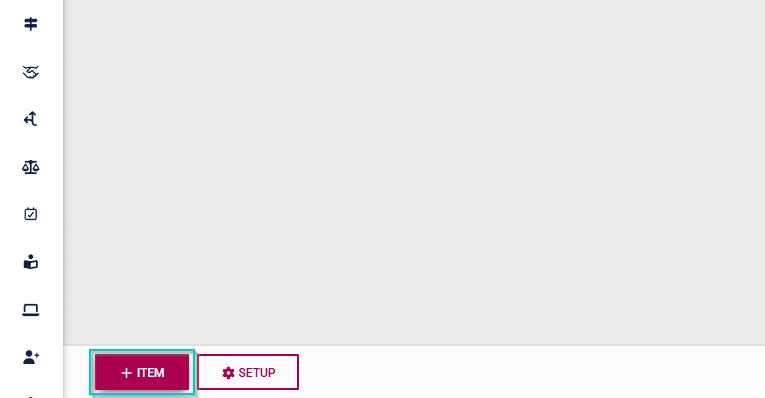
- To add a new master data item, click on +ITEM.
- Select the type of section item from the drop-down menu.
- Toggle the switch to set the status to active.
- Add a name for the section item.
- Add a description.
- Click SAVE when you are finished, SAVE ADD NEW to add another master data item or click CANCEL to discard your edits.
Configure evaluation periods
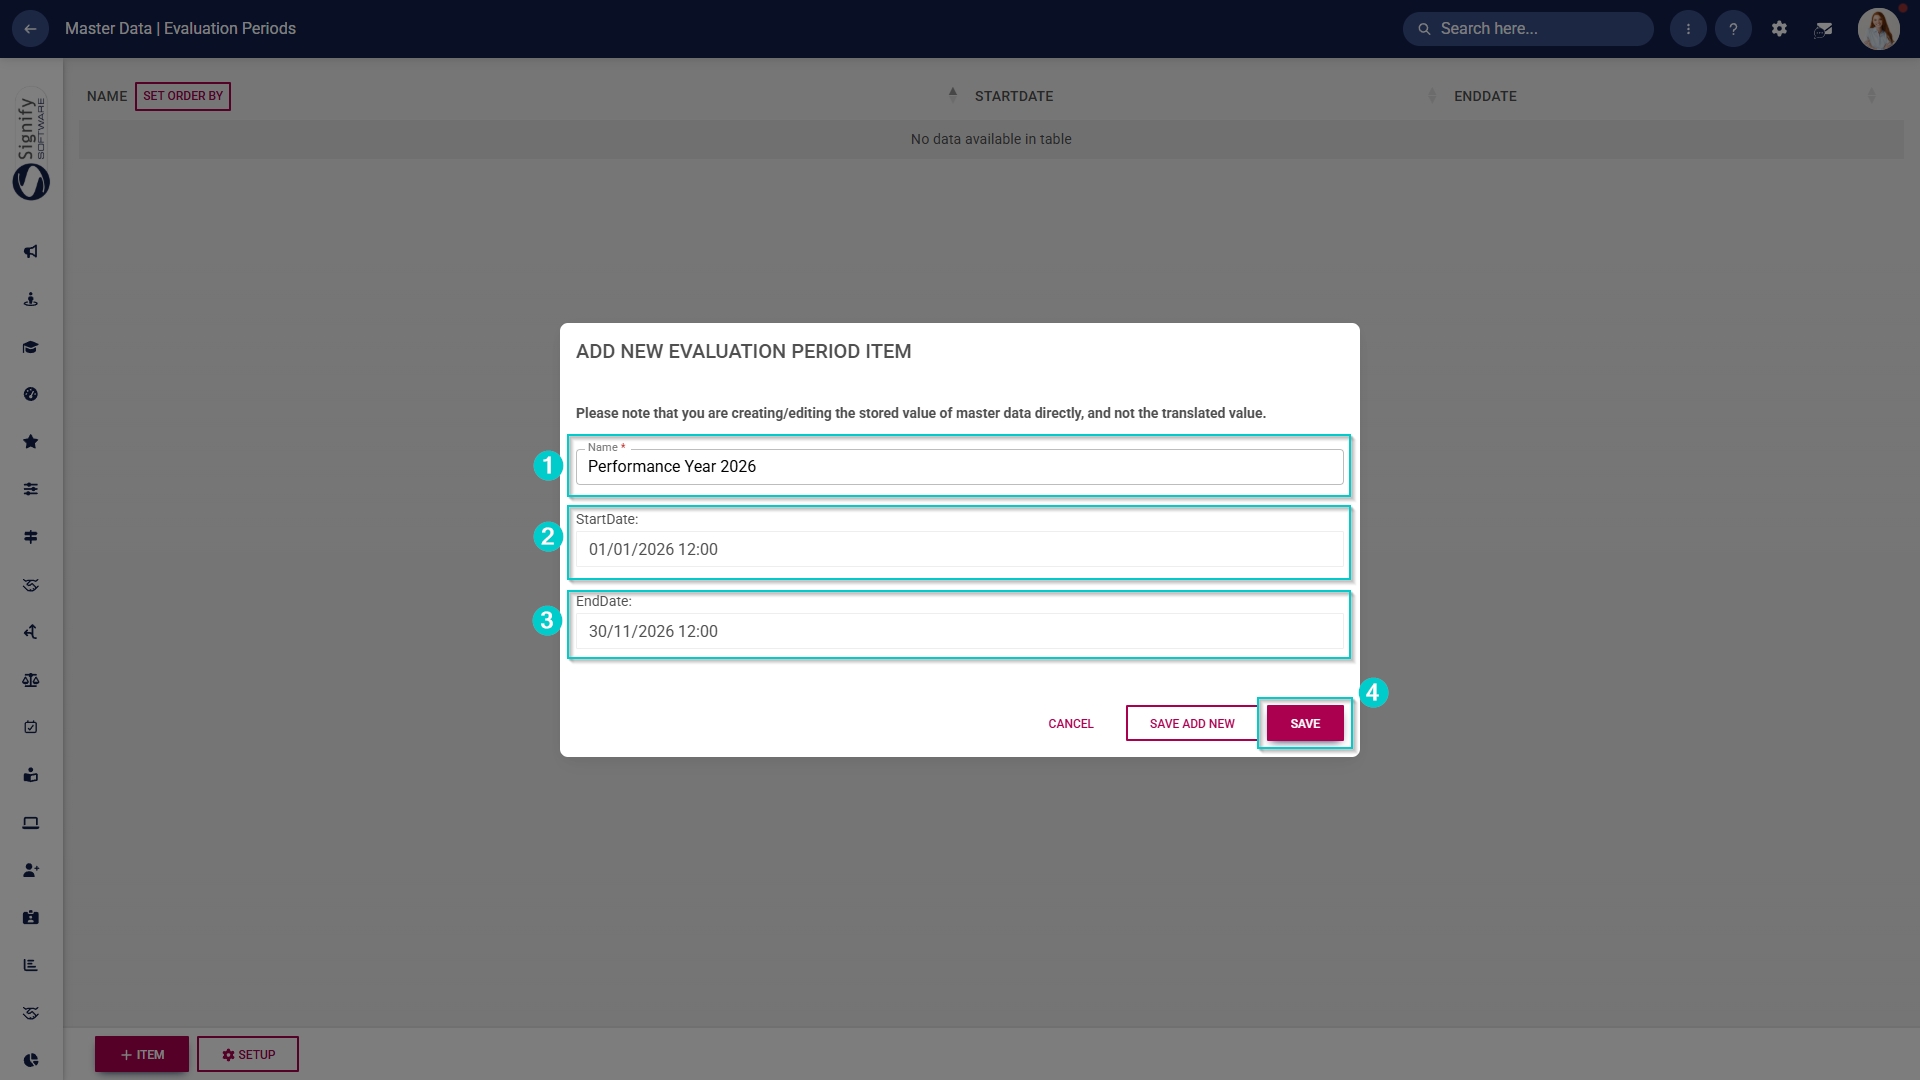
- Click on the Evaluation Periods category to continue.
- To add a new master data item, click on +ITEM.
- Add a name for the evaluation period.
- Select a start date and an end date.
- Click SAVE when you are finished, SAVE ADD NEW to add another master data item or click CANCEL to discard your edits.
Performance Management product setup
- Click the gear icon to access the Setup and Configuration menu.
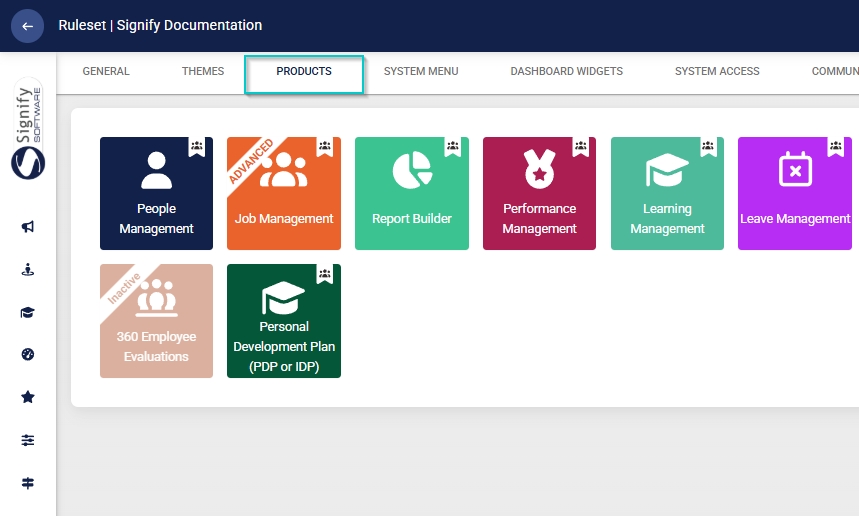
- Click Ruleset Setup.
- Select the ruleset you would like to update.
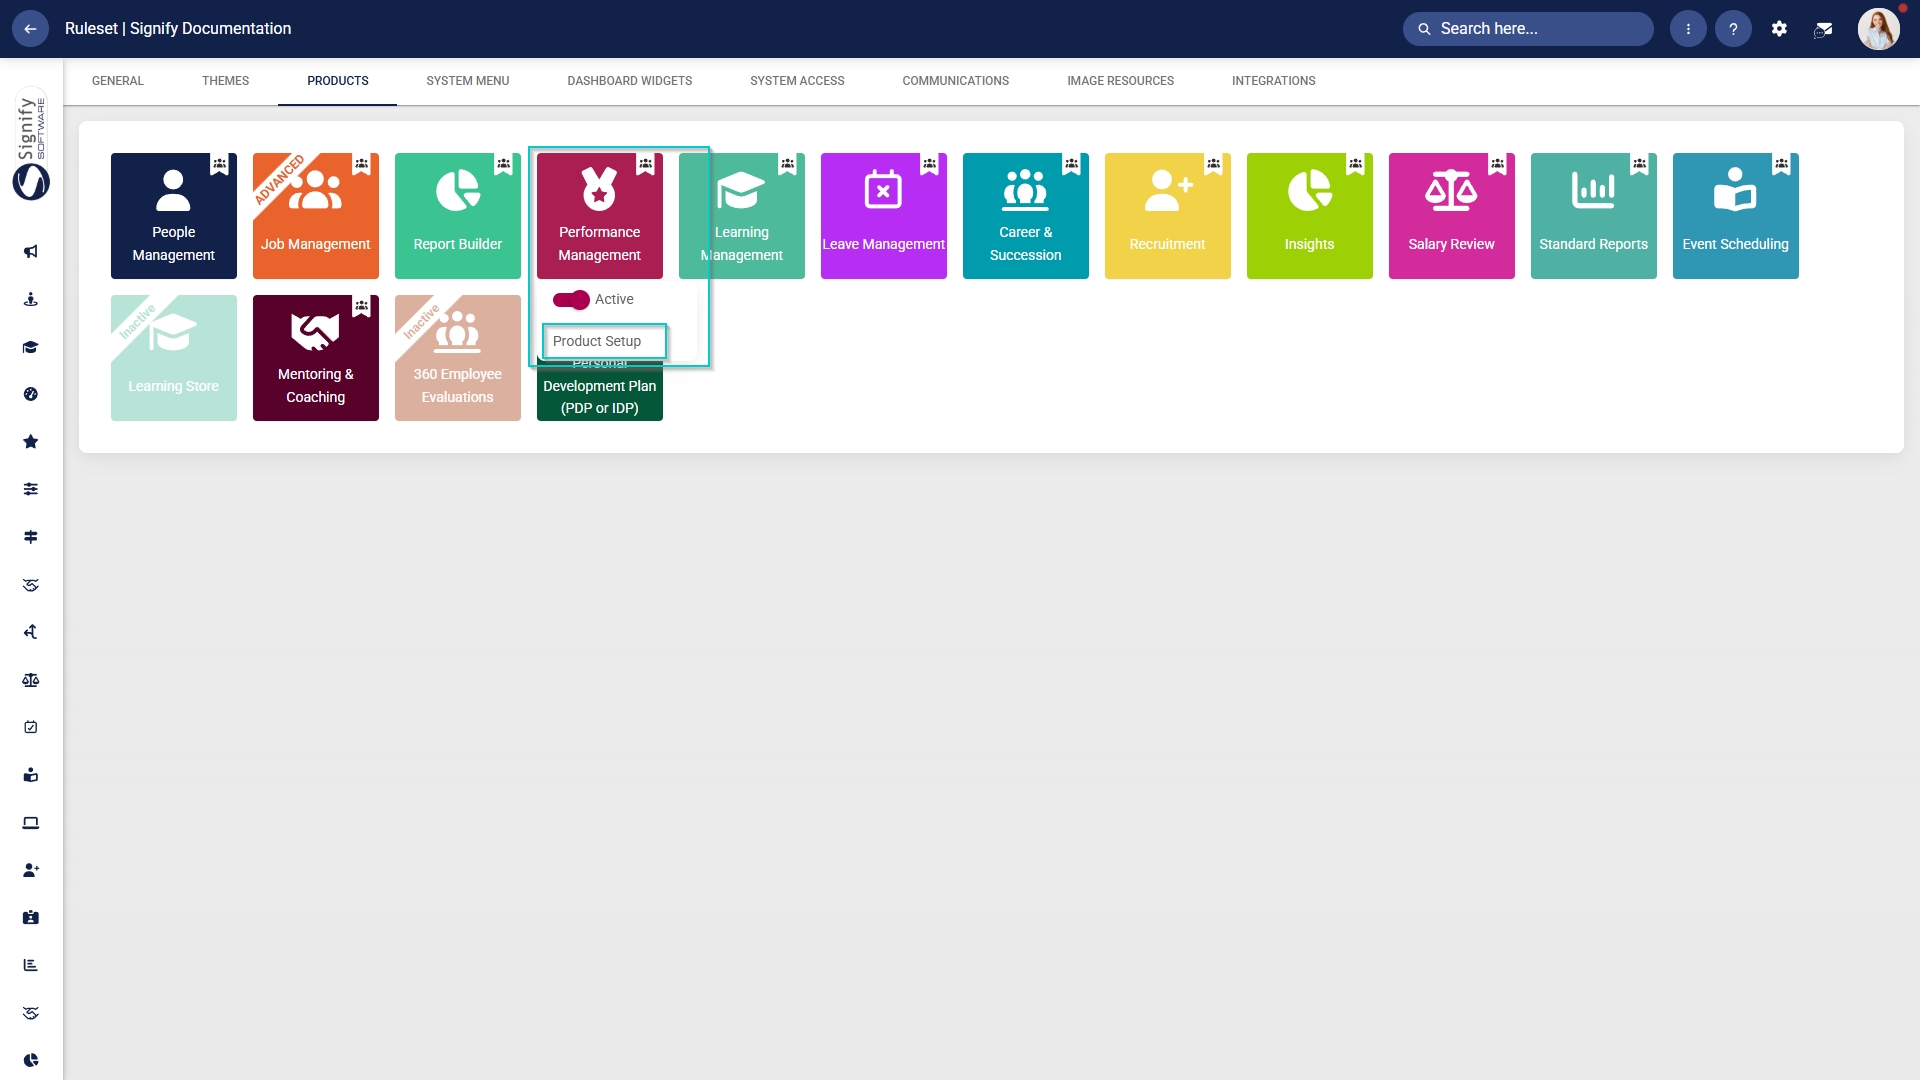
- Click on the Performance Management product card, then click Product Setup.
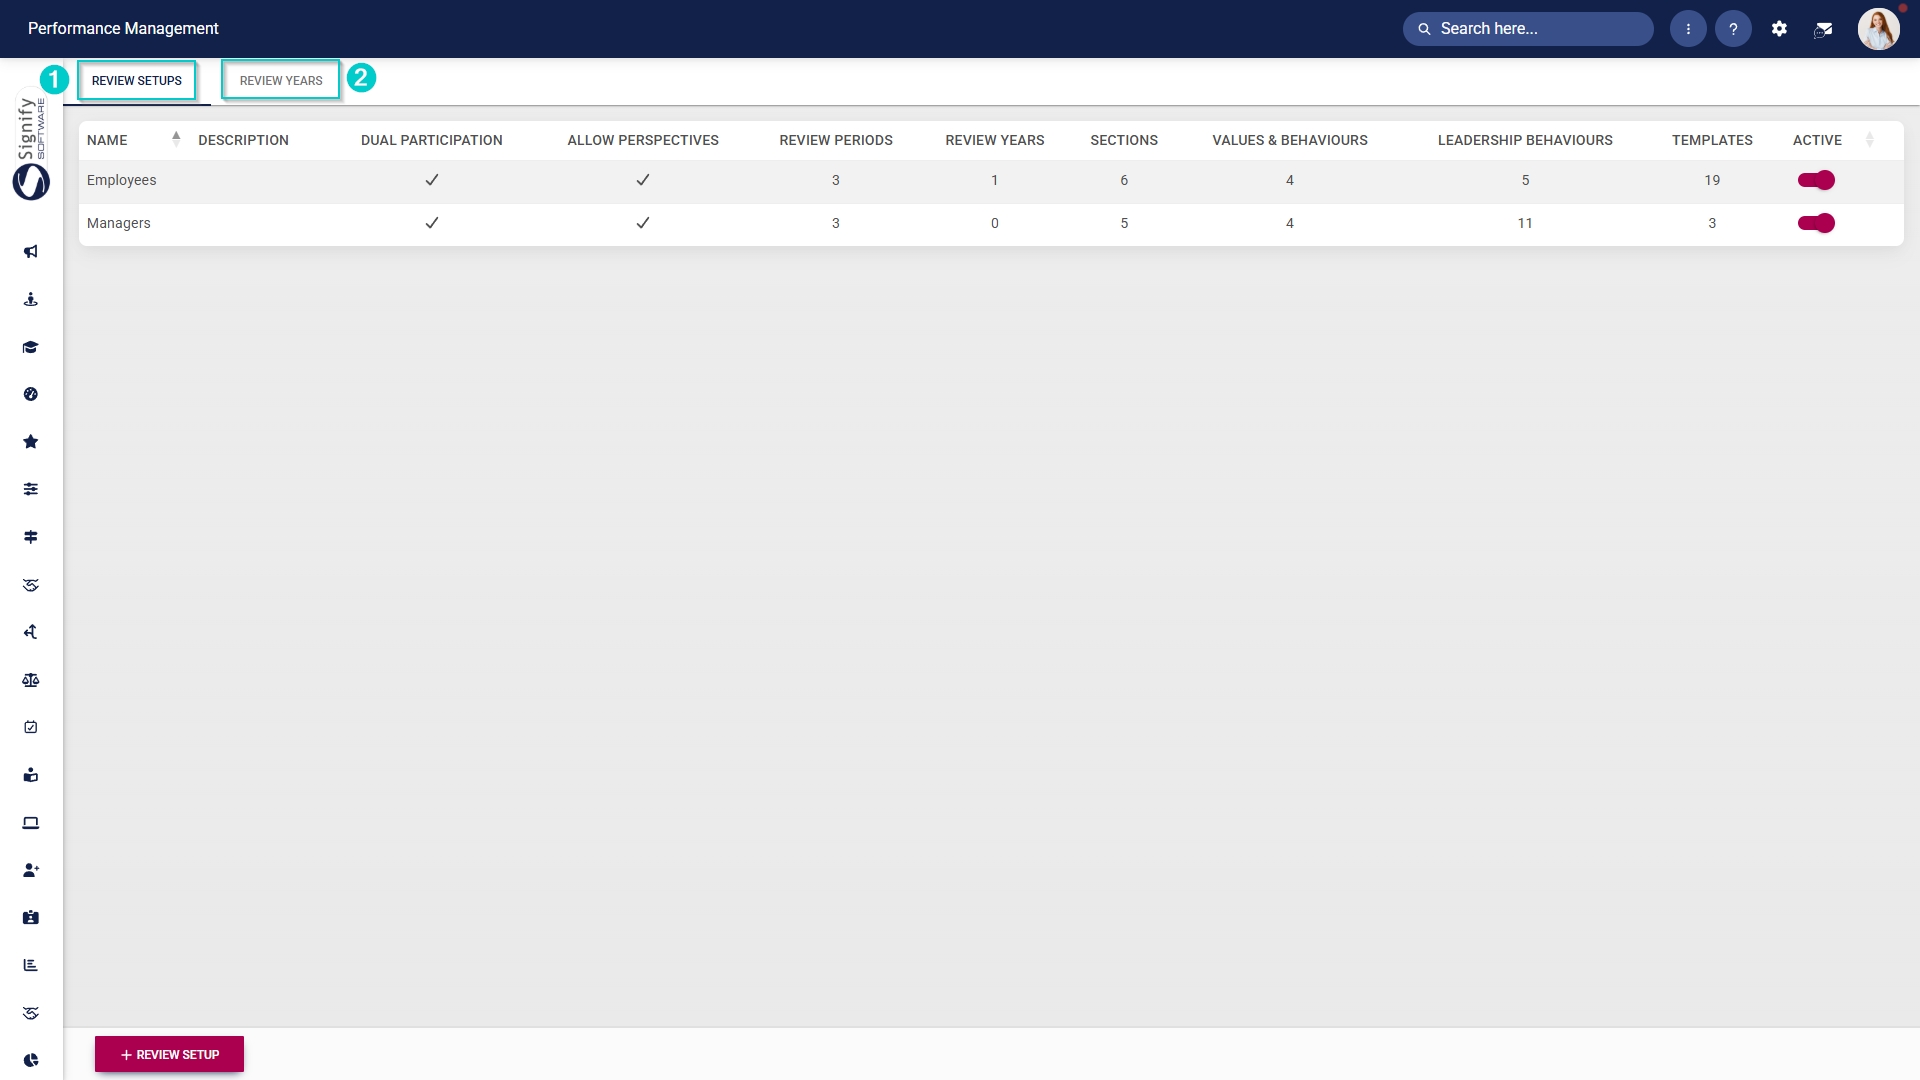
Review setups
Setups
A review setup defines the structure and rules governing the performance review process within an organisation. It determines how performance agreements function,operate, specifying rating permissions, the level of theemployee employee's involvement, and approval workflows.
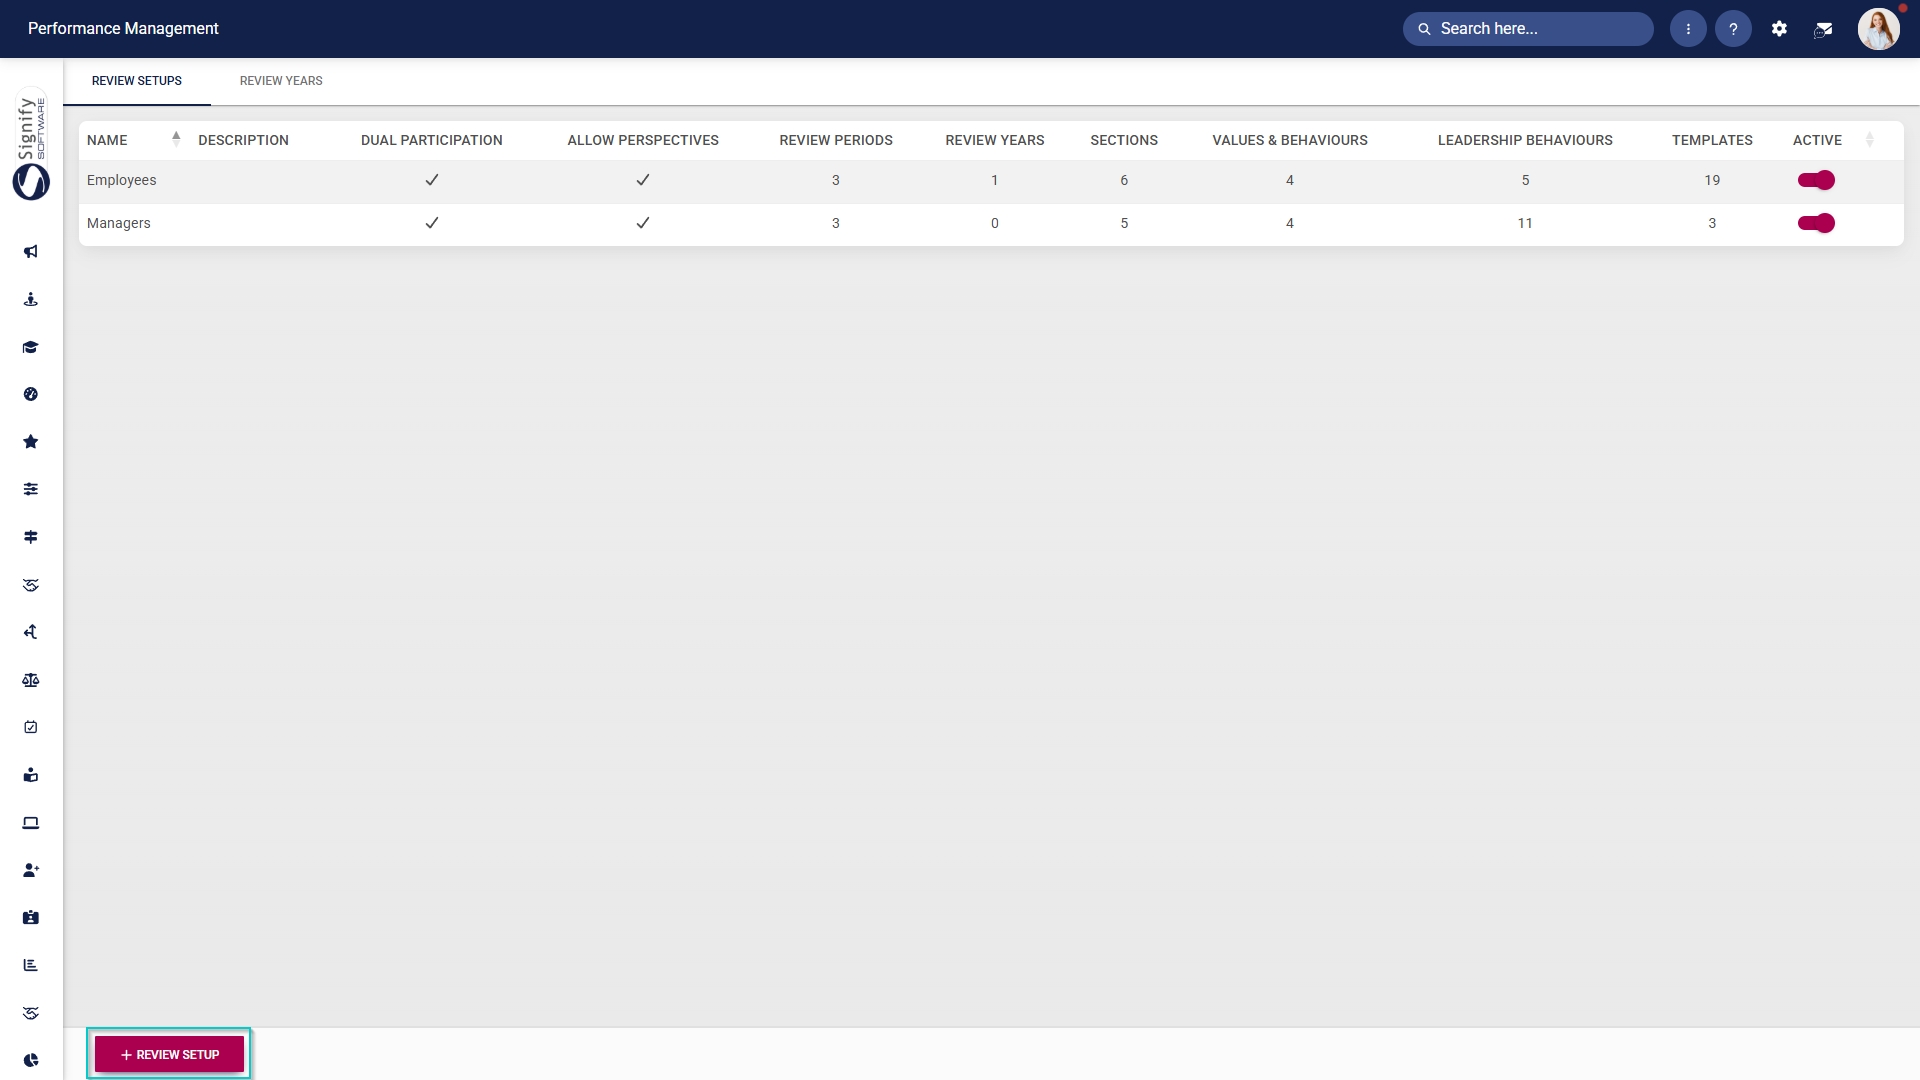

When you start the review setup, onlyto the Details menupage.
Let's examine each menu item more closely.
Details
The name, description, and configuration settings for the review setup can be edited on the Details screen.
|
||
|
SETTING NAME |
MODE |
DESCRIPTION |
|
Dual participation – both the employee and the manager will participate electronically. If disabled, only the manager will participate electronically. |
 |
Either the manager or the employee can create the performance agreement. The setting and rating of objectives requires the employee's participation.
Also activates the Dual Participation settings (see below). |
 |
The manager can create and approve the performance agreement and rate the objectives without the employee's participation. The employee will be allowed to view the agreement.
Also deactivates the Dual Participation settings (see below). |
|
| Allow perspectives. |
|
Allows perspectives as the highest level of categorisation. KPAs will be added to perspectives when creating performance agreements. |
|
Perspectives are not required for performance agreements, so KPAs can be added directly when creating performance agreements. |
|
|
Allow the manager to edit the review survey scores. |
|
A manager can update the review survey scores. Employees can view the scores. |
|
The review survey scores cannot be edited. Employees and managers can see the scores. | |
| Show the timeline to the manager and employees on the Performance Management dashboard. |
|
The timeline will display on the Performance Management dashboard. |
|
The timeline will not display on the Performance Management dashboard. | |
| The next review period can only start when the previous one has been completed. | |
Forces the one review period to be completed before the next one can start. Thus, if you have two review periods, the first must be finalised before you can start the second. |
|
Review periods can be started in any order if the phases are open. | |
| Hide scores and weights during the Ratings phase. | |
Instead of displaying scores and weights, labels will be added to the rating scales. |
|
The scores and weights will be displayed during the Ratings phase. | |
| Allow excluding review items. | |
Review items can be excluded from the overall final score. |
|
All review items are included in the overall final score. | |
| Auto-copy the objectives from the previous review period in the same year. The agreement status will also be copied (e.g., Approved or In Progress). | |
The objectives from the immediately preceding review period's agreement are automatically copied, without needing to select the agreement. (e.g., Approved or In Progress).
If no immediately preceding agreement is available, the pop-up menu prompts you to create one. In this instance, it does not copy the agreement's status. |
|
The pop-up menu with the agreement creation options will appear. Objectives from the previous review period's agreement will not be copied. |
|
| When copying from another agreement, use the section weights from the copied agreement rather than those of the review setup. The rest of the structure is copied from the review setup's configuration. | |
The section weights from the copied agreement override the section weights configured in the review setup's settings. |
|
The copied agreement will inherit the section weights from the review setup's settings. |
|
|
Allow other people (other than the manager) to rate a person at the lowest level (e.g., KPI level). |
|
Selected people (other than the manager) can evaluate a person on a specific KPI.
Also activates the Allow Non-Manager Ratings settings (see below). |
|
Only the manager can rate a person at the KPI level.
Also deactivates the Allow Non-Manager Ratings settings (see below). |
|
| Lock agreements for managers and employees. | |
Managers and employees can view agreements but not edit them.
Also activates the Locked Agreements settings (see below). |
|
Managers and employees can view and edit agreements.
Also deactivates the Locked Agreements settings (see below). |
|
| Allow interpolation | |
Interpolation is used to map actual values to the rating scales of a KPI. Actual values are entered when rating a KPI, and these values are then mapped to give a rating. A rating can also be excluded. |
|
Interpolation is switched off. | |
| Allow adding of a training intervention to PDP (when adding a new action plan). | |
When adding an action plan to a performance agreement (if enabled), a training intervention can be added to a PDP. |
|
Action plans are added to performance agreements without linking to training interventions. |
|
|
||
|
SETTING NAME |
MODE |
DESCRIPTION |
| The person's Self-Rating and Manager Rating must be approved before the Final Rating can be completed. |  |
This setting appears only when Dual Participation is enabled. how this will work. |
| Sub-setting 1: Show the person's approved Self-Rating to the manager only once the manager has approved the Manager Rating. | |
The employee's self-rating and the manager’s rating must be approved before the final rating can be completed. The person’s self-rating will be visible to the manager once their rating has been approved. |
| Sub-setting 2: Show the person's approved Self-Rating to the manager, regardless of the Manager Rating approval status. | |
The employee's self-rating and the manager’s rating must be approved before the final rating can be completed. The employee's approved self-rating will be shown to the manager, regardless of whether the manager's ratings have been approved or not. |
| Sub-setting 3: Show the Manager Rating to the person only once the Final Rating has been approved. | |
The employee's self-rating and the manager’s rating must be approved before the final rating can be completed. The manager’s rating will only be visible to the person once the final rating has been approved. |
| The Manager Rating and the Final Rating can be completed simultaneously (the Final Rating can only be approved once the person's Self-Rating has been approved). | |
This setting only shows when the Dual Participation setting has been enabled.
been approved. The manager will see the self-ratings only after they have been approved. The employee will see the manager's ratings once they have been approved, and will see the final ratings once these are approved. |
| Only show the Final Rating column and hide the Manager Rating column. | |
This setting only shows when the Dual Participation setting has been enabled. self-ratings and final ratings are needed. The final rating can only be approved when the employee's self-ratings have been approved. |
|
||
|
SETTING NAME |
MODE |
DESCRIPTION |
| Allow anonymous evaluations |
|
Selected people, other than the manager, can rate a person on a KPI level. The evaluation results will be presented anonymously.
The main setting, as well as the sub-setting, determines how this will work. |
|
Selected people, other than the manager, can rate a person on a KPI level. The comments and ratings of the person who performed the evaluation will be shown. |
|
| Sub-setting 1: Show the results anonymously (the manager and employee will not see who submitted the ratings). | |
Neither the manager nor the employee will see who submitted the ratings. |
| Sub-setting 2: Show the results anonymously only to the employee (the manager will see who submitted the ratings, but not the employee). | |
The employee will not be able to see who submitted the ratings and comments, but the manager will. |
| Sub-setting 3: Hide the evaluation summary page from employees. | |
The evaluation summary page will not be visible to employees, but the manager can view it. |
| Sub-setting 4: Show the comments and ratings anonymously (the manager and employee will see the ratings and comments submitted). | |
The manager and employee can view the ratings and comments submitted, but will not see who submitted them. |
|
||
|
SETTING NAME |
MODE |
DESCRIPTION |
| Always | |
Managers and employees can view performance agreements, but they cannot edit them. |
| Only when created via a performance management API (when created manually, this rule will not apply). | |
Managers and employees can view performance agreements, but cannot edit them if the agreements were created using a performance management API. |
Review Items
Review ItemsPeriod
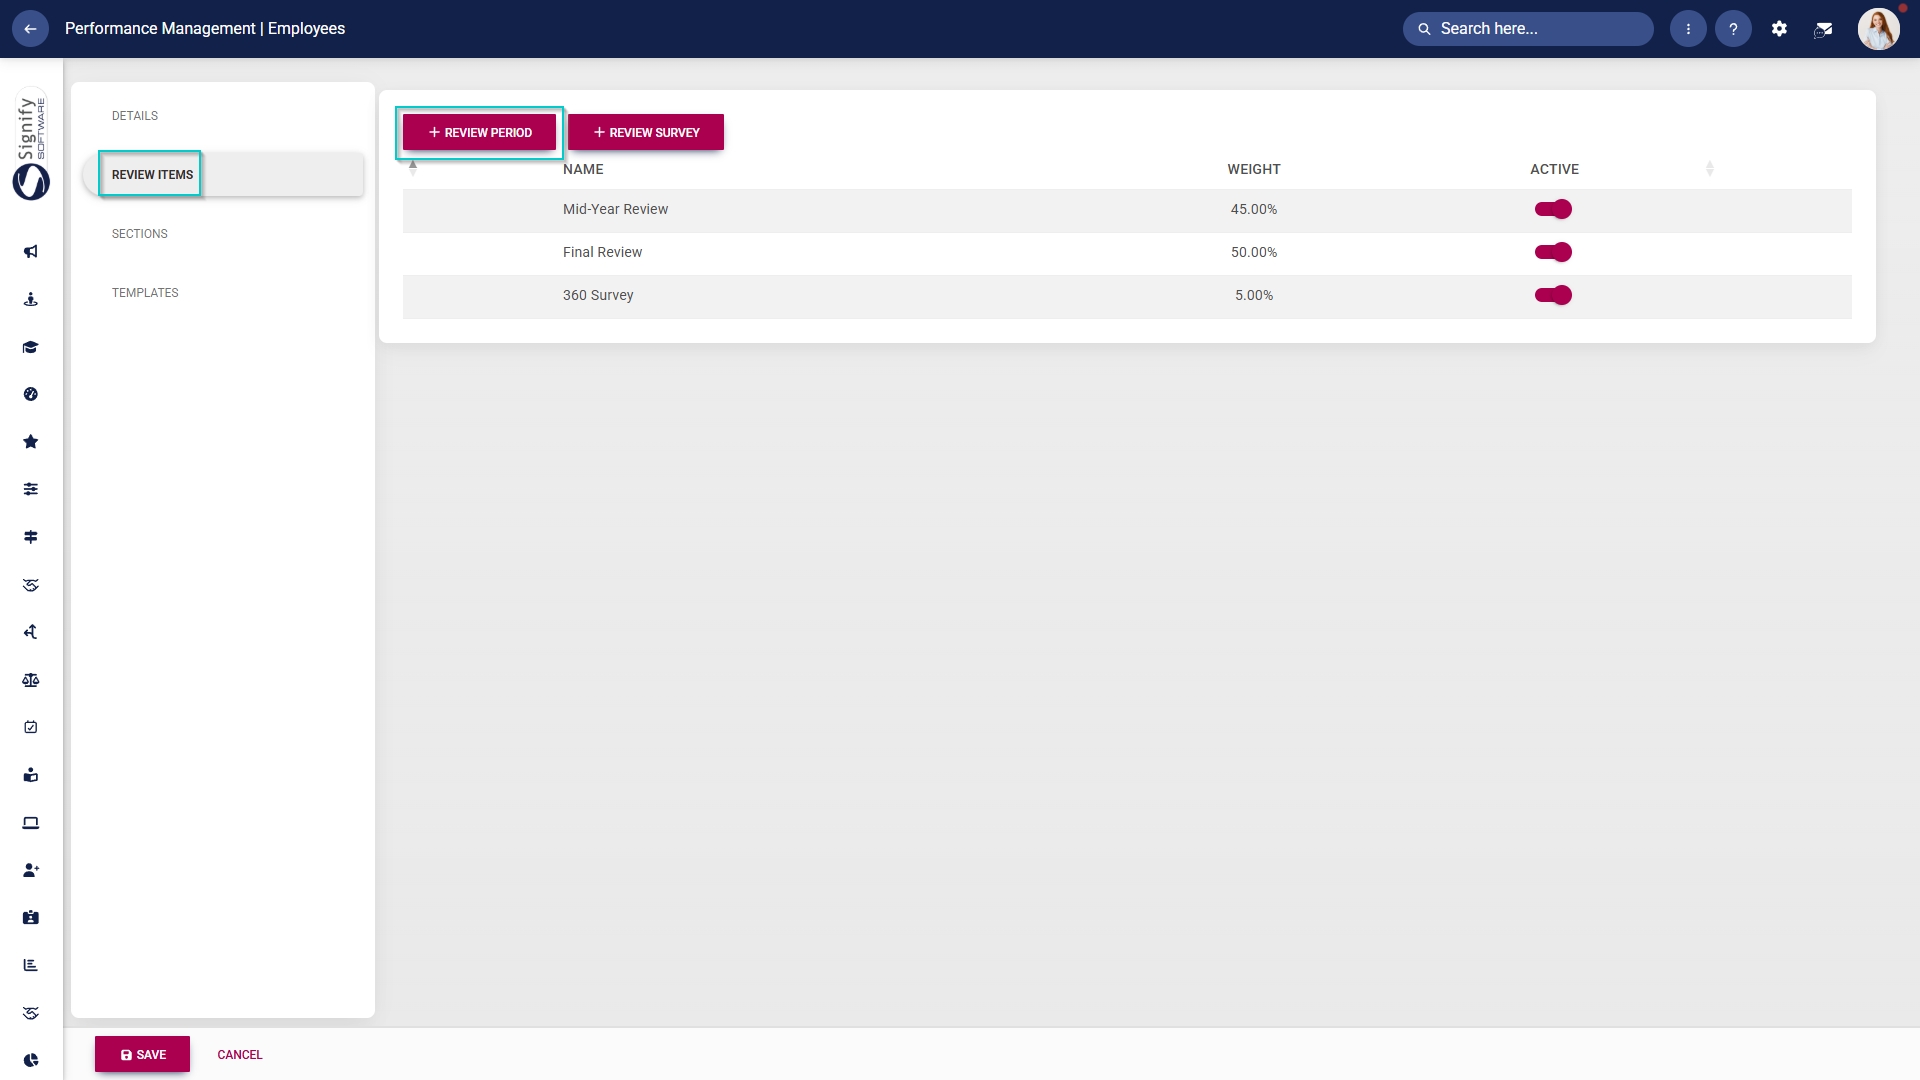
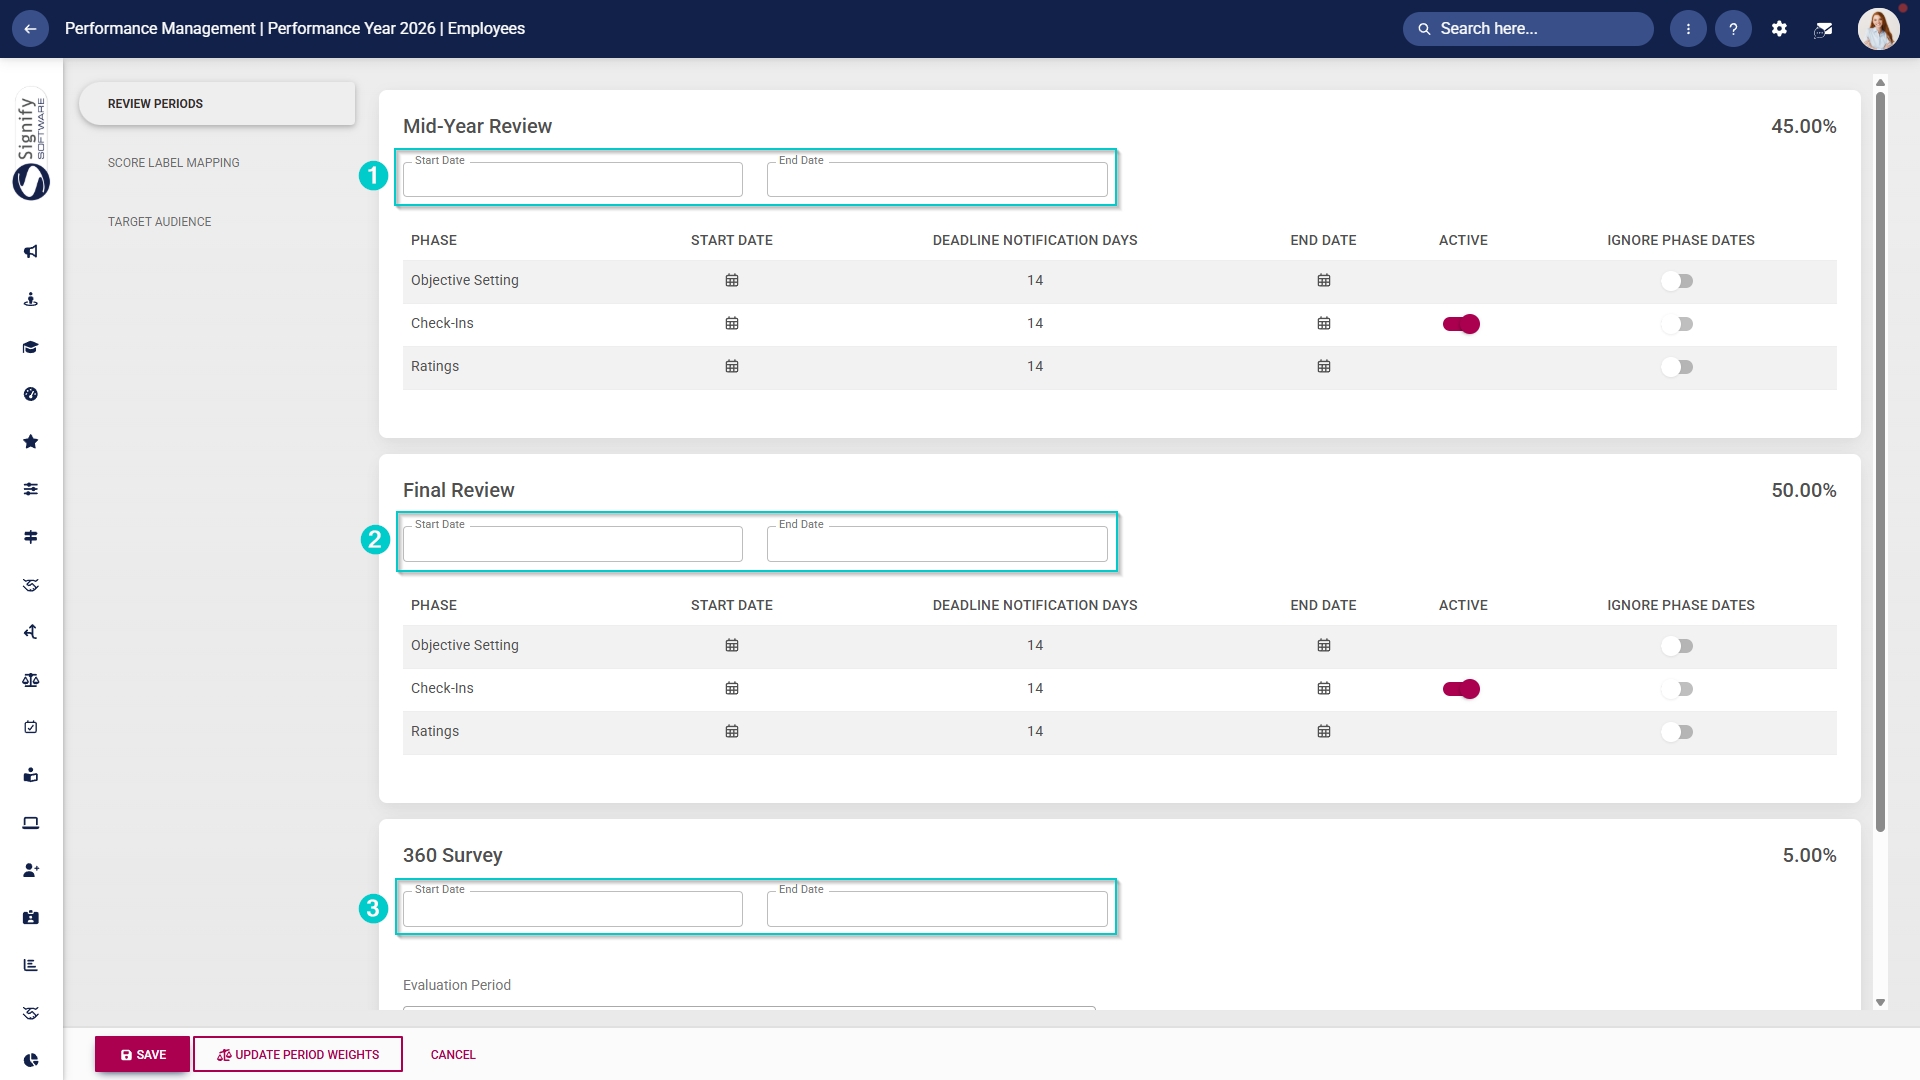
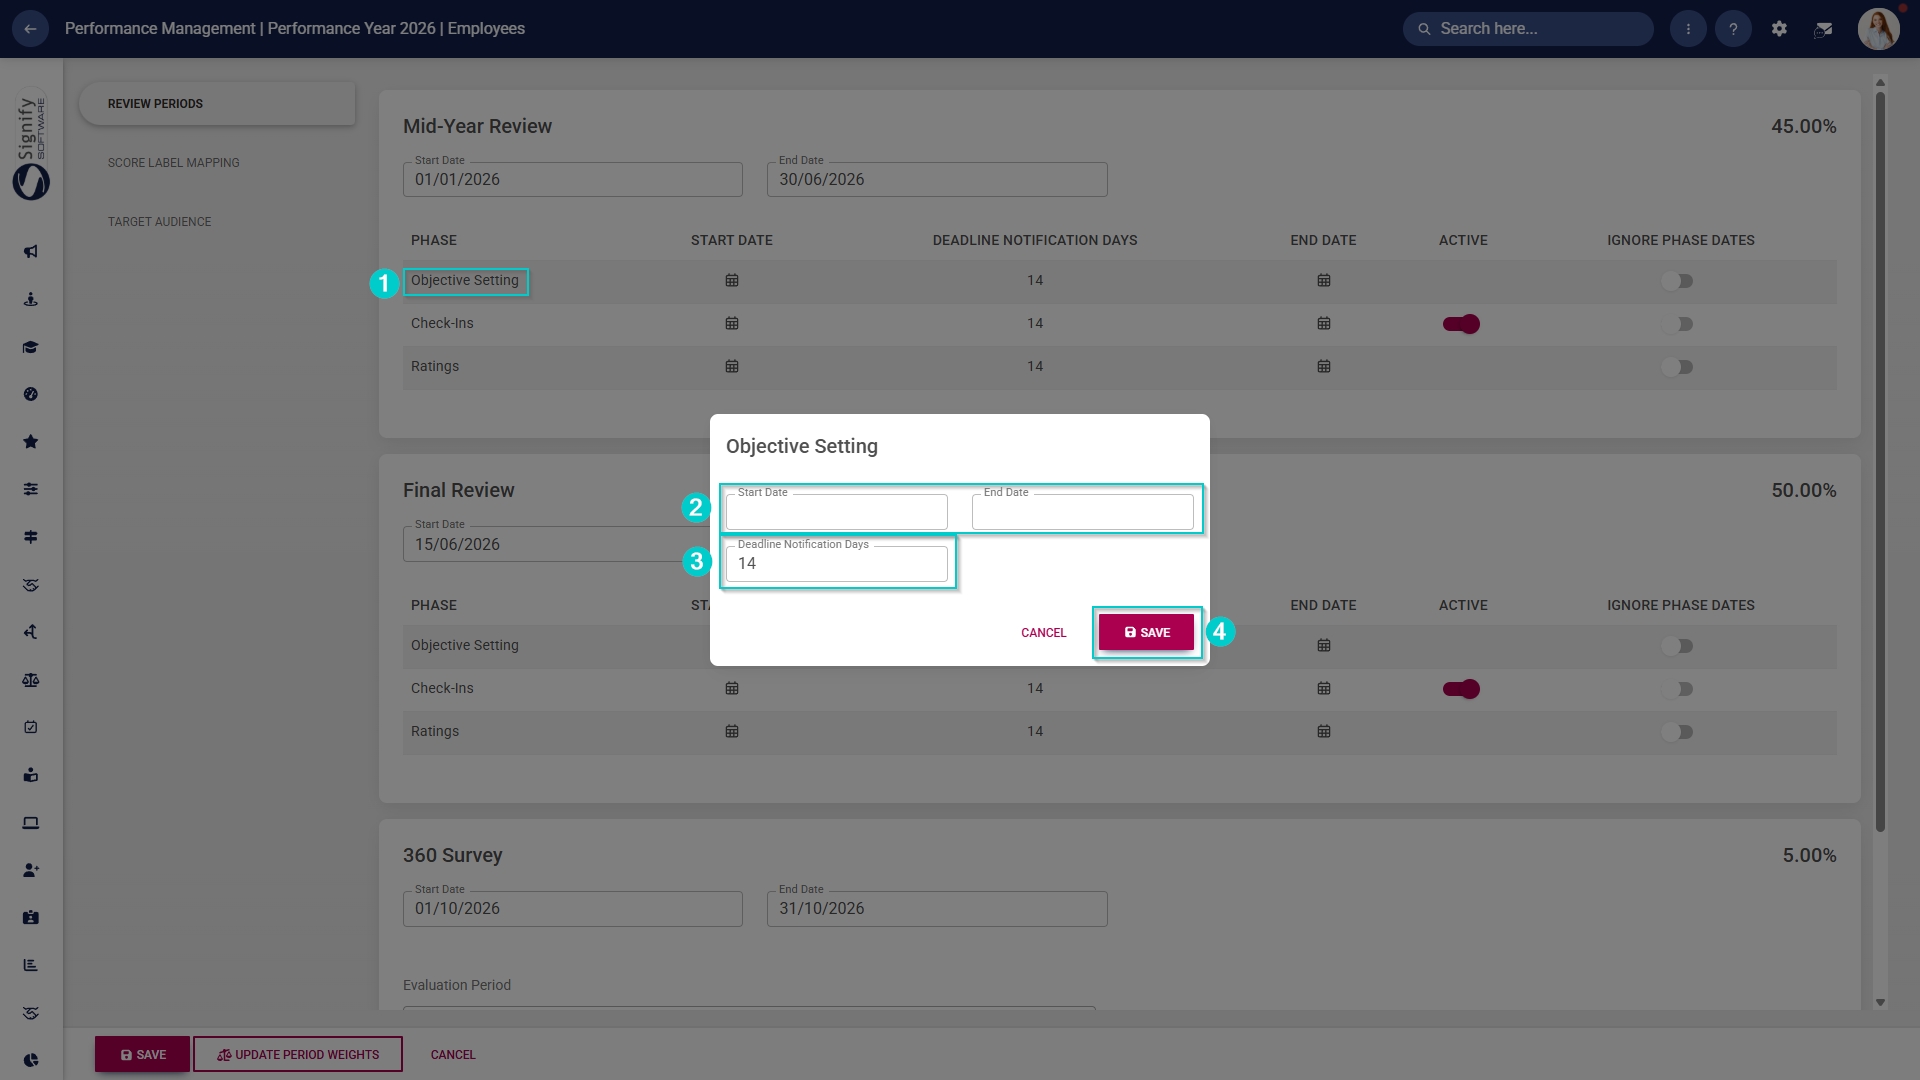
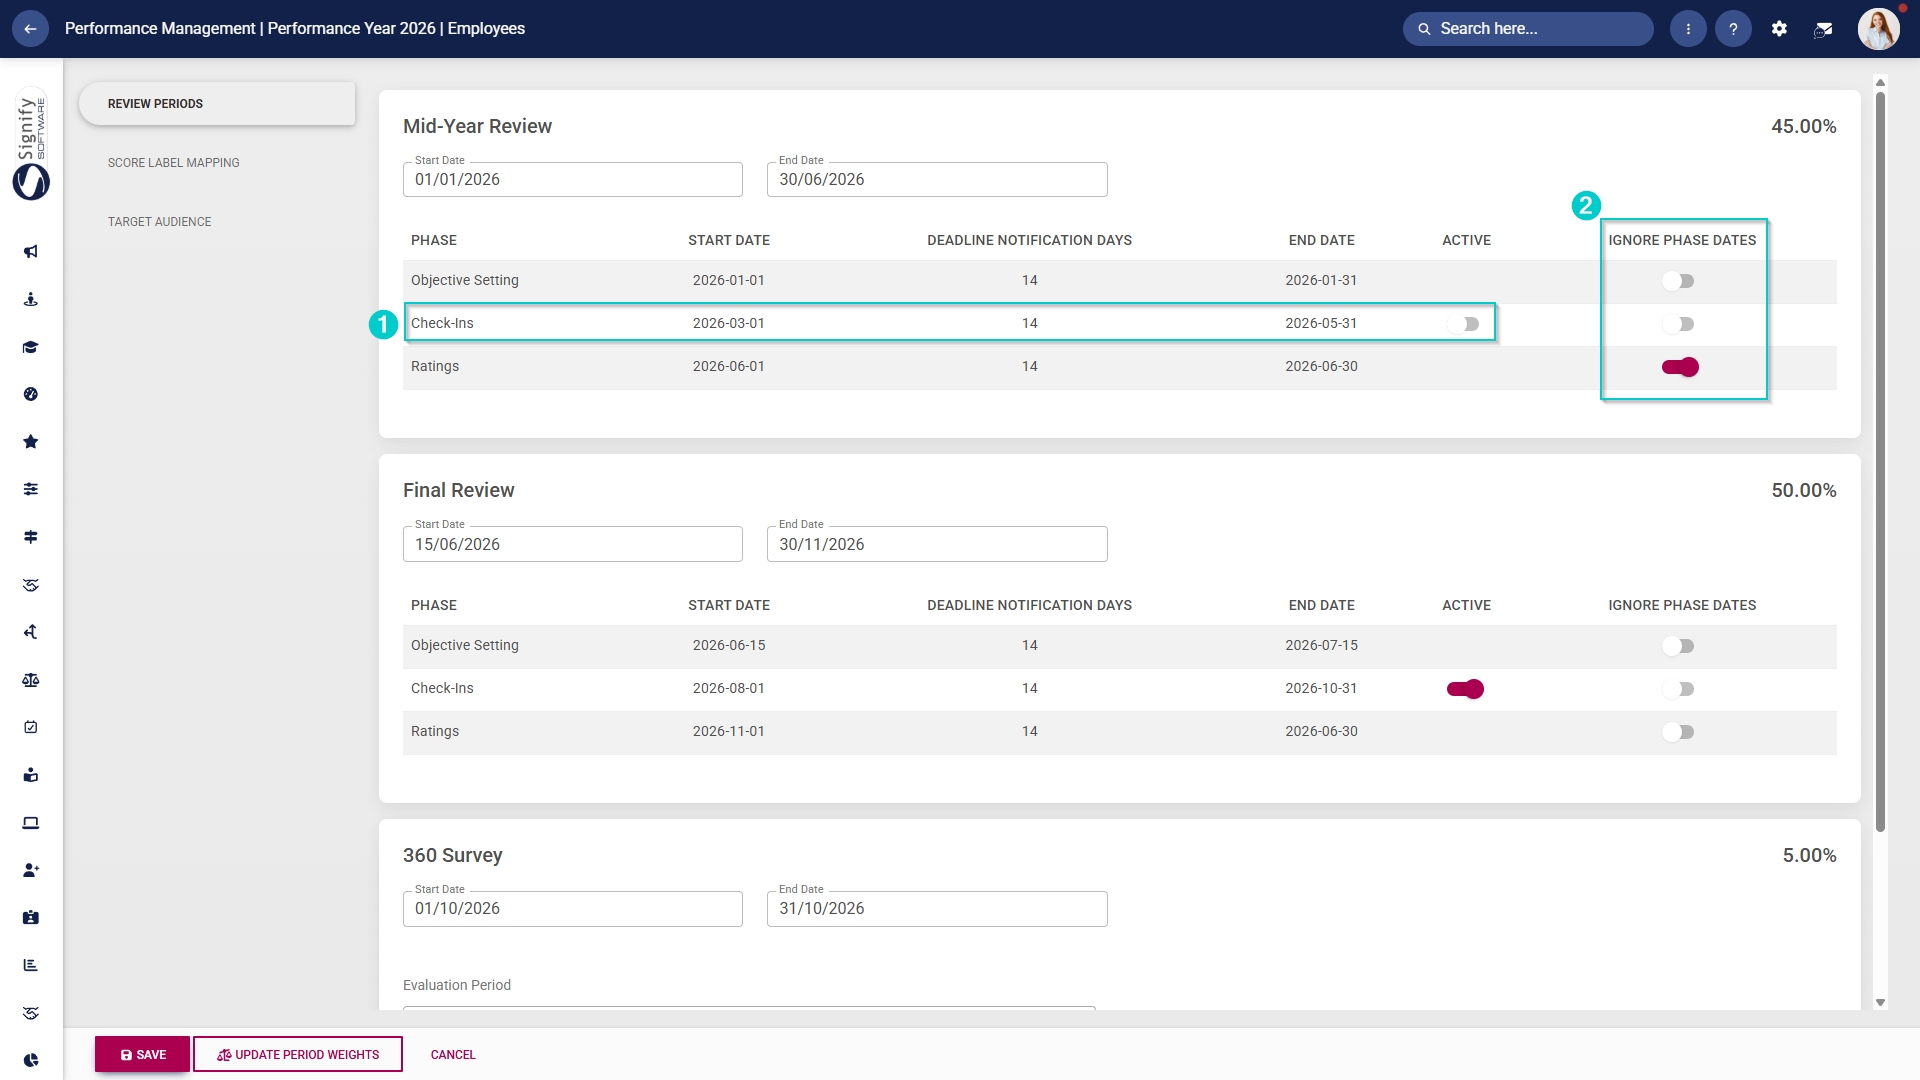
- Fill in the name and weight of the review period.
- Toggle to set the review period's status to active.
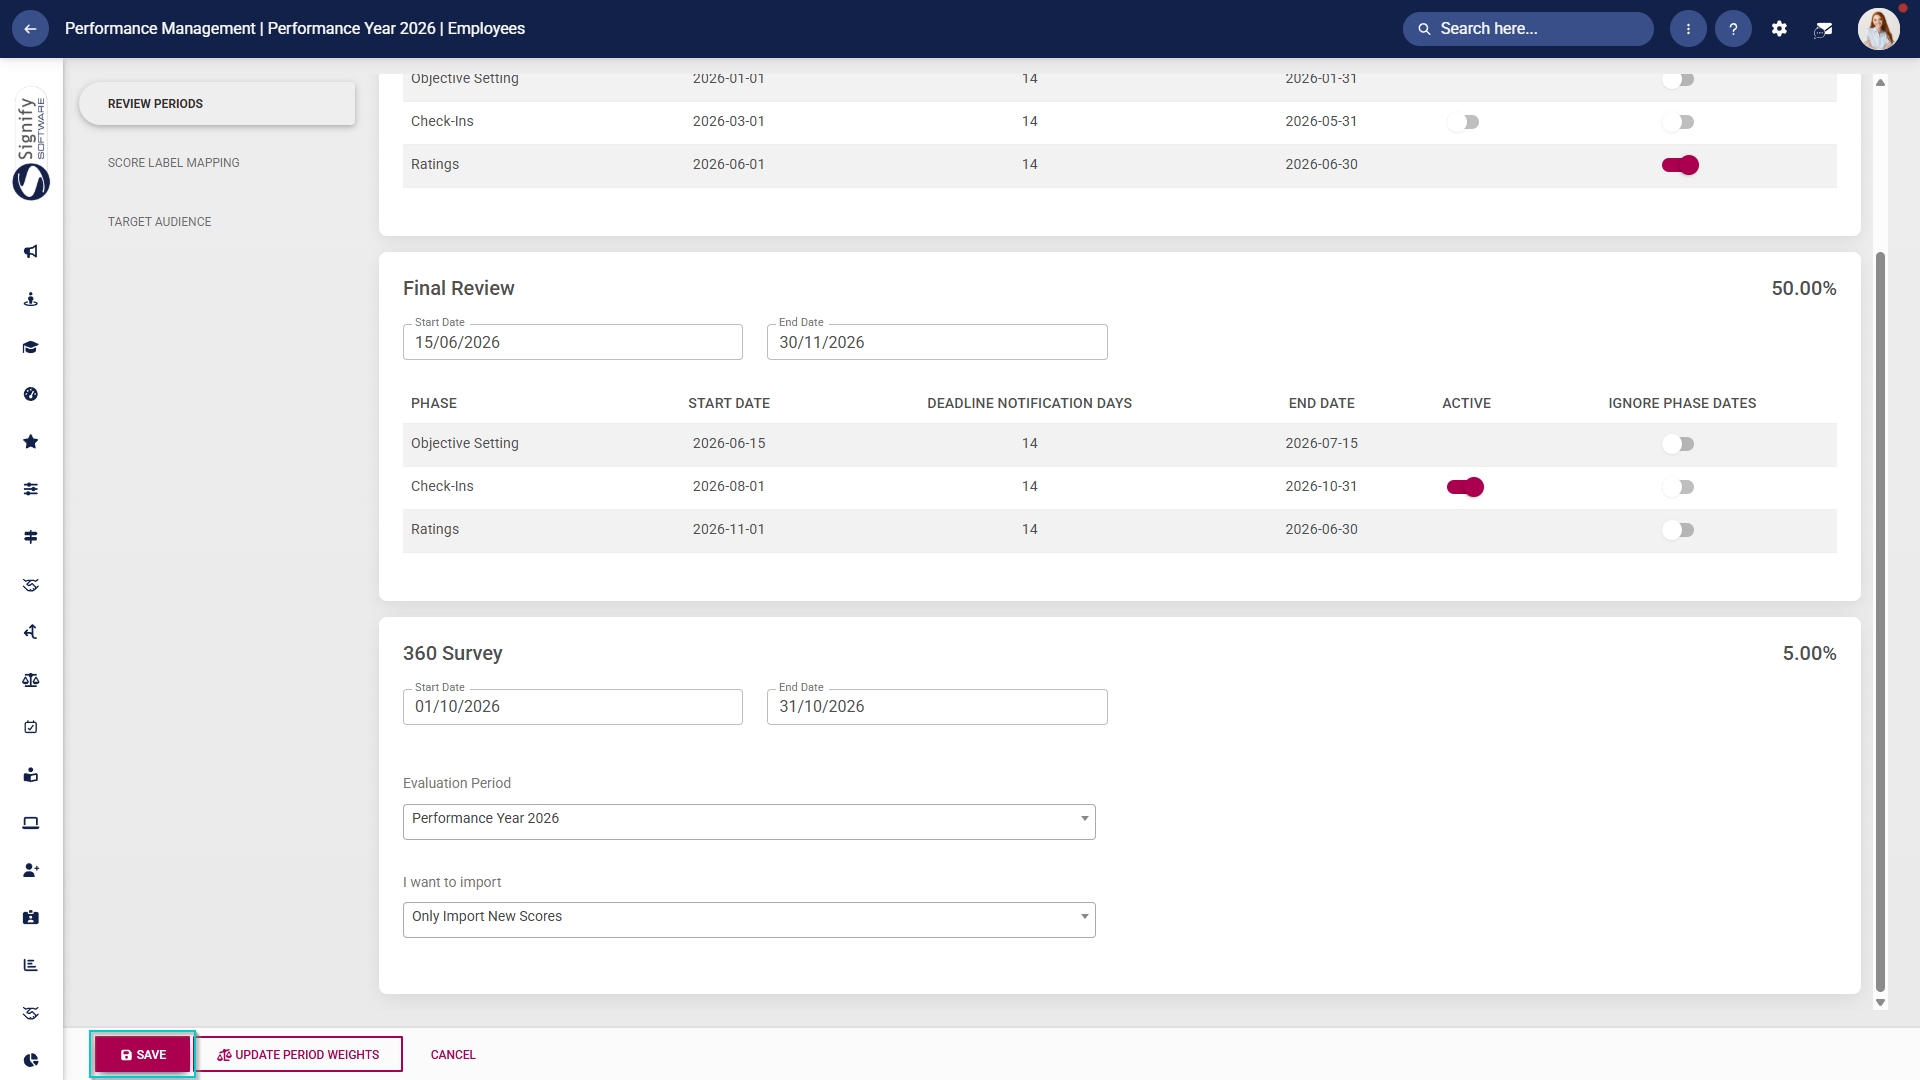
- Click SAVE when you are finished or click CANCEL to discard your edits.
Review Survey
- Click +REVIEW SURVEY to add an evaluation to the review setup.
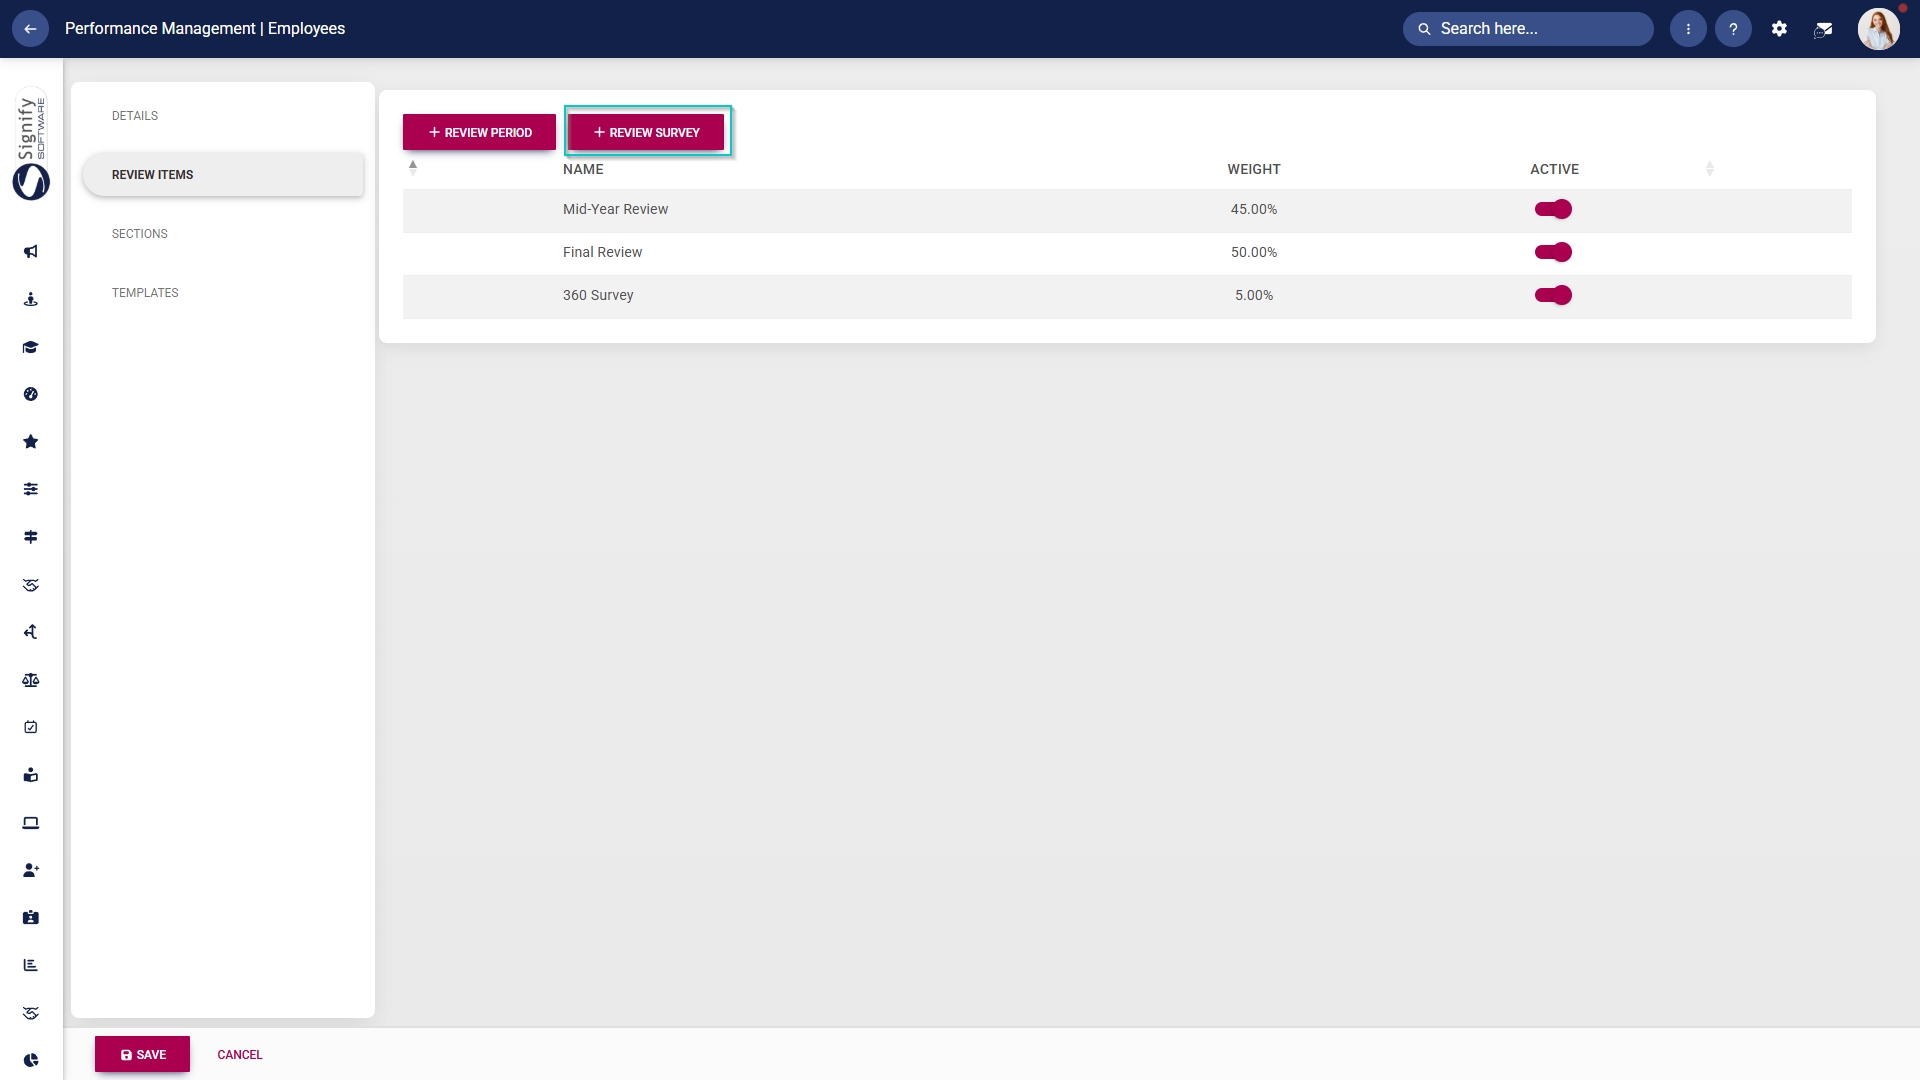
- Fill in the name, weight, and maximum score of the review survey.
- Switch the toggles to select the status for the following:
-
- Active
- Allow revised scores
- Require mandatory comments.
-
- Click SAVE when you are finished or click CANCEL to discard your edits.
- If you have finished configuring the review items, they will appear on the Performance Management dashboard as shown below:
Sections
The different Sections of the performance agreement can be switched on or off, assigned weights, or configured for use.
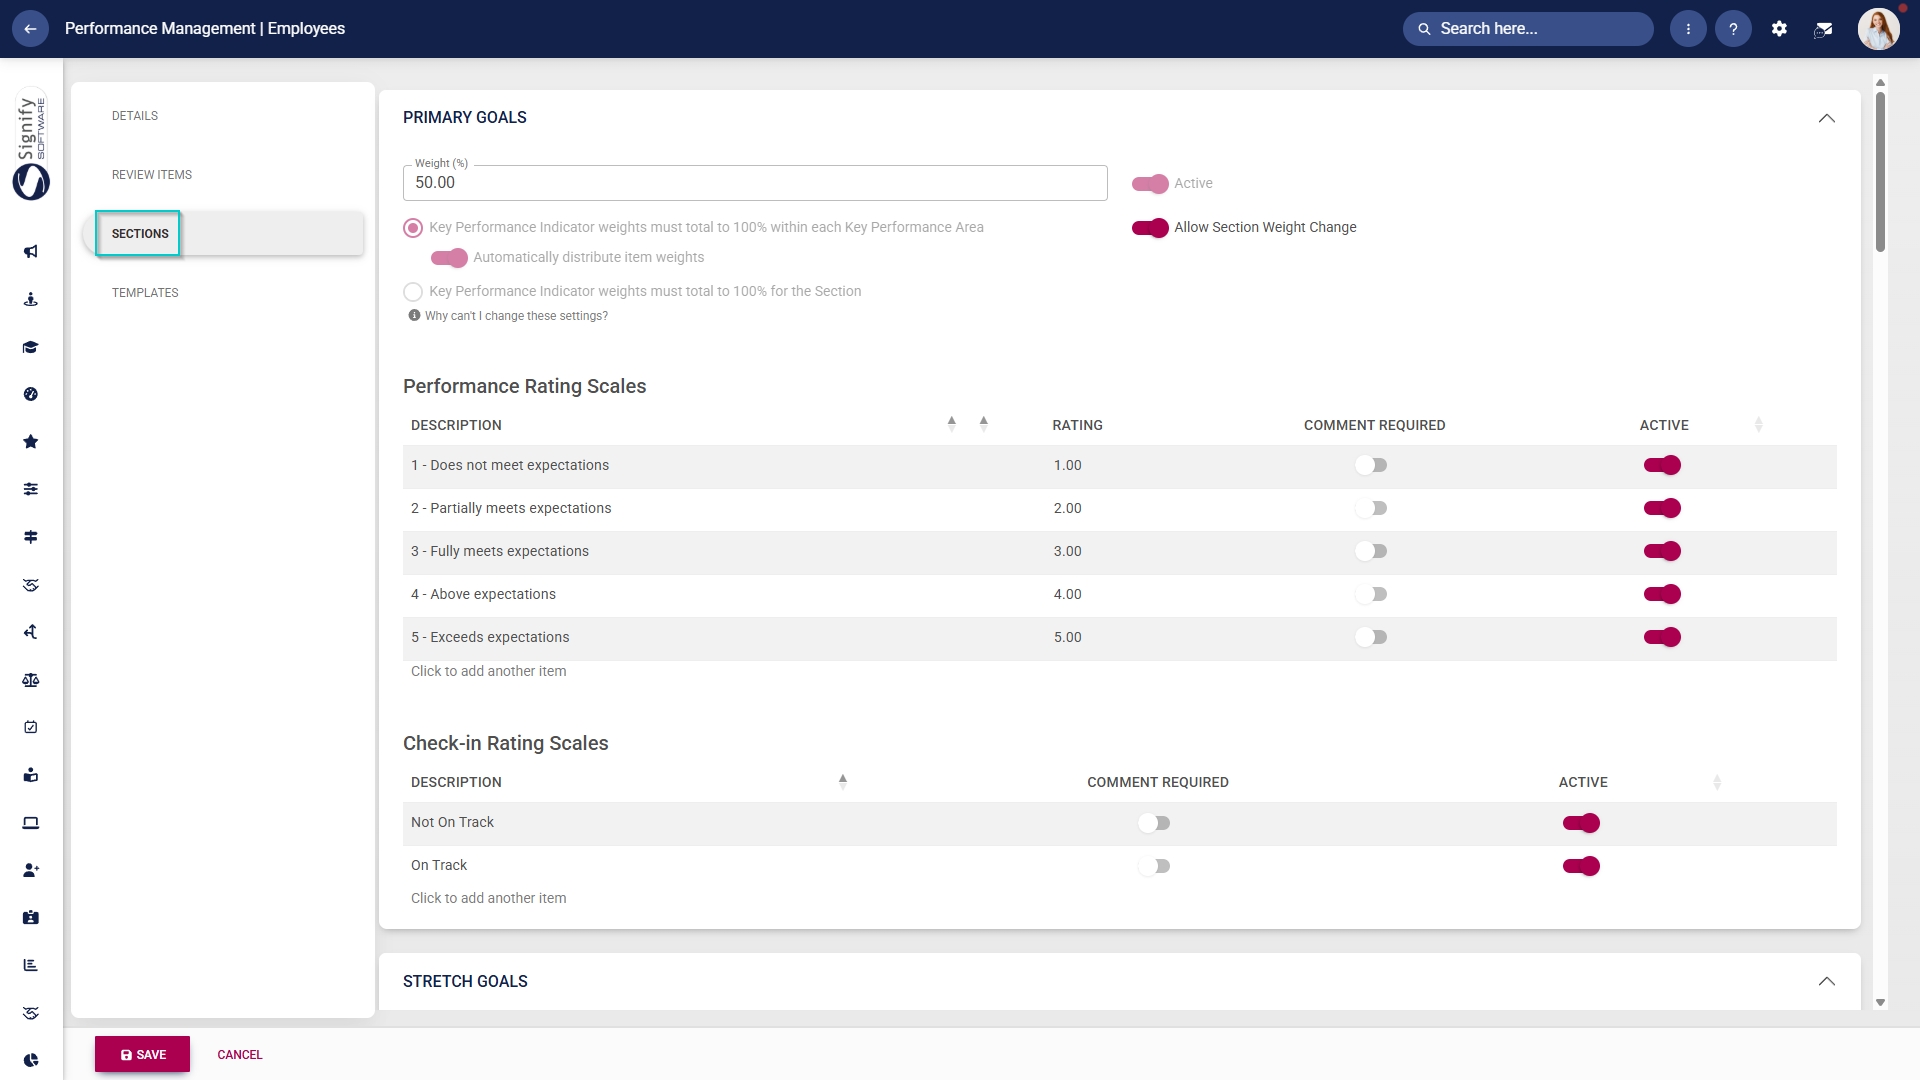
The following steps will guide you through setting up and configuring the sections of a performance agreement.
A performance agreement can consist of the following sections:
- Primary Goals (always enabled by default)
- Stretch Goals (optional)
- Values and Behaviours (optional)
- Leadership Behaviours (optional)
- Key Competencies (optional)
It is important to ensure your section weights add up to 100% for the performance agreement, or you may receive an error message as follows:
Let us look at the settings linked to each section of the performance agreement in more detail.
Primary Goals
Primary Goals form the core performance expectations of a role. They define what must be delivered for the organisation to function effectively and sustainably.
Since this section of a performance agreement is always enabled by default, the toggle to disable it is greyed out.
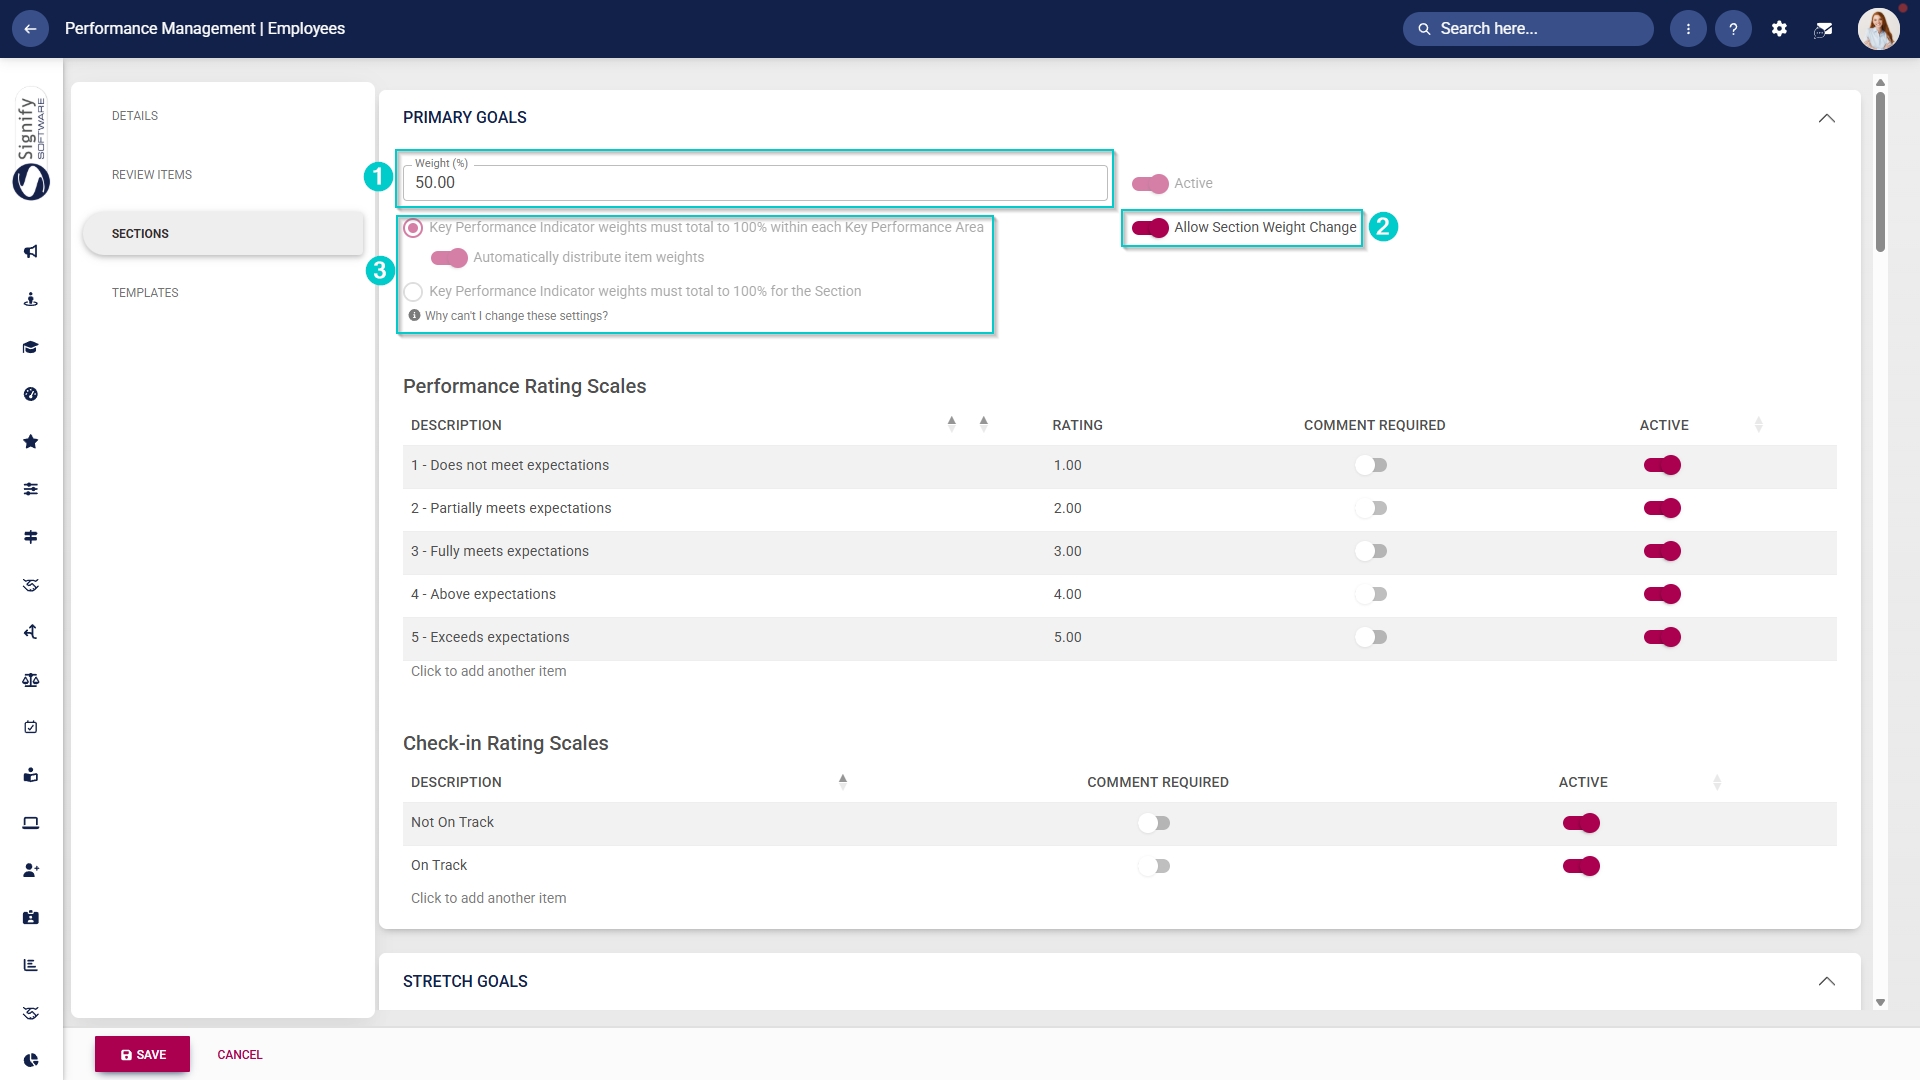
- Add a weight for this section.
- Use the toggle to choose whether the section's weight
maycanchange or not.change. - Configure the settings related to Key Performance Indicator weights:
- Option 1: The Key Performance Indicator weights must add up to 100% per Key Performance Area.
- You can choose to automatically distribute the item weights (i.e. if there are 5 KPIs for a specific KPA, each KPI will have a weight of 20%).
- Option 2: The combined weighting of all Key Performance Indicators (KPIs) within a section must total 100% (i.e., if there are 2 KPAs in the section, each with 2 KPIs, each KPI will have a weight of 25%).
- Option 1: The Key Performance Indicator weights must add up to 100% per Key Performance Area.
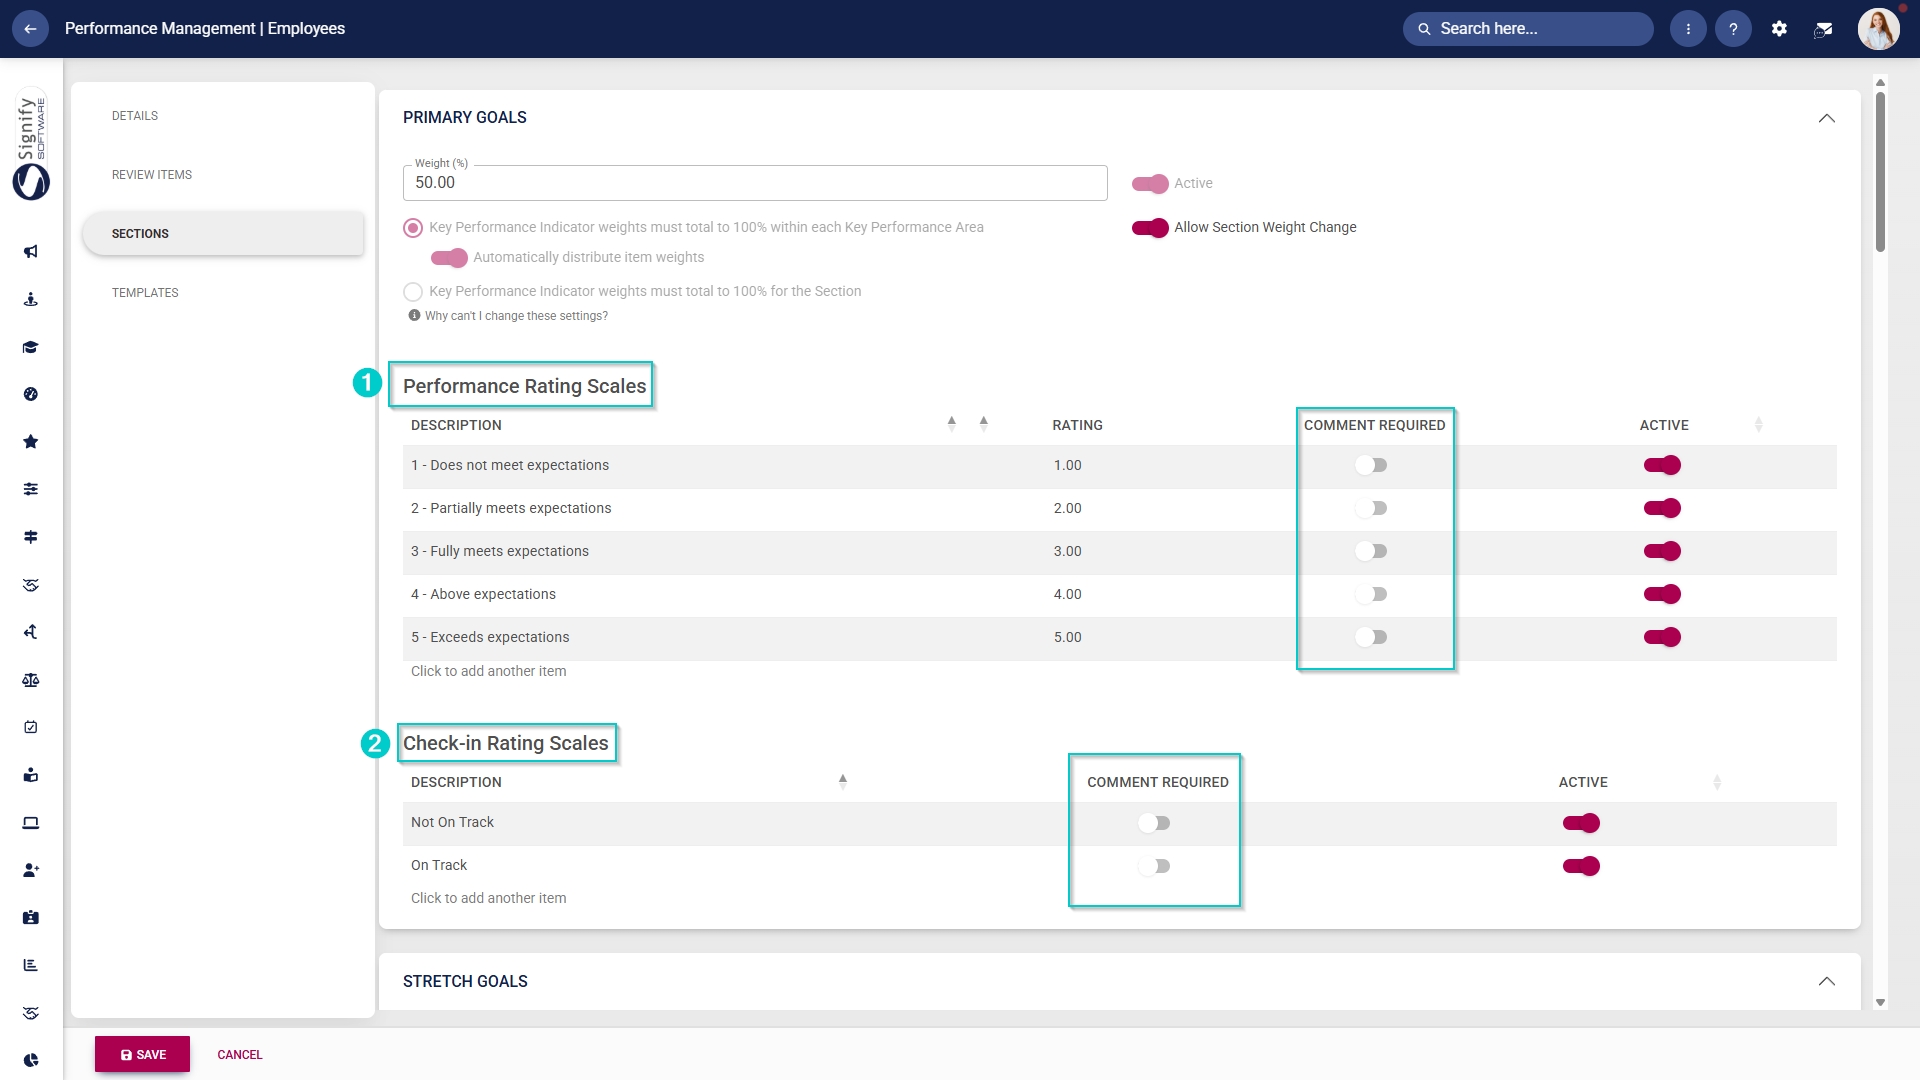
- Configure the performance rating scale and the check-in rating scale to be used for this section.
- Toggle to select whether comments will be required during check-ins or when rating objectives.
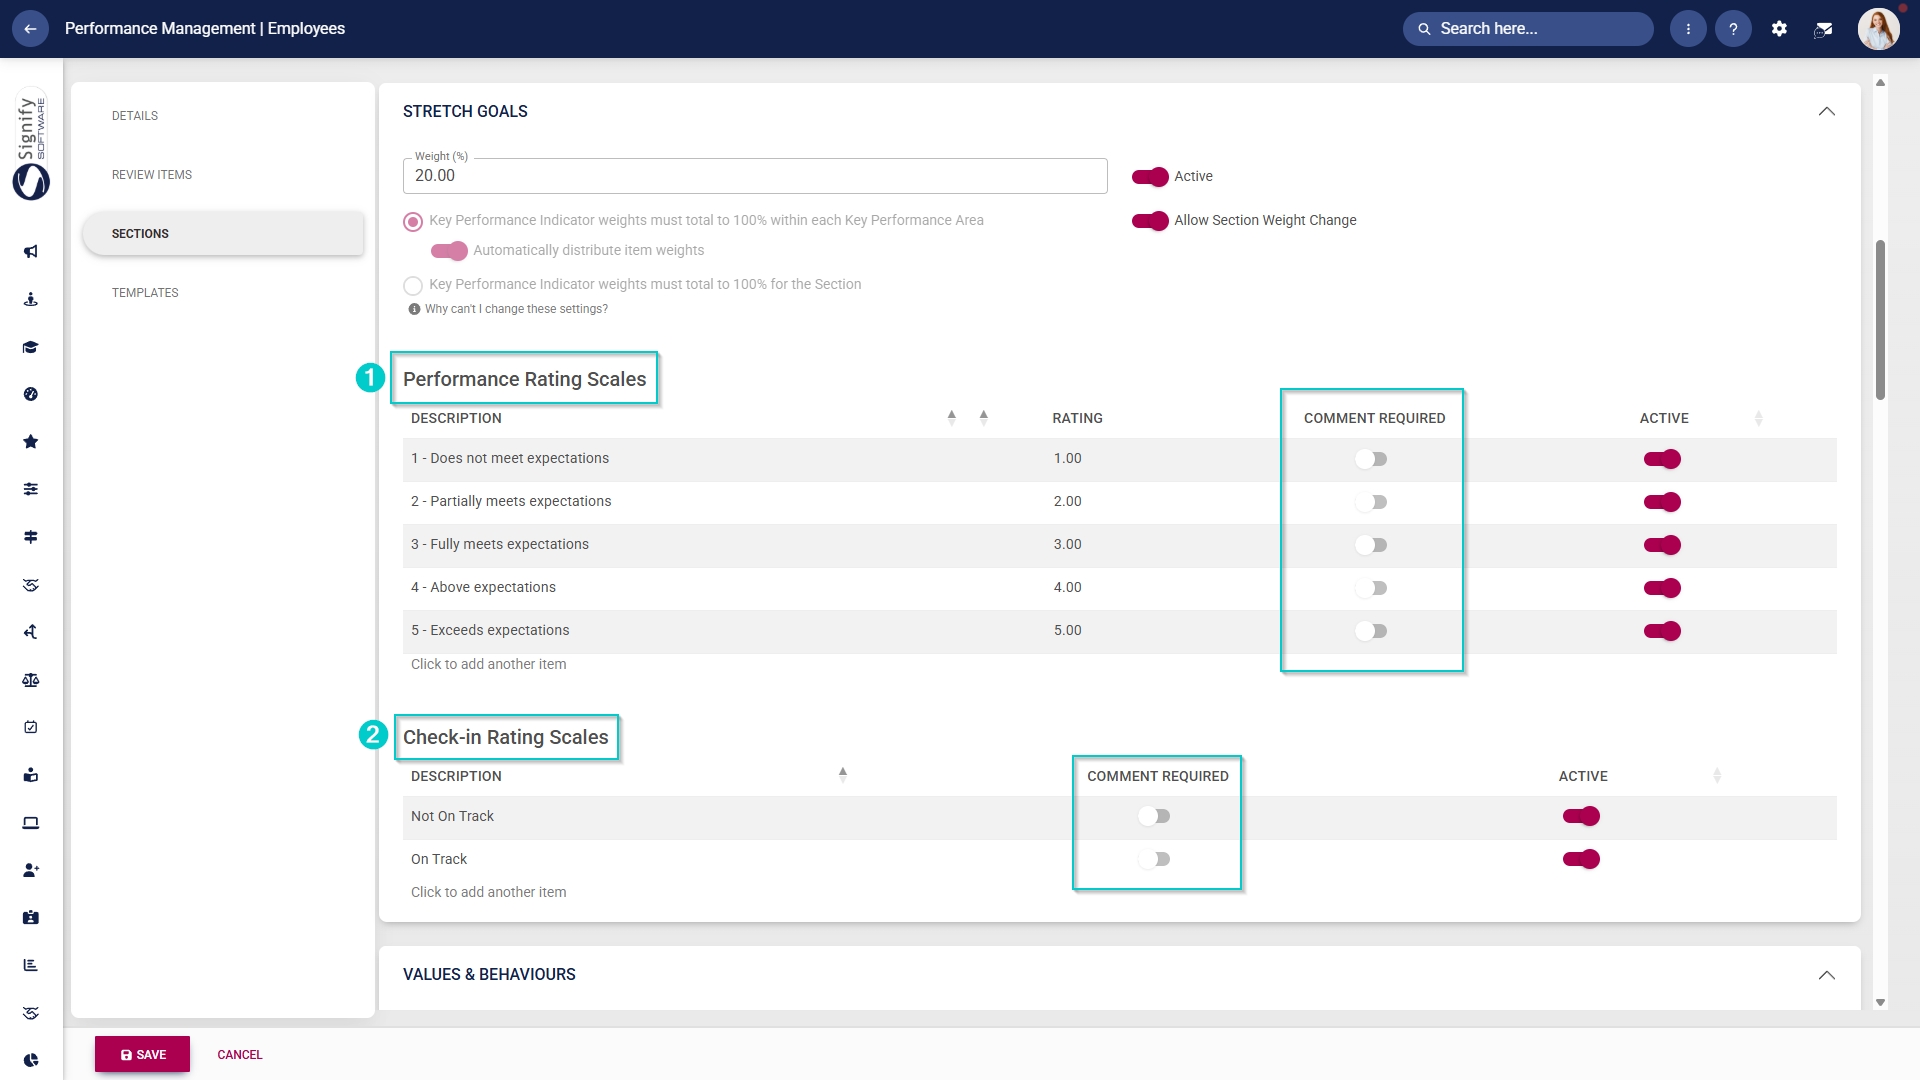
Stretch Goals
This section is an optional addition to performance agreements. Stretch Goals are intentionally ambitious and are typically linked to strategic growth, innovation or transformation rather than routine delivery.
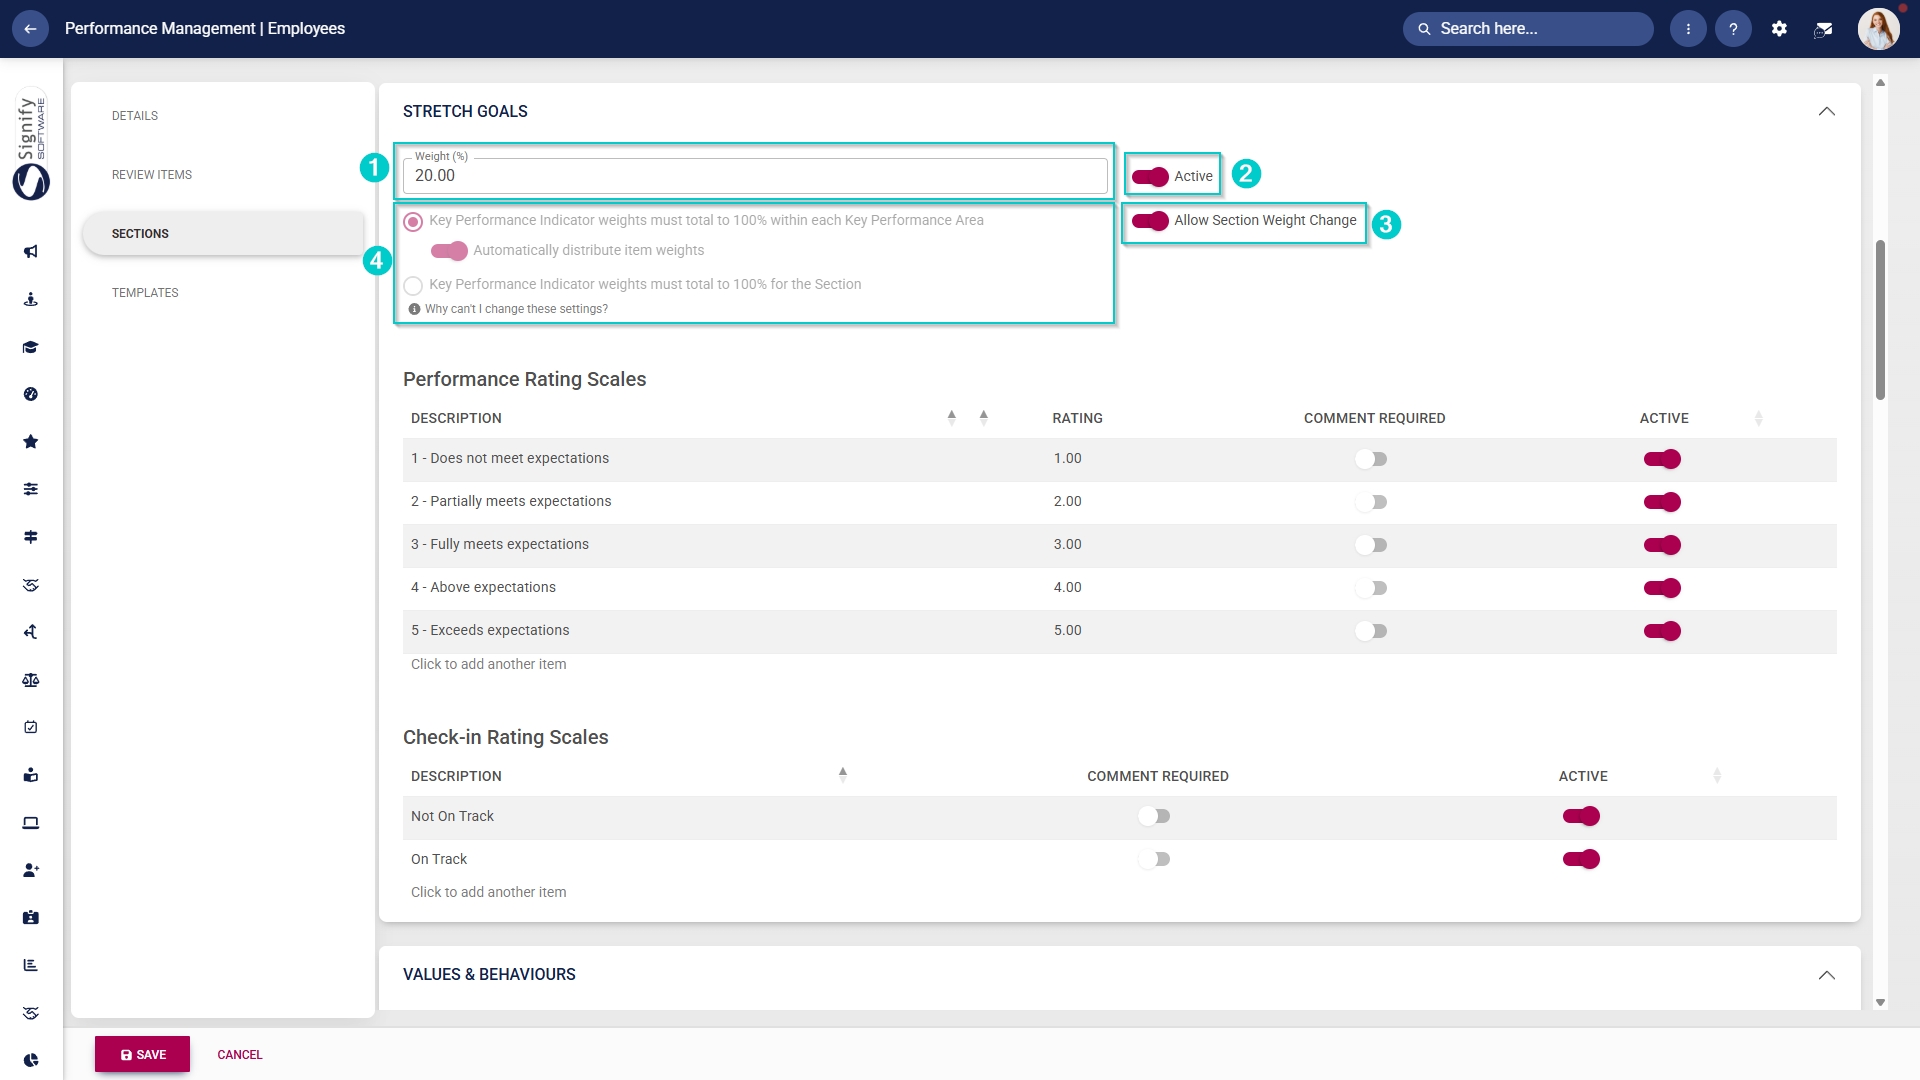
- Add a weight for this section.
- Toggle to set the section to active.
- Use the toggle to choose whether the section's weight
maycanchange or not.change. - Configure the settings related to Key Performance Indicator weights:
- Option 1: The Key Performance Indicator weights must add up to 100% per Key Performance Area.
- You can choose to automatically distribute the item weights (i.e. if there are 5 KPIs for a specific KPA, each KPI will have a weight of 20%).
- Option 2: The combined weighting of all Key Performance Indicators (KPIs) within a section must total 100% (i.e., if there are 2 KPAs in the section, each with 2 KPIs, each KPI will have a weight of 25%).
- Option 1: The Key Performance Indicator weights must add up to 100% per Key Performance Area.
- Configure the performance rating scale and the check-in rating scale to be used for this section.
- Toggle to select whether comments will be required during check-ins or when rating objectives.
Values and Behaviours
The Values and Behaviours section of a performance agreement supports growth beyond technical competence. Whereas the primary goals focus on what is achieved, this section focuses on how it is achieved.
- Add a weight for this section.
- Toggle to set the section to active.
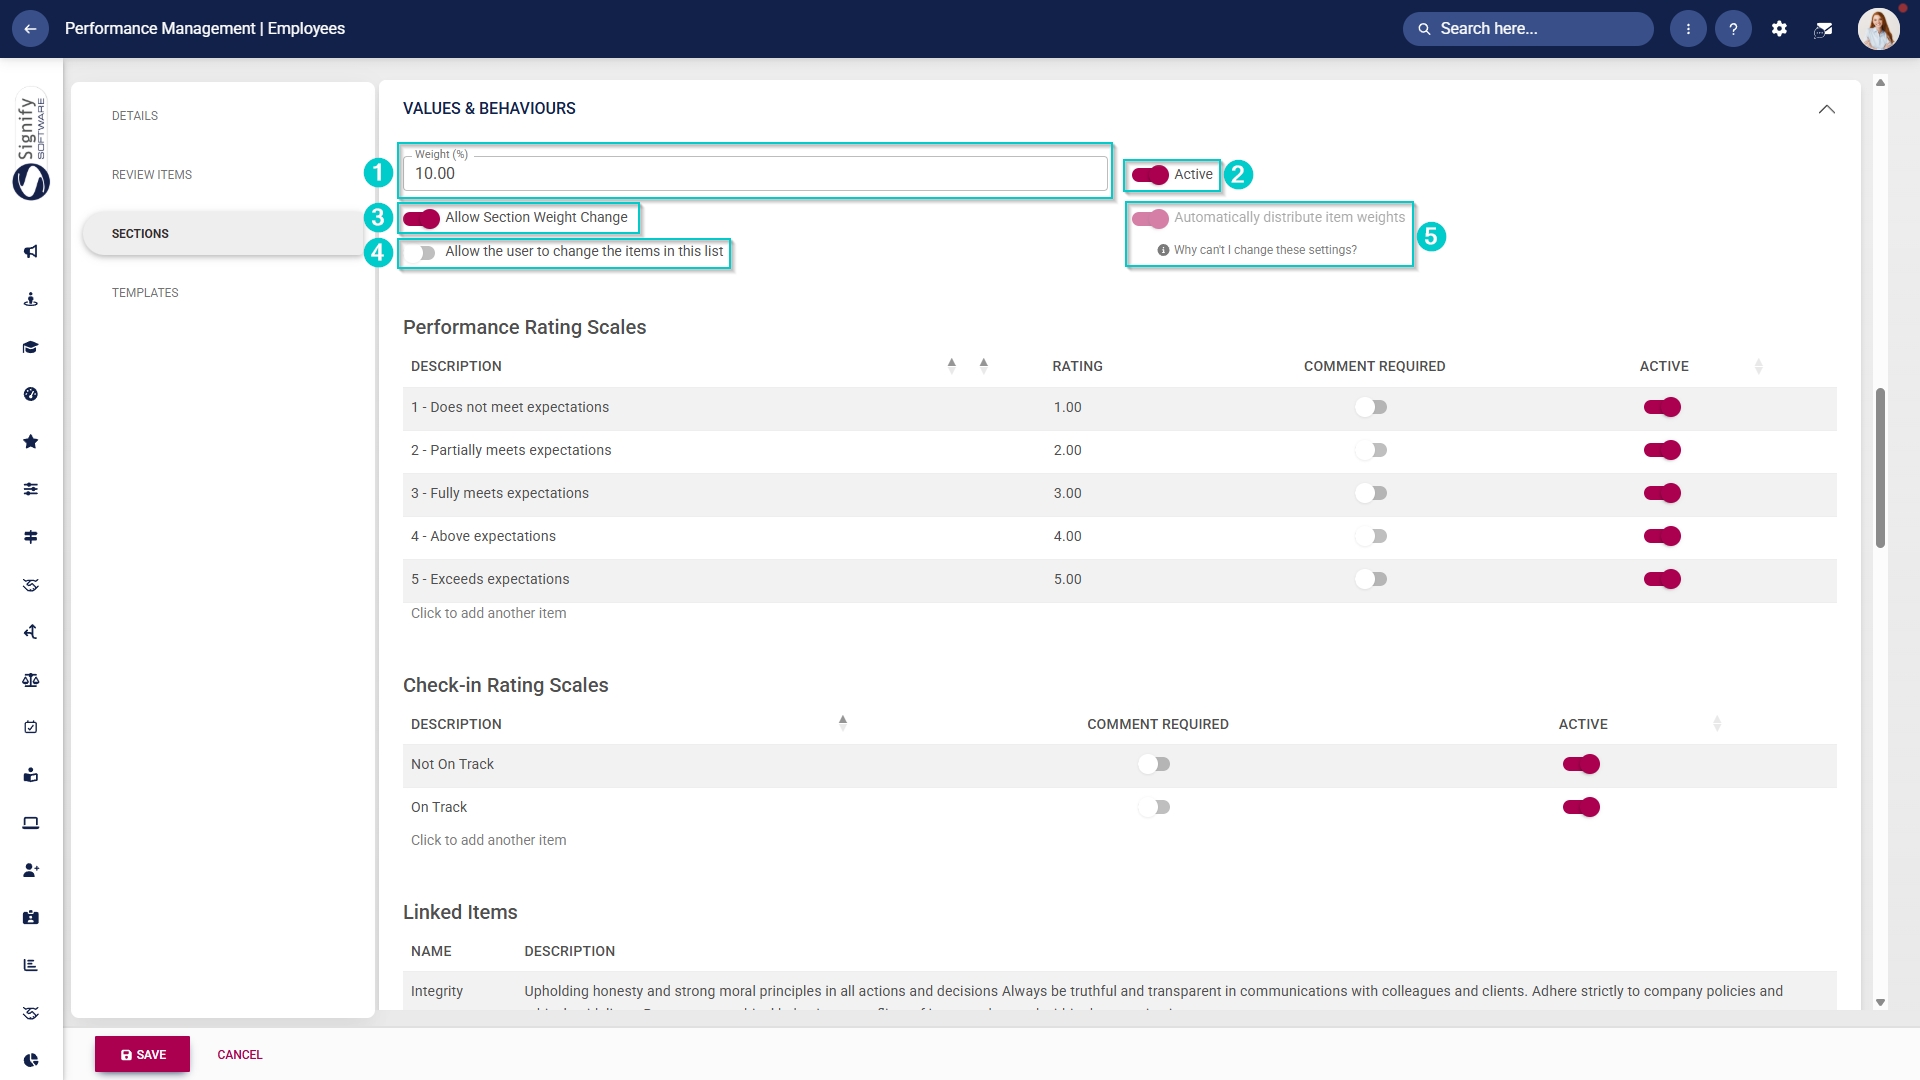
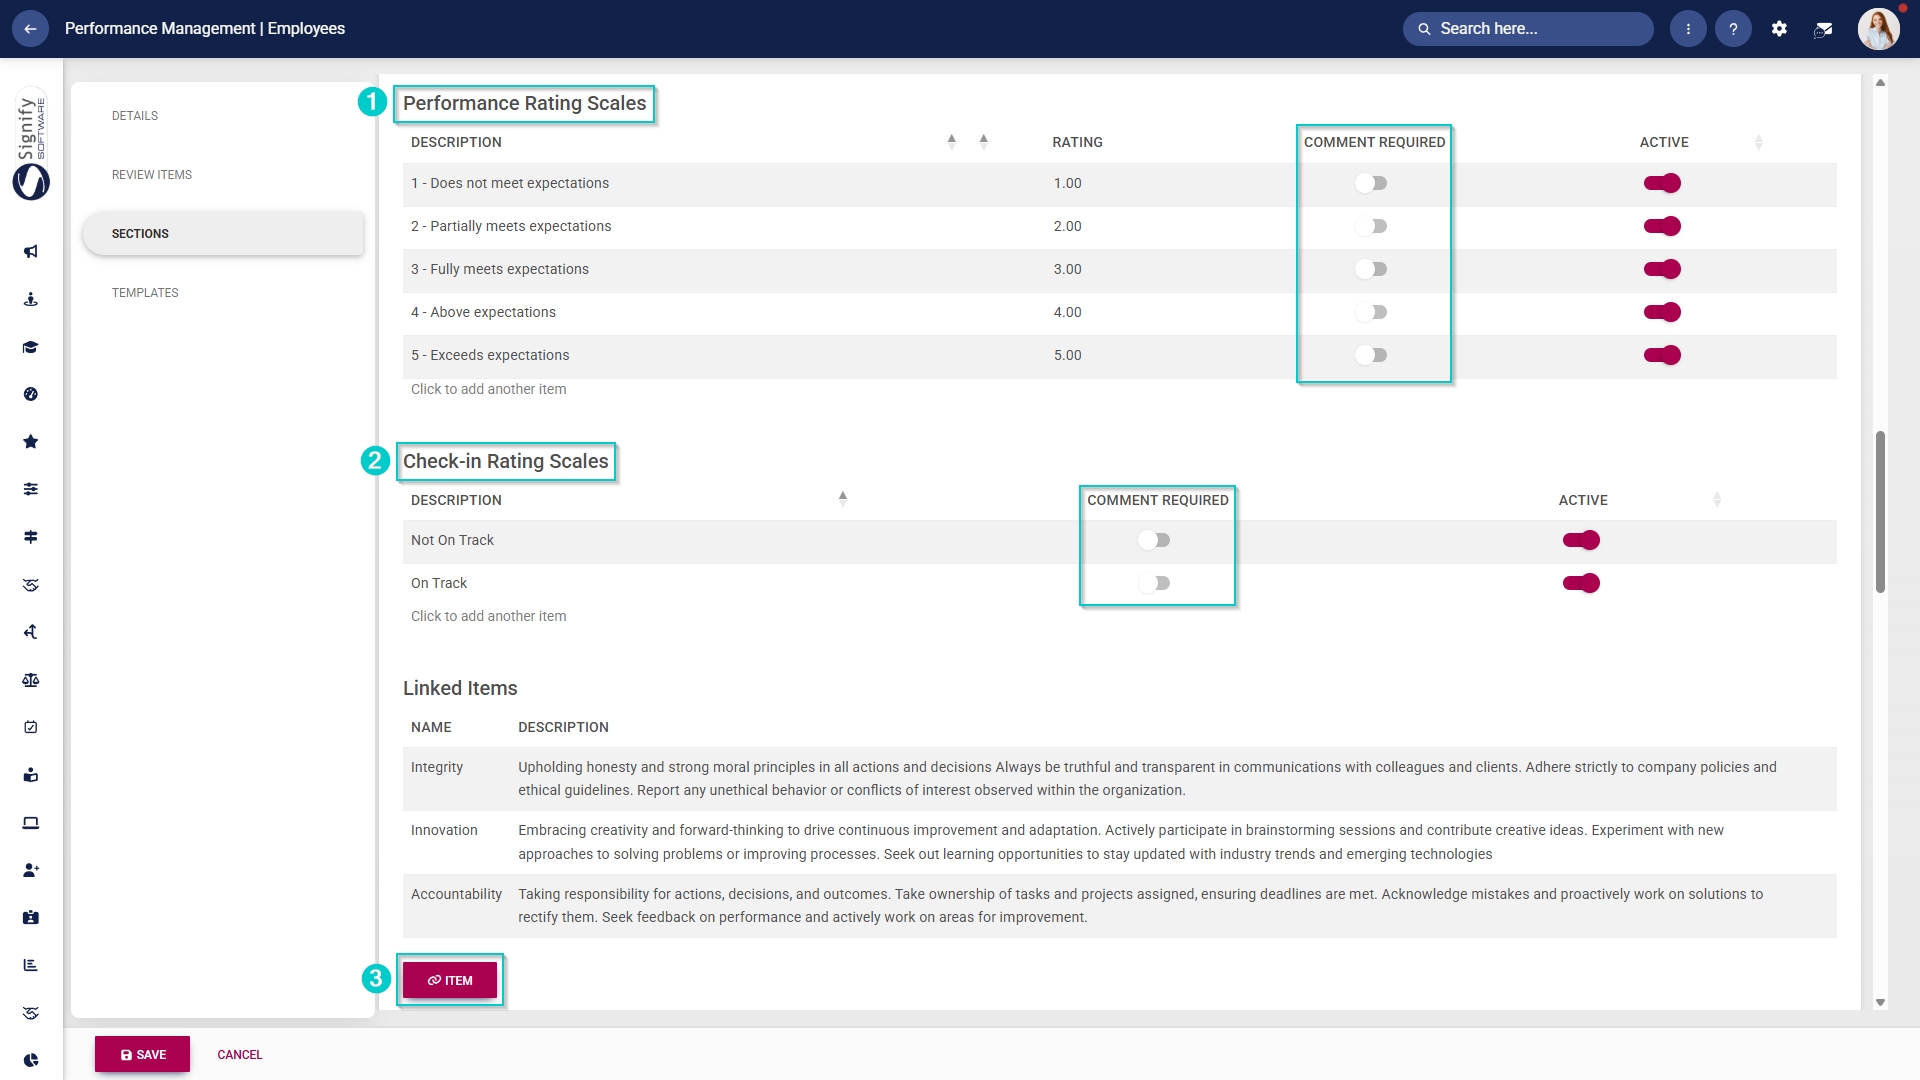
- Configure the performance rating scale and the check-in rating scale to be used for this section.
- Toggle to select whether comments will be required during check-ins or when rating items.
- Link master data values and behaviours to the performance agreement.
- Click here to find out how to update the Master Data Library.
Leadership Behaviours
Including a Leadership Behaviours section in a performance agreement is crucial to strategic governance. It not only assesses leadership effectiveness but also emphasises its direct influence on organisational culture and long-term success. At senior levels, leadership behaviours significantly shape the broader organisational environment, influencing team dynamics, decision-making, and overall performance beyond individual KPIs.
- Add a weight for this section.
ChooseToggle to set the section to active.
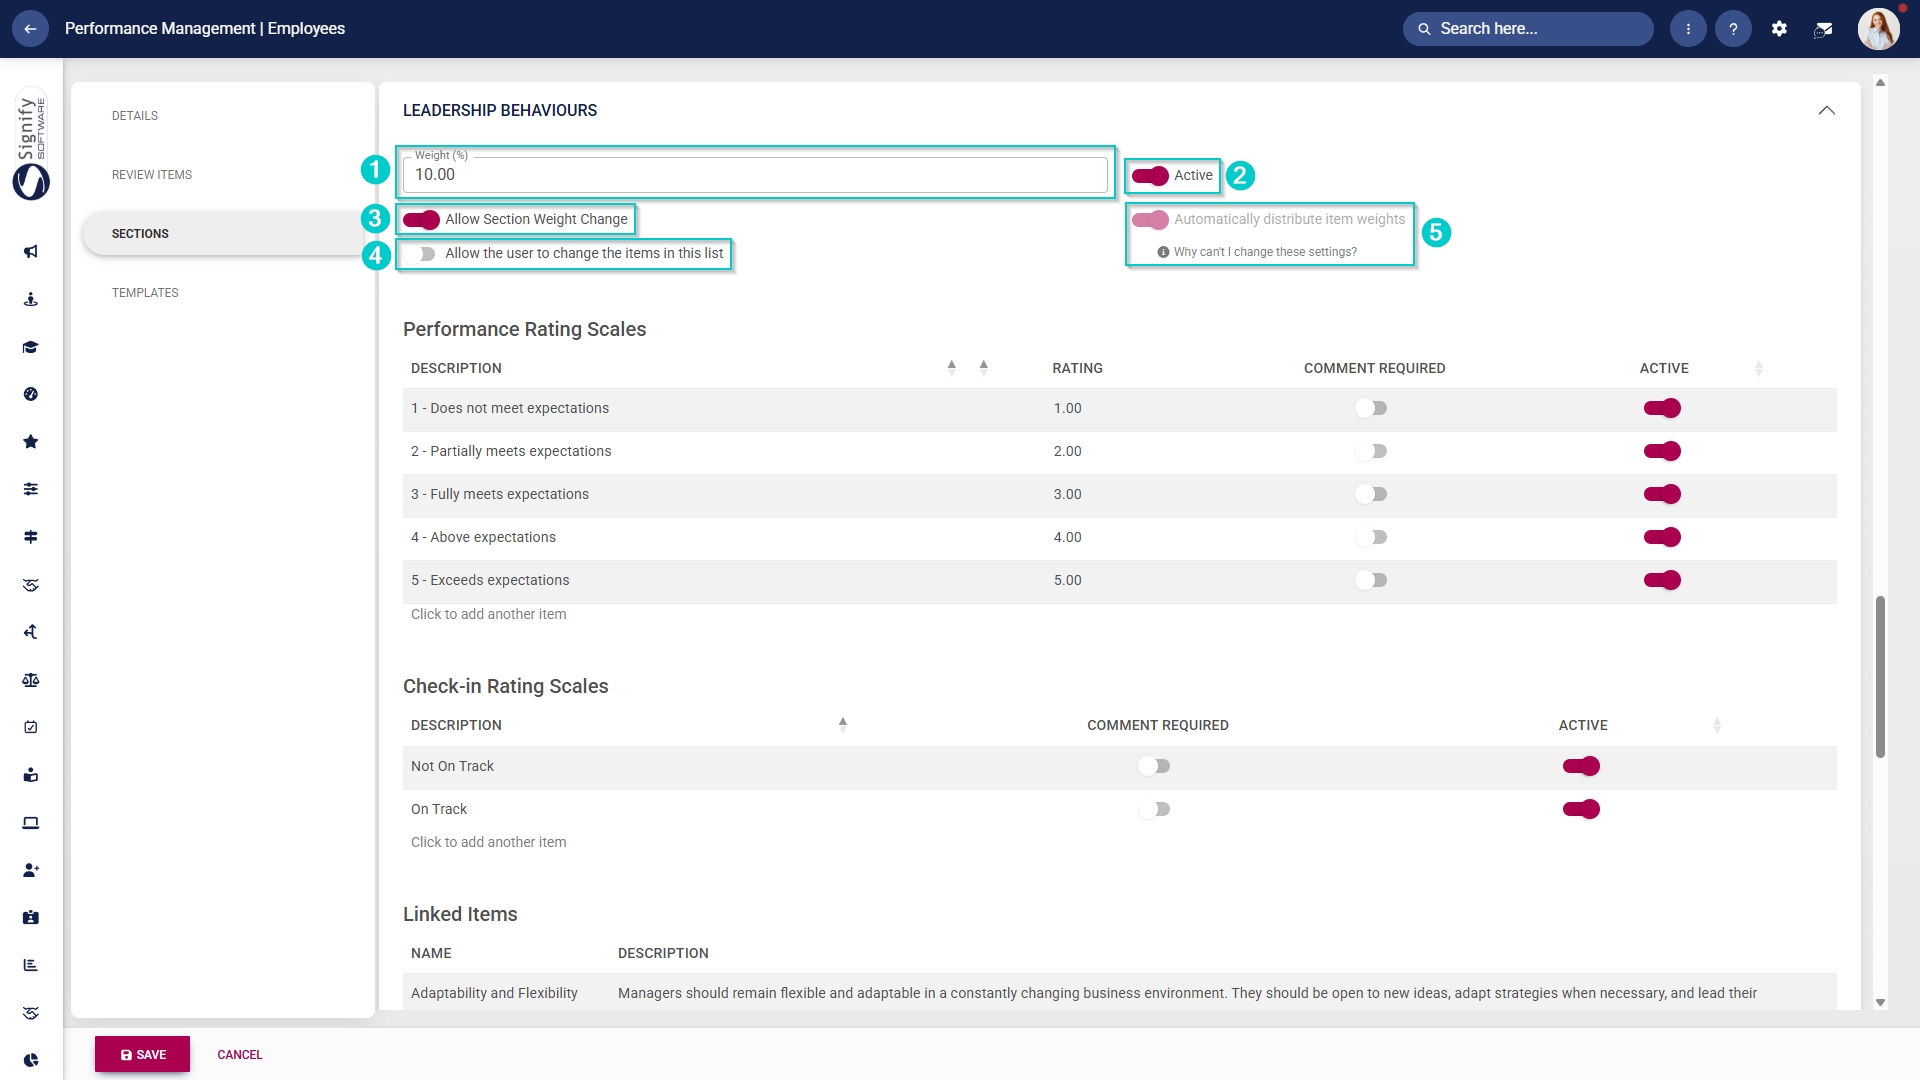
- Configure the performance rating scale and the check-in rating scale to be used for this section.
- Toggle to select whether comments will be required during check-ins or when rating items.
- Link master data leadership behaviours to the performance agreement.
- Click here to find out how to update the Master Data Library.
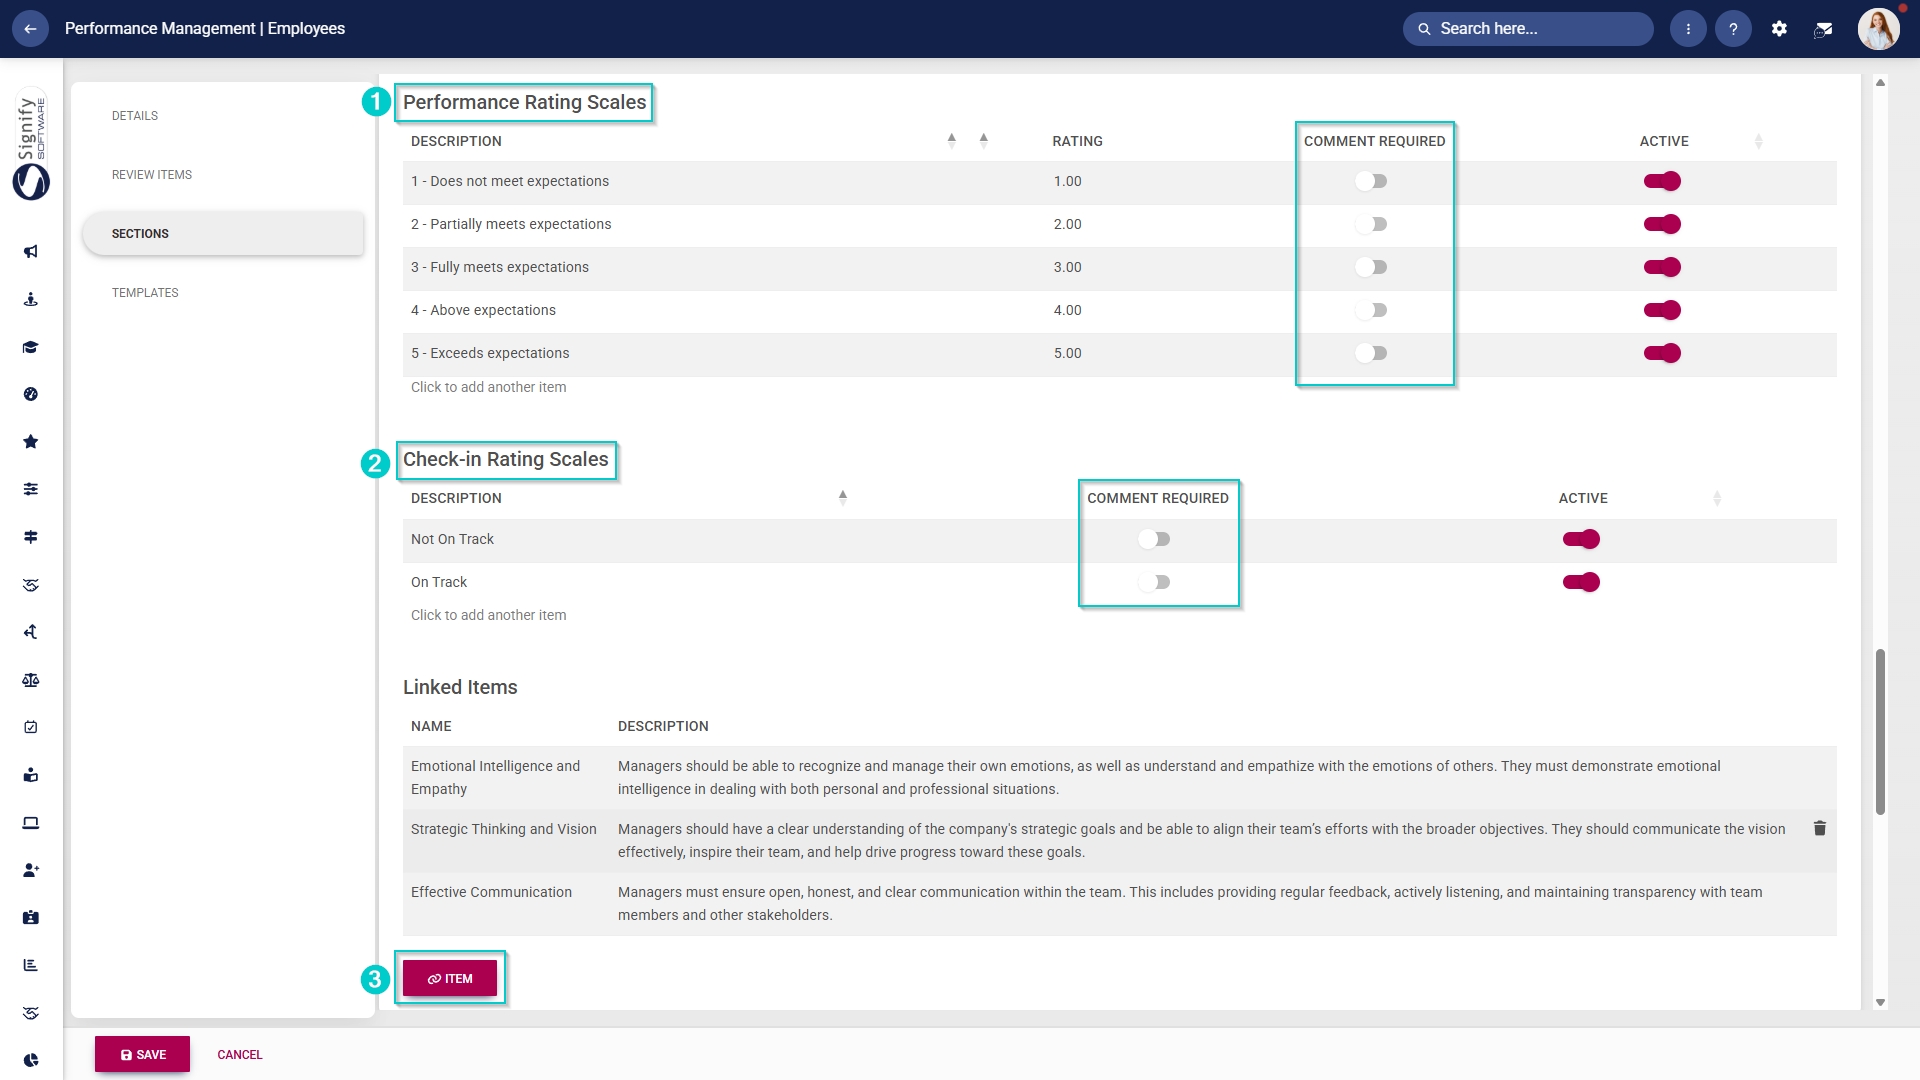
Key Competencies
Listing Key Competencies in a performance agreement ensures that capability, not only output, is formally assessed. While goals measure results, competencies evaluate the underlying skills and proficiency that enable high performance.
This section strengthens talent governance, succession planning and capability development.
- Add a weight for this section.
ChooseToggle to set the section to active.
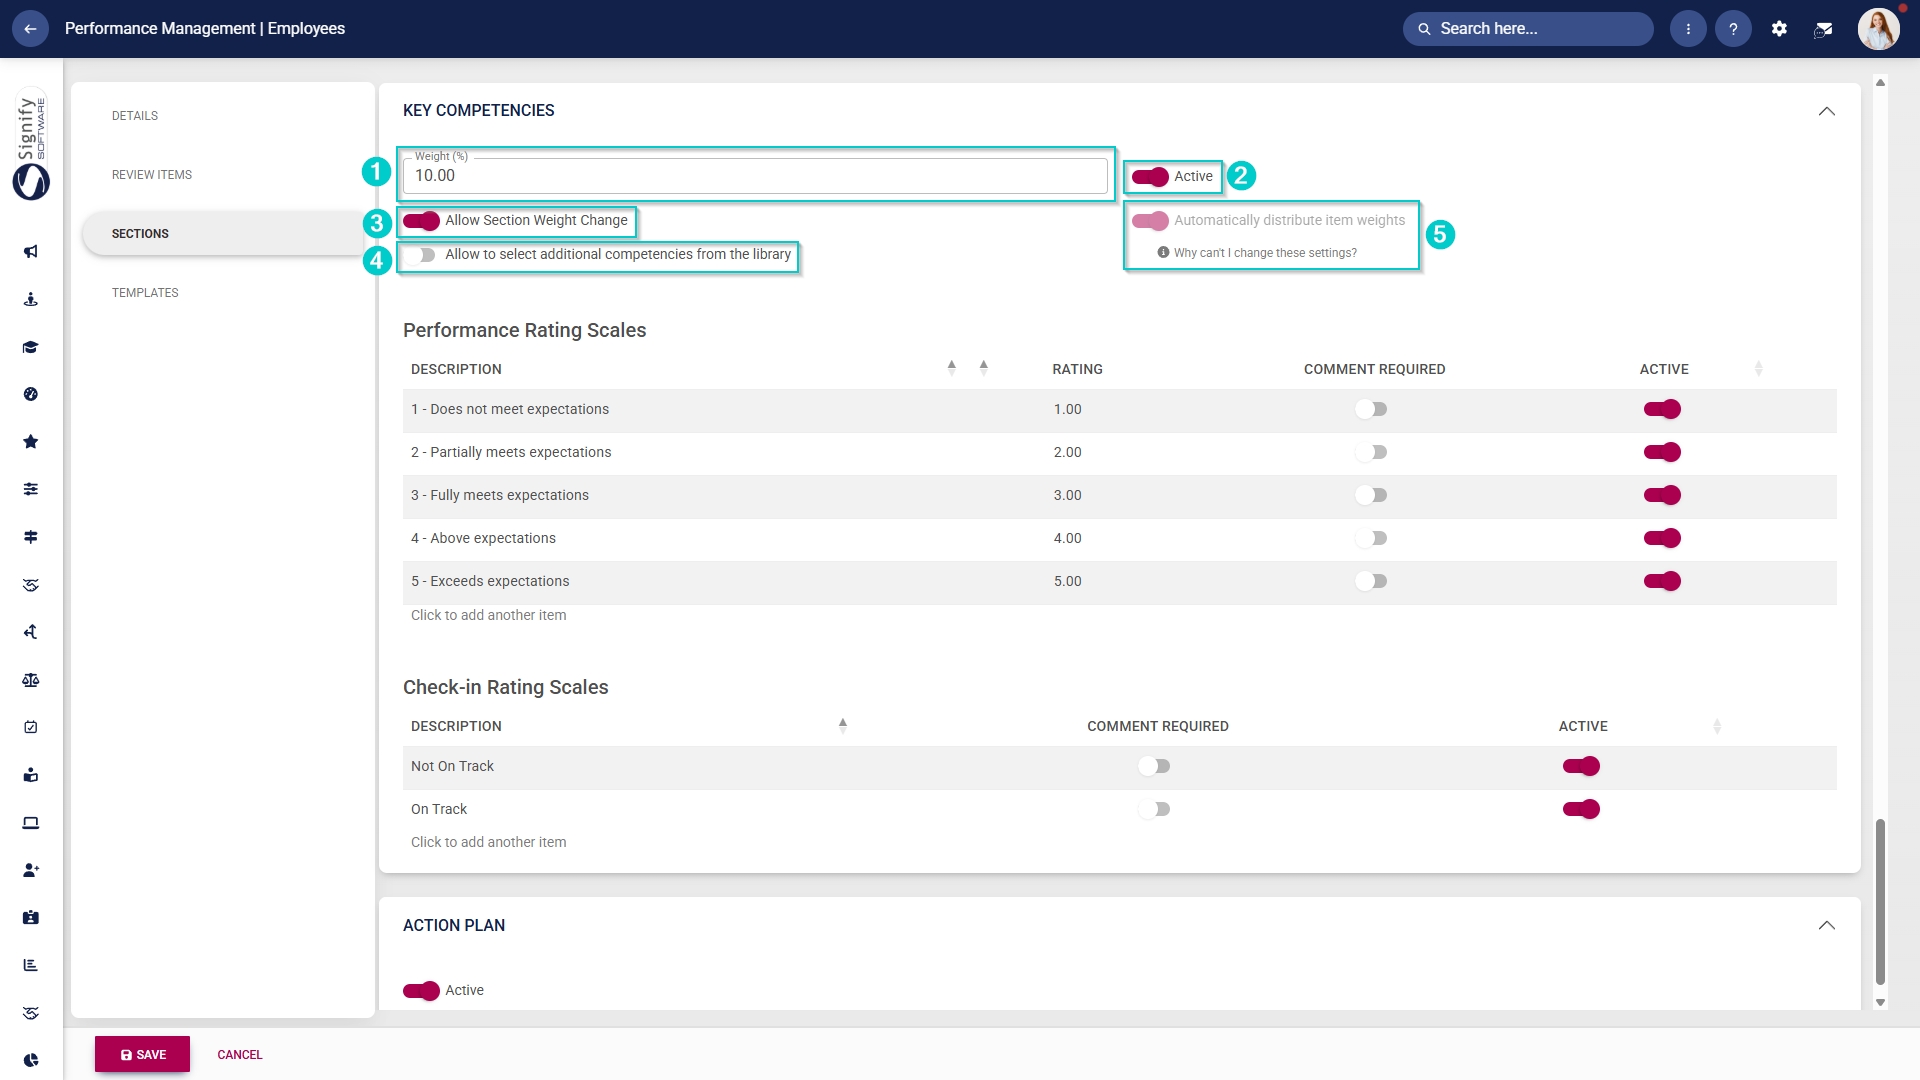
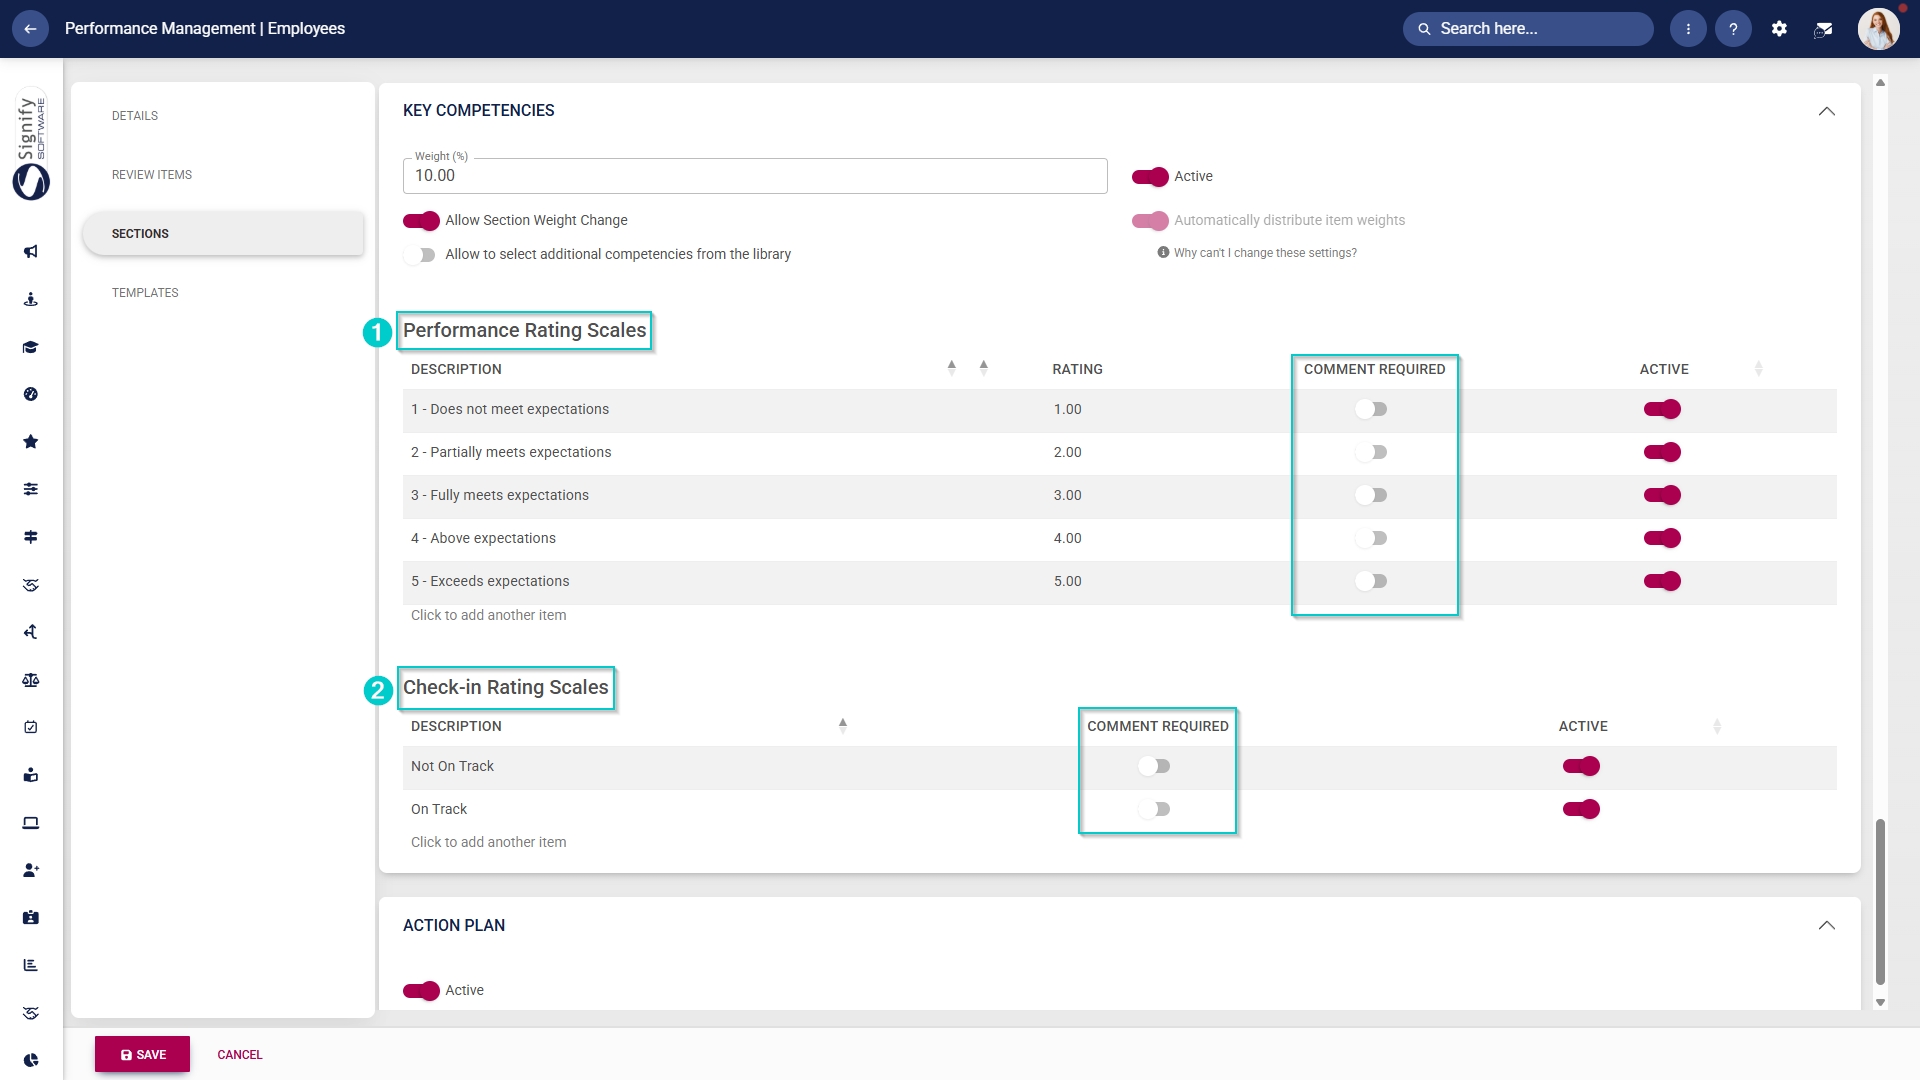
- Configure the performance rating scale and the check-in rating scale to be used for this section.
- Toggle whether comments will be required during check-ins or when rating items.
Action Plan
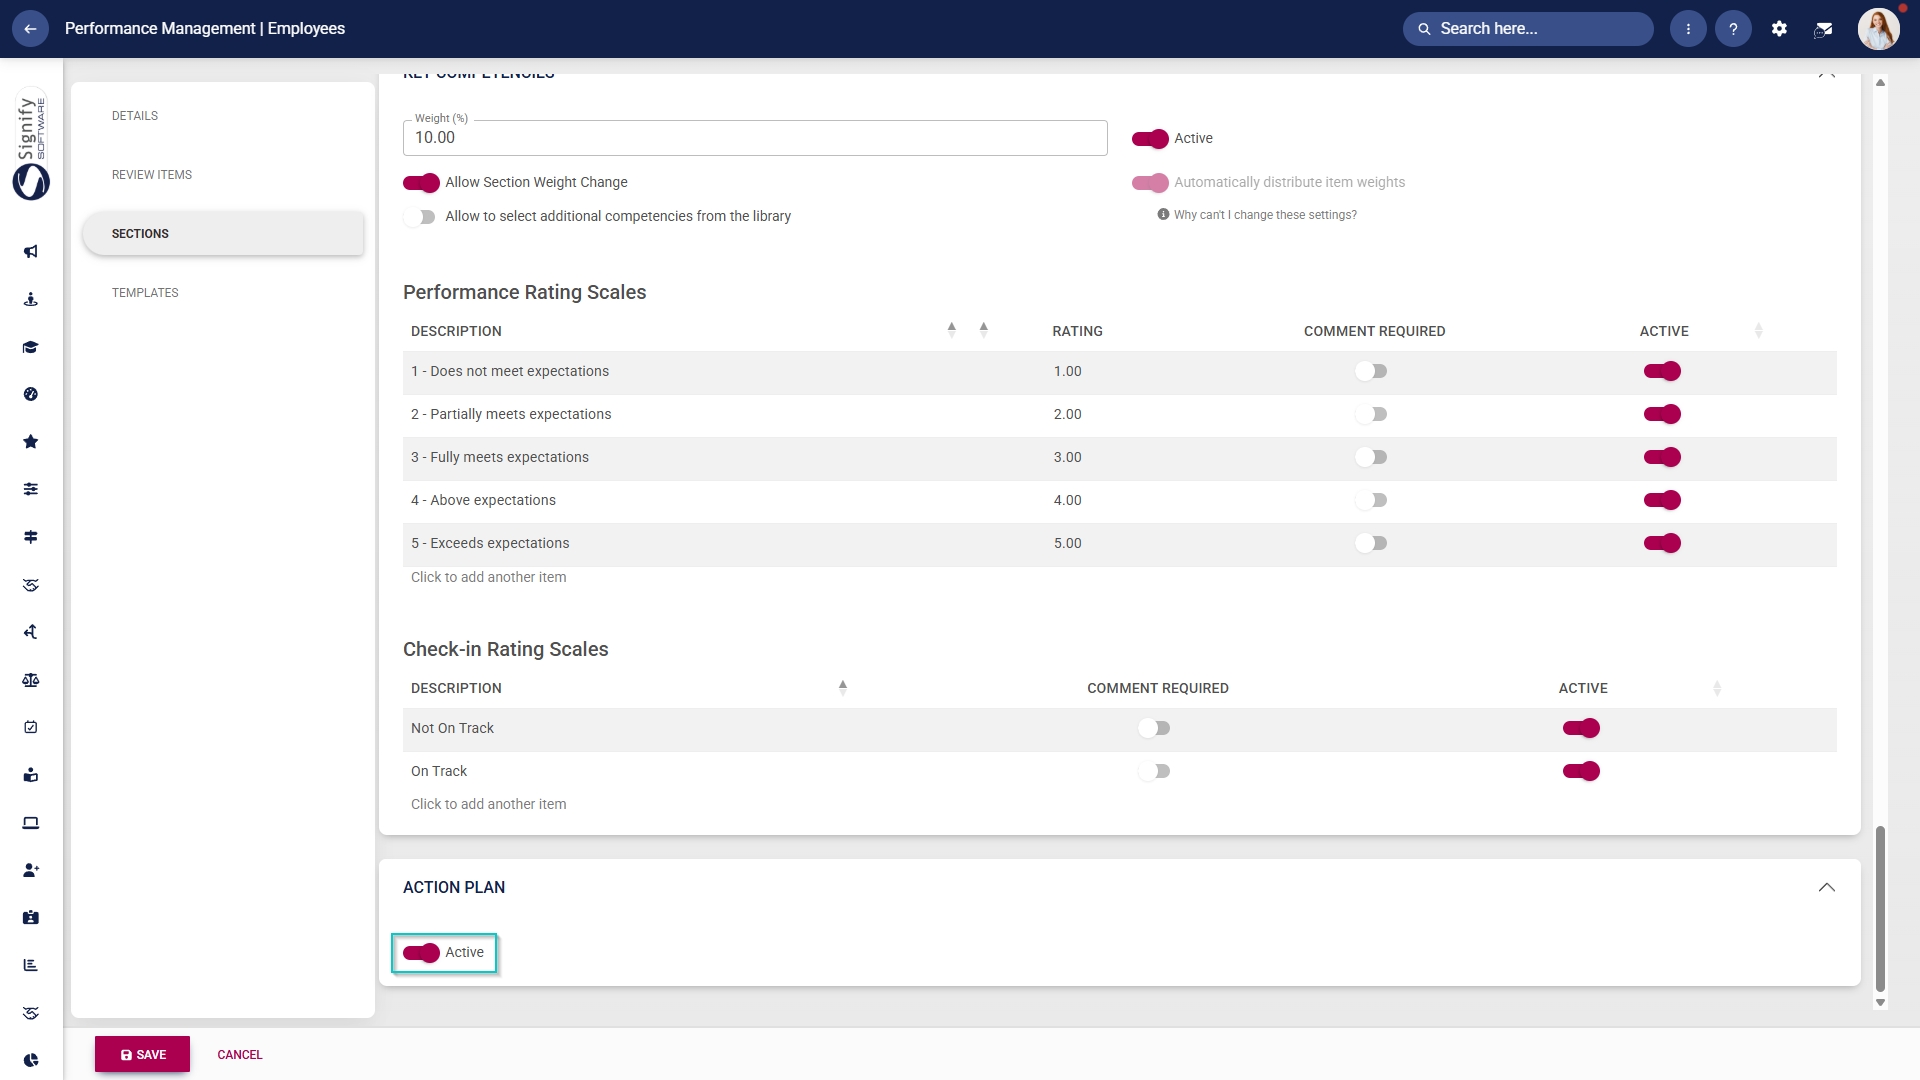
Linking an Action Plan to a performance agreement transforms the document from a static evaluation tool into a dynamic performance management instrument. It ensures that identified gaps, risks or development areas are not merely recorded but actively addressed. In other words, this section closes the loop between assessment and improvement. Toggle to switch action plans on or off.
Templates
The final menu item when creating or editing review setups is Templates.
Creating performance agreement templates can greatly enhance the efficiency of developing performance agreements, making the process smoother and more organised. This not only ensures consistency in format but also helps minimise administrative burdens. By following this guide, you’ll be equipped to craft reusable performance agreement templates that can serve effectively across multiple performance cycles.
To begin, ensure you are on the Templates screen in the review setup's settings.
Create New Template
- Click +NEW TEMPLATE.
- Add a descriptive
titlename for this performance agreement template.
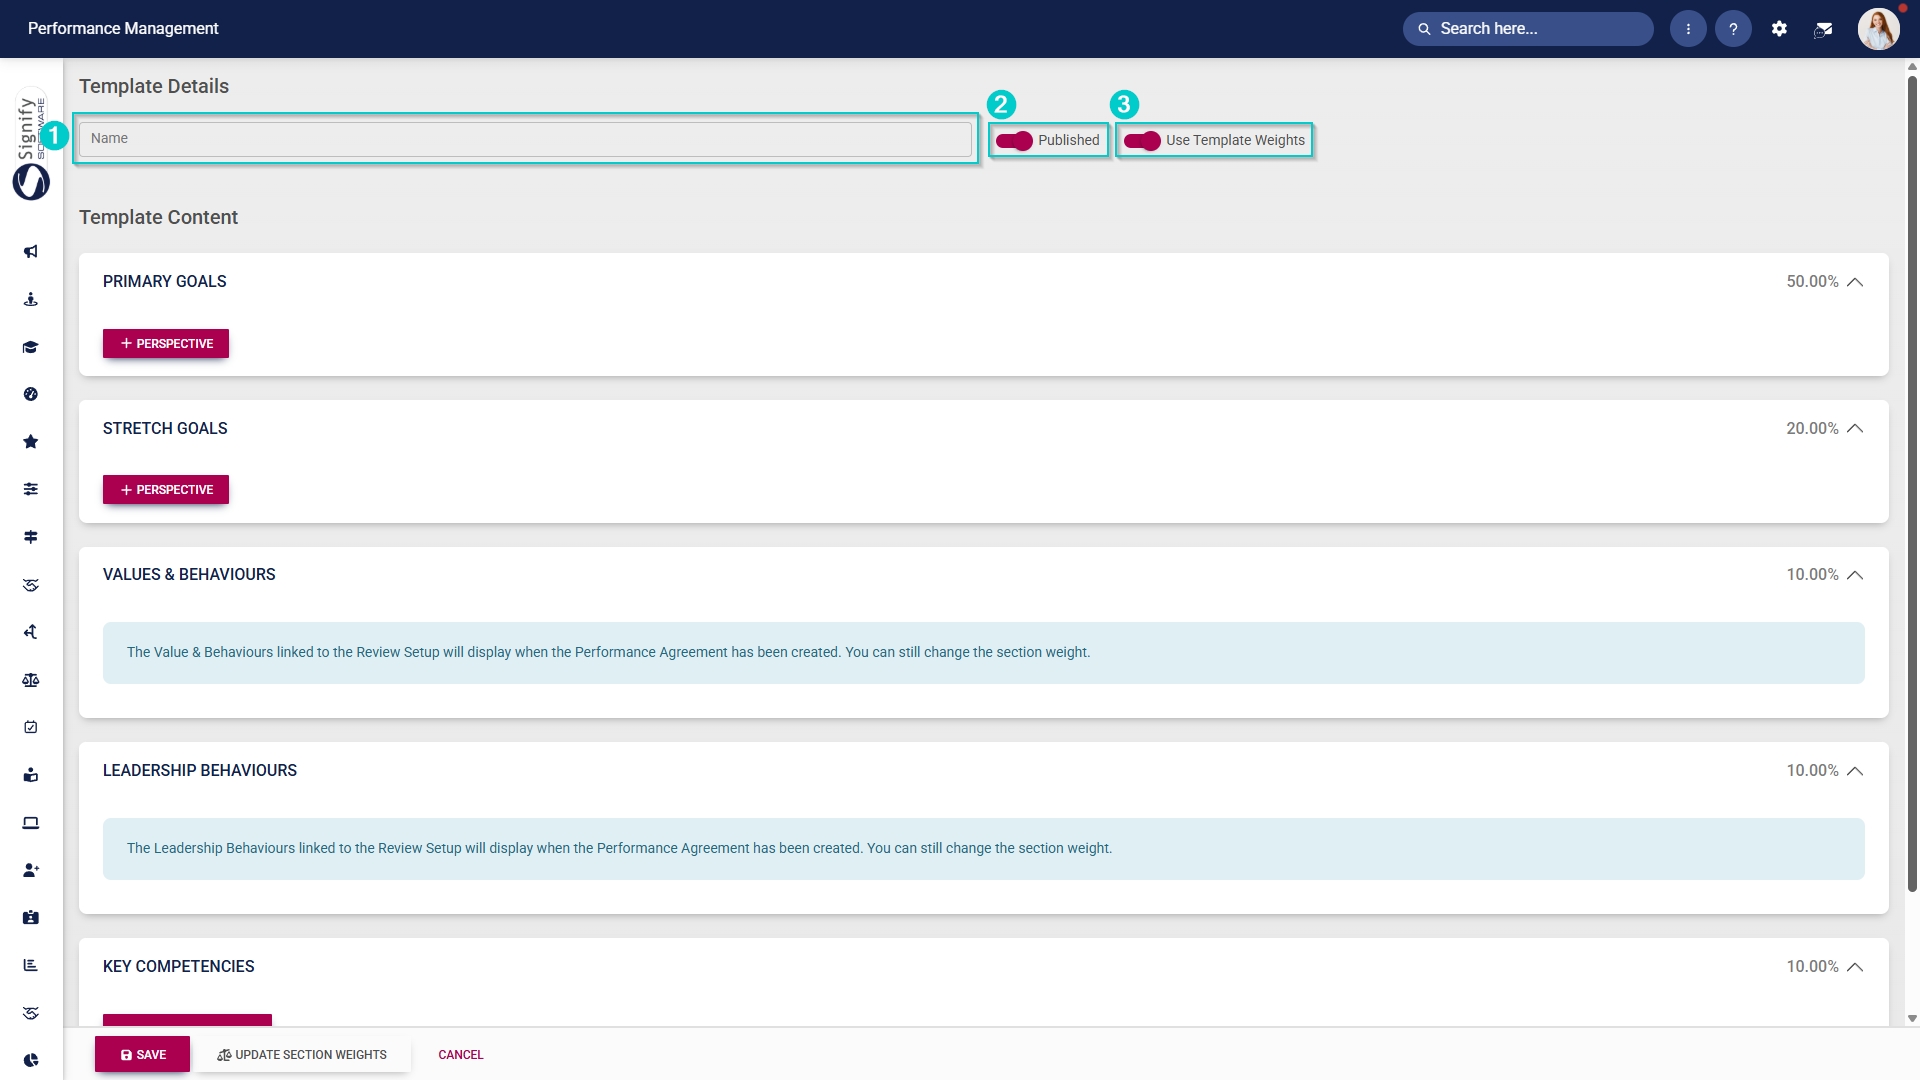
Add Primary Goals and Stretch Goals
The process for adding primary and stretch goals is the same for both sections. Follow the steps below to add primary goals, then repeat them for stretch goals.
Add perspectivesPerspectives
- If you are using perspectives, click +PERSPECTIVE. If not, skip ahead to adding a key performance area.
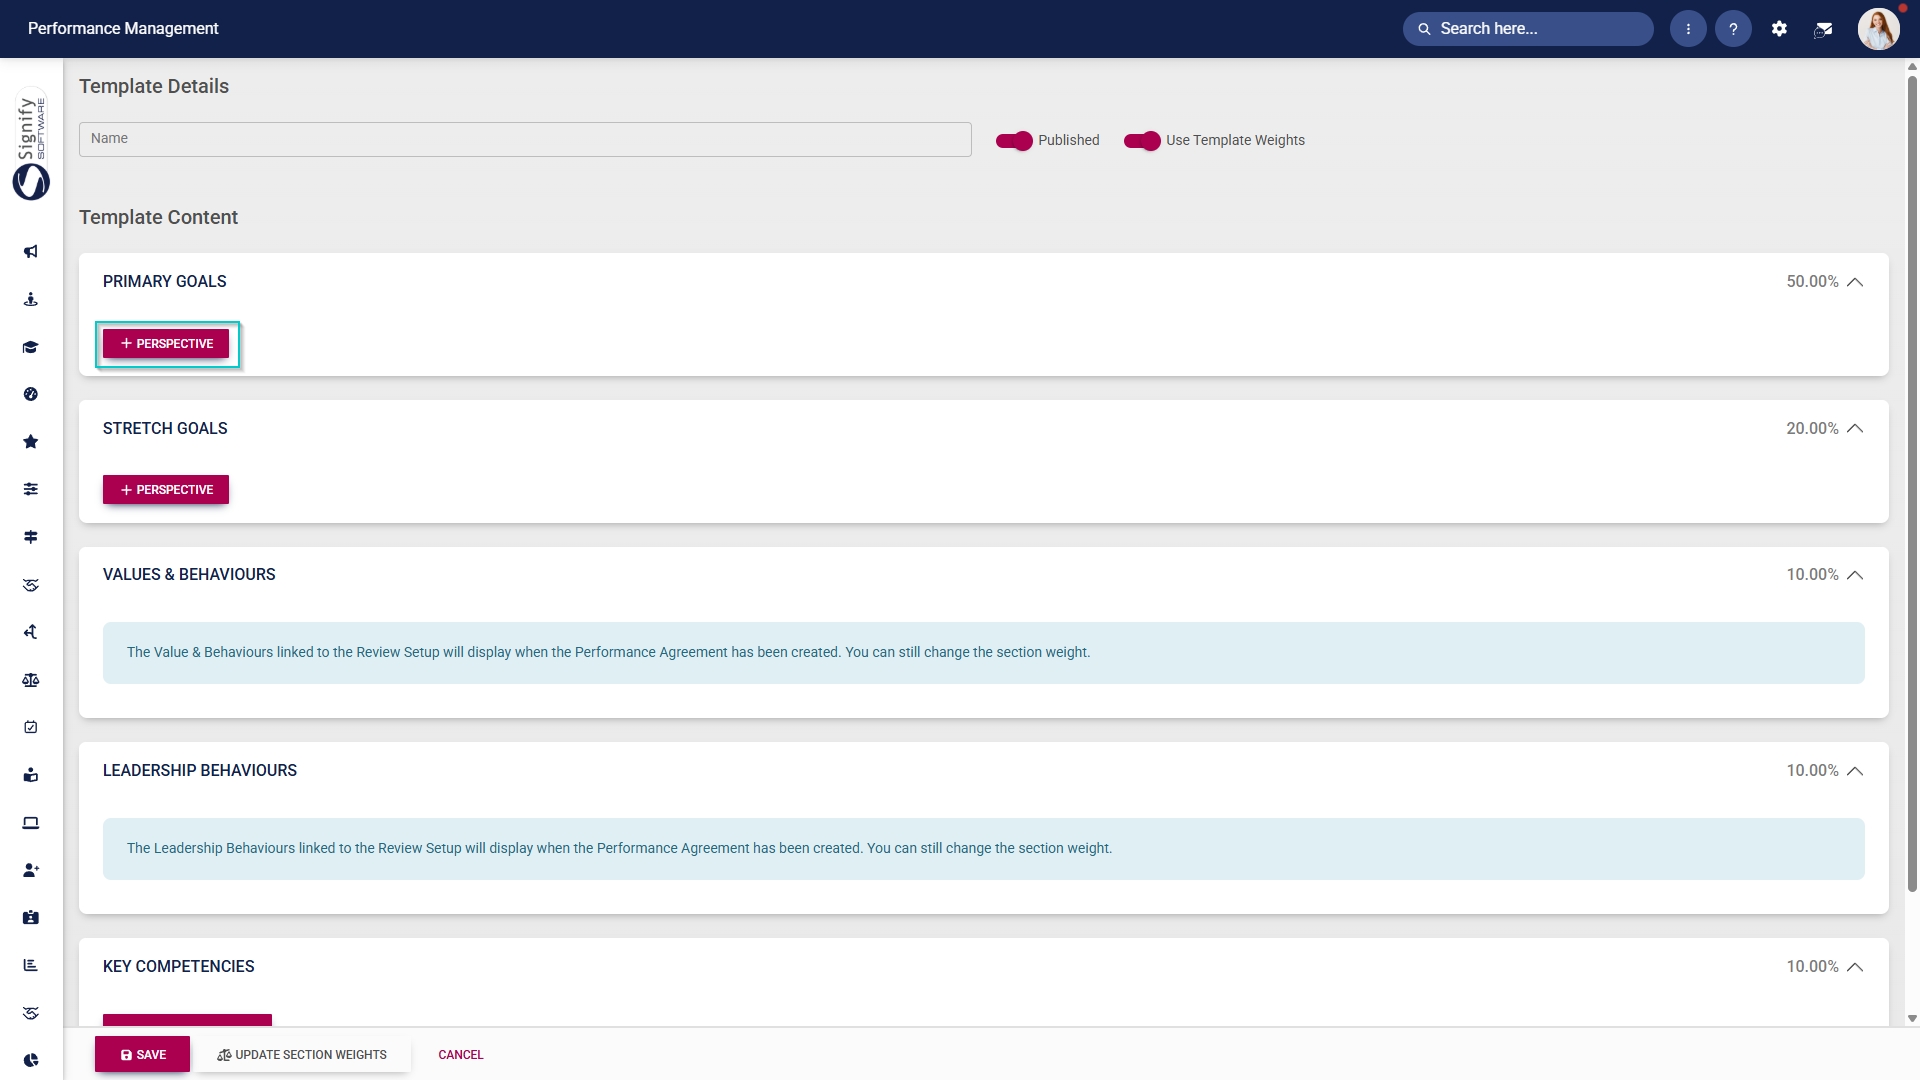
- Select a perspective from the drop-down
menumenu.
- Your added perspectives and their assigned weights will display on the screen.
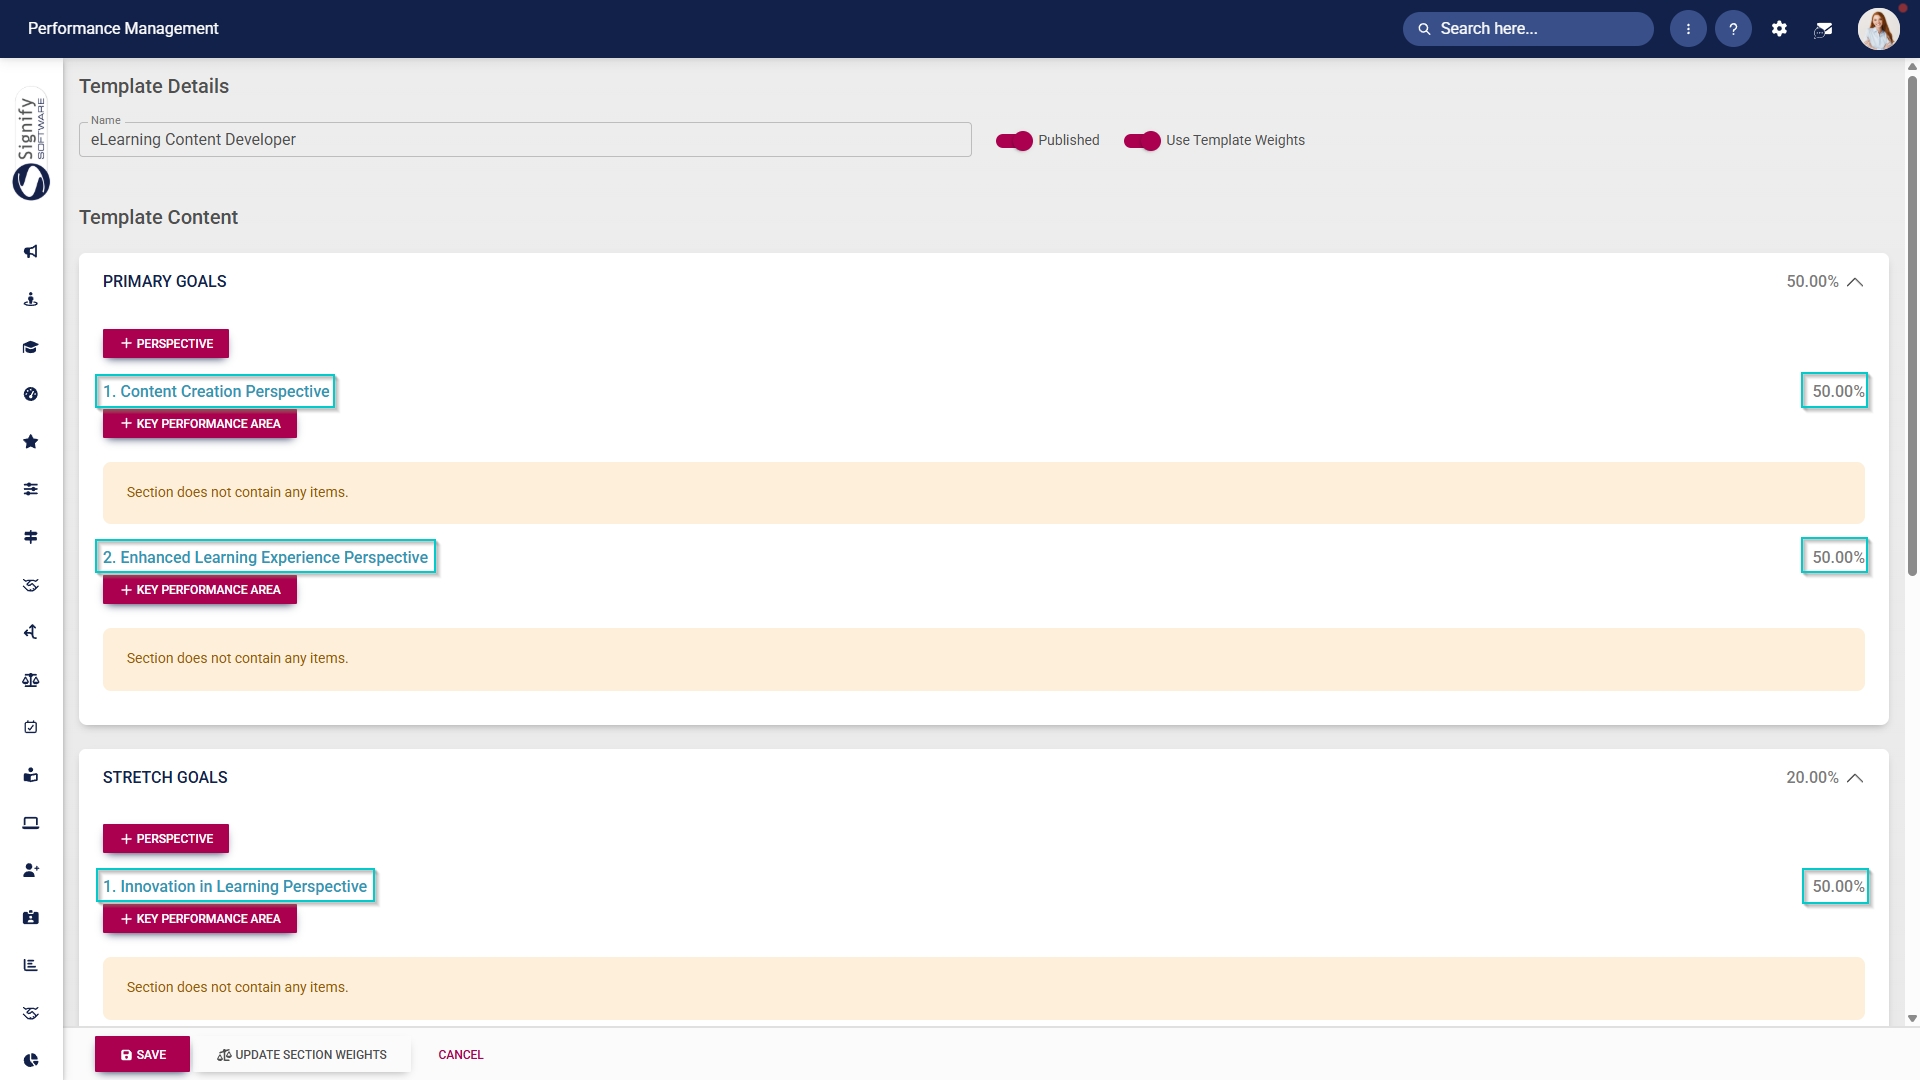
Add KPAs
- Click +KEY PERFORMANCE AREA to add a KPA.
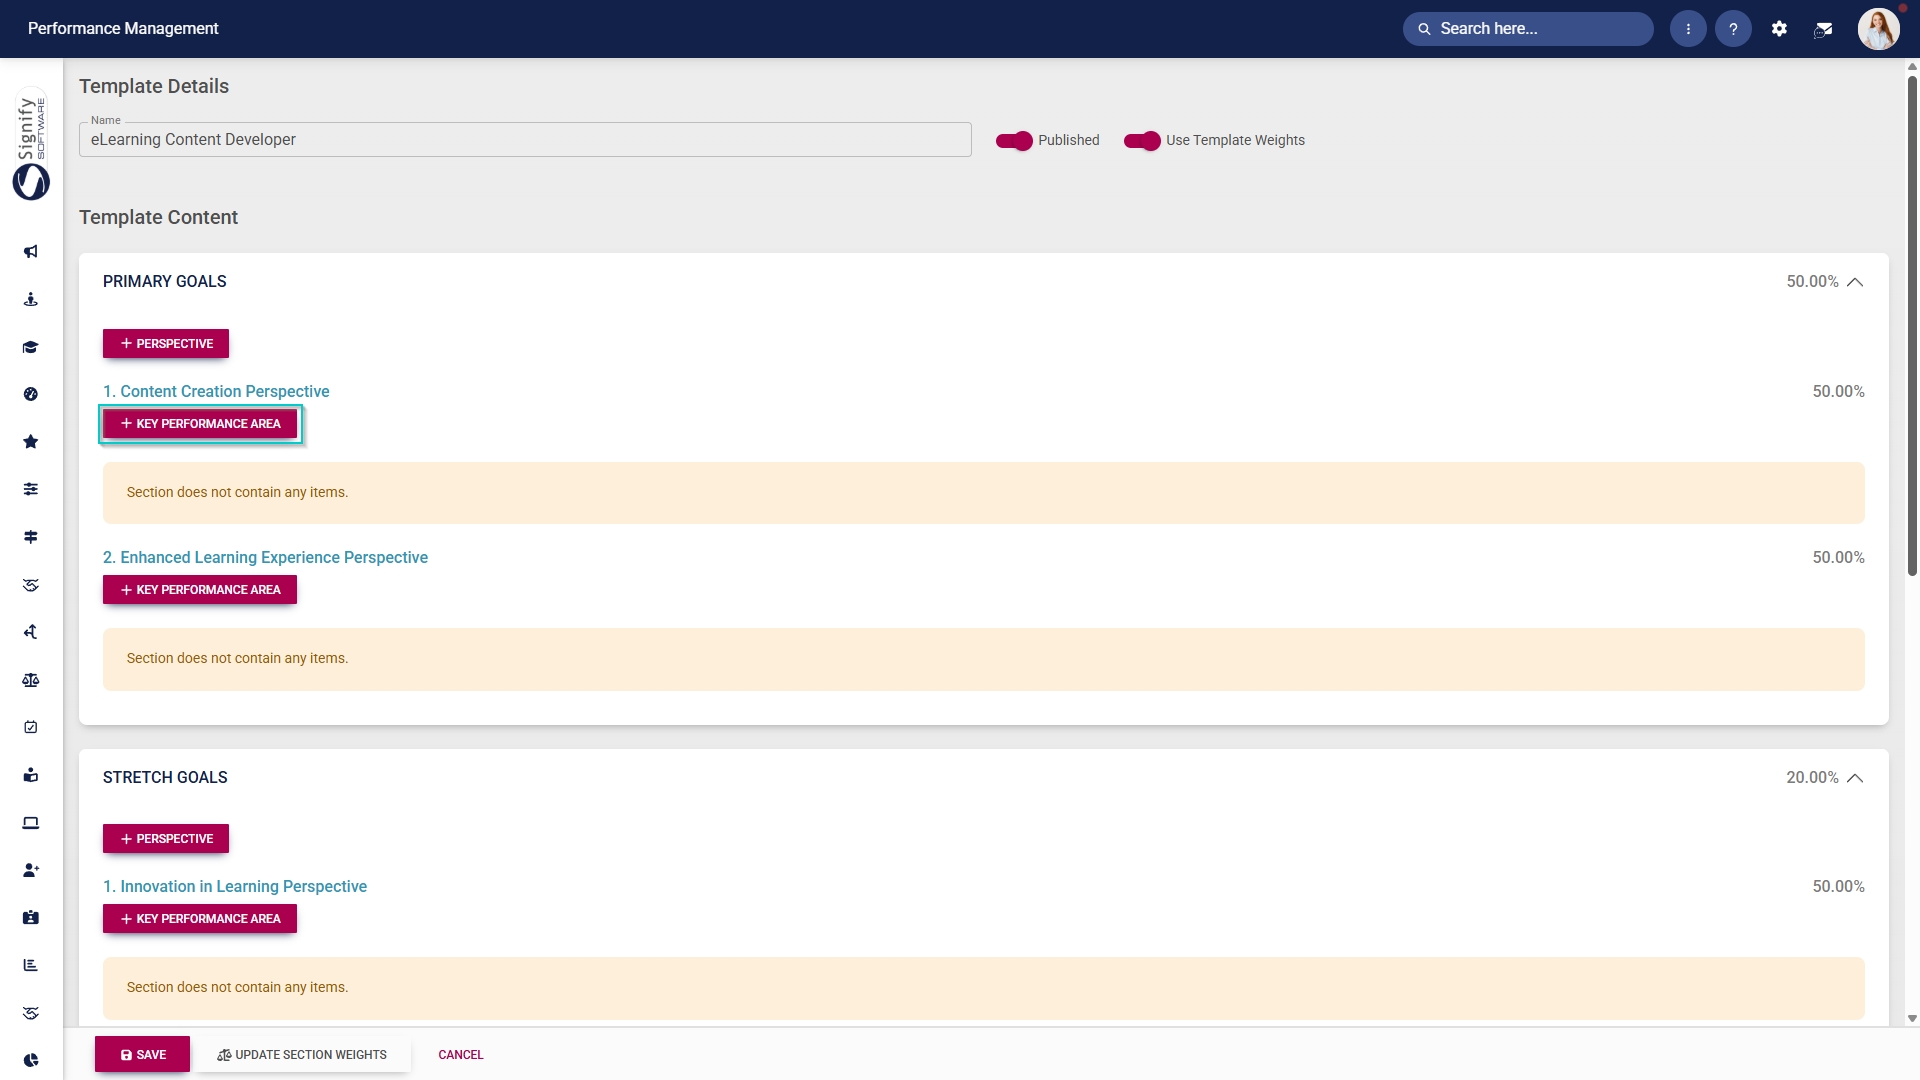
TypeUse the radio buttons to opt to type your own KPA in the designated field, or select one from the Master Data Library.
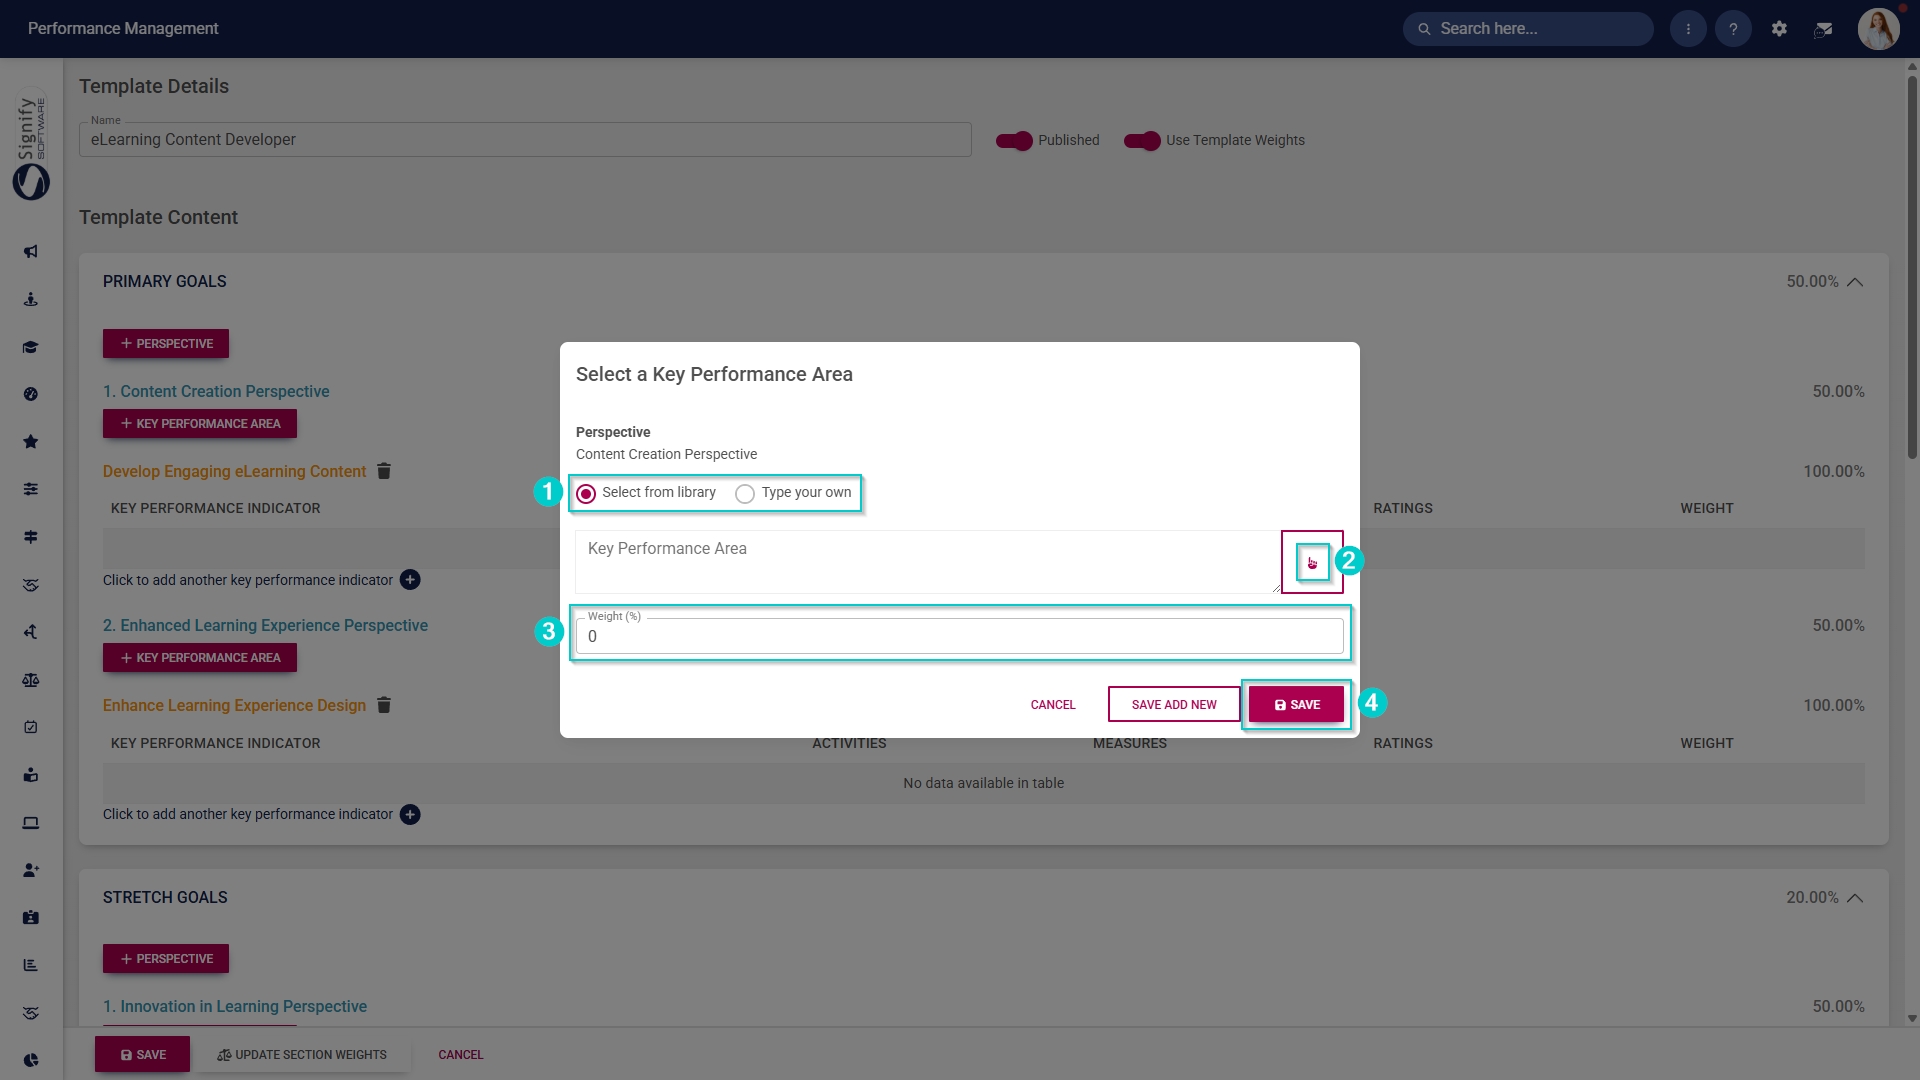
- Your added KPAs and their assigned weights will display on the screen.
Add KPIs
- Click KEY PERFORMANCE INDICATOR+ to add a KPI to a KPA.
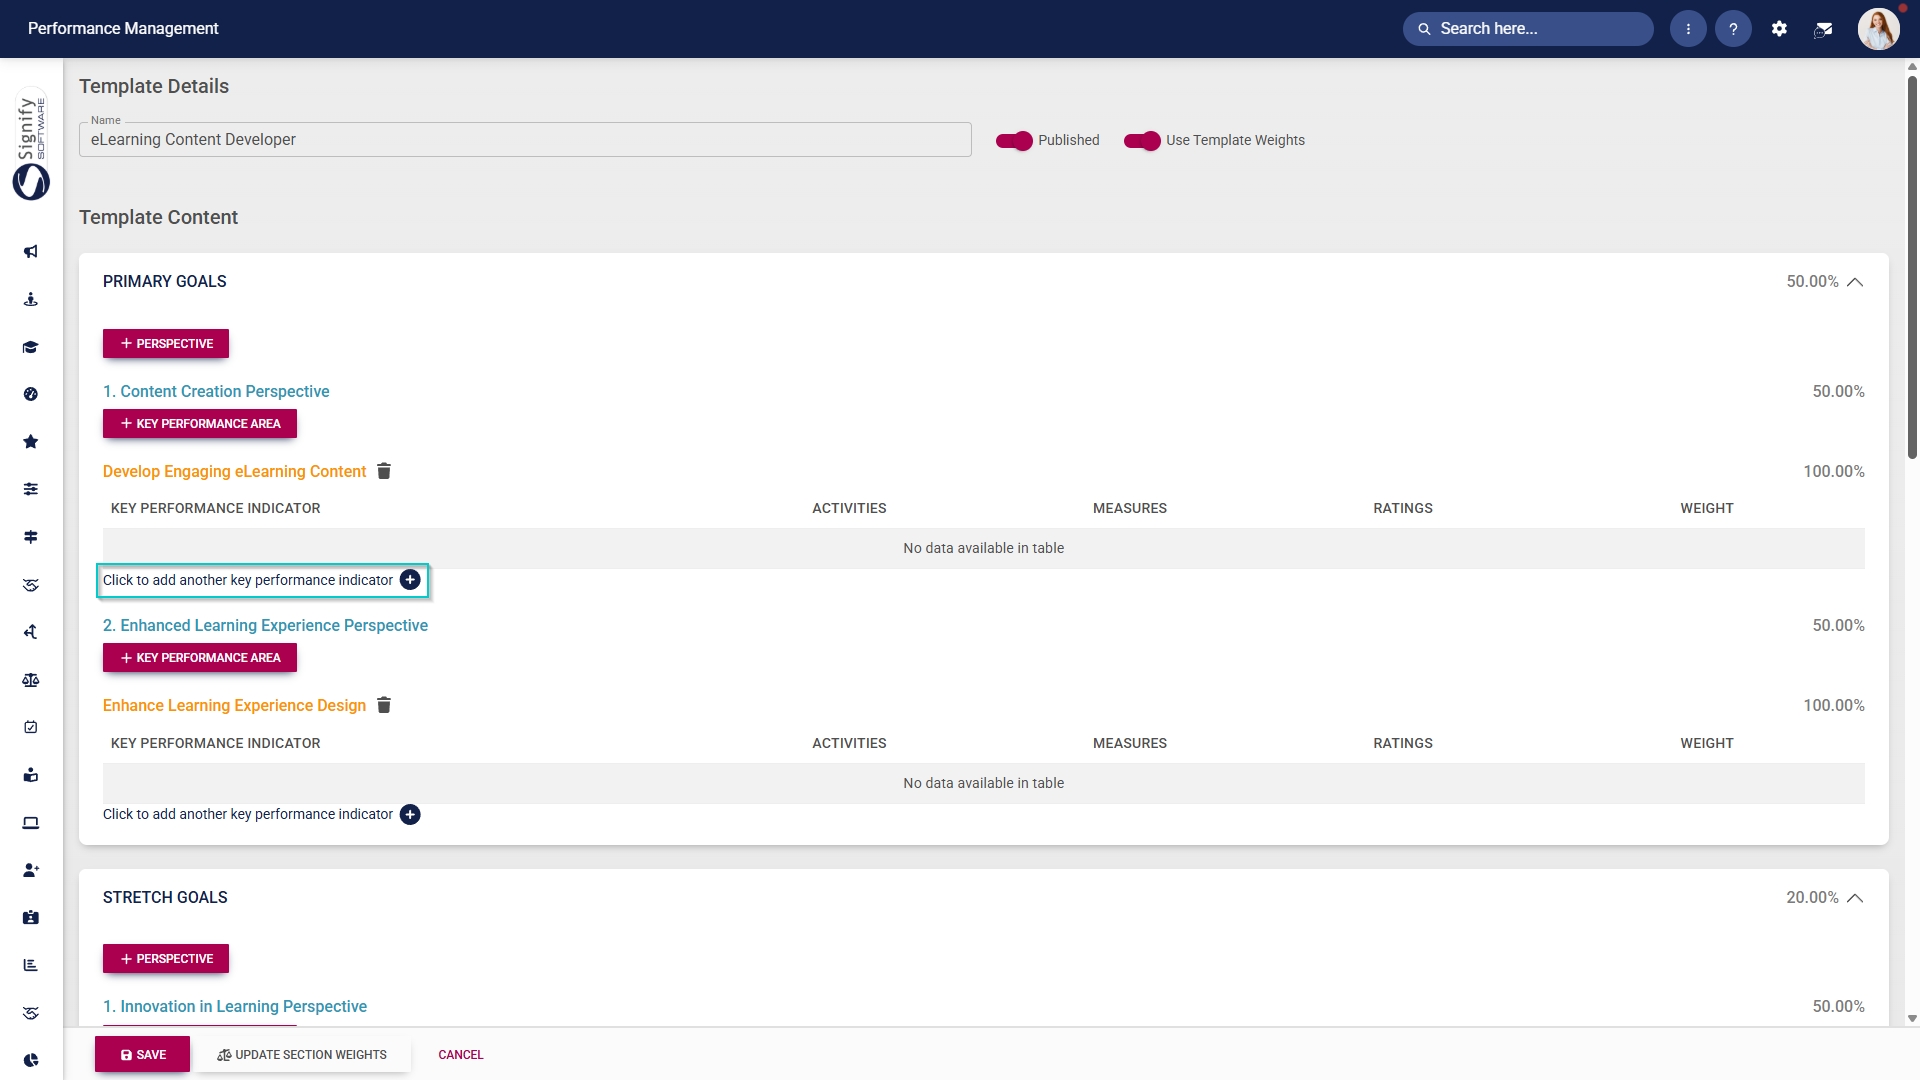
TypeUseinthe radio buttons to opt to type your ownKPI,KPI in the designated field, or select one from the Master Data Library.
- Your added KPIs and their assigned weights will display on the screen.
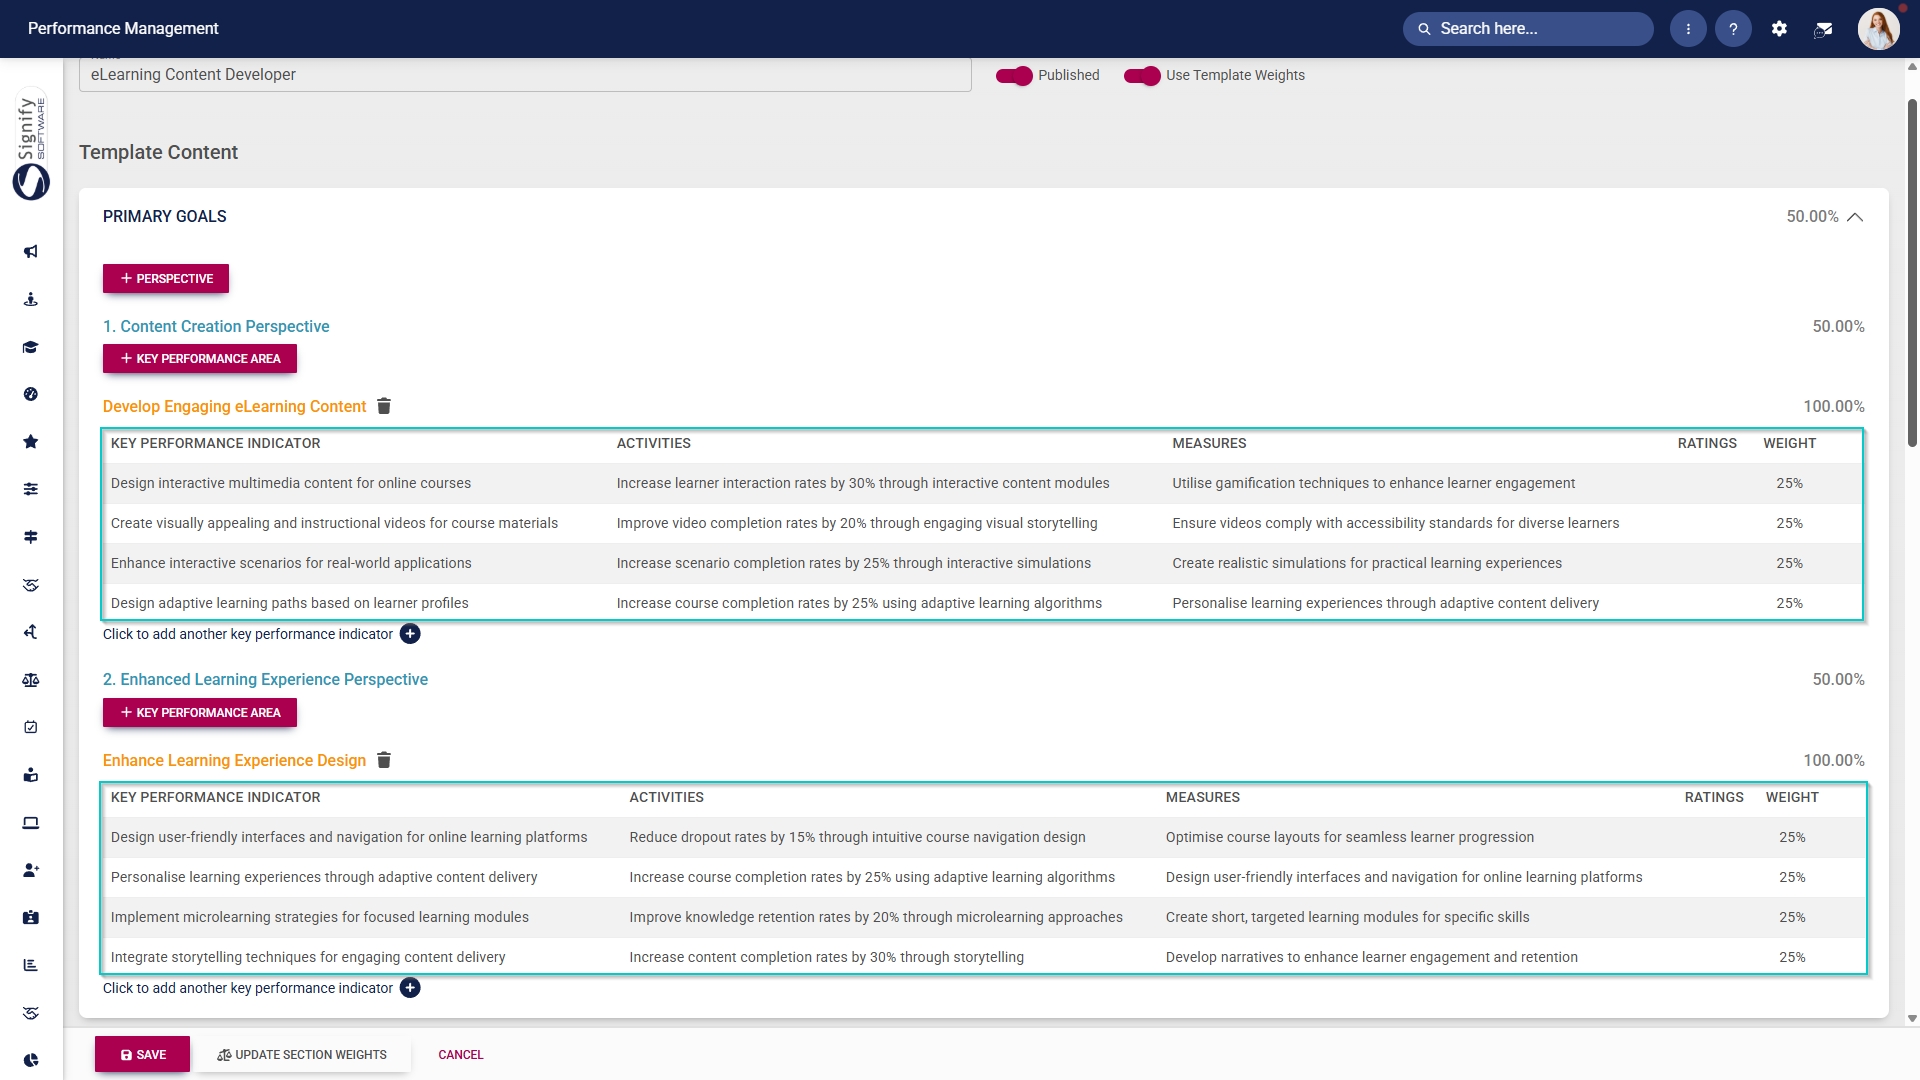
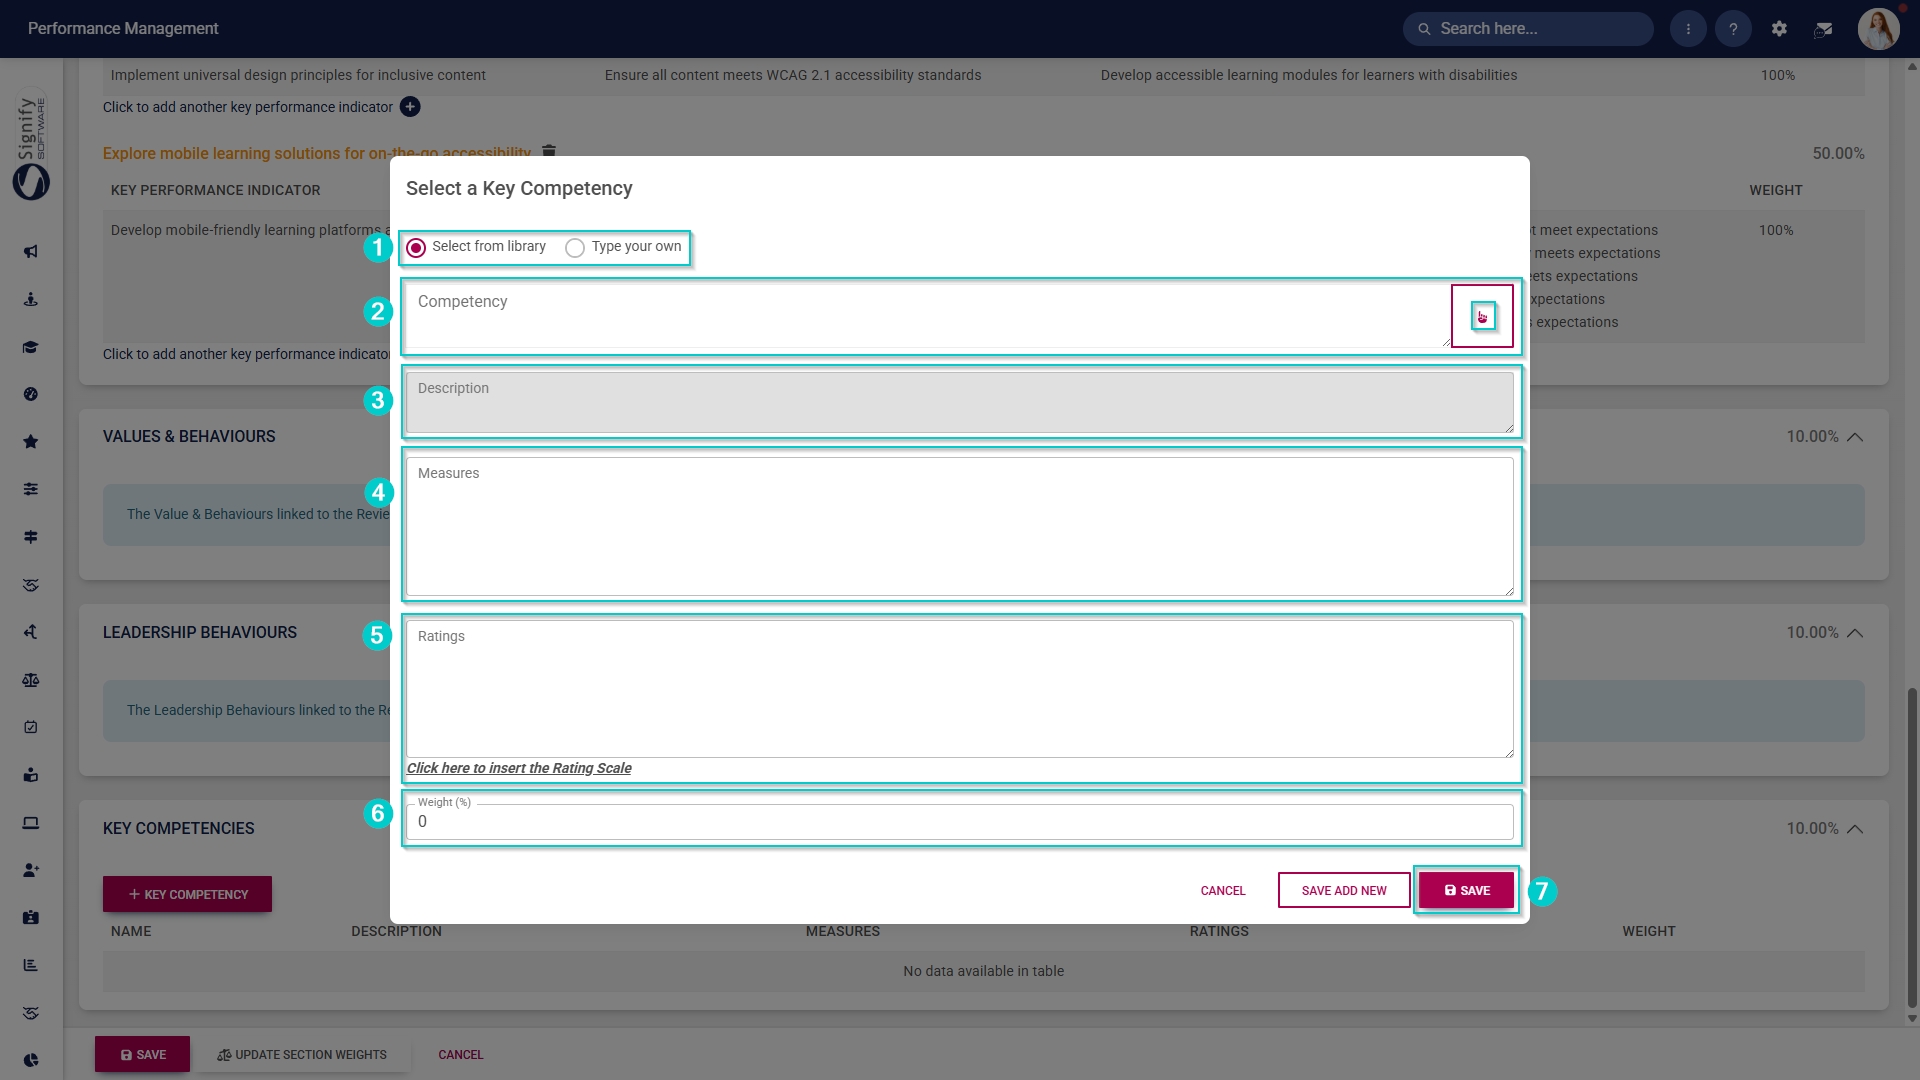
Add Values and Behaviours, Leadership Behaviours, and Key Competencies
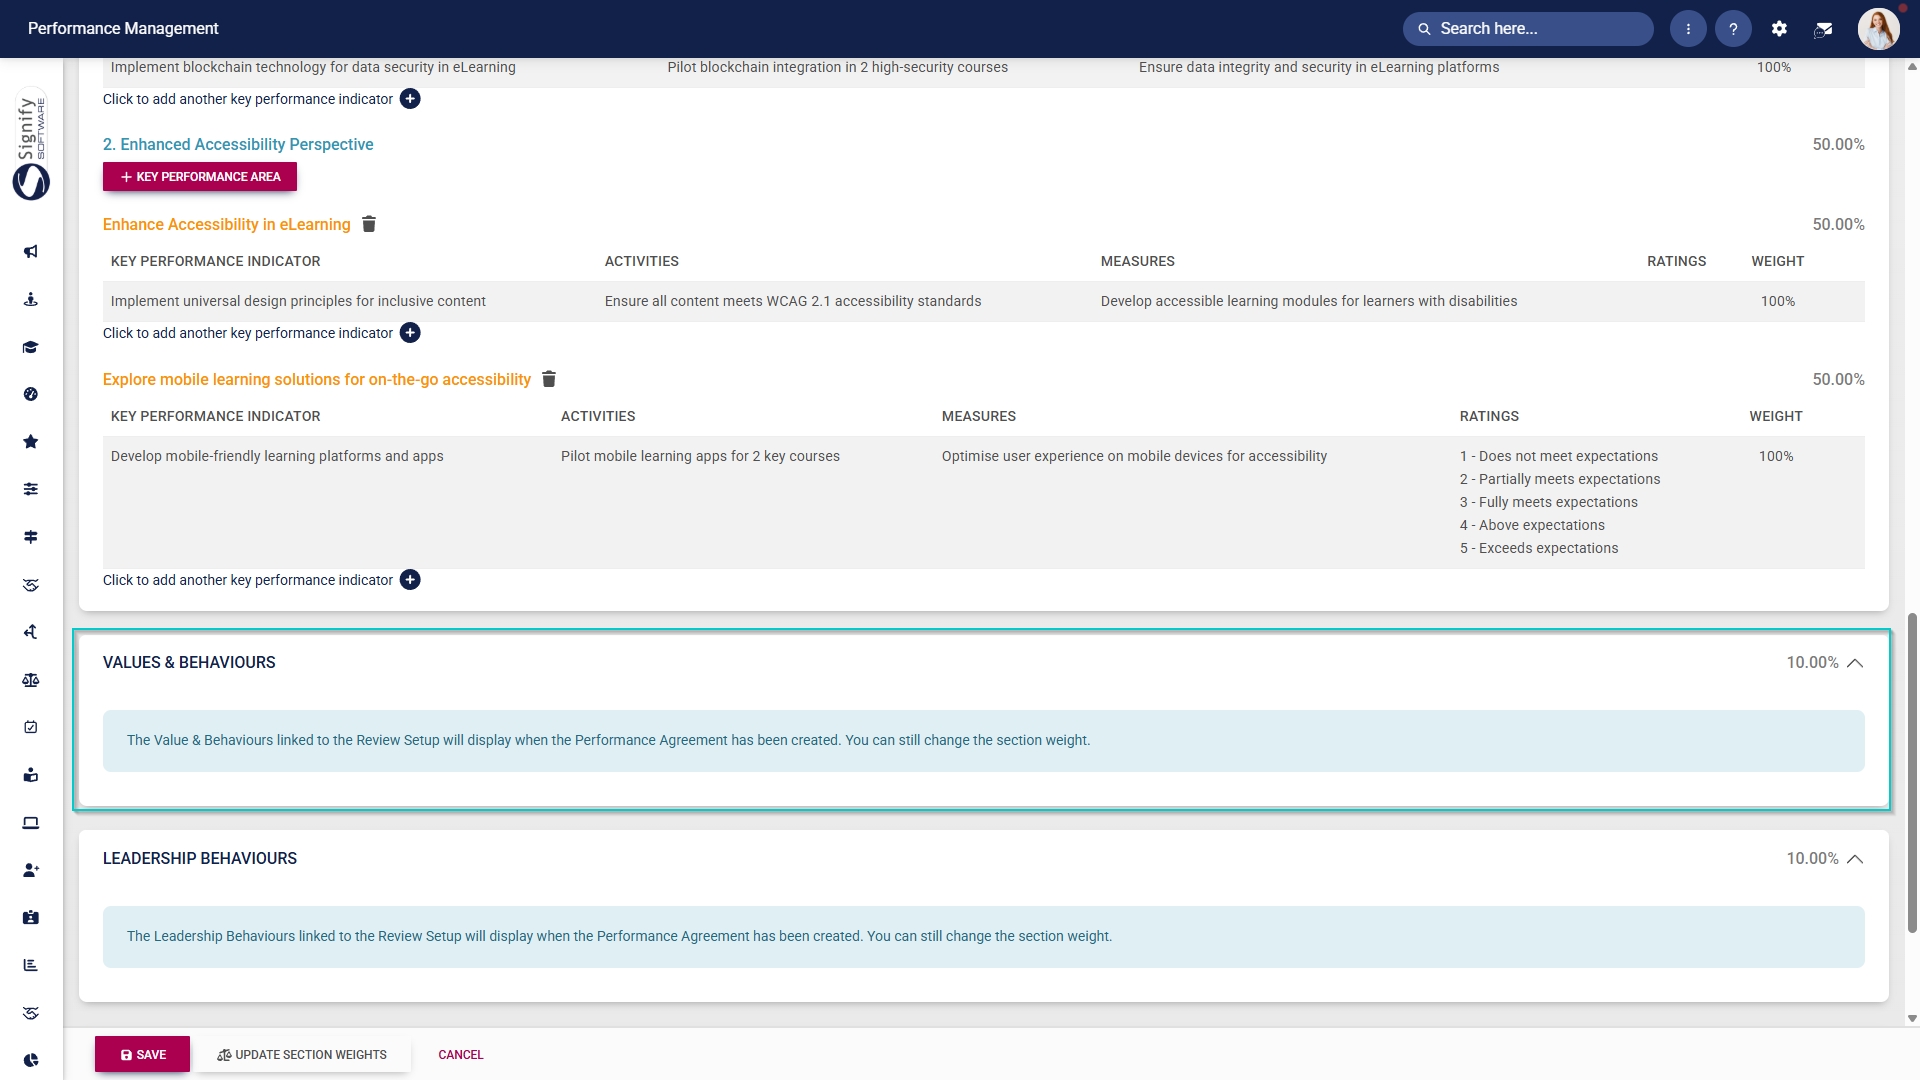
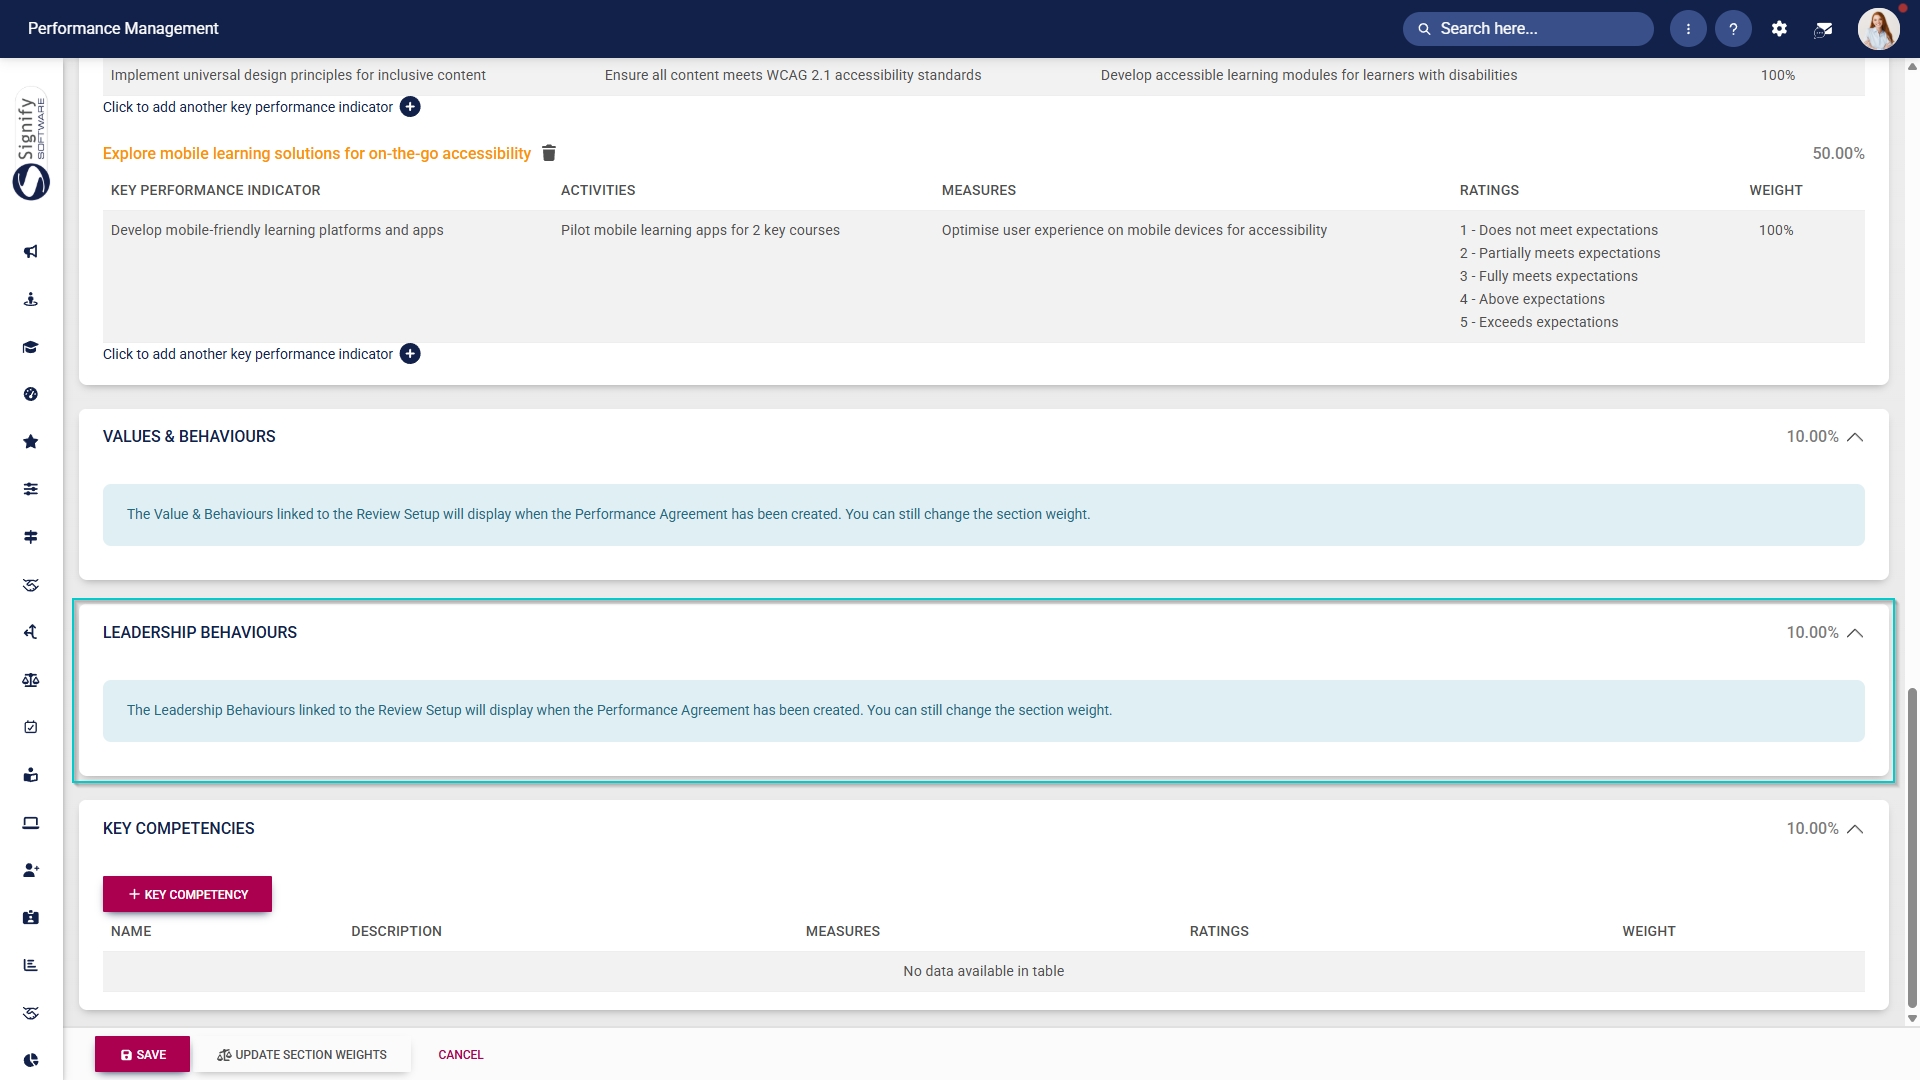
Key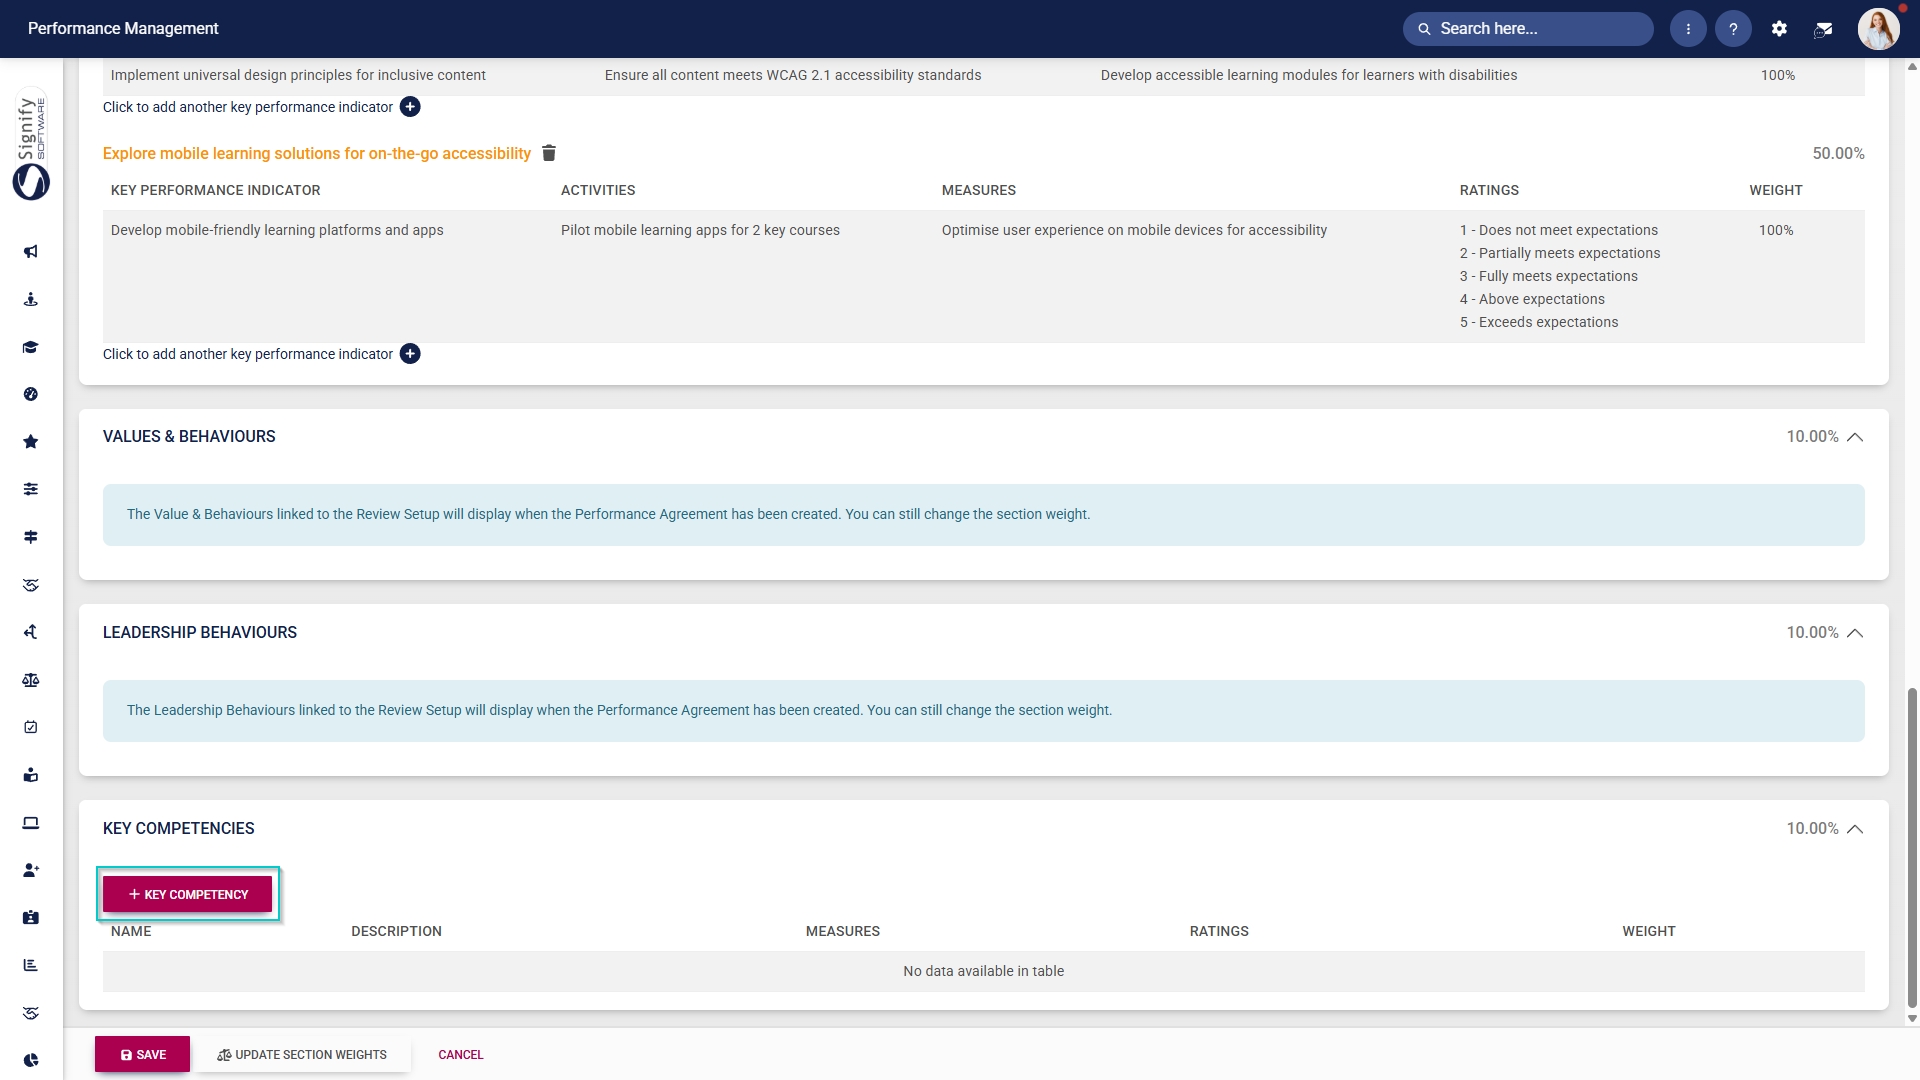
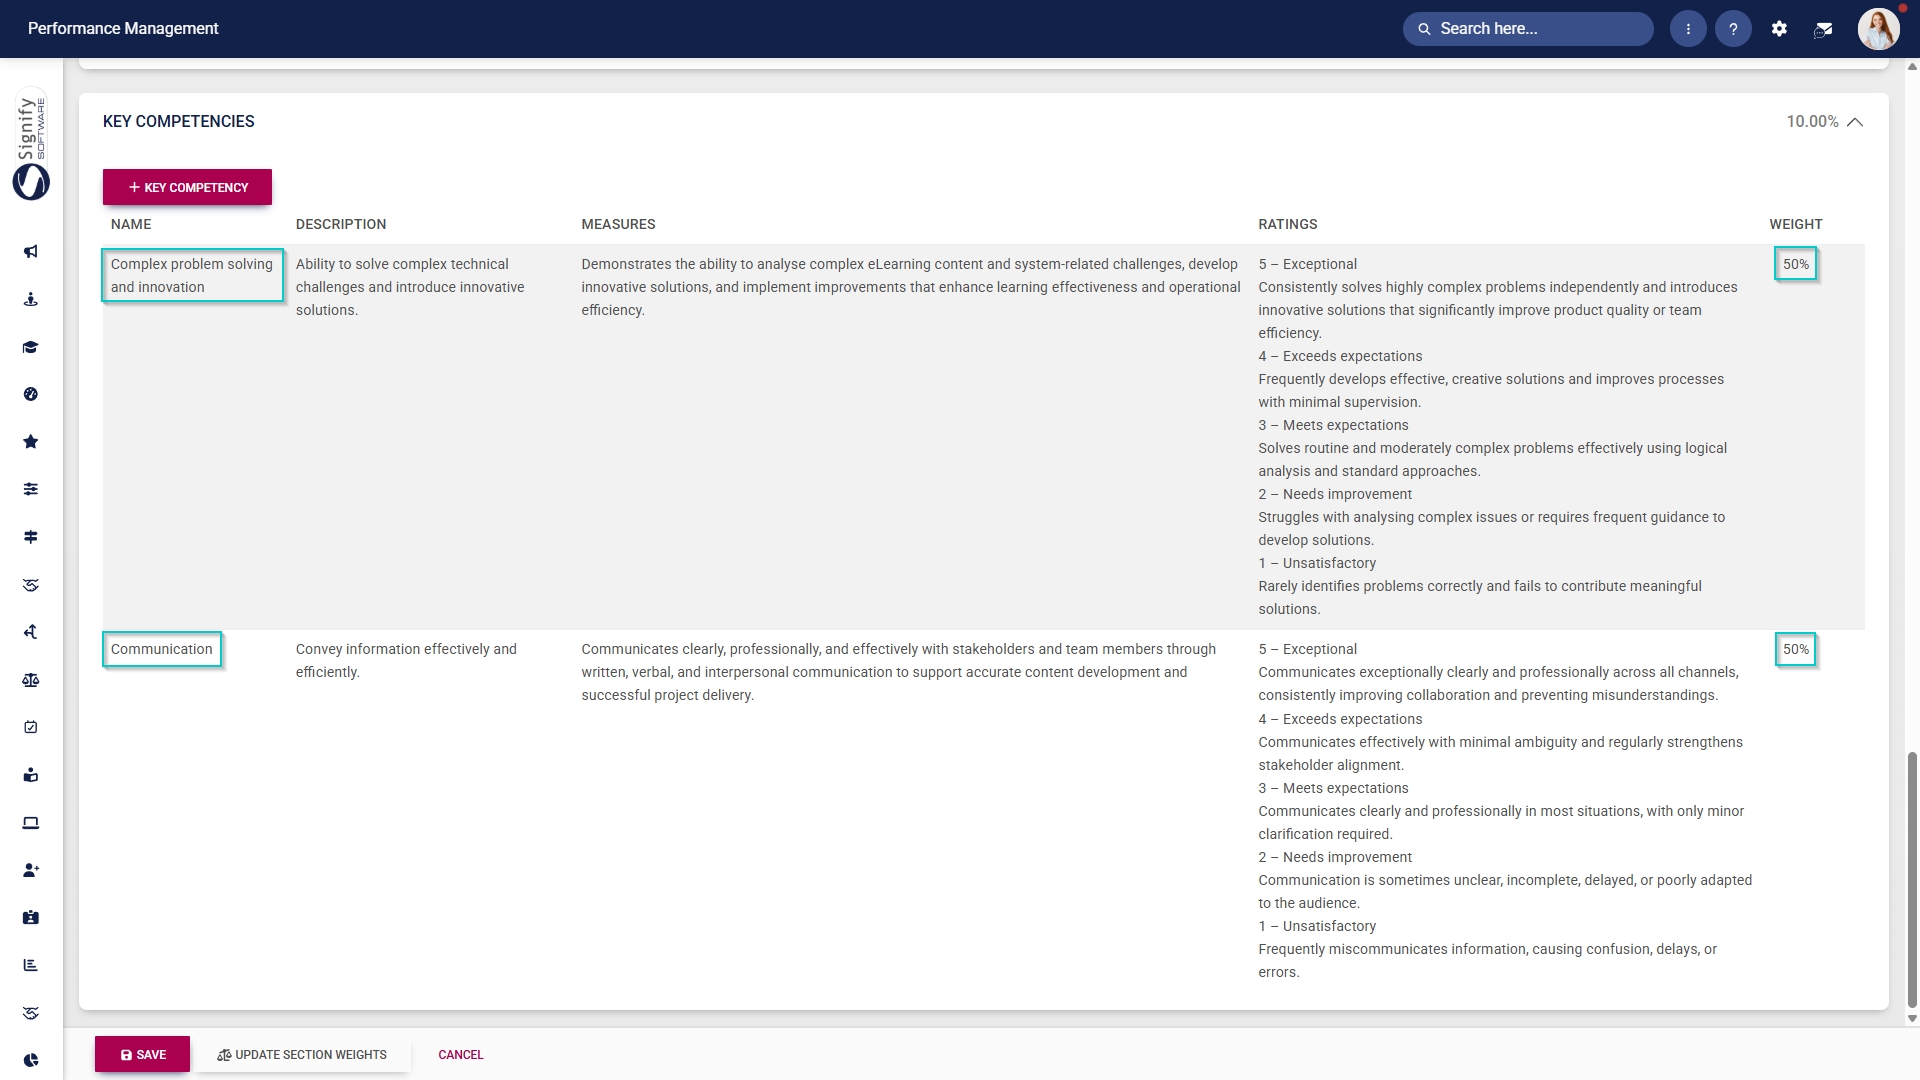
Save a created template
- Before you save the template you have created, ensure the following is in place:
- The template has a descriptive name.
- The template is published (if it is ready
toforbe useduse in your review setup). - The template's weights are correct.
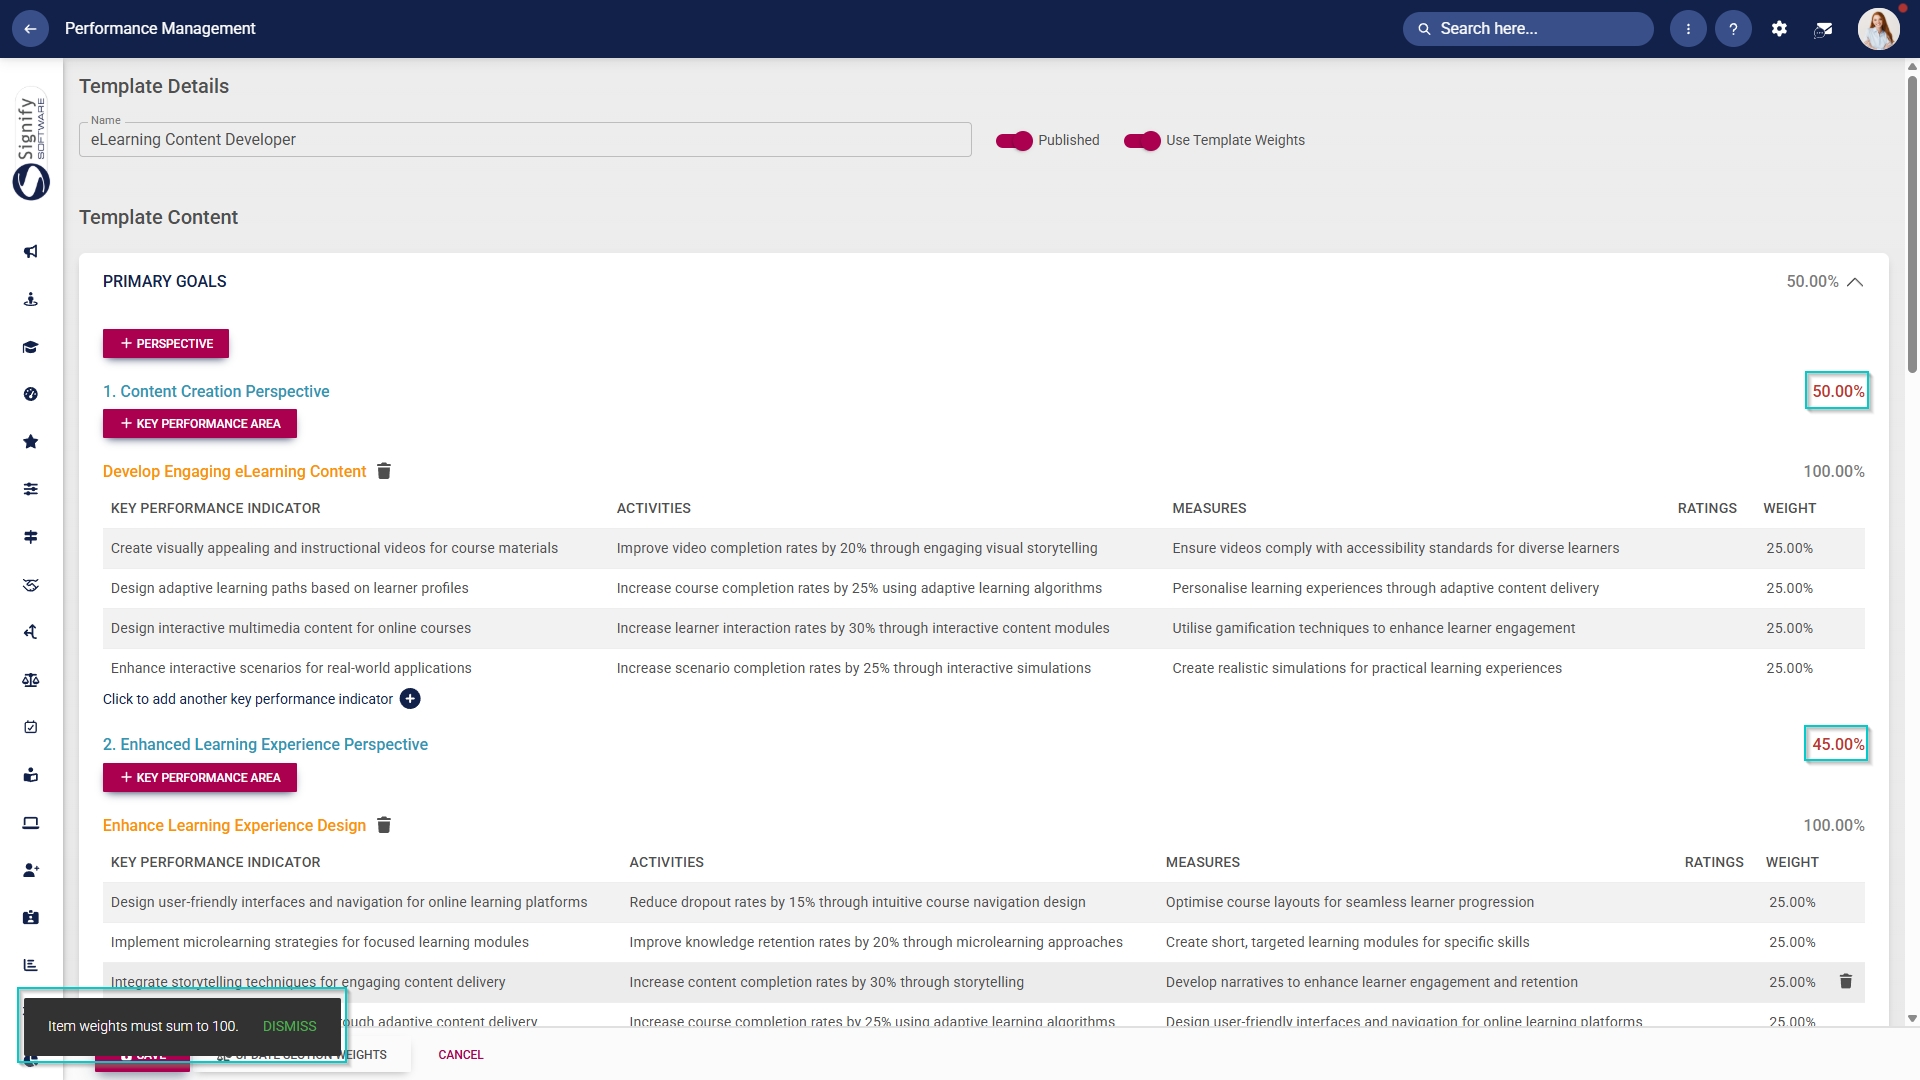
- All the weights of the perspectives in a section should add up to 100%.
- The total weighting of all KPAs linked to a specific perspective (or to a section, where perspectives are not applied) must equal 100%.
- All KPI weights linked to a KPA should total 100%.
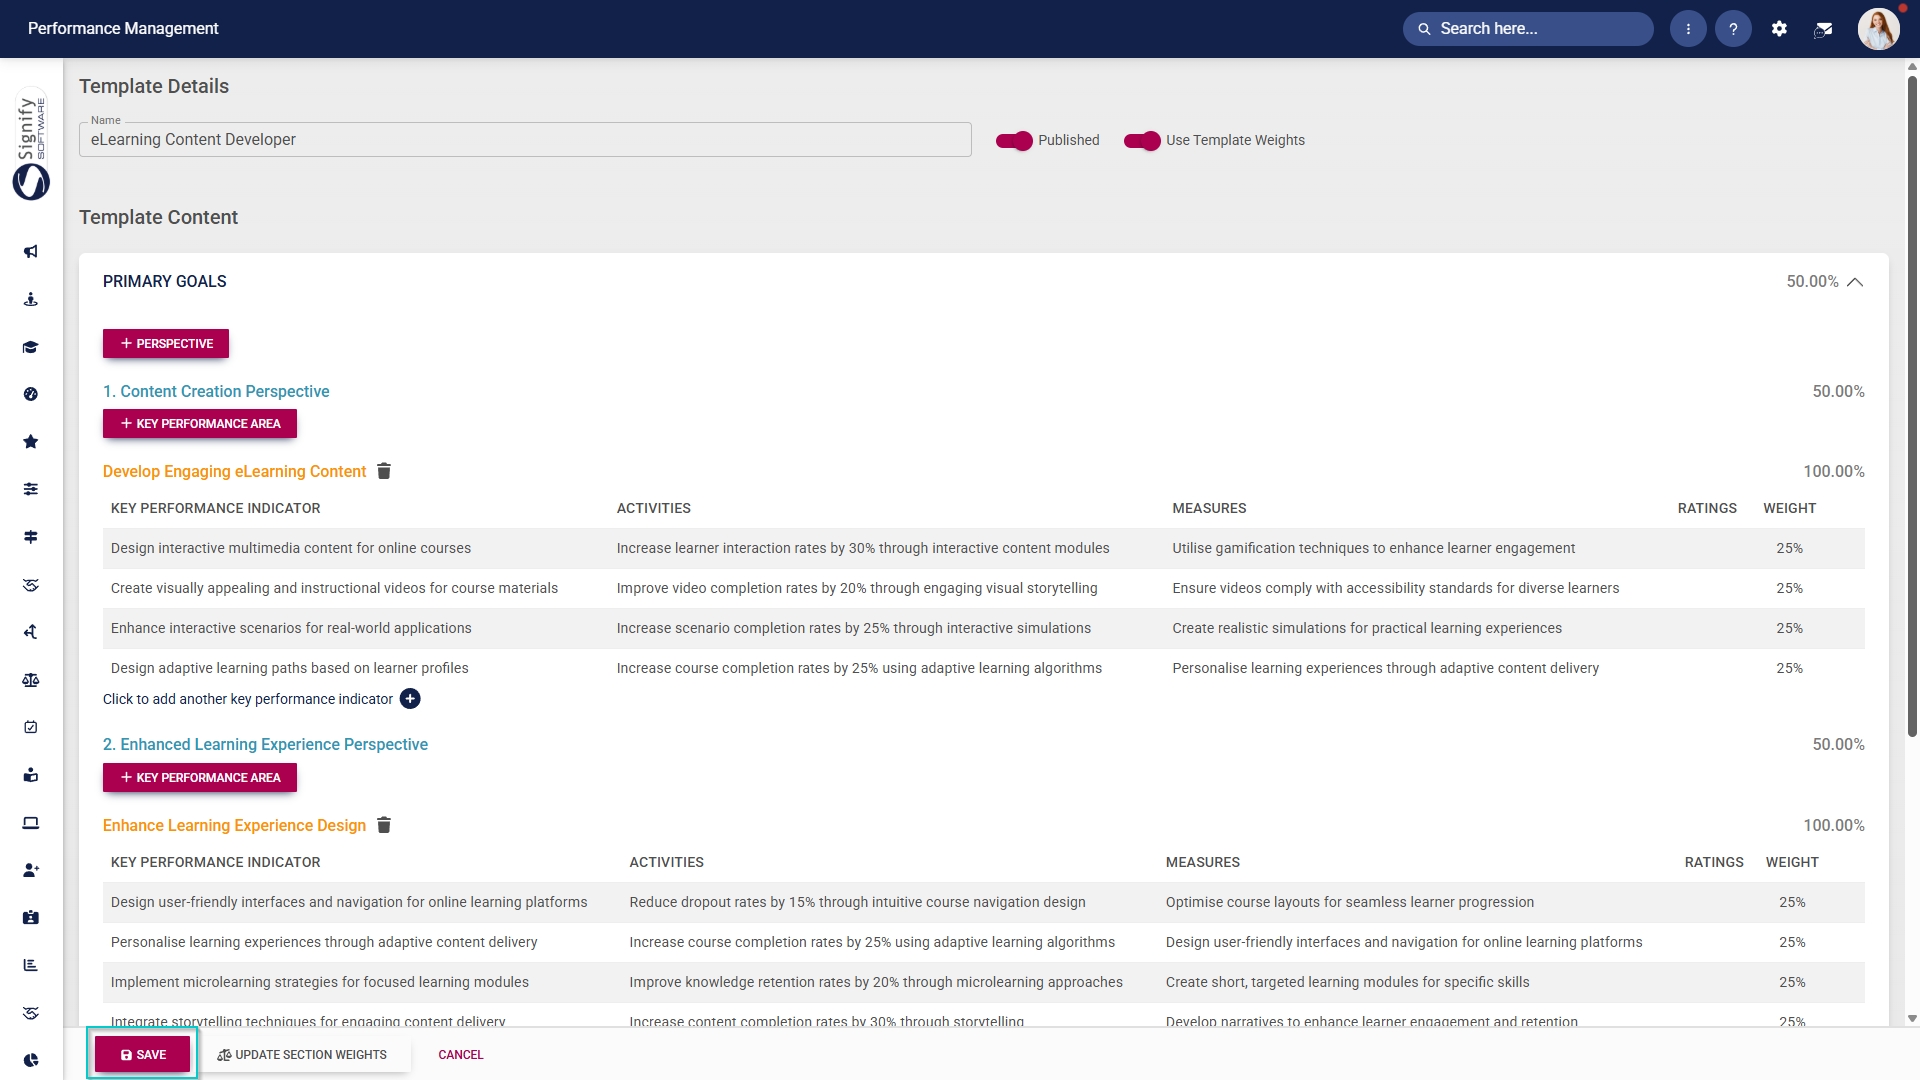
- Click SAVE
.when you are finished or click CANCEL to discard your edits.
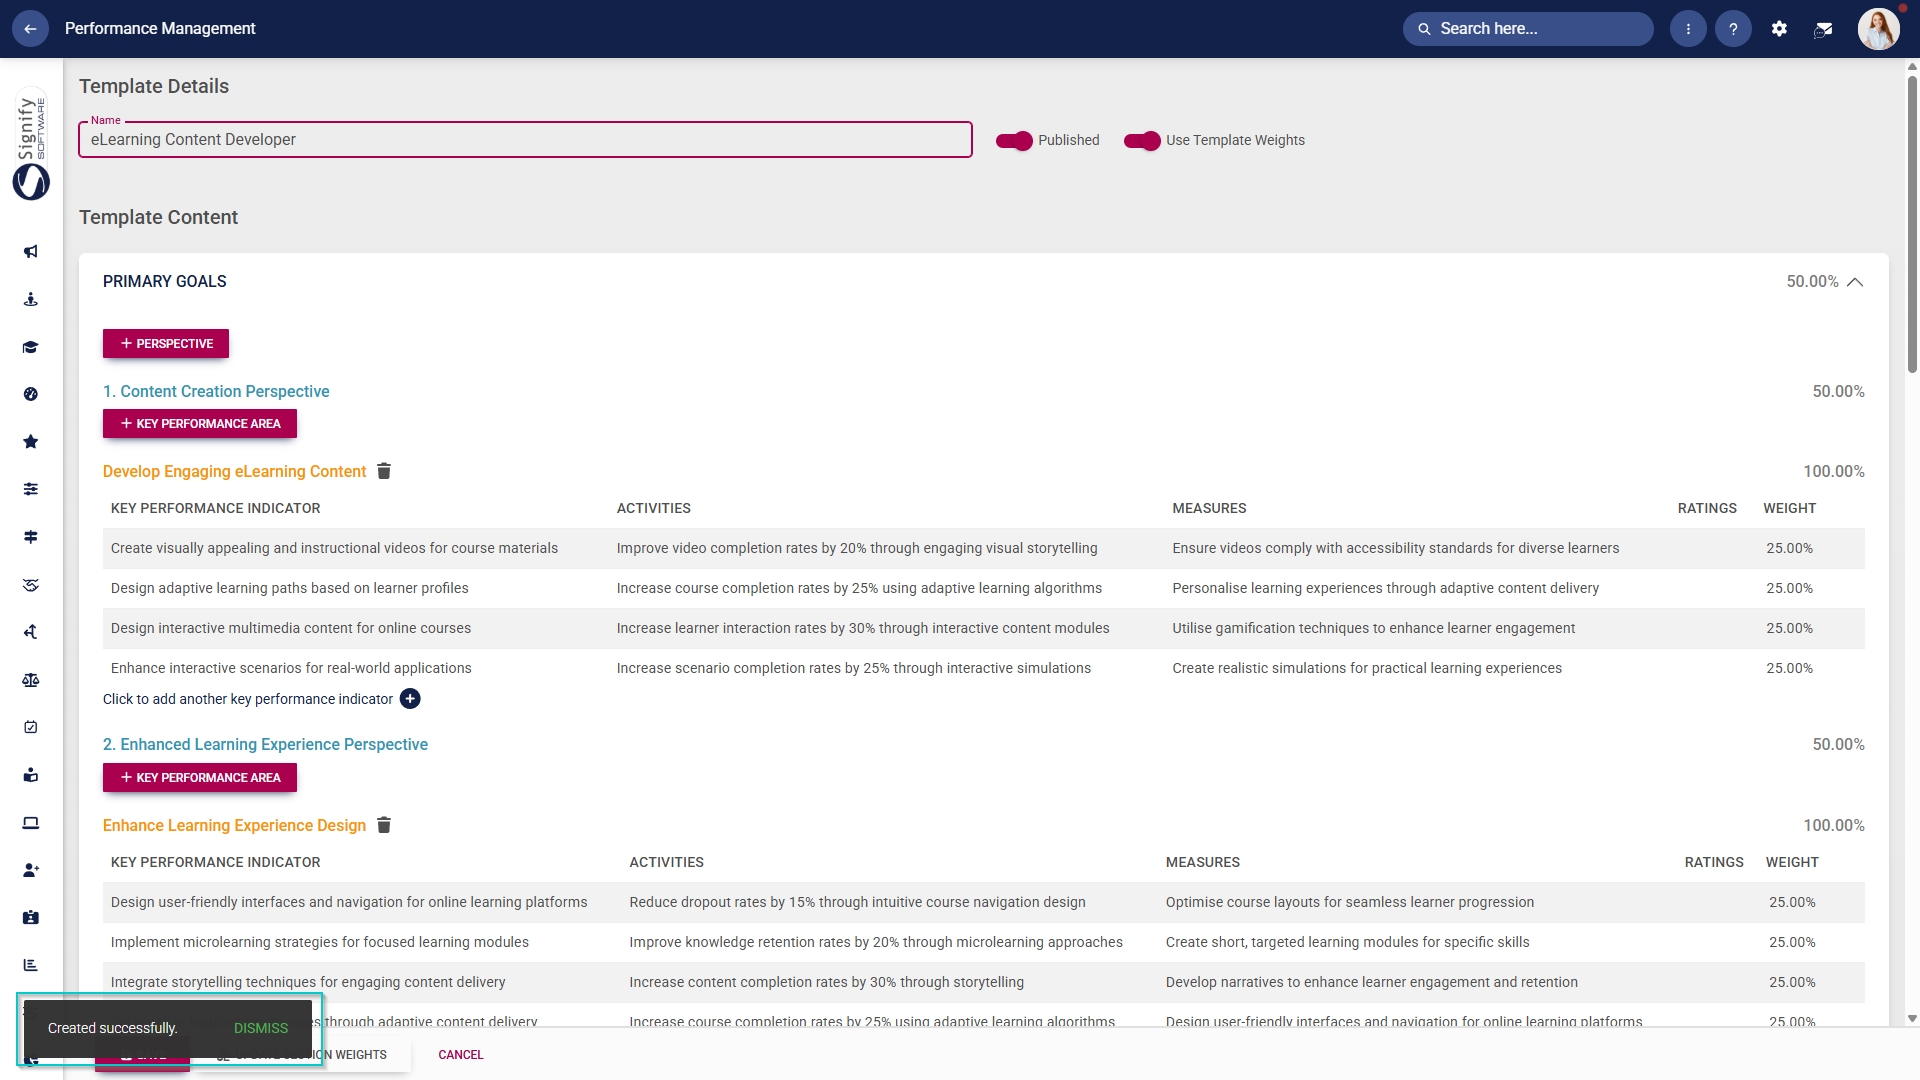
- A message will display indicating the successful creation of the template.
- If the template weights are not balanced, an error message will appear.
Import a Template
Templates can also be imported using an import sheet. The template will be populated using Excel, prepared for import into the Performance Management module, and automatically linked to a review setup.
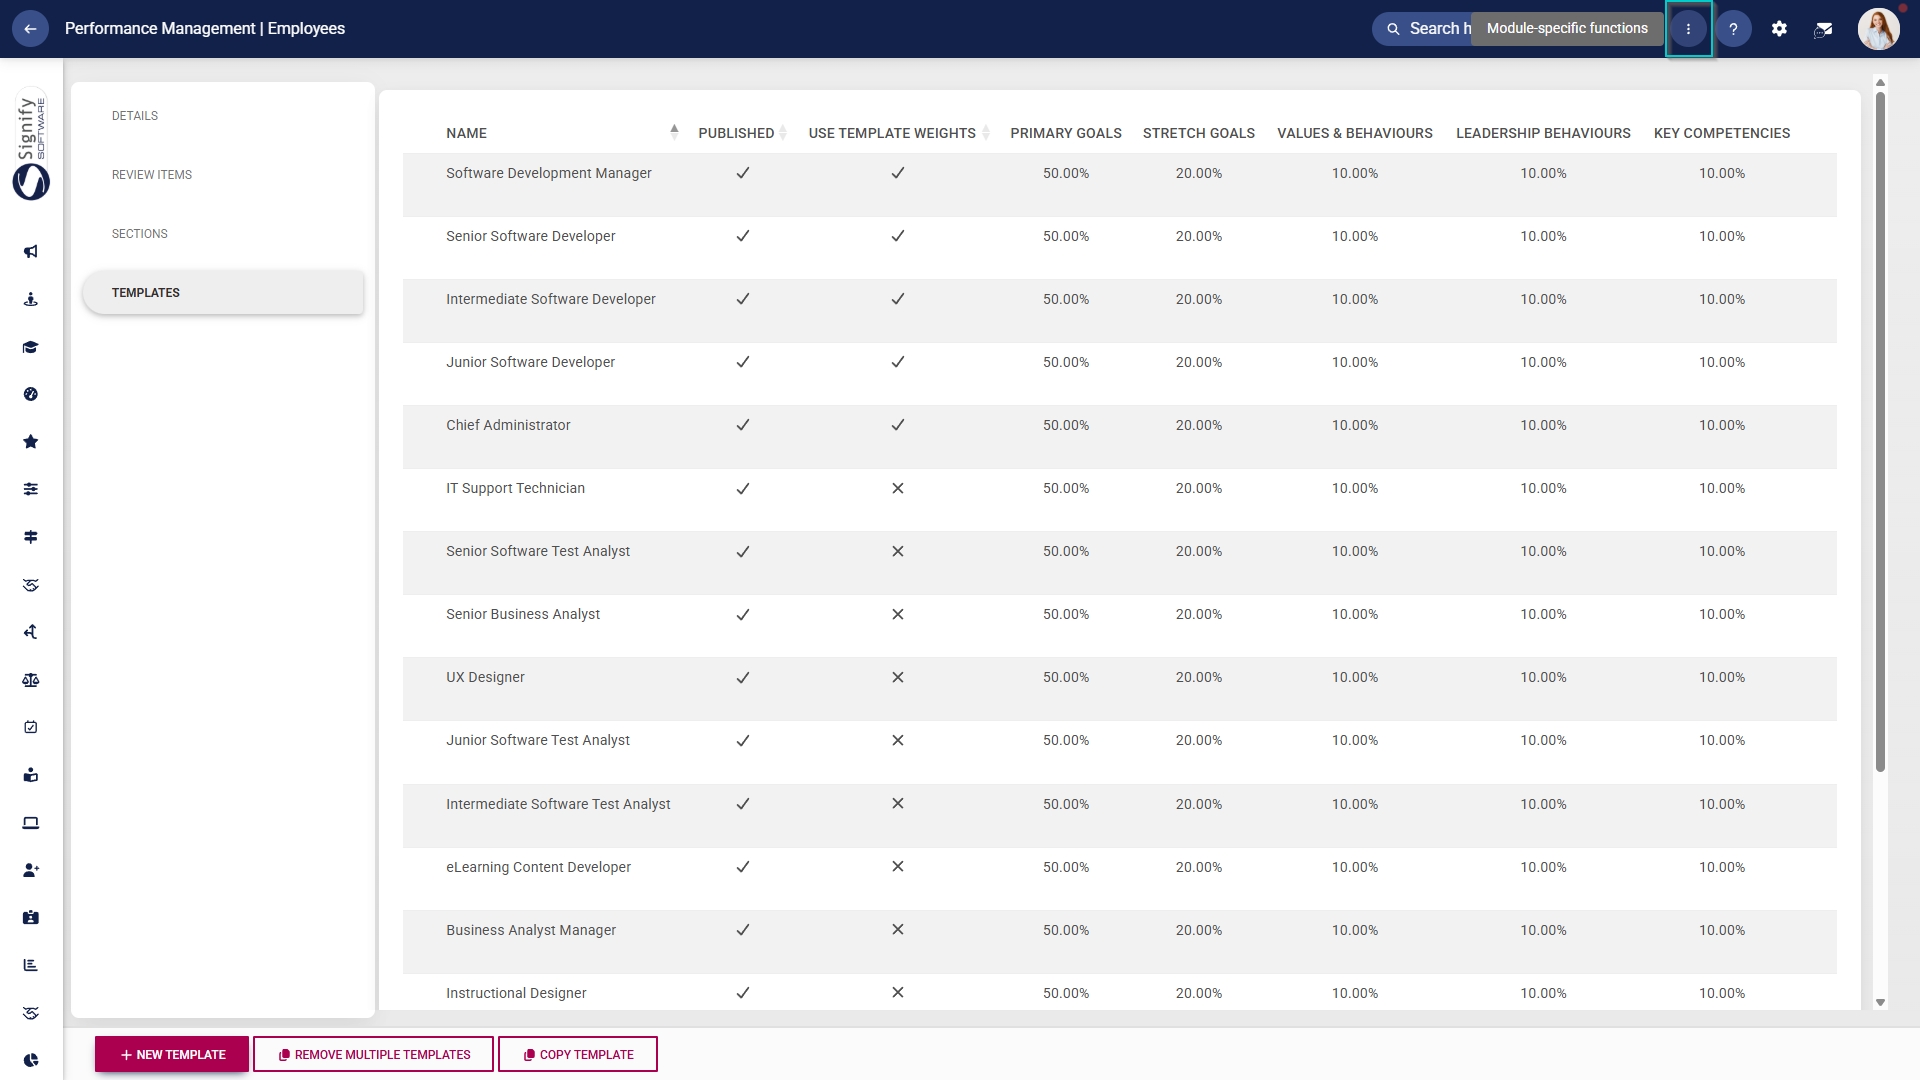
- To begin importing a template, access the Module-Specific Functions
menu.menu by clicking the kebab icon at the top of the screen.
- Click Import.
- Select Performance Management from the drop-down
menu,menu.
- Download the Excel import file and populate it with the template's details.
- When you have completed this step, click UPLOAD IMPORT FILE to upload your import file.
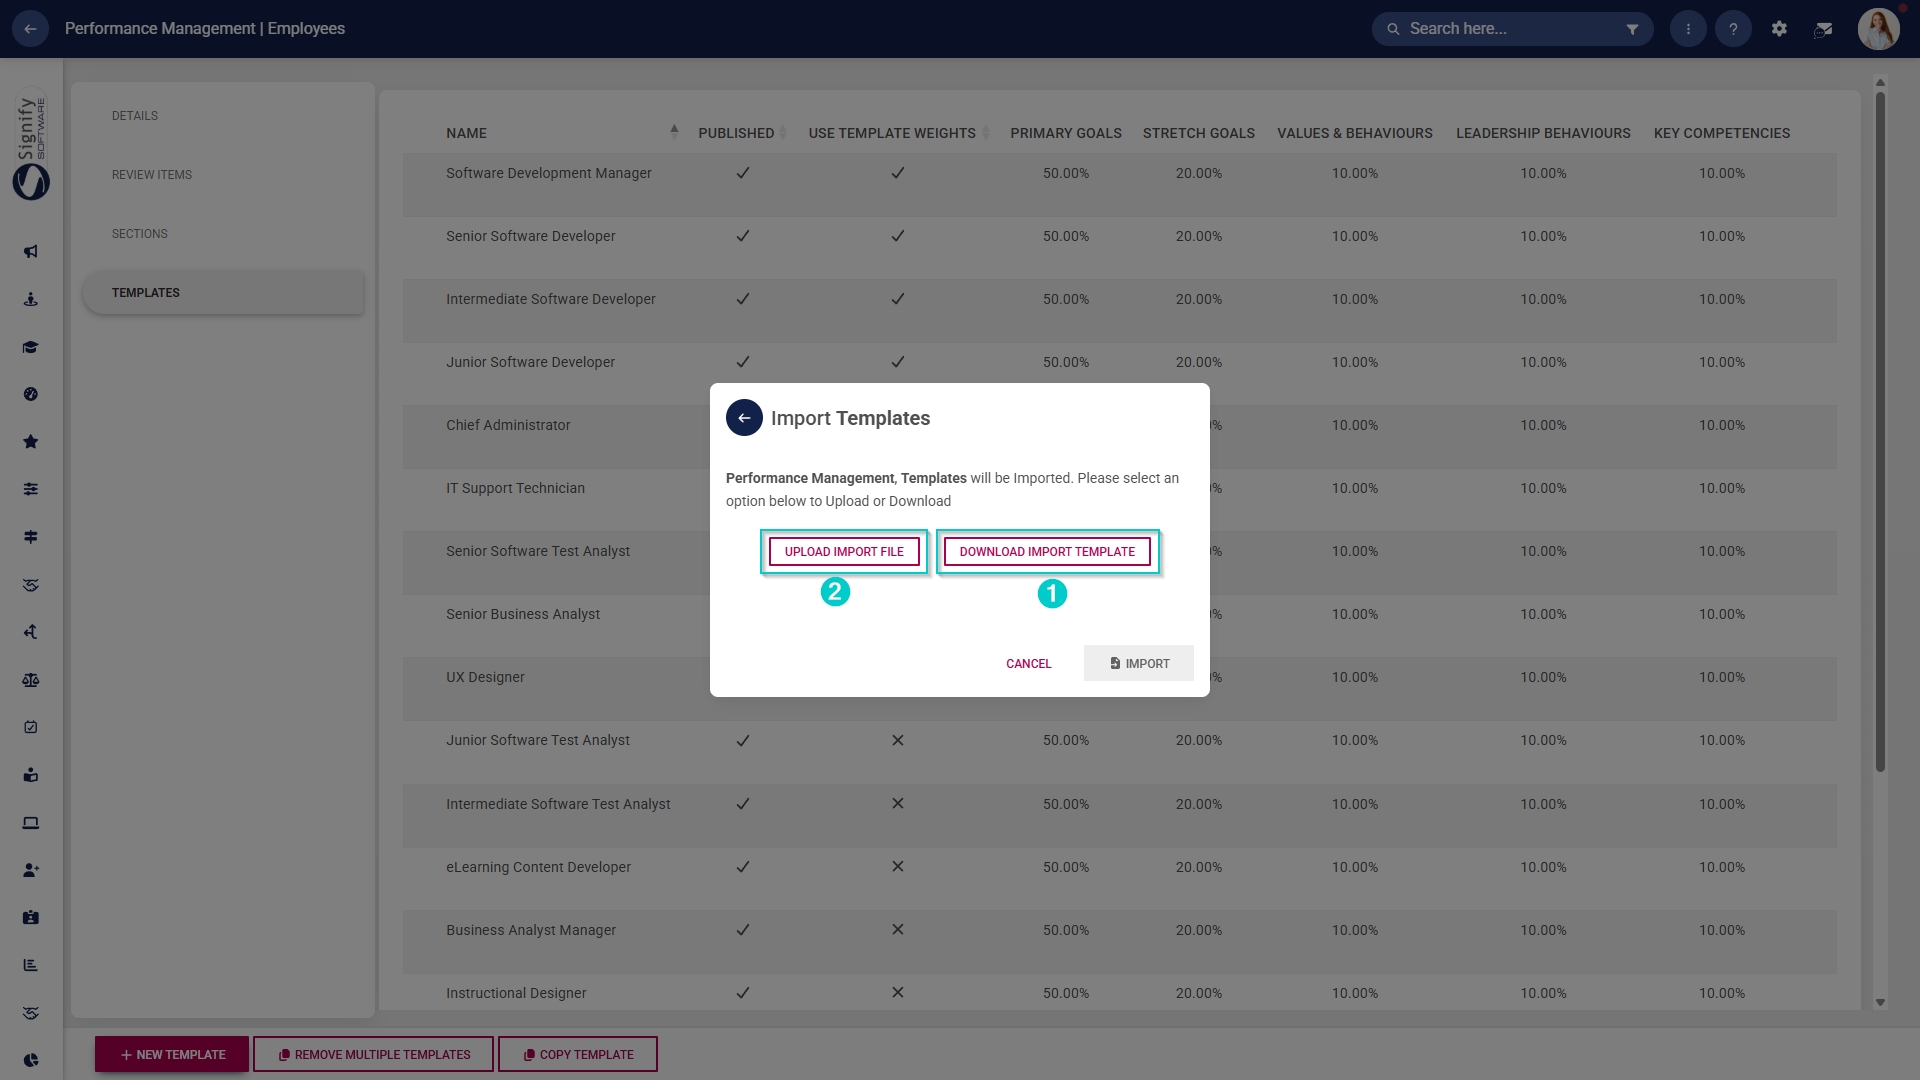
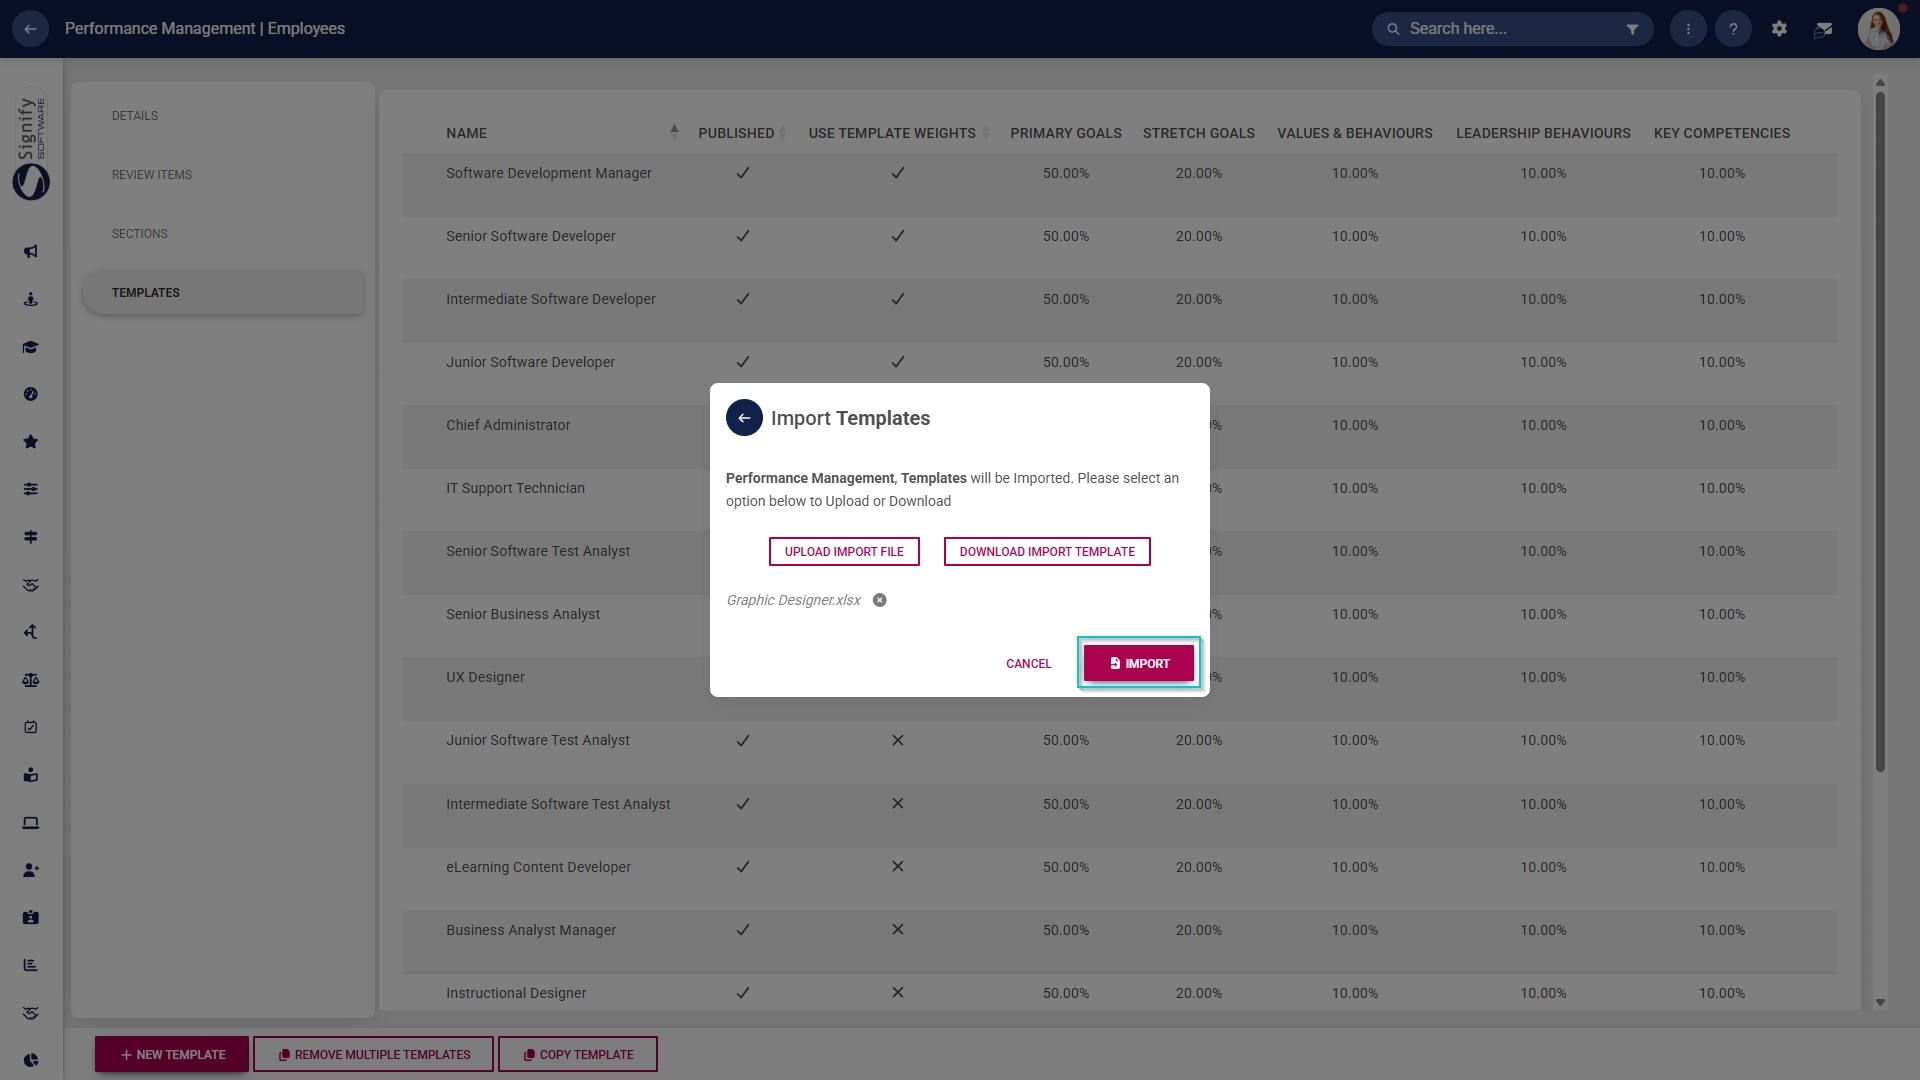
- Once the file has successfully uploaded, click IMPORT.
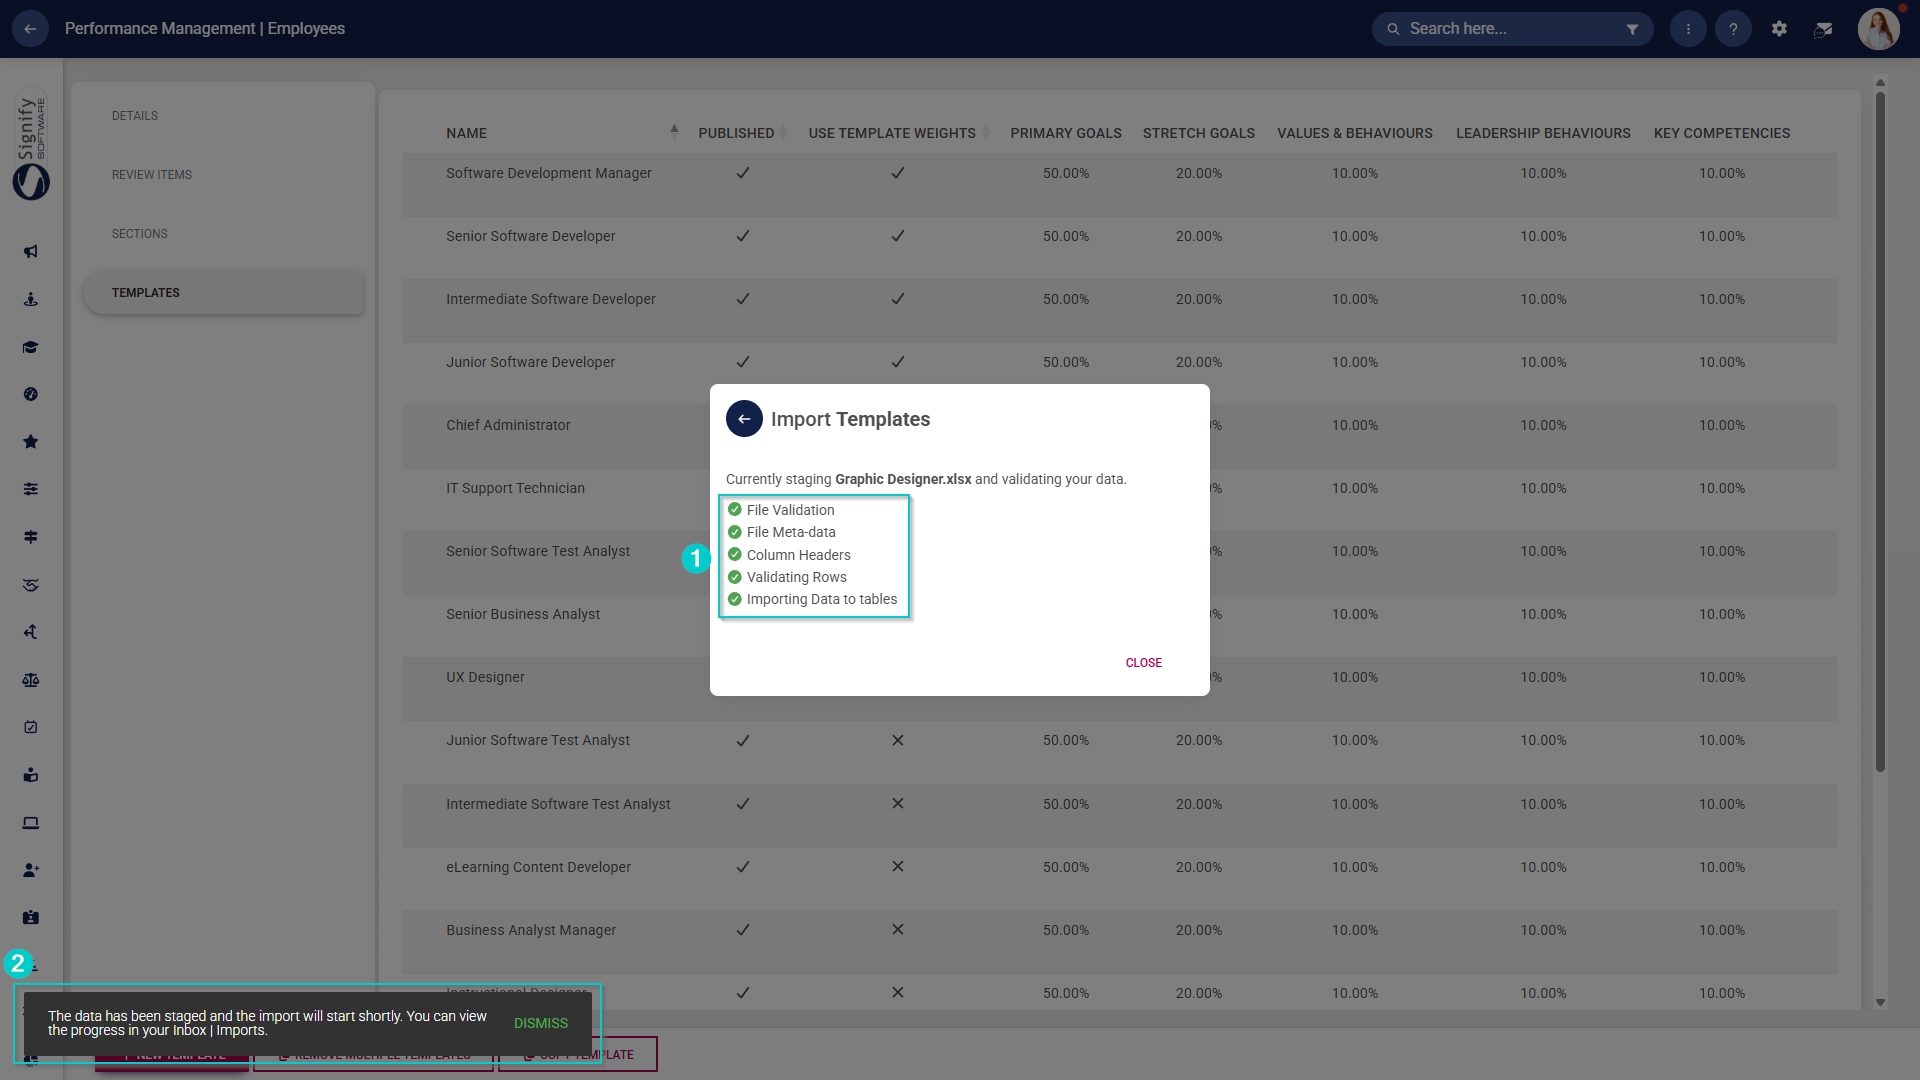
- The import results will be displayed. If the file was successfully staged for import, the results will all show green ticks.
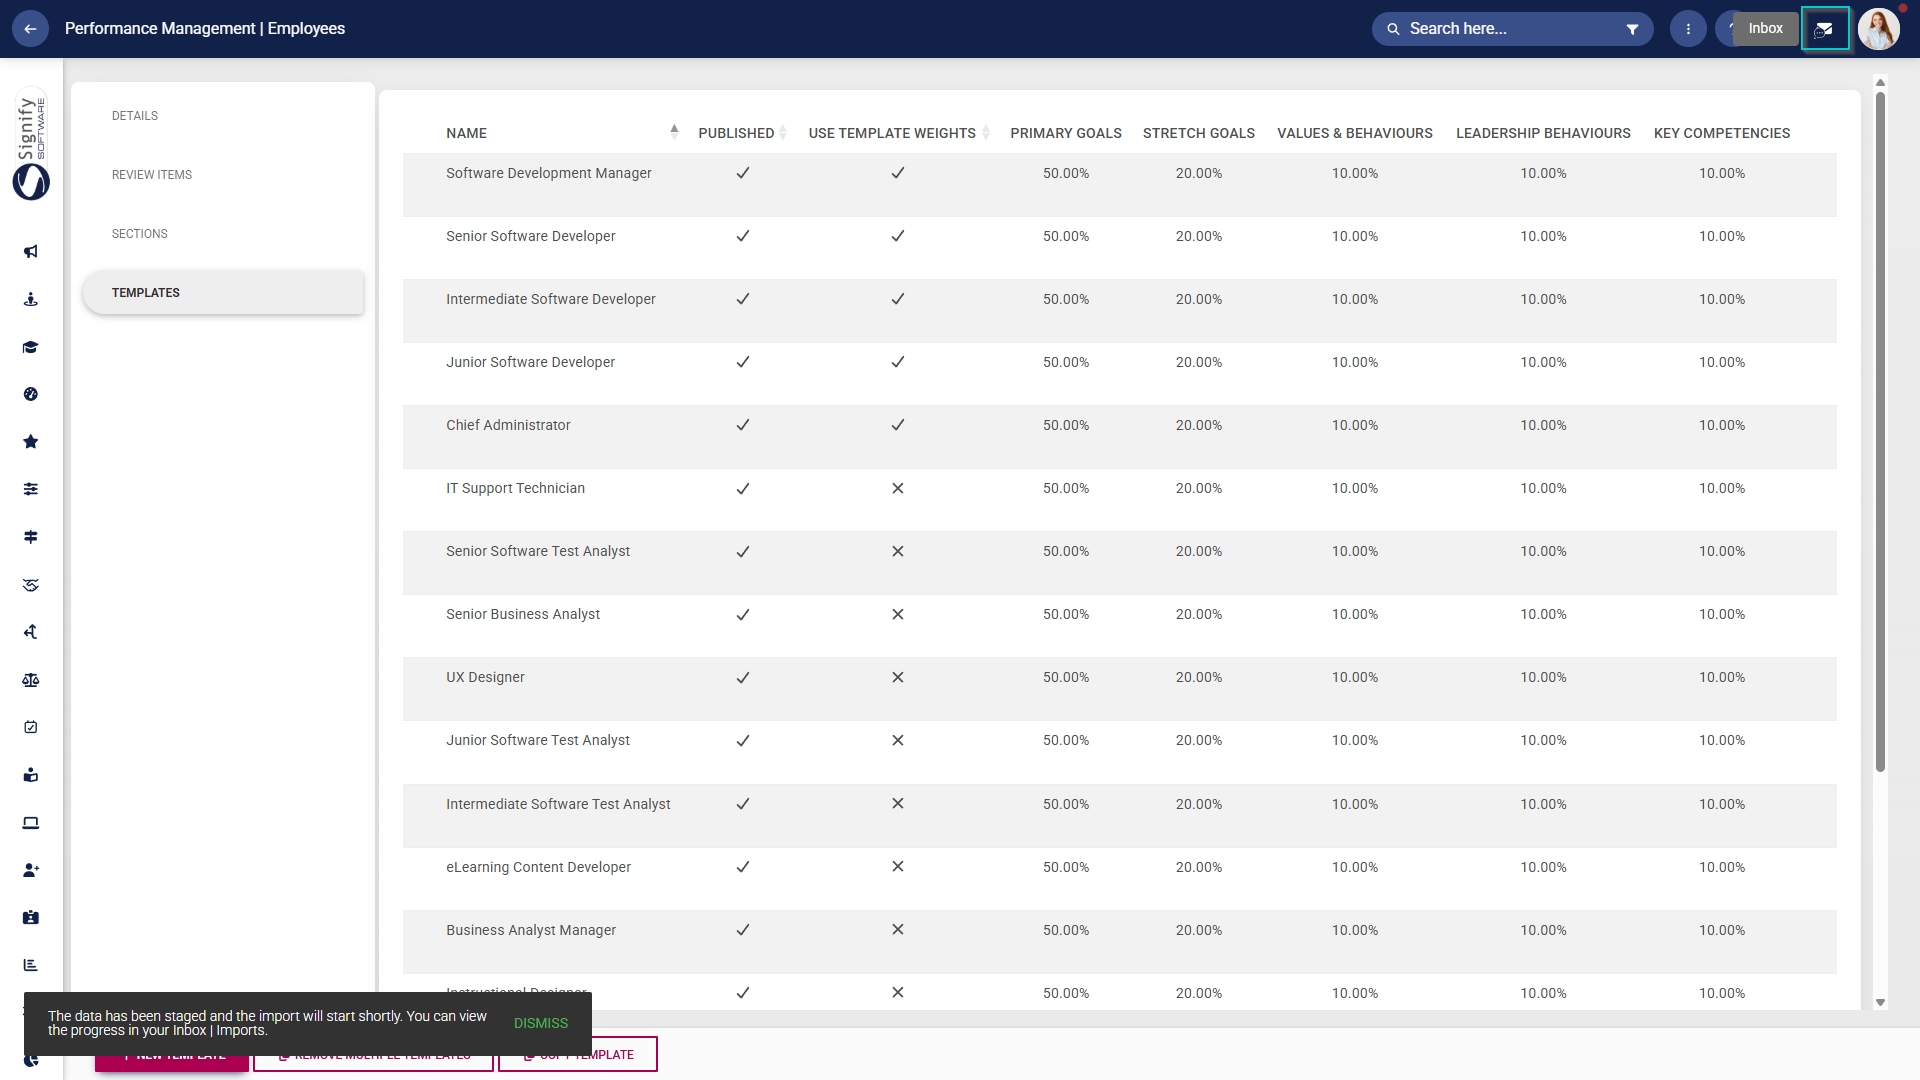
- To view the status of the template's import, navigate to the system inbox
.at the top of the screen.
- Click Imports.
- The table will show all the results of recent system imports. Locate your performance template import entry, and view the status.
- Staged: The import is still in progress.
- Completed: The import has completed successfully.
- CompletedWithErrors: There are errors in your import file.

- To view the errors with your import file, find the CompletedWithErrors entry and
hover overclick thethreekebabdots.icon.

- Click Export Errors to investigate why the template did not complete the import process.

- The export document containing the errors will be located in your system inbox.
- Once you have reviewed
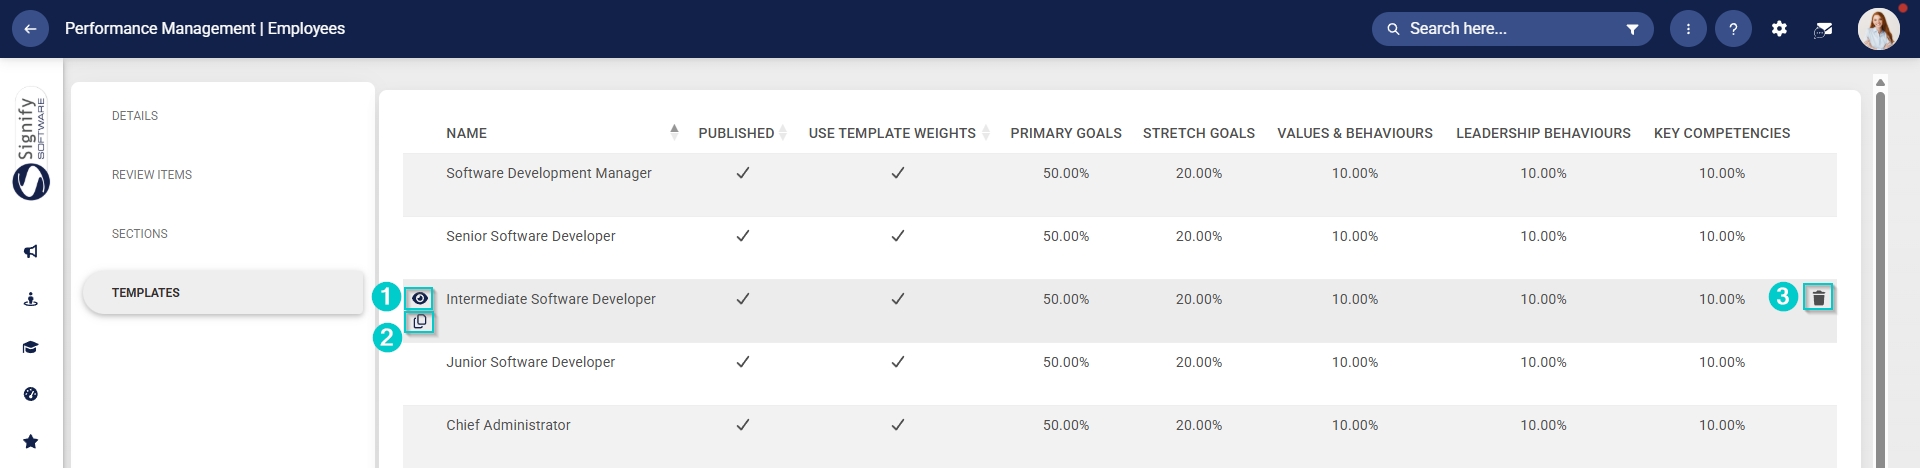
allthe errors with your imported templates, they should import successfully, and your template library should look like this:
Templates can easily be copied or deleted by hoveringHovering overthe desireda templateandineitherthe Template Library reveals a few features:-
- Preview a template by clicking the
copyeyeoricon.
Delete a template by clicking the dustbin
Review Years
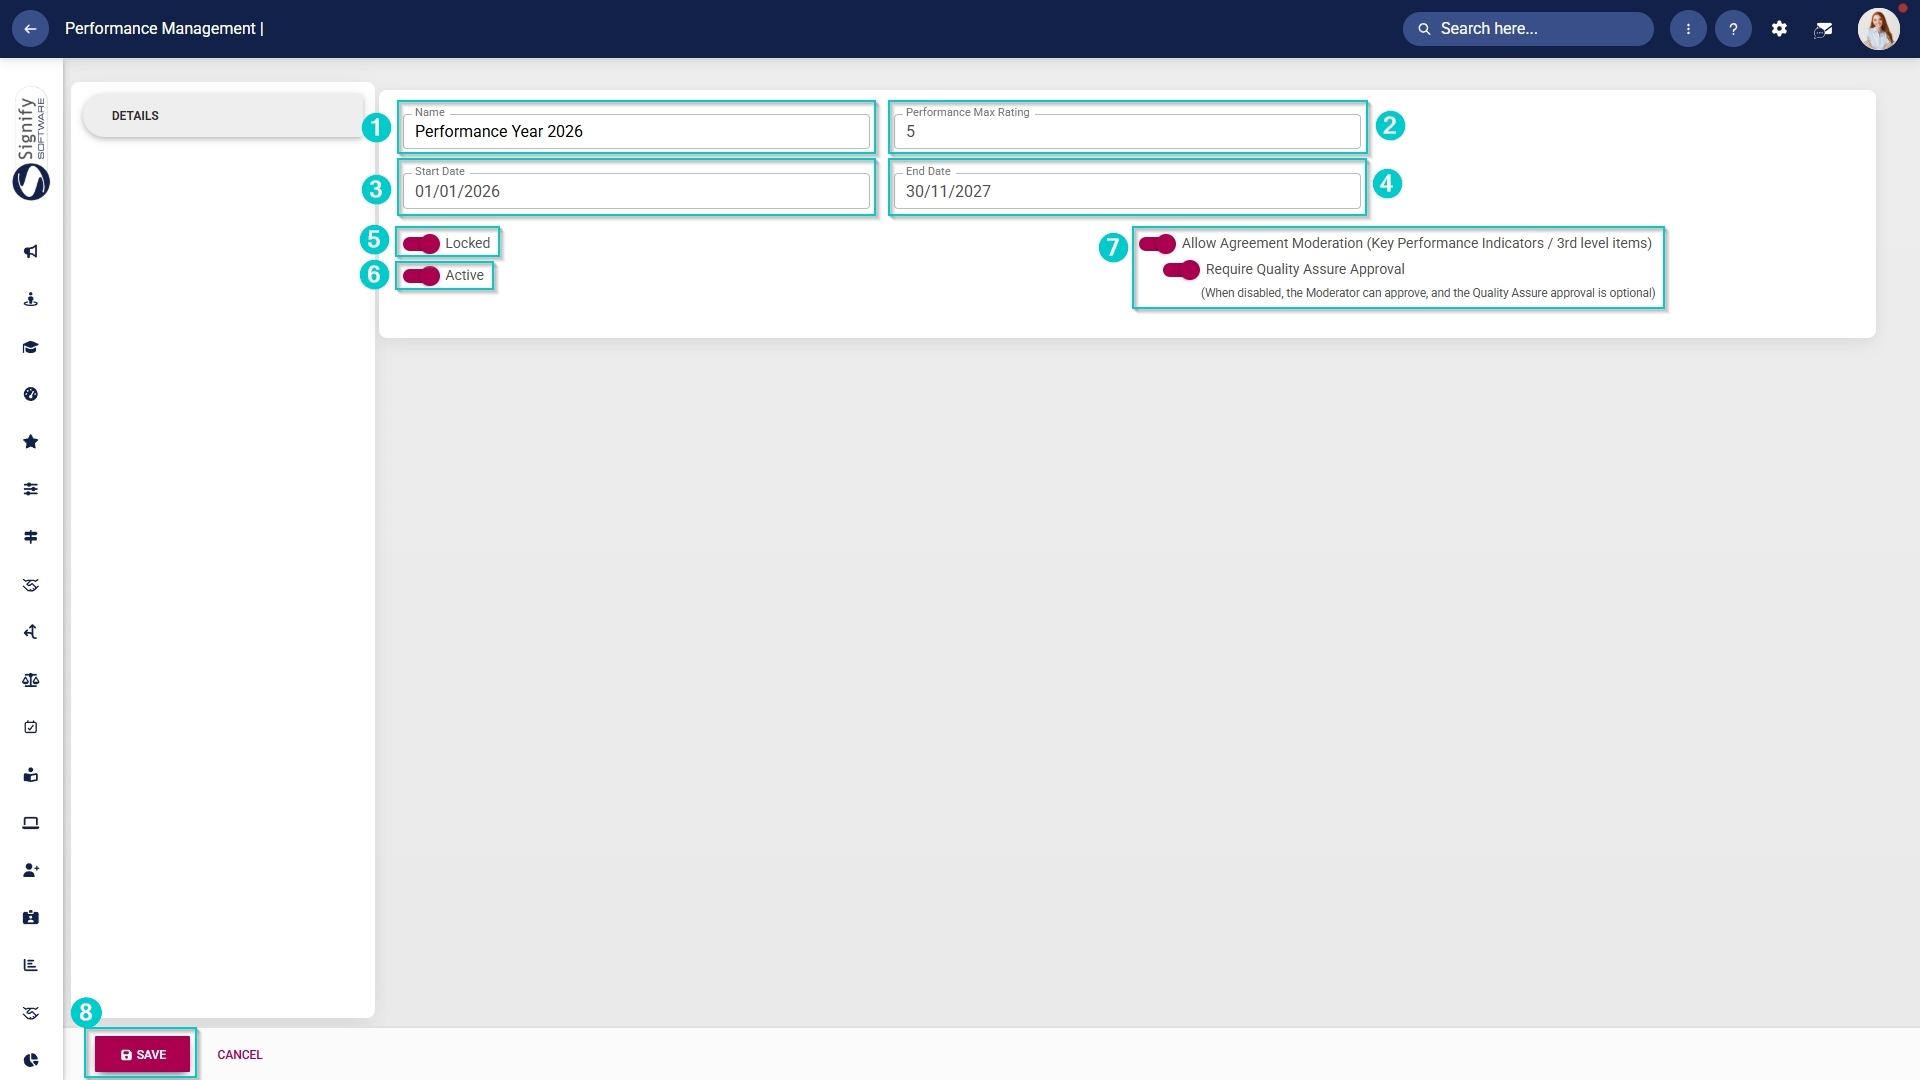
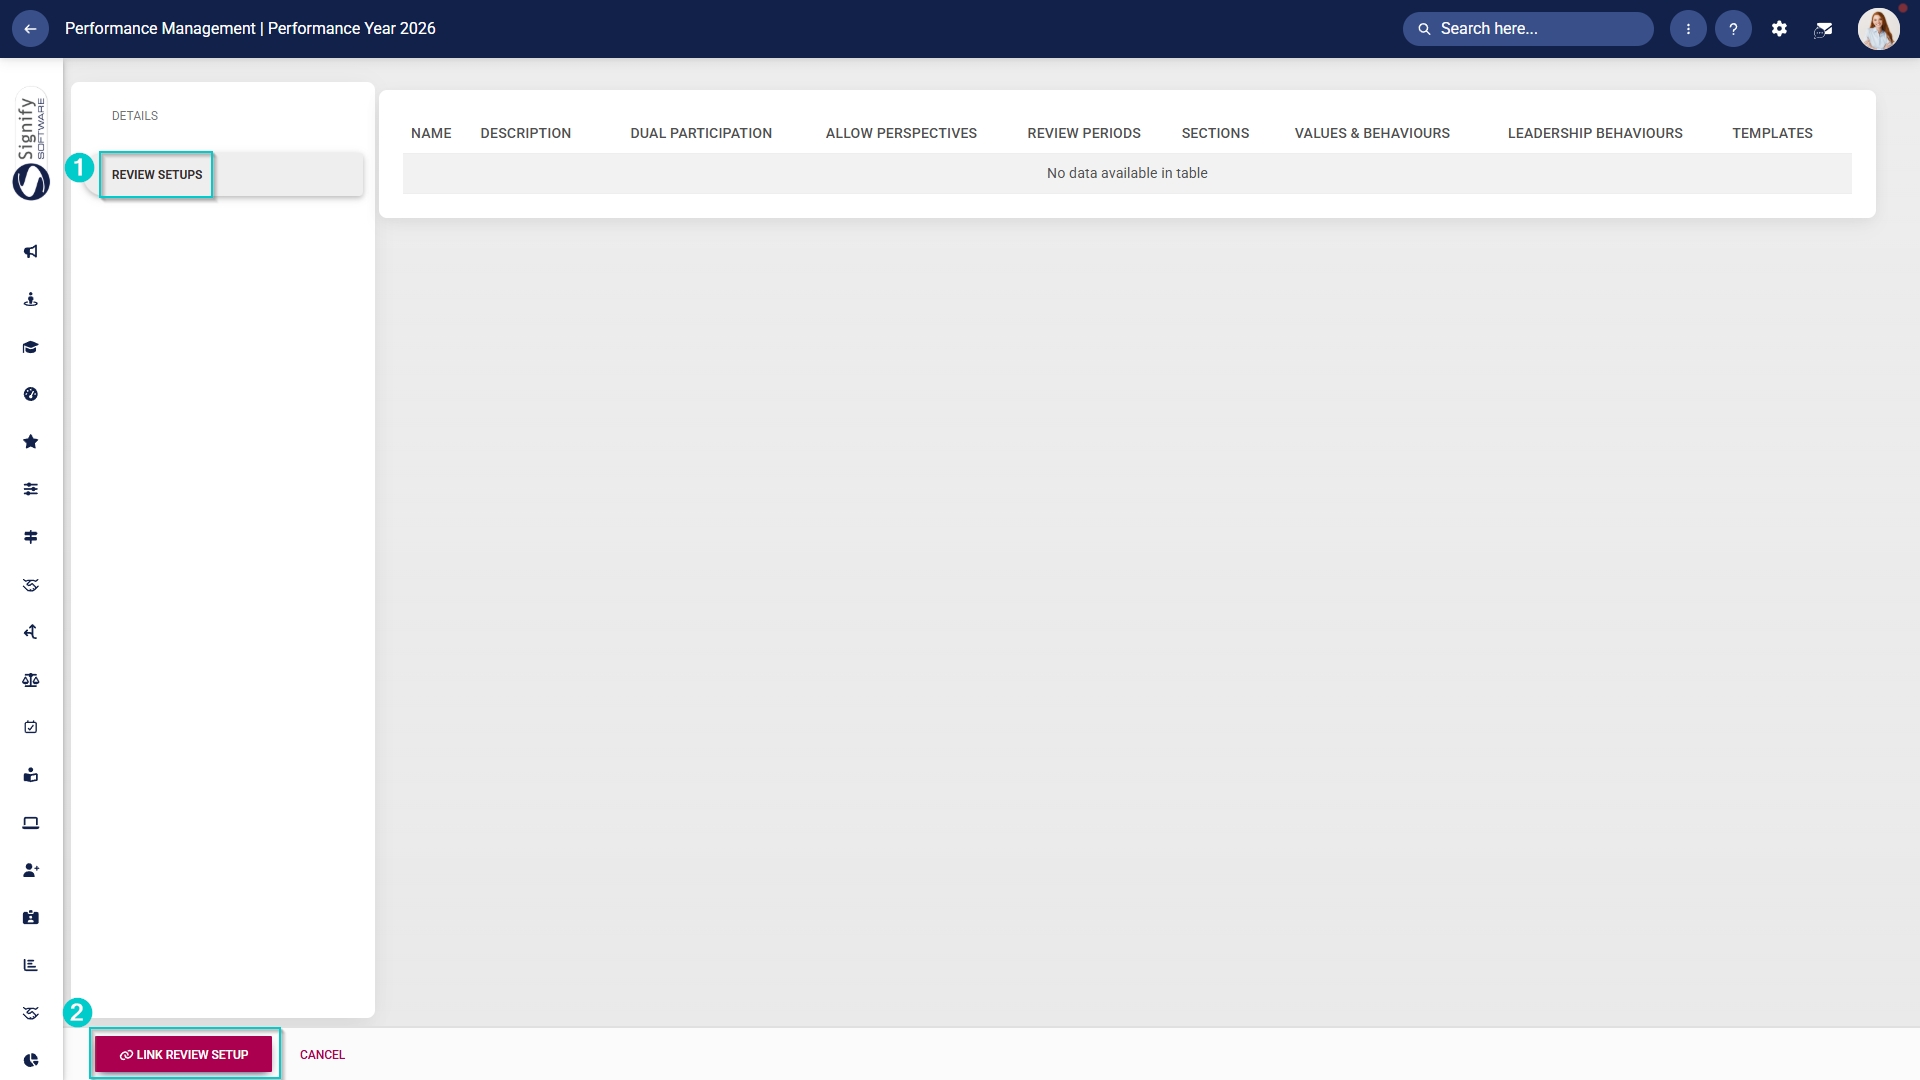
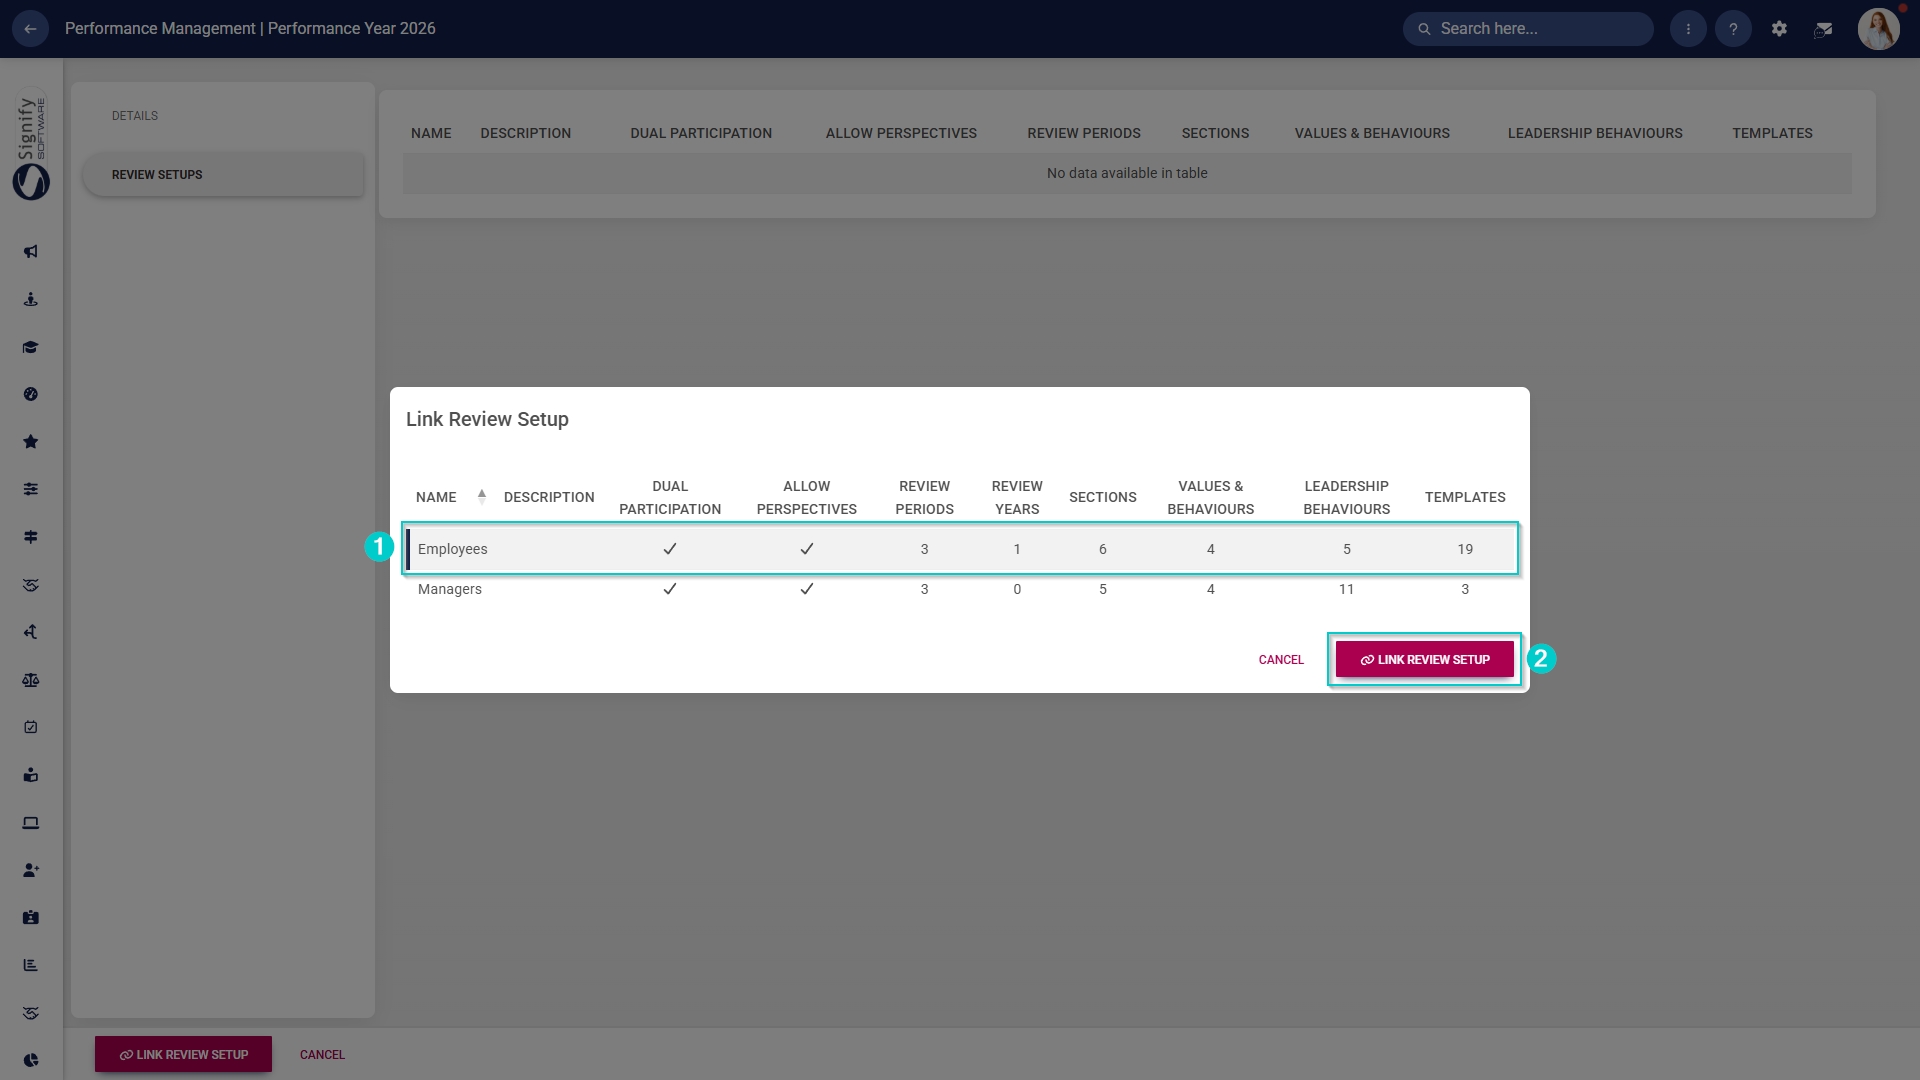
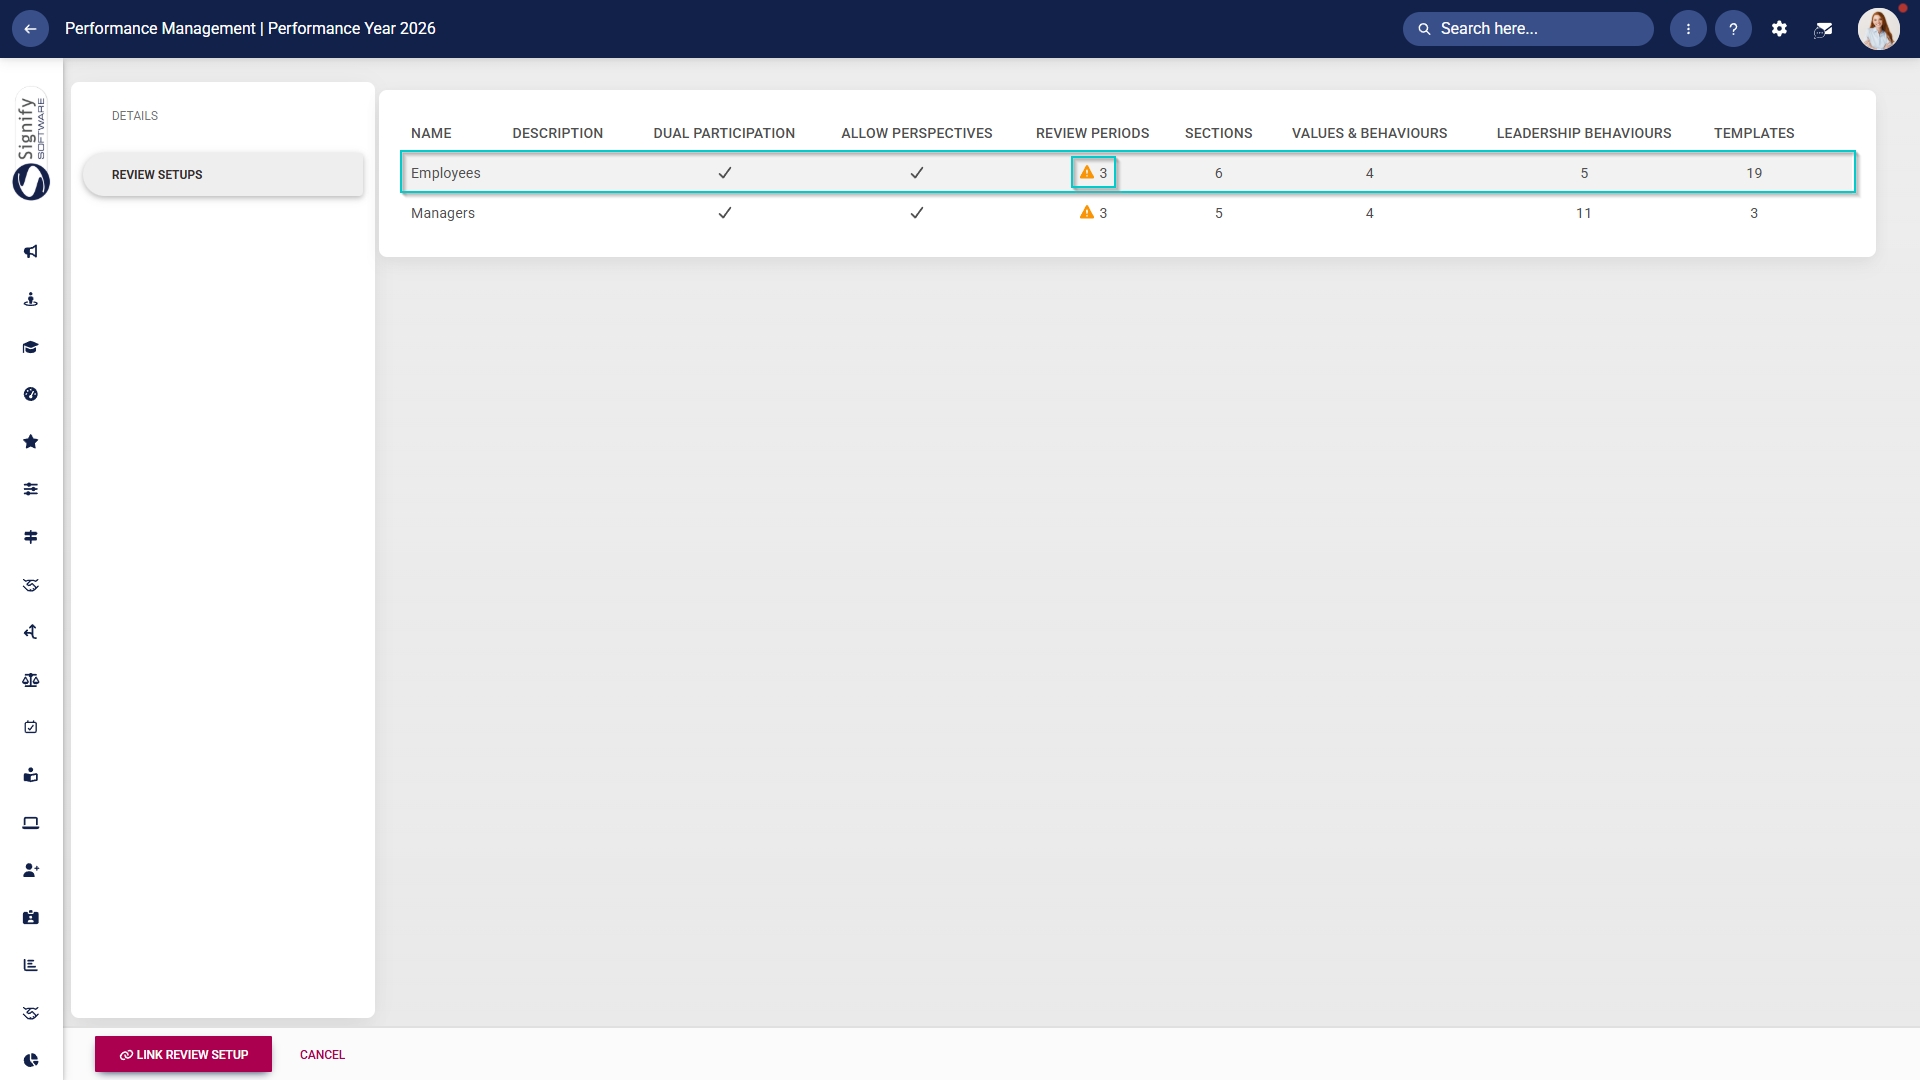
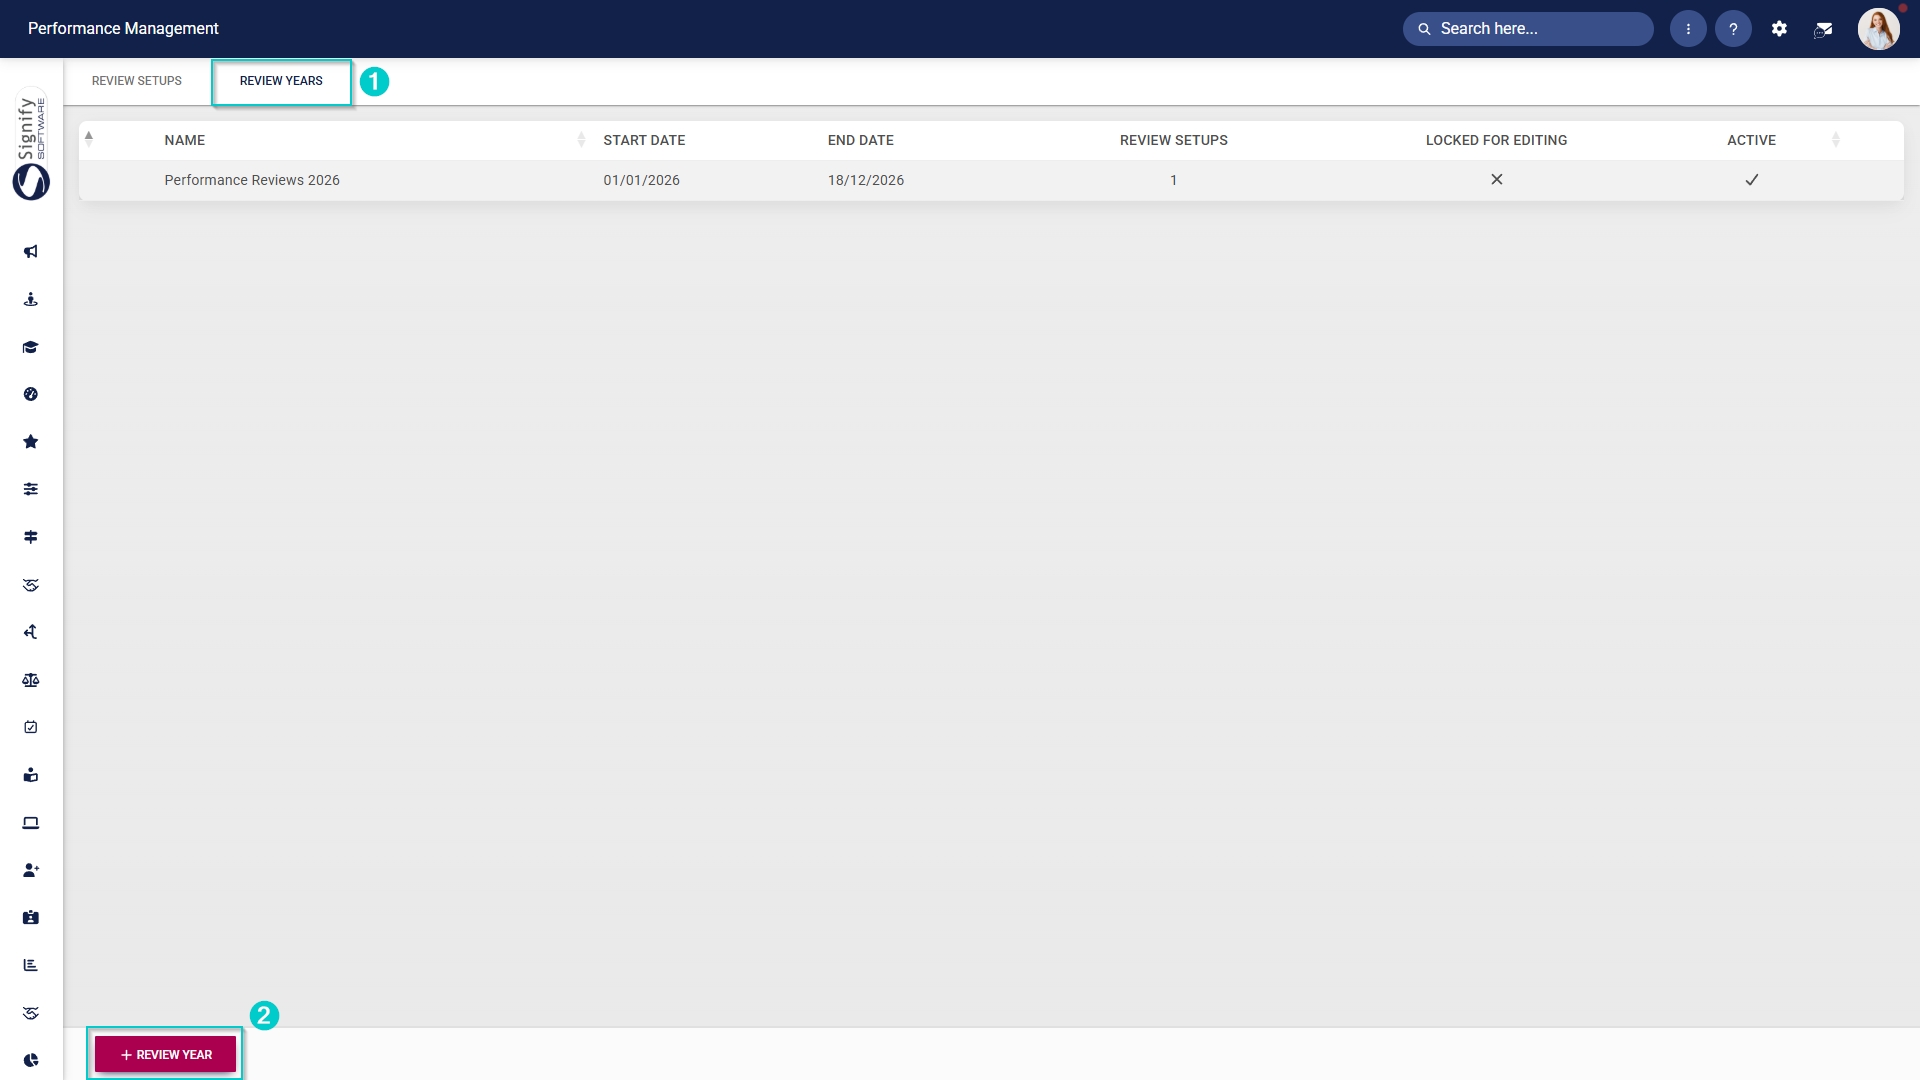
A review year can be created once the review setups have been created. Let us recap how to get to the review years screen.
For moderated agreements, toggle to require quality assurance approval. Click SAVE when you are finished or click CANCEL to discard your edits.