Event Management: Create Master Data
As an example of working with Event Management master data we will populate a few Venues, add an Event Coordinator and also discuss adding Training Interventions. This will be used to demonstrate the importance of correctly registering your master data and also emphasise some of the the functionalities of the master data sections.
Venues
The diagram below shows in a simple way how much information could be captured against a venue. It must be added that Venues is probably the most comprehensive of the master data sections. Besides populating the venues, the additional information that will also be discussed is:
- Room
- Campus
- Venue-related settings in the Event Management Module

Adding a Venue
1. Open the list of venues from the event management master data:
Modules | Event Management | Master Data | Venues | Venue
2. If a venue is to be deleted, tick its delete checkbox and click Delete.
3. To add a new venue, click Add. A blank venue page will open where you can provide the appropriate details.

4. Complete the venue detail page and click Save. After submitting the venue, the previously greyed-out tabs (Room, Communication, Address, Documents and Campus) become active.
5. Save Add New is used to to save the current venue and immediately create a next blank page for another new venue to be added. This is a handy feature when you have to add multiple venues one after the other.
6. After saving a Delete button is displayed so that a venue can be deleted while still on the venue screen.
The information on the venue’s other tabs is optional but can be of great help in preventing event disasters e.g. overbooking a room, booking an event on the wrong campus etc. When an event is set up, the information provided on the other tabs will generate subtle warning messages e.g. when allowing more attendees than a room can accommodate.

Adding A Room
7. Click to open the ROOM tab. On this screen, if it is an existing venue with existing rooms, a list of available rooms is shown. This list looks similar to the list of venues.
- NOTE: Be sure to ALWAYS add a room called TBA (To be announced) for cases when the specific room for the event cannot be determined up front. This room is shown on the screen below.
8. Click Add on the room tab to add a new room to this venue.

9. Provide the room details and click Save to submit.

Venues Not Showing on Event Detail Page?
There are two reasons why a venue that was registered under master data does not show up in the venue library on the event detail page:
- A setting is available in the Event Management module with which to select either of the following two alternatives for venues:
- Allow events to be created by selecting ONLY the venue. (Therefore venues don’t have to have rooms linked to them in order to be selected for an event)
- Force events to be created with a venue AND a room. (Therefore a venue without at least one room linked to it cannot be selected for an event) - The Event Management module is being operated on a campus basis and the venues in the library have not been linked to their respective campuses.
Enable cross-schema booking on rooms (optional)
1. From the System Administration Tools menu, click to open the configuration item: follow the navigation below and click show all.
System Administration | Tools | Configuration | Framework | Human Resources | Event Management
2. In the list of settings search for Enable cross schema booking on rooms and tick the setting value checkbox. Click Update Settings.
On the Room Detail tab you will now see a new setting available that will allow you to publish rooms to other schemas.

3. Tick the checkbox of each schema you want to publish the room to, click Save.

Linking a Room to a Campus
Linking a room to a campus is an optional step and will not be discussed here. It is not a requirement anywhere in the system and will not affect its working or the selections that can be made.
Linking a Venue to a Campus
Linking a venue to one or more campuses is an optional step unless you operate the event module on a campus basis. Refer to the working with campuses section for more information on setting up campuses.
If the event management module was configured to operate on a campus basis, the following should be considered when loading venues:
- Every venue must be linked to a campus to enable the venue to be used for an event.
- A venue can be linked to more than one campus, making the venue available for both.
In order to link a venue to a campus, follow these steps:
1. Open the list of venues from the event management master data:
Modules | Event Management | Master Data | Venues | Venue
2. To open click on the venue that must be linked to a campus. From the venue’s tab strip, click campus to display a list of linked campuses.
3. Click Add to open the campus selection screen.
4. From the list tick the campus that should be linked to this venue and click Select to link it.
If there are no existing campuses to link, click Add then complete and save the campus detail.

Coordinator
As with the list of standard venues, a list of event coordinators can also be loaded. This library of coordinators is then available for use in events.
Adding a new Coordinator
1. Open the list of coordinators from the event management master data:
Modules | Event Management | Master Data | Coordinator
2. Click Add to add a new coordinator to the library by selecting an employee from list of employees.

3. If a coordinator is to be deleted, tick its delete checkbox and click Delete.
Note: If the coordinator is currently linked to a future event, the message in the image below is displayed:
The message warns that the coordinator(s) are still linked to events and, if you want to proceed with the deletion of the coordinator(s), the earliest date on which the coordinator(s)
can be deleted. This date is typically a date just after the last event for a coordinator has been completed.
Make your selection of coordinators to delete or to leave on the list and click Delete to accept the future dates on which the remaining coordinators will be ended in the system.

Training Interventions
The training interventions master data section contains a library of courses that can be used in events. As such the information required seems relatively simple and only one field, the Intervention Name, is mandatory. These are found on the Training Intervention Detail tab.
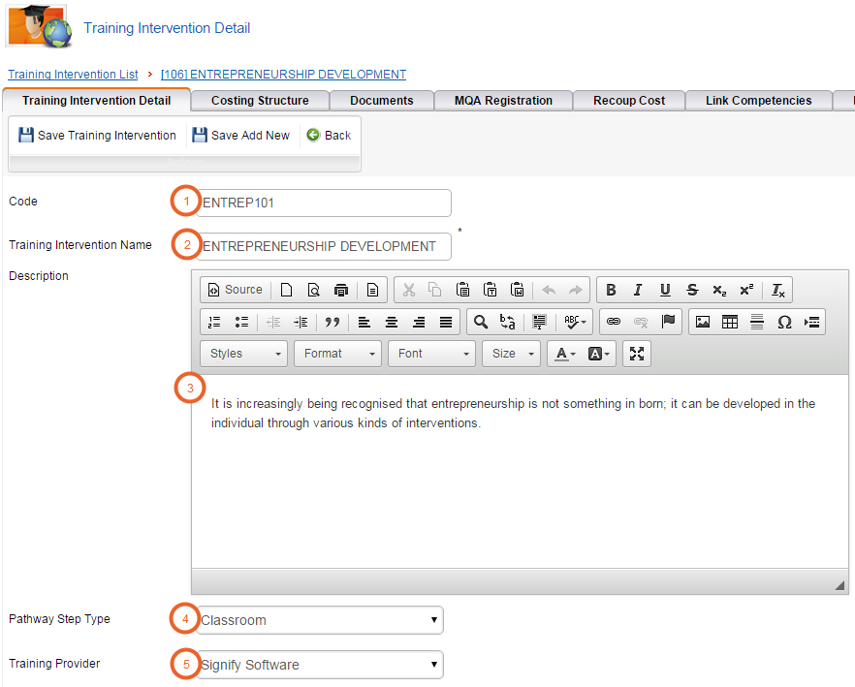
Training Intervention Detail
However, a closer look at the role the screen on the next page and its information plays, reveals many important aspects that determine amongst other things:
- The name under which events etc., based on this intervention, will be saved to an employee’s learner history.
- Whether learner records using this intervention will be able to be used in official reports.
- An important consideration is that every record logged in the Learner Records must have a corresponding record in the training intervention library. An exception to this rule is historical learner records imported into Signify HR from external sources.
Below is a description of the purpose of some the fields as well as some general guidelines.
1. Code
A code a client uses to uniquely distinguish this course. The code is not an auto-generated field.
2. Training Intervention Name (Required)
A name serving as heading for an intervention. Attention should be given to this name since it is:
- The name users would see when booking on an event by this name.
- The name under which a record will be written to an employee’s learner records.
The name under which an assessment is published.
3. Description
Describe the focus and contents of an event. The field allows text formatting.
4. Type
This field determines where (in which module) an intervention is displayed. If an intervention’s type is:
- Classroom, it could only be used in Event Management.
- Assessment, it is visible as an activity when building assessments.
- Etc.
5. Training Provider
The training provider usually responsible for training on this intervention.
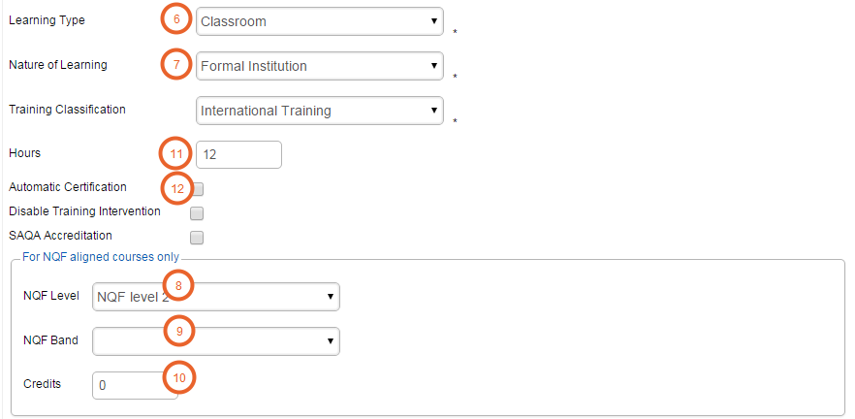
6. Learning Type
An arbitrary categorisation. Potentially affecting the categorisation on reports. Examples of typical learning types are 1 Day Classroom, Awareness Training, Motivation etc.
7. Nature of learning
An arbitrary classification of learning. Examples are Internal, External, Formal etc.
FOR NQF-ALIGNED INTERVENTIONS ONLY
8. NQF Level
Use only if the course is NQF aligned.
9. NQF Band
1 - 4: General and further education and training qualifications sub-framework
5 - 7: College diplomas and technical qualifications
8 - 10: Degree and occupational qualifications
10. Credits
Use only if course is NQF aligned.
11. Hours
Number of hours the average person would need to complete this course.
12. Automatic certification
Can be used to automatically issue a person with a unique certificate number on successful completion of a course. The rules for this are process-specific and must be configured by Signify Software. To activate and use this option, please contact Signify for assistance.
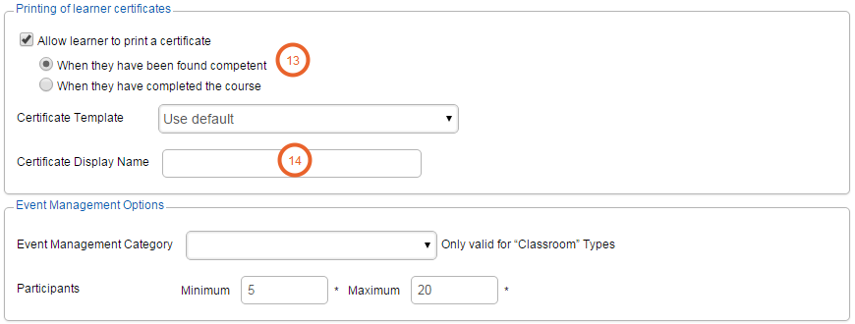
PRINTING OF LEARNER CERTIFICATES
13. Learner can print certificate when competent
If a person was marked competent on a course and this check box is switched on for the particular intervention, the learner record would be available on the Employee Self Service Portal and the employee could then print an official certificate for himself.
14. Certificate Display
If used, will override the intervention’s name with a specific certificate-friendly name.
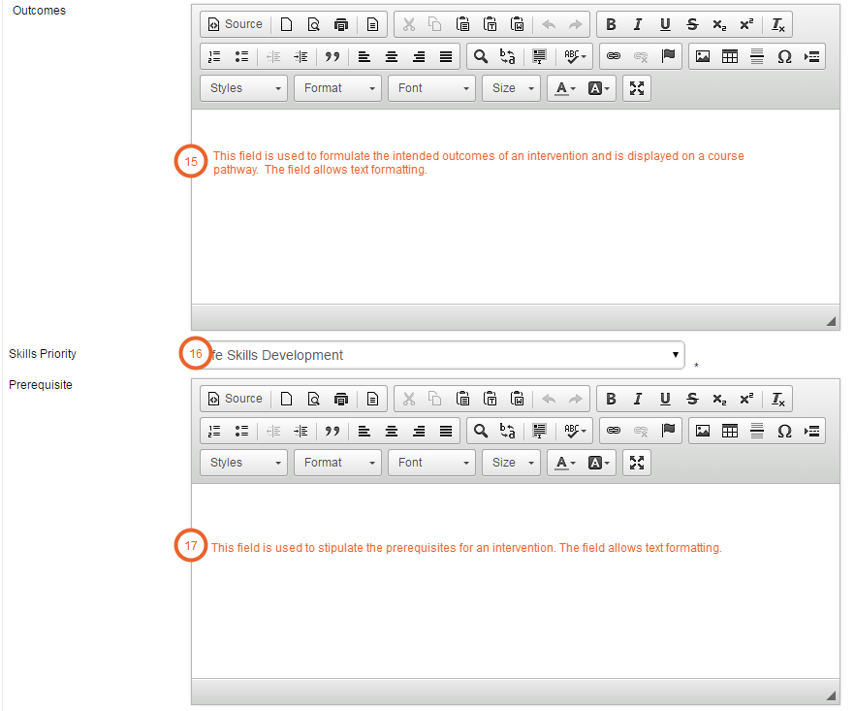
16. Skills Priority
Used in SETA reporting.
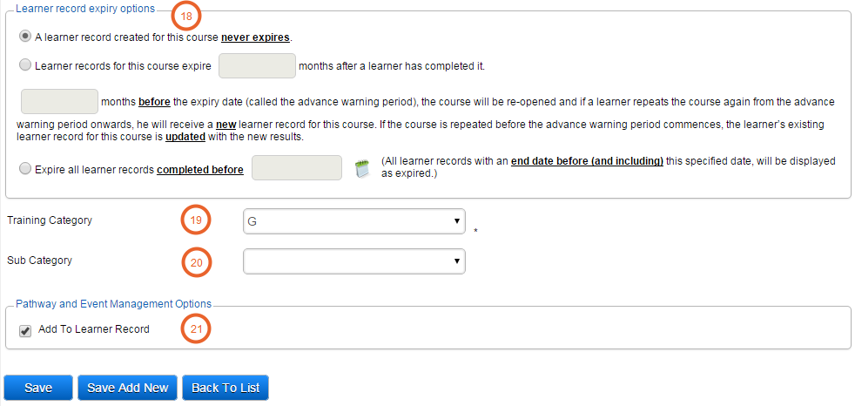
18. Learner record expiry options
Only used for reporting purposes.
19. Training category
A list of the DTI training categories. Find below a short definition for each category.
- A - Formal Qualification.
- B - Formal Qualification with mentorship.
- C - Structured Learning in the workplace with mentorship or coaching e.g. Apprenticeship where practical involvement is required and formally accessed by an accredited body.
- D - Institutional instruction together with structured, supervised experiential learning in the workplace (Learnership).
- E - Structured, supervised experiential learning in the workplace which may include some institutional instruction - such training typically has an assessment linked to it.
- F - Structured information sharing or direct instruction involving workshops, seminars or conferences and short courses with no assessment link to it.
- G - Informal and on the job training.
20. Sub category
For reporting purposes.
21. Log to Learner record
Tick this box if an intervention should cause the Log to Learner Record checkboxes to be ticked by default on step 3 of the Attendance register of an event.
Costing Structure
The Costing Structure tab allows a user to specify the cost elements for an intervention. This structure is then available on employee learner records, on training event attendance registers etc.
Note the following when specifying the cost elements:
1. Click Add to add new cost elements from the cost elements library.
- For every cost element you can specify:
- The proposed amount to be billed per course attendee.
- Whether the amount is Editable for a specific event. (Meaning if changed it would be changed for all attendees on the event as well)
- Whether the amount can be Changed per Attendee. (If this is ticked in addition to Editable, the implication is that the amount for a cost element can be changed not only on an event level but also on an attendee level.
