Technical Manual - Employee Data Import Process
INTRODUCTION
The Signify System is not always the primary source of employee data and information needs to be imported from other sources. This document describes the employee data import process used by Signify Software to import and maintain employee information received from different sources using a number of import methods.
IMPORT PROCESS METHODS
The employee data received from the client, will always be imported into a staging table first and then written into the Signify system. A number of stored procedures are executed once the information is in the staging table, to complete the import process.
All the import methods mentioned below, except the Excel Spreadsheet Template Import, can be scheduled to occur daily (even more than once a day), weekly or monthly as per the client’s requirements.
1. EXCEL SPREADSHEET TEMPLATE IMPORT
- A comma delimited CSV file that can be imported via the existing front-end import system functionality.
- This approach is used to:
- Receive employee data from a client in an Excel spreadsheet.
- Do tests and validations on the correctness of the employee data received.
- Do a once off import of employee data to confirm the data, fields etc.
- Schedule the automatic import.
- The client captures the information in the standard Signify Excel employee import template and sends the information to Signify.
- The import sheet layout has to be exactly the same as defined in the detail layout of the Excel template file described in the “Excel Import Template Layout” section.
2. SIGNIFY IS PROVIDED WITH A VIEW INTO THE CLIENT'S DATABASE
- Client’s IT to populate view or staging table on the client’s database.
- A scheduled automated job will import the data from the client’s database into the Signify staging table.
- The standard import process will be followed.
3. CLIENT PLACES DATA FILE ON A FTP SERVER
- Signify to provide layout format for import data file.
- Signify to create a secure location for FTP files.
- Client initiates a push action and creates a data file on the FTP Server.
- A scheduled automated job will import the data from the client’s FTP data file into the Signify staging table.
- The standard import process will be followed.
4. CLIENT PLACES DATA DIRECTLY INTO THE SIGNIFY DATABASE
- Signify to provide layout format for the Signify staging table.
- Signify to assign secure access to the Signify staging table.
- Client import data directly into the Signify staging table.
- A scheduled automated job will import the data from Signify staging table and the standard import process will be followed.
5. SIGNIFY READS DATA FROM THE CLIENT'S ACTIVE DIRECTORY
· Client to provide Signify with Active Directory login details.
· Signify to verify that they can connect to Active Directory.
· Client to specify what information should be sourced from Active Directory.
· A scheduled automated job will import the data from the client’s Active Directory into the Signify staging table.
· The standard import process will be followed.
6. CLIENT SENDS THE DATA TO THE SIGNIFY API
· Signify provides the client with the API URL and credentials.
· Client sends the data to the API endpoint which will populate the staging table.
· Client to specify what information should be sourced from Active Directory.
· A scheduled automated job will import the data from Signify staging table and the standard import process will be followed.
TYPICAL IMPORT PROCESS DIAGRAM
The process below is a diagrammatical representation of typical processes which can be followed to import client data.

IMPORT FILE LAYOUT
The employee data import template layout is described below.

| Field Name | Mandatory / Recommended | Default Value if Not Provided | Format | Max No Characters | Comments / Validations |
| EmployeeNumber | Mandatory | Alphanumeric | 50 | No spaces in front of the number. This number will be used to create the employee’s username for logging into the system. Number must be unique per employee. Can be omitted if setting is active within Signify HR to automatically generate employee numbers. |
|
| Surname | Mandatory | Alphanumeric | 500 | ||
| FullName | Mandatory | Alphanumeric | 500 | ||
| MaidenName | Alphanumeric | 500 | |||
| KnownAs | = FullName | Alphanumeric | 500 | This field will be displayed on most reports and screens. | |
| Initials | Alphanumeric | 20 | |||
| ID | Recommended | Alphanumeric | 50 | Populate with either a national ID number, an employee number or ensure a passport number is provided in the passport field | |
| TelNoW | Alphanumeric (+## ## ### #### ) | 200 | Numbers not in the specified format will be imported as a whole and not split into code etc. (+27-12-345678 format only) |
||
| TelNoH | Alphanumeric (+## ## ### #### ) | 200 | |||
| CellNo | Alphanumeric (+## ## ### #### ) | 200 | |||
| Recommended | Alphanumeric | 200 | |||
| EmpTitle | Alphanumeric | 500 | All values used here will be made part of the master data tables. Therefore ensure these values are correct if completed. | ||
| Location | Alphanumeric | 500 | |||
| OrgLevel1 | Recommended | COM | Alphanumeric | 100 | This is the highest level in the company. The Org Code must be unique across all org levels. |
| OrgLevel1_Description | Mandatory | Company | Alphanumeric | 500 | This is the highest level in the company, usually the group/company's name. |
| OrgLevel1_Region | Alphanumeric | 4000 | Values inserted in this field will also be populated in the Master Data for the Address Region. | ||
| OrgLevel1_Province | Alphanumeric | 500 | Values inserted in this field will also be populated in the Master Data for the Business Address Province. | ||
| OrgLevel2 | Alphanumeric | 100 | Only org level 1 is mandatory. Levels 2 to 9 are optional and are to be used only if needed. For each level (1-9) in the organisation structure: An arbitrary (unique) code as well as name/description for the node of the position within which the employee is appointed. If no code is provided, a code is automatically generated by the employee import process. If the combination of levels do not comply to the organisation structure rules (e.g. Level 2 can exist within Level 1, Level 4 can exist within Level 3 or Level 2, etc), the record will be rejected. The same Organisation Node Code cannot be used in multiple Organisation levels or locations - i.e. the organisation node code per node must be unique within the file |
||
| OrgLevel2_Description | Alphanumeric | 500 | |||
| OrgLevel2_Region | Alphanumeric | 4000 | |||
| OrgLevel2_Province | Alphanumeric | 500 | |||
| OrgLevel3 | Alphanumeric | 100 | |||
| OrgLevel3_Description | Alphanumeric | 500 | |||
| OrgLevel3_Region | Alphanumeric | 4000 | |||
| OrgLevel3_Province | Alphanumeric | 500 | |||
| OrgLevel4 | Alphanumeric | 100 | |||
| OrgLevel4_Description | Alphanumeric | 500 | |||
| OrgLevel4_Region | Alphanumeric | 4000 | |||
| OrgLevel4_Province | Alphanumeric | 500 | |||
| OrgLevel5 | Alphanumeric | 100 | |||
| OrgLevel5_Description | Alphanumeric | 500 | |||
| OrgLevel5_Region | Alphanumeric | 4000 | |||
| OrgLevel5_Province | Alphanumeric | 500 | |||
| OrgLevel6 | Alphanumeric | 100 | |||
| OrgLevel6_Description | Alphanumeric | 500 | |||
| OrgLevel6_Region | Alphanumeric | 4000 | |||
| OrgLevel6_Province | Alphanumeric | 500 | |||
| OrgLevel7 | Alphanumeric | 100 | |||
| OrgLevel7_Description | Alphanumeric | 500 | |||
| OrgLevel7_Region | Alphanumeric | 4000 | |||
| OrgLevel7_Province | Alphanumeric | 500 | |||
| OrgLevel8 | Alphanumeric | 100 | |||
| OrgLevel8_Description | Alphanumeric | 500 | |||
| OrgLevel8_Region | Alphanumeric | 4000 | |||
| OrgLevel8_Province | Alphanumeric | 500 | |||
| OrgLevel9 | Alphanumeric | 100 | |||
| OrgLevel9_Description | Alphanumeric | 500 | |||
| OrgLevel9_Region | Alphanumeric | 4000 | |||
| OrgLevel9_Province | Alphanumeric | 500 | |||
| Birthday | Recommended | 1900/01/01 | YYYY/MM/DD | 500 | |
| Race | Alphanumeric | 500 | |||
| EthnicGroup | Alphanumeric | 500 | |||
| Gender | Alphanumeric | 500 | |||
| JobCode | Recommended | = MAX(All numeric Job Codes) + 1 | Alphanumeric | 255 | An arbitrary code used to uniquely identify a job e.g. ENG001. If not provided in the file and a job exists in the system for the JobTitle, the existing JobCode will be used. |
| JobTitle | Mandatory | Learner | Alphanumeric | 255 | If the JobCode exists in the system and the current Title differs from the Title in the import, the Title in the system is updated to the value in the import. |
| PositionCode | Recommended | = JobCode + . + [ MAX(All numeric Position Codes for JobCode) + 1 ] | Alphanumeric | 255 | An arbitrary code used to uniquely identify a position linked to a job e.g. ENG001.1. If not provided in the file and and a position exists in the system for the PositionTitle, the existing PositionCode will be used. |
| PositionTitle | Recommended | Learner | Alphanumeric | 255 | If the PositionCode exists in the system and the current Title differs from the Title in the import, the Title in the system is updated to the value in the import. |
| OccupationalCategory_ShortCode | Alphanumeric | 10 | |||
| OccupationalCategory_Description | Alphanumeric | 255 | |||
| OccupationalLevel_ShortCode | Alphanumeric | 10 | |||
| OccupationalLevel_Description | Alphanumeric | 255 | Choose only from the following: · Specialist or Middle manager; · Technical worker or Junior management; · Semi-skilled / discretionary decider; · Unskilled / defined decider |
||
| InternalGrading | Alphanumeric | 255 | These values MUST be unique per Job. | ||
| OFOCode | Alphanumeric | 50 | |||
| MovementReason | Alphanumeric | 100 | |||
| EmploymentType_Code | Recommended | Permanent | Alphanumeric | 50 | Double-check these values. Inconsistencies/differences between values which should be the same will cause them to be treated as separate values. |
| EmploymentType_Description | Mandatory | Permanent | Alphanumeric | 500 | Double-check these values. Inconsistencies/differences between values which should be the same will cause them to be treated as separate values |
| LineManagerEmployeeNumber | Recommended | Alphanumeric | 100 | The employee number of the line manager to whom the employee reports. Mainly used for HR Event Management, not critical in LMS. The line manager automatically acts in the place of all other managers unless the others are populated. Note that for every employee who is used as a line manager, there has to be a separate employee record in the import sheet or the line manager should already exist as an employee in the system. |
|
| LineManagerName | Recommended | Alphanumeric | 500 | ||
| PerformanceManagerEmployeeNumber | = LineManagerEmployeeNumber | Alphanumeric | 100 | The employee number of the manager to whom the employee reports for performance management purposes. | |
| PerformanceManagerName | Alphanumeric | 500 | |||
| DepartmentManagerEmployeeNumber | Alphanumeric | 100 | |||
| DepartmentManagerName | Alphanumeric | 500 | |||
| TrainingManagerEmployeeNumber | = LineManagerEmployeeNumber | Alphanumeric | 100 | The employee number of the manager to whom the employee reports for training approval purposes. | |
| TrainingManagerName | Alphanumeric | 500 | |||
| PDPFirstApproverEmployeeNumber | Alphanumeric | 100 | |||
| PDPFirstApproverName | Alphanumeric | 500 | |||
| PDPSecondApproverEmployeeNumber | Alphanumeric | 100 | |||
| PDPSecondApproverName | Alphanumeric | 500 | |||
| LeaveManagerEmployeeNumber | = LineManagerEmployeeNumber | Alphanumeric | 100 | The employee number of the manager to whom the employee reports for leave approval purposes. | |
| LeaveManagerName | Alphanumeric | 500 | |||
| SalaryReviewManagerEmployeeNumber | = LineManagerEmployeeNumber | Alphanumeric | 100 | ||
| SalaryReviewManagerName | Alphanumeric | 500 | |||
| StartDateInCompany | Recommended | (1) Start Date In Group (2) Start Date In Position (3) Start Date In System (4) GETDATE() (see comments) |
YYYY/MM/DD | 10 | The employee’s start date in his current company if the client has a multi-company system configuration. If this date is not provided in the import and a position for this employee in the Job/Position and Schema exists in the system, the date from the existing position is used. StartDateInGroup = StartDateInCompany = StartDateInPosition |
| StartDateInGroup | Recommended | (1) Start Date In Company (2) Start Date In Position (3) Start Date In System (4) GETDATE() (see comments) |
YYYY/MM/DD | 10 | The employee’s initial start date in the group as a whole if the client has a multi-company system configuration. If this date is not provided in the import and a position for this employee in the Job/Position and Schema exists in the system, the date from the existing position is used. StartDateInGroup = StartDateInCompany = StartDateInPosition |
| StartDateInPosition | Recommended | (1) Start Date In Group (2) Start Date In Company (3) Start Date In System (4) GETDATE() (see comments) |
YYYY/MM/DD | 10 | The position the employee currently holds. If this date is not provided in the import and a position for this employee in the Job/Position and Schema exists in the system, the date from the existing position is used. StartDateInCompany = StartDateInPosition = TerminationDate |
| TerminationDate | Recommended | 9999/12/31 | YYYY/MM/DD | 10 | If Signify is expected to import previous/terminated employees then this field should be provided StartDateInPosition = TerminationDate |
| ReasonForTermination | Resignation (if TerminationDate != 9999/12/31) | Alphanumeric | 500 | Should only be provided if TerminationDate is present and not 9999/12/31 | |
| Nationality | Alphanumeric | 500 | |||
| HomeLanguage | Alphanumeric | 500 | |||
| Home_Country | Alphanumeric | 500 | |||
| Home_Region | Alphanumeric | 500 | |||
| Home_CityTownVillage | Alphanumeric | 500 | |||
| Home_PostalCode | Alphanumeric | 10 | |||
| Home_UnitNumber | Alphanumeric | 50 | |||
| Home_Complex | Alphanumeric | 500 | |||
| Home_StreetNo | Alphanumeric | 50 | |||
| Home_Street | Alphanumeric | 500 | |||
| Home_Address1 | Alphanumeric | 500 | |||
| Home_Address2 | Alphanumeric | 500 | |||
| Home_Address3 | Alphanumeric | 500 | |||
| HomePostal_Address1 | Alphanumeric | 500 | |||
| HomePostal_Address2 | Alphanumeric | 500 | |||
| HomePostal_Address3 | Alphanumeric | 500 | |||
| HomePostal_Country | Alphanumeric | 500 | |||
| HomePostal_Region | Alphanumeric | 500 | |||
| HomePostal_CityTownVillage | Alphanumeric | 500 | |||
| HomePostal_PostalCode | Alphanumeric | 10 | |||
| Business_FloorNumber | Alphanumeric | 50 | |||
| Business_Address1 | Alphanumeric | 500 | |||
| Business_Address2 | Alphanumeric | 500 | |||
| Business_Address3 | Alphanumeric | 500 | |||
| Business_Country | Alphanumeric | 500 | |||
| Business_Region | Alphanumeric | 500 | |||
| Business_CityTownVillage | Alphanumeric | 500 | |||
| Business_PostalCode | Alphanumeric | 10 | |||
| PassportNumber | Alphanumeric | 50 | |||
| MaritalStatus | Alphanumeric | 500 | |||
| Citizenship | Alphanumeric | 500 | |||
| Disability | Alphanumeric | 500 | More than one disability can be added per employee. Use the semicolon to add more than one disability. | ||
| Customfield1 | Alphanumeric | 2000 | Custom Fields are only imported if enabled per customer | ||
| Customfield2 | Alphanumeric | 2000 | |||
| Customfield3 | Alphanumeric | 2000 | |||
| Customfield4 | Alphanumeric | 2000 | |||
| Customfield5 | Alphanumeric | 2000 | |||
| Customfield6 | Alphanumeric | 2000 | |||
| Customfield7 | Alphanumeric | 2000 | |||
| Customfield8 | Alphanumeric | 2000 | |||
| Customfield9 | Alphanumeric | 2000 | |||
| Customfield10 | Alphanumeric | 2000 | |||
| Customfield11 | Alphanumeric | 2000 | |||
| Customfield12 | Alphanumeric | 2000 | |||
| Customfield13 | Alphanumeric | 2000 | |||
| Customfield14 | Alphanumeric | 2000 | |||
| Customfield15 | Alphanumeric | 2000 | |||
| Customfield16 | Alphanumeric | 2000 | |||
| Customfield17 | Alphanumeric | 2000 | |||
| Customfield18 | Alphanumeric | 2000 | |||
| Customfield19 | Alphanumeric | 2000 | |||
| Customfield20 | Alphanumeric | 2000 | |||
| PasswordIfNewEmployee | Recommended | = Auto generated | Alphanumeric | 75 | System will never update password for existing employees. System will only assign password for new employees. System will force password change at first logon |
| SchemaID | Mandatory | 1 | Numeric | 4 | Only required if more than one schema exists |
IMPORT PROCESS STAGES
The import process kicks off by executing a validation process to determine if the information in the staging table is acceptable. If a specific record fails the validation process, this record will not be imported by the actual import. All the records that passed the validation will be imported.
The import process stages are as follows:
1. PRE-IMPORT
When the Excel Spreadsheet Template Import method is used, the import sheet layout has to be exactly the same as defined in the “Excel Import Template Layout” section. The entire import file can be rejected because:
- The number of columns are not correct.
- The column names are not correctly defined.
- The fields contain commas, carriage returns or other special characters.
Before any changes are made, the process makes a backup of the import process file content which will be processed.
The following data validations are done before a record is inserted or updated in the Signify System to ensure that data integrity is maintained:
- Date validations:
- All the dates are in the correct format (YYYY/MM/DD).
- Start date in company is after start date in group.
- Start Date in Position is after start date in group and after start date in company.
- Termination date is after Start Date in position.
- Termination date is after Start Date in company.
- Termination date is after Start Date in group.
- Employee Data:
- Employee’s employee number is populated.
- Employee’s first name is populated.
- Employee’s surname is populated.
- Employee number is not duplicated in the import.
- Job codes and positions:
- A job title is provided for each employee.
- Multiple employees are not appointed in the same position at the same time.
- The same job title does not exist for different job codes.
- Employment:
- All employees have an employment type description.
- All employees have at least one organisation level.
- Schema ID is populated for each employee.
2. ACTUAL IMPORT
The information is imported in the following order once the validation has been completed.
- Master data:
- Address related master data (e.g. Countries)
- Employment Types
- Titles
- Ethnic Groups
- Genders
- Races
- Marital Status
- Nationality
- Occupational Categories (OFO-related)
- Occupational Levels (OFO-related)
- OFO Codes
- Languages
- Org Structure Master Data (Codes & Names):
- Validation performed:
- Ensure that the Org Structure nodes for each record conform to all rules for the Org Structure as configured for the Schema (e.g. Level 3 node can be child of Level 1 or Level 2, Level 2 node can be child of Level 1, etc.)
- Some clients prefer to manually maintain their organisation structures. In such a case Signify will only appoint employees in an org structure nodes that already exists.
- Job Profiler Master Data:
- Job Codes & Titles
- Position Codes & Titles
- Link Positions to the correct nodes in the Org Structure.
- Import of Basic Employee Details per employee (New or update existing)
- Import of Reporting Line Details per employee
- Import of Appointment Related Data in the following order:
- Terminations
- I.e. an employee’s current position is terminated
- Transfers
- I.e. an employee transfer from one position to another is identified
- Corrections
- I.e. the basic employee or appointment data must be corrected
- New Appointments
- I.e. the employee and position is entirely new
- Terminations
- Further actions performed after employee import process has been completed:
- Create User Account if new employee and link to employee account (using an SP)
- Disable user accounts for terminated employees
- Update flat Org Structure for all Org Nodes (using an SP)
- Subgroups are created for managers and org structure levels.
- Further Customer Specific Actions:
- Import of Custom Field Details per employee only if enabled per customer.
- Create/update all Employee Subgroups as needed
- Update Subsidiary Codes, etc.
Any records failing validation are excluded from the import and a validation log entry is created for these records to populate exception reports from the import process.
Excel Spreadsheet Template Import method
1. PREPARING THE DATA
The following steps assume you have already populated and verified the data in the Signify Software Employee Data Import spreadsheet. For a full discussion on populating the spreadsheet, please see the addendum later in this document.
2. IMPORTING THE DATA
After you have successfully populated the Employee Data Import spreadsheet, you can start with the import by following these steps.
1. Save the Excel spreadsheet as a Comma Delimited (CSV) file.

2. Open the Signify system, logging in as an Administrator.

3. Select System Administration from the Administration Menu

4. Highlight and open Import Data under System Administration | Import Data

5. Search for the relevant import template and click on the link in the Action column. Select the Import File link:

6. Once the Import File option is chosen, the below screen will be displayed:
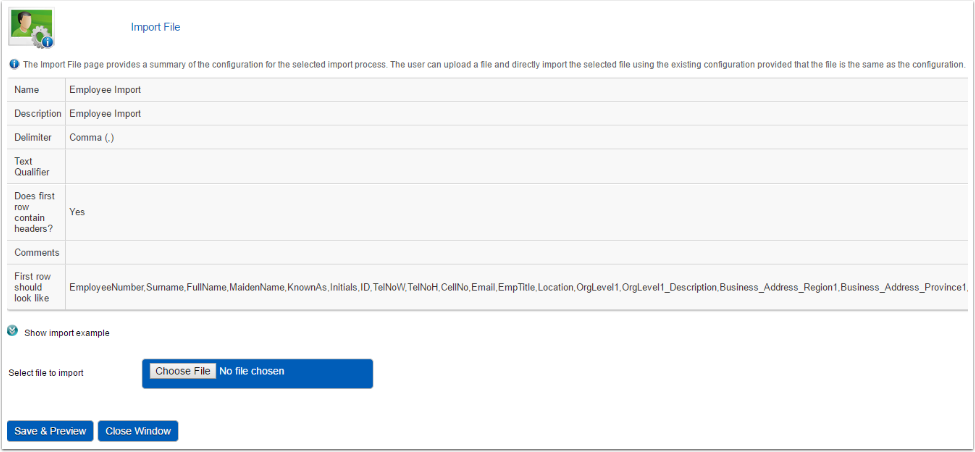
When using a preconfigured import template, most of the import steps would be configured correctly.
- Click Choose File and then navigate to your newly saved CSV file.

- Click Save & Preview.

- Tick “I verify that the preview of the below data is correct”.
- Click Execute Mock Import to preview the imported information.

- View the Mock Import results.
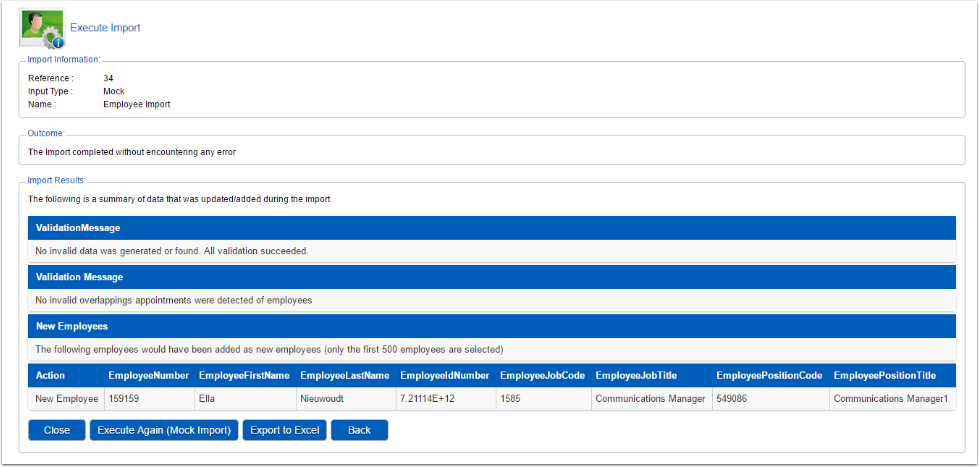
- If the mock import results are correct, click on Execute Import.
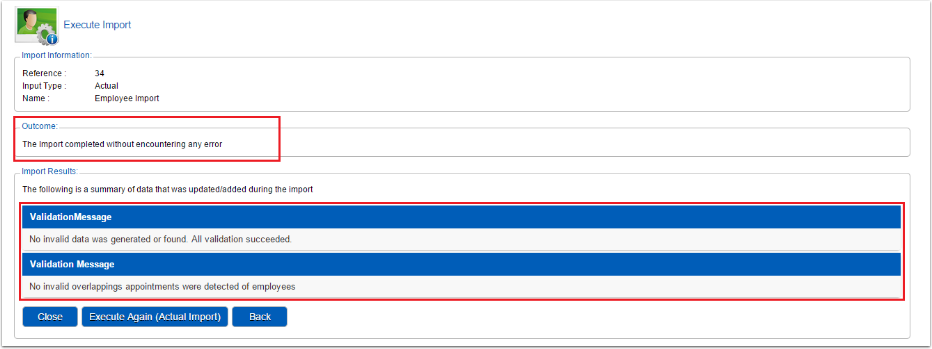
- Once you are satisfied with the results, click on Close.
4. HOW TO DOWNLOAD A SAMPLE FILE
- A sample file will provide the exact data sets required for the import process to go through smoothly.
- On the Home page select System Administration:

- At the top menu on the System Administration tab, select the Import Data from the drop-down list.
- Click on the link in the Action column and then select the Download sample file link.

- Once the file has finished download the file can be opened and saved.
NOTE: the downloaded file will always be in CSV format.
5. EXCEPTION MANAGEMENT
An audit trail is kept for all records imported, updated and rejected and is available via the Signify report module. The audit records are only available for a few months after the import and are then automatically deleted.
The following are examples of exceptions messages that should be resolved before a record can be successfully imported and saved:
- Incorrect date format(s)
- StartDateInGroup ({0}) cannot be AFTER StartDateInCompany ({1})
- StartDateInCompany ({0}) cannot be AFTER StartDateInPosition ({1})
- StartDateInPosition ({0}) cannot be AFTER TerminationDate ({1})
- Employee number duplicates in the import file.
- There are different Job Titles using the same Job Code
- Position is not unique, another employee in the import has the same position code
- Appointment record overlaps another appointment record for employee OR another employee is appointed in the same position overlapping the time period specified. Start and End Date in a position is determined by Start Date In Position and Termination Date respectively.
- LineManagerEmployeeNumber - 4779 - does not exist in the system or in the import file
- PDPFirstApproverEmployeeNumber - 4779 - does not exist in the system or in the import file
- DepartmentManagerEmployeeNumber - CM01586 - does not exist in the system or in the import file
- PerformanceManagerEmployeeNumber - CM01586 - does not exist in the system or in the import file
- TrainingManagerEmployeeNumber - CM03397 - does not exist in the system or in the import file
- LeaveManagerEmployeeNumber - 9442 - does not exist in the system or in the import file
- Appointment overlaps existing appointment for employee
- Employee cannot be transferred to another schema with the same start date in position
- An unexpected scenario or anomaly has occurred. Please review the appointment information for further information
Below find the exception reports available for the import process.
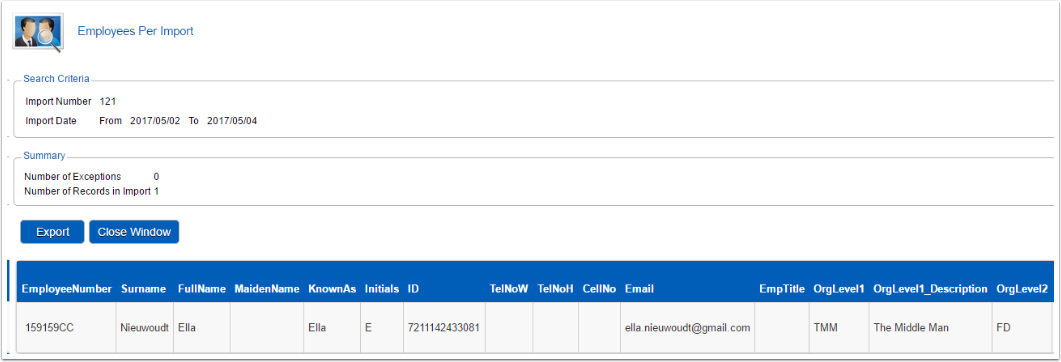
6. EMPLOYEE IMPORT SUMMARY AND DRILLDOWN REPORT
This is a drilldown report whereby the user can drill down on the number of ‘Exceptions’ (rejections) and the total number of ‘Records in Import’ per day.

The user can click on the hyperlinks in the summary report to see the detail information per employee.
7. EMPLOYEE IMPORT VALIDATION LOG E-MAIL
Currently the employee import process running at one of the Signify customers automatically sends an email to one of their employees containing the results of the import process, after the import process has completed. This enables them to respond to any errors in the import file to correct the information when imported again. See below an example of such import file.

FREQUENTLY ASKED QUESTIONS
1. When does the Signify process, which picks up data from the client’s staging table, run?
The process can be scheduled according to the client’s needs and specifications e.g. every morning at 5:00 AM.
2. How is this process initiated, is it a batch process or manual run?
A SQL job initiates the scheduled task.
3. What does the process do exactly e.g. populate tables, perform any data validations?
· Clear the Signify import table.
· Copy all data from the client’s staging table to the Signify staging table.
· Data validations are done before a record is inserted or updated in the Signify System to ensure that data integrity is maintained.
· An audit trail is kept for all records imported, updated and rejected and is available via the Signify report module, since the amount of data generated, the audit is only available for a few months after the import date.
4. What if there is no data in the client’s staging table, does it notify anyone that the process was unsuccessful or is no action taken?
Nobody will be notified that the client’s staging table contains no data. The SQL job will start as normal, but no data will result in no changes in the Signify system.
5. If there are no changes found when comparing to the existing data within Signify to the new imported client data, what action is taken?
No update is done in the Signify system.
6. If there are updates for existing records, does it delete the old record and insert a new record, or merely update the existing record with the new values?
Depending on the type of change, personnel information only updates the existing record, while a position change creates a new record.
7. For new data, is it as simple as inserting the new record/s?
Yes, a new record is created for each new employee.