Working with a Learnership Pipeline
A Learnership Pipeline is a predefined group of learners to be scheduled and trained as a group on a Learnership for a specific pipeline period.
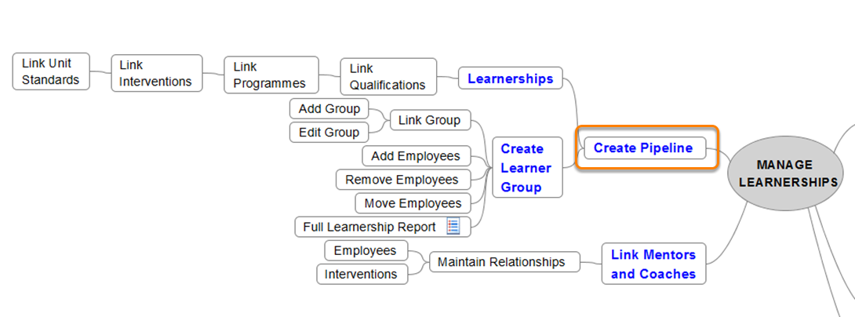
Learnership Pipeline Mind Map
How to Work with a Learnership Pipeline

HOW DID I GET HERE?
System Administration | Modules | eLearning | Learning Management | Learnership | Learner Groups
Learnership Pipeline List Screen
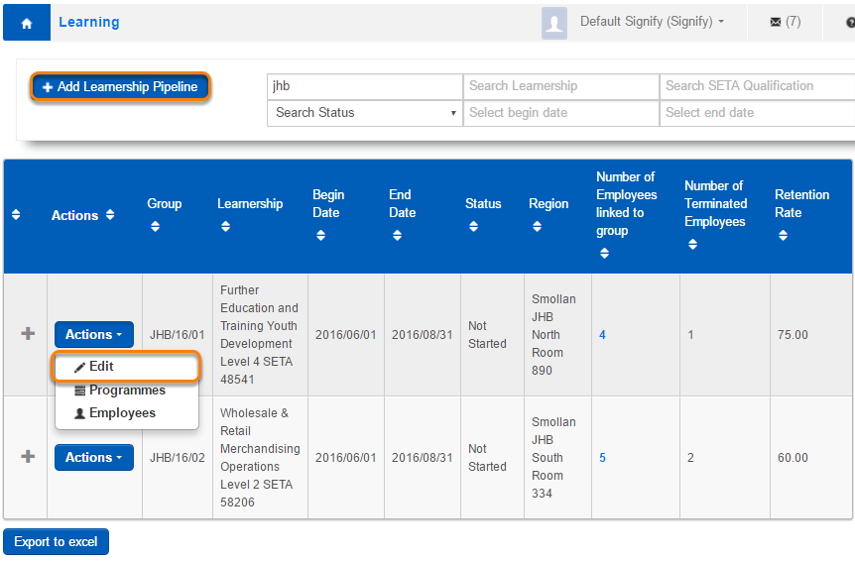
- The “Learnership Pipeline Screen” is the starting point for the whole learnership management process.
- A list of all the learner groups linked to learnerships will be display on the Learnership Pipeline List Screen.
- The list can be filtered by: Group, Learnership, Qualification, Begin date, End Date, Status and Region.
- Functionality to Add and Edit of a Pipeline is available.
- Note that a pipeline cannot be deleted once it has been created. It can only be edited and the learners within the learner group, can still be changed. In the case of pipeline wrongfully created, change the status to ‘Cancelled’
- The System/Learnership Administrator is responsible for creating and maintaining the pipeline list.
How to Add a Learnership Pipeline
To add a new learnership pipeline, click on the Add Learnership Pipeline button on the Pipeline List screen.
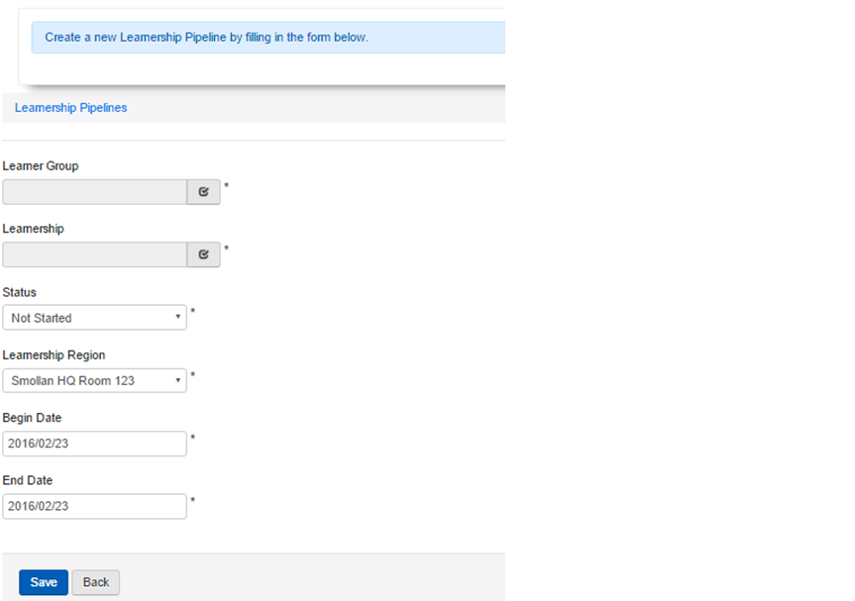
The following information is available to be entered on the Add a Pipeline screen:
- Learner group drop down: list of all the active learner groups.
- Learnership drop down: list of all the registered learnerships.
- Status dropdown: list with hardcoded values: Not Started, In Progress, Pending External Verification, Pending Certificate, Completed and Cancelled.
- Learnership Region: Populate drop down list from Event Management Region.
Note: On adding of a pipeline a warning message should be displayed: “Are you sure you want to create this pipeline, because once created, the pipeline cannot be changed.”
How to Manage the Learnership Pipeline

The steps in managing a learnership are dependent on each other. It is therefore important to complete the steps in a certain order as shown in the mind map above:
STEP 1: Enter planned values
STEP 2: Create Events
STEP 3: Book Learner Group on Events
STEP 4: Create Learner Records
STEP 5: Attendance Register
STEP 6: Update Learner Records
STEP 7: View and Update Actuals
How to work with Learnership Pipeline Programmes
HOW DID I GET HERE?
System Administration | Modules | eLearning | Learning Management | Learnership | Pipelines | Programmes
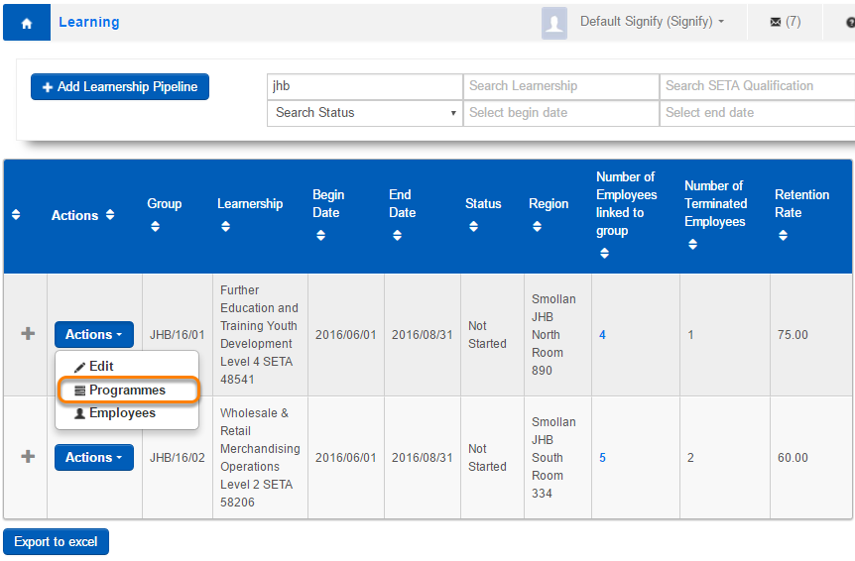
The first step in the learnership process is to create the Rollout plan with planned values. To enter planned values click on Programmes in the Actions drop down list on the Learnership Pipeline List screen.
Learnership Pipeline Programmes List Screen

- A list of all the programmes linked to the selected learnership will be displayed.
- The following functionalities are available per programme:
- Enter planned values that will be used for generating the rollout plan and events.
- Display learner records with the opportunity to enter assessment and moderation detail as well as upload documents.
- It is important that the planned values be entered first, before you can continue with Step 2, i.e. “Create Events”.
- Only the System/Learnership Administrator can execute the actions on this screen.
STEP 1 (Planned Values):
The first step in the learnership process is to capture planned values (rollout plan detail) for all the programmes in the list by selecting Planned Values in the Actions dropdown.
STEP 1: How to Work with Planned Values (Rollout Plan)

The System/Learnership Administrator is responsible for maintaining the Rollout Plan detail. There are mainly two types of interventions i.e. Classroom and POE Submission used when entering planned values.
The Classroom Intervention:
- On the Rollout Plan Detail screen, select the Theoretical Training Classroom intervention from the dropdown list on top of the screen.
- Only the Training Start Date and Training End Date are mandatory fields and will be used when events are created in Step 2. However all the values should be filled in for the Classroom intervention because these values will be printed on the Rollout Plan report.
The POE Submission Intervention:
- On the Rollout Plan Detail screen, select the POE Submission intervention from the dropdown list on top of the screen.
- Only the Training Start Date and Training End Date are mandatory fields and will represent the planned POE Submission date.
- The Training Start Date and Training End Date will be used to create the POE Submission learner records later in the Learnership process.
- For reporting purposes the POE submission date should also be entered for the POE Intervention.
After the values have been entered and saved you can use the Rollout Plan report to validate the inputs. This is an important step to ensure the Start and End Dates have been entered correctly because the dates will be used to create bulk events in the next step of the Learnership process.
How to Print the Rollout Plan Report

Click on the Print Rollout Plan button on the Learnership Pipeline Programmes screen to view the Rollout Plan Report.
Example of the Rollout Plan Report

STEP 2: How to Create Events

STEP 2 (Create Events):
This functionality will automatically create and schedule the "Theoretical Training" events for all the Classroom type interventions linked to the programmes in the list.
All the training start dates and training end dates for all the theoretical training interventions per programme should be entered, before events can be created.
To create events click on the “Create Events” button.
Before the actual events are created, a validation screen will be displayed, showing the outcome of the bulk event creation procedure. You can choose to continue or cancel the process.
- Events will be created automatically using the following values:
- Create an event only if the intervention pathway type = Classroom
- Ref no = The next available number
- Created Date = Today
- Created User = System/Signify
- Event Status = Planned
- Status = Not Yet Published
- Training Intervention = Intervention Name
- Start Date = Planned training start date Start Time = 09:00
- End Date = Planned training end date End Time = 16:00
- Include non-working days = Yes
- Provider = Smollan L&D (This value should be pre-defined in the “Event Management | Master Data | Training Providers” master table, otherwise the event will not be created.
- Venue = blank
- Coordinator = blank
- Send event notifications from coordinator address = No
- Facilitator = Rollout plan facilitator name or blank
- Attendees allowed: Min=0 Max=100
- Attendee bookings will be accepted up to 1 days before...
- Attendee cancellations will be accepted up to 1 days before...
- Classification = Smollan - Local
- Category = Foundational (This value should be pre-defined in the “Event Management | Master data| Training | Category” master table otherwise the event will not be created)
- Region = Learnership Pipeline | Region
- Course Type = Internal
- Intended Target Market = blank
- Terms and Conditions = blank
How to work with Learnership Pipeline Employees
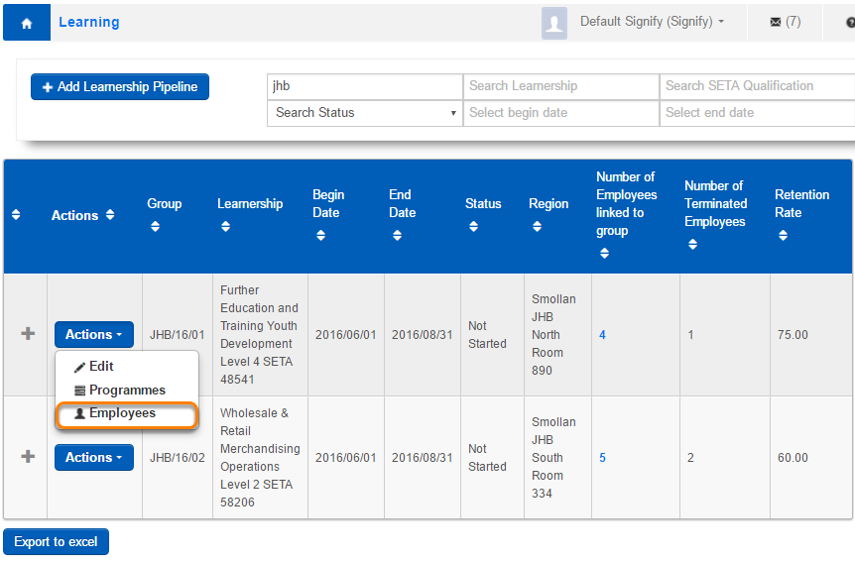
HOW DID I GET HERE?
System Administration | Modules | eLearning | Learning Management | Learnership | Pipelines | Employees
The next step in the learnership process is to book learners on events. Click on Employees in the Actions drop down list on the Learnership Pipeline List screen.
STEP 3: How to Book Employees on Events
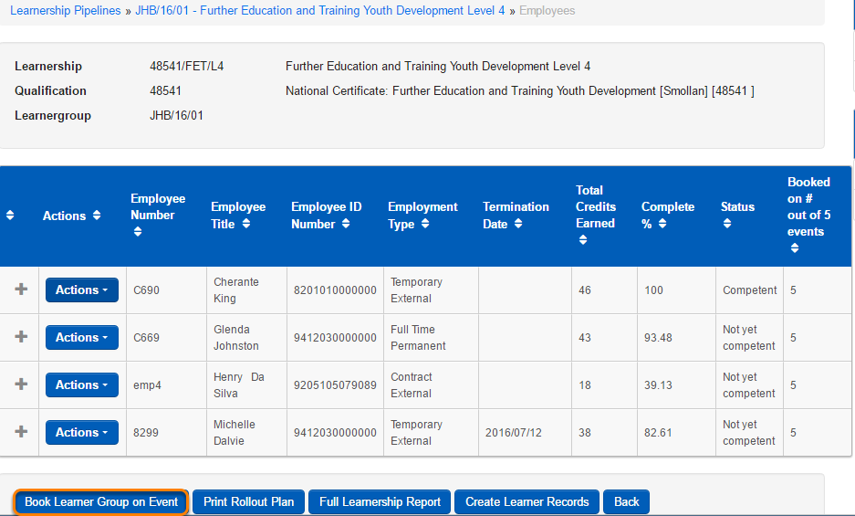
STEP 3 (Book learner group on event):
After events have been created in STEP 2, the group of learners can now be booked on the events. Click on Book Learner Group on Events button.
Before the learners are booked on the events, a validation screen will be displayed, showing the outcome of the bulk event booking procedure.
STEP 4: How to Create Learner Record
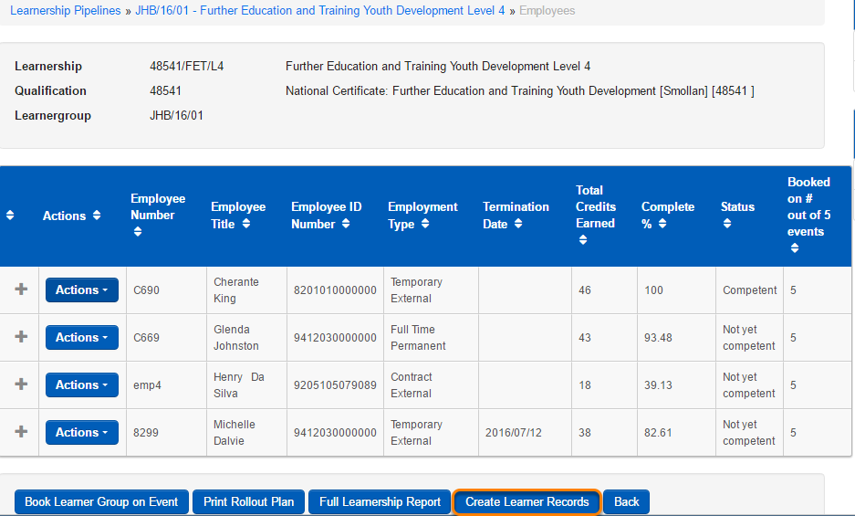
STEP 4 (Create Learner Records):
After learners have been booked on the events, learner records for all the learners can now be created.
The following learner records are automatically created for all the learners in the Learnership Pipeline when clicking on the Create Learner Record button:
- A Qualification learner record that will show total progress of the learner on the Learnership Qualification.
- A Programme learner record will indicate the progress on the Programme.
- Training learner records for all the interventions (Theoretical Training and POE submission).
How to View Learner Records
- Using the Learnership Pipeline Screen:
- System Administration | Modules | eLearning | Learning Management | Learnership | Pipelines | Programmes | Select a Programme | Employee Learner Records
- Using the Manage Employees Screen:
- Manage Employees | Select an Employee | Employee Development | Learner Records
How to Update Employee Attendance
HOW DID I GET HERE?
System Administration | Modules | Event Management | Training Scheduling | Manage Training Attendance Register
After the learners have been booked and scheduled on an event and training has started. The attendance should be captured for the learners.
Attendance is captured by a System/Learnership Administrator.
STEP 5: Update the Attendance Register per Event
STEP 5: (Attendance Register):
After learner records have been created in STEP 4 the attendance on training events can be captured.
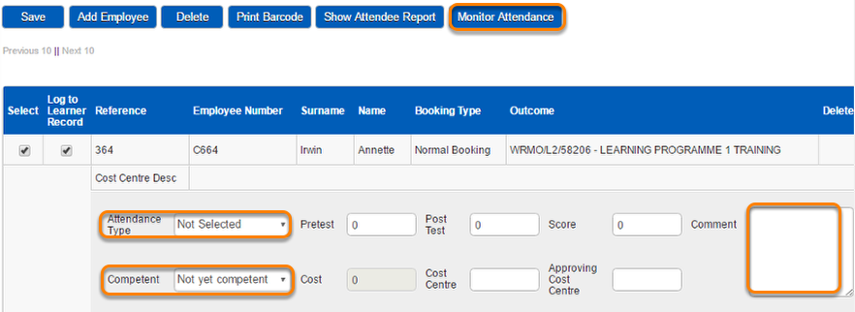
Note: Classroom Training Intervention's Attendance Type and Competent fields can only be updated in the attendance register and NOT from the Learnership Pipeline Module.
Update the following fields in the attendance register for the whole event (that can stretch over more than one day):
- Attendance Type:Attended, No Show, Cancelled and Not Selected
- Competent: Competent, Not yet Competent,
- Facilitator Comment.
Update the Attendance Register per Event per Day

The Monitor Attendance functionality gives the user the opportunity to enter employee attendance per day. This screen will only be populated when the Attendance Type on the Attendance Register is "Attended". The attendance per day will enable capturing data for reporting purposes only.
How to Update Learner Records

HOW DID I GET HERE?
System Administration | Modules | eLearning | Learning Management | Learnership | Pipelines | Programmes | Employee Learner Records
After the attendance for Classroom Interventions have been entered, the POE Submission training intervention's status can now be updated.
STEP 6: How to the Update Learner Record Status

STEP 6: (Update Status for Learner Records):
- The following information can be captured per learner record:
- Assessment: Assessor Name, Assessment Date and Assessor Comment.
- Internal Moderations: Internal moderator Name, Internal moderator Date and Internal moderator Comment.
- External Moderations: External moderator Name, External moderator Date and External moderator Comment.
- Comments: Additional comments.
- Documents: Upload of documents.
- Classroom Training Intervention status Update:
- The user cannot update the status to "Competent" for classroom training interventions from this screen. The status will automatically be set to "Competent" when the complete and competence status for classroom interventions is updated from the Events | Attendance Register or Manage Employee | Learner Records or Attendance Register.
- The user can however update the status to ‘No Book, Absent or TBA’.
- The user cannot update the Status from Competent back to any other status on this screen. In the event that this is needed, the values should be updated from Manage Employee | Learner Records.
- POE Training Intervention status update:
- The user has the opportunity to update the status of the POE submission training intervention learner record to ‘Competent, No Book, Absent or TBA’ on this screen.
- When the Competent option is selected and saved, the Manage Employee learner record will be updated with values: Completed = ‘Y’ and Competent = ‘Y’ and Complete date = Today’s date.
- The user cannot update the Status from Competent back to any other status on this screen. In the event that this is needed, the values should be updated from Manage Employee | Learner Records.
- When a learner record’s status is updated to ‘Completed’ and ‘Competent’ from the learner record or attendance screen, the learnership status will automatically be set to ‘Competent’.
STEP 7: View and Update Employee's Programme Actuals
HOW DID I GET HERE?
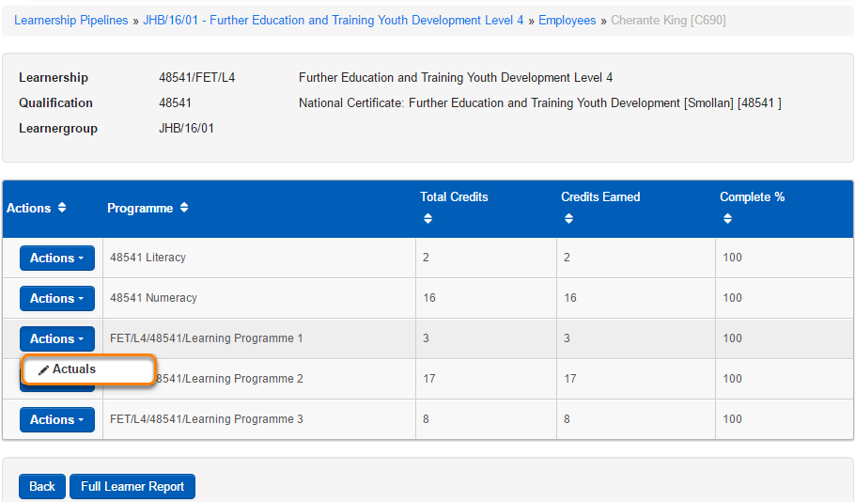
System Administration | Modules | eLearning | Learning Management | Learnership | Pipelines | Employees | Programmes | Actuals
STEP 7 (View and Update Programme Actuals):
- View actual progress on the Programme by clicking on the “Actuals” link in the Actions drop down list.
- The learner’s programme status update on this screen will work in the same way as updating the status on the learner record discussed in STEP 6.
- A detail progress screen is displayed on screen “Employee Programme Actuals Detail”.
Employee Programme Actuals Detail Screen
