How To Create Subgroups
How to get there?
Click on System Administration (1), then Click on Subgroup (2).


What to do?
- Click on Create (1) to create a new subgroup
- Enter the subgroup Description (2).
- If you want to select an existing category:
- Select Category (3).
- From the drop down (4) select the existing category.
- If you would like to create a new category:
- Select New Category (5).
- Enter the name for your new category (6).

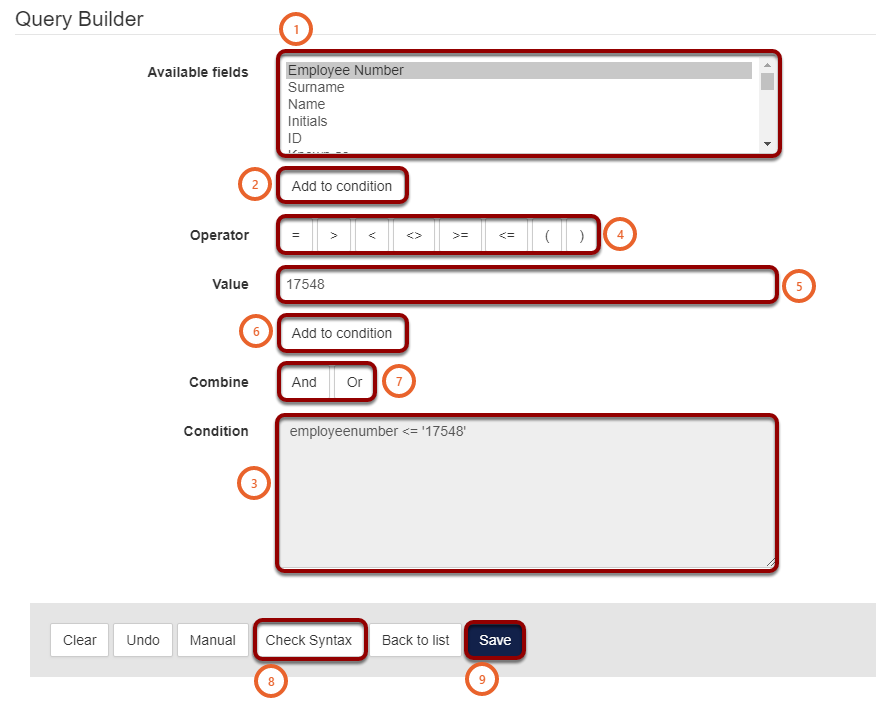
Add subgroup conditions
Subgroup conditions define which employees should be included in the subgroup.
- Select from the Available fields (1) the field that would be used to define who should be included in the subgroup. E.g. Employee Number.
- Click on Add to Condition (2).
- The condition will be added to the Condition field (3).
- Click on the Operator (4) you would like to use.
- Enter the Value (5).
- Click on Add to Condition (6) to add the requirement to the Condition field (3).
NOTE: Exact values have to be provided. Should a value that is not on the system be used, the script will still validate however, as the Value does not exist, the system will not link any employees to the subgroup.
- You can combine conditions by using And or Or buttons (7).
And (7) is used to specify two/more conditions that an employee meet in order to be included. E.g. if an employee is part of Gauteng branch managers, And they are part of Limpopo branch managers they will be included. This also implies that employees who only form part of one group will not be included.
Or (7) is used when an employee should be included in the subgroup if they are part of one condition or another. E.g. if an employee is part of Gauteng branch managers, Or if they are part of Limpopo branch managers they will be included. This also implies that employees from both groups will be included. There is no limit on the number of OR conditions that can be added.
- When the Conditions are complete click on the Check Syntax button (8).
- If there are no errors in your syntax then click on Save (9).
Test the subgroup
How to get there?
Click on System Administration (1), then with your cursor hover over Modules (2) and click on Manage Employees (3).


What to do?
- From the Activate Subgroup drop down select the (More...) (1) option.
- A new window will open.

- Use the Subgroup field (2) to search for the subgroup.
- Click on Search (3).
- Then select your Subgroup (4).
- Click on Select (5).


- Click on the Activate button (6) to activate the subgroup.
- Search for the employees (7) that should be in the subgroup you created to ensure that the subgroup has worked.
Note: Remember to switch your subgroup back to All Employees.


